AWS Partner Network (APN) Blog
Improve the Availability of Existing Okta IAM Federation Setup Using Multi-Region SAML Endpoints
By Amit Kumar Agrawal, Sr. Solutions Architect – AWS
By Sina Soojodi and Ballu Singh, Principal Solutions Architects – AWS
By Pranjal Gururani, Solutions Architect – AWS
By Kapil Patil, Sr. Partner Solutions Architect – Okta
 |
| Okta |
 |
Federation using Security Assertion Markup Language (SAML) 2.0 is a popular choice as it enables customers to use their existing external identity provider (IdP) and avoid managing multiple sources of identities when accessing Amazon Web Services (AWS) accounts.
Some customers have historically configured external IdP and AWS Identity and Access Management (IAM) federation using the global SAML endpoint signin.aws.amazon.com. This global endpoint is hosted in us-east-1, and could potentially become unavailable during an outage in that region.
This post builds on the recommendation of using regional SAML endpoints for failover by showing how you can configure Okta‘s federation with IAM to increase its availability. We will show you detailed steps to configure Okta, an AWS Security Competency Partner, to utilize multiple regional AWS SAML sign-in endpoints that can be deployed at setup by the Okta admin.
This configuration is currently in production at Zoom Video Communications and according to Yasin Mohammed, manager of cloud operations: “This multi-region and fault tolerant method to access AWS accounts with Okta and AWS IAM using SAML 2.0 federation helped us ensure business continuity and cloud operations resiliency during single region level outages.”
About Okta Federation
Federating Okta to IAM provides users single sign-on (SSO) access to assigned IAM roles in an account.
Okta’s AWS Account Federation application allows admins to fetch and assign roles to your workforce. It can scale to manage access to multiple AWS accounts in your organization. Users can select the role to assume for login, which defines their permissions for the duration of that authenticated session.
Solution Walkthrough
In this section, we’ll implement the solution described in this AWS blog post using Okta as the identity provider.
- Log in into your Okta admin console. From the left panel, select Application > Application. Select Browse App Catalog and search for “AWS Account Federation.” Select the AWS Account Federation app and choose Add.
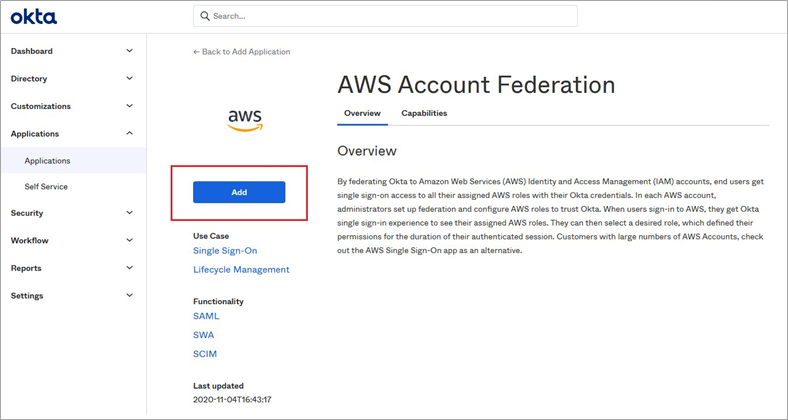
Figure 1 – Add AWS Account Federation.
- In General Settings, leave defaults and select Next. On the Sign On tab, leave defaults and then select Edit.
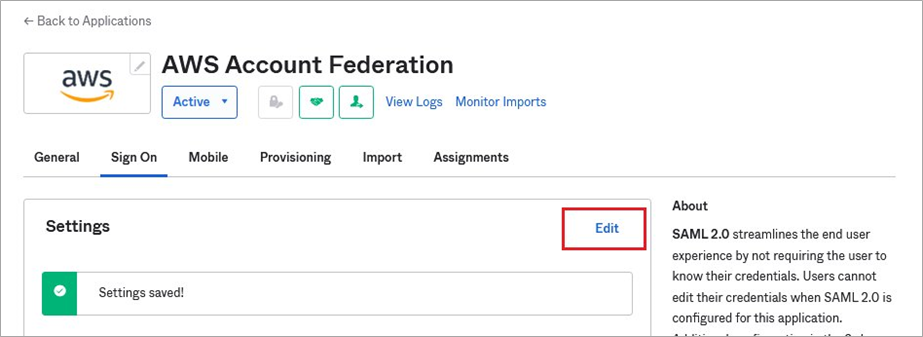
Figure 2 – Sign On tab.
- Scroll down to find the Default Relay State and set it to https://us-west-2.console.aws.amazon.com/ or to the region of your choice. Without this step, there’s no guarantee the regional-specific SAML sign-in process will forward you to the console sign-in page of the region you want.
.
Next, click on Identity Provider Metadata. This will open metadata.xml. Save this file (right-click and save as metadata.xml) as we’ll use it later. Scroll down and select Done.
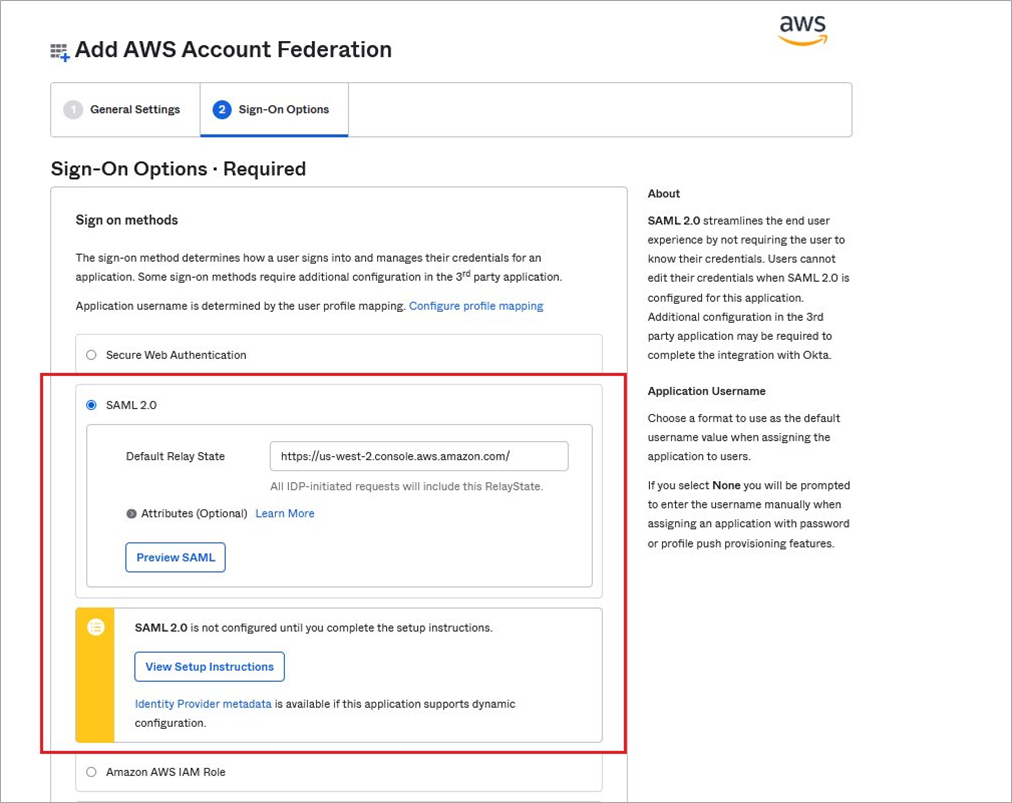
Figure 3 – SAML settings.
- Navigate to your IAM console in your AWS account. Select Identity Provider > Add Provider > SAML, and enter Provider Name. Upload the metadata.xml you saved earlier, and select Add Provider.
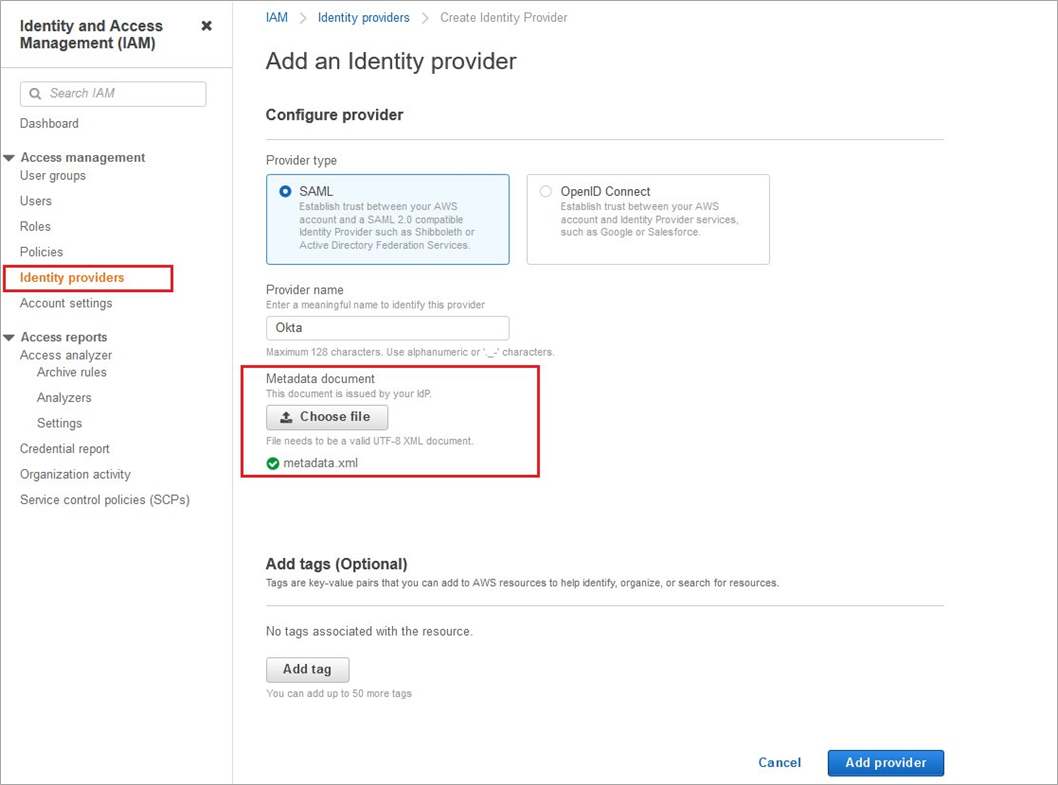
Figure 4 – Add identity provider.
- Your IdP should now show up under Identity Provider console. Select the IdP and copy its Amazon Resource Name (ARN) as we’ll use it in the next step. Select Assign Role to add Okta as a trusted source.

Figure 5 – Identity provider ARN.
- For this exercise, we are creating a new role. Select Create a new role, then SAML 2.0 Federation, and check Allow programmatic and AWS Management Console.
.
Edit the trust relationship and replace the singular SAML: aud condition with a multivalued condition. Default: “SAML: aud”: “https://signin.aws.amazon.com/saml“. With modifications: “SAML: aud”: [ “https://signin.aws.amazon.com/saml“, “https://us-west-2.signin.aws.amazon.com/saml“, “https://us-east-2.signin.aws.amazon.com/saml” ]
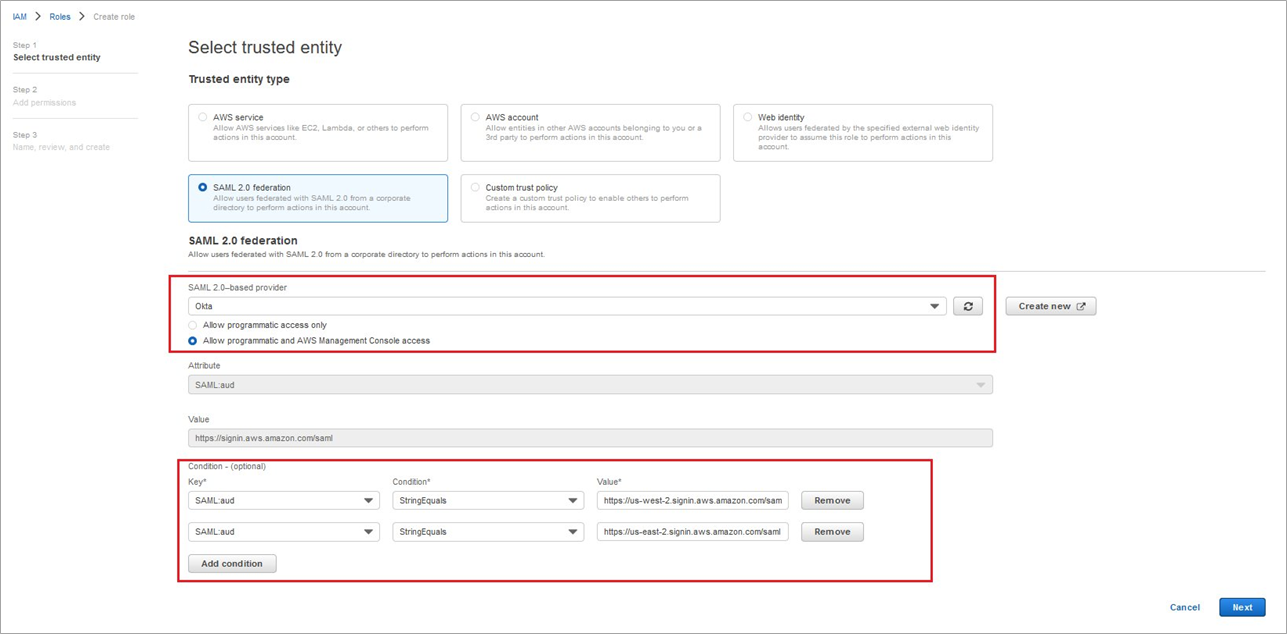
Figure 6 – SAML 2.0 role configuration.
This is how your policy should look like:
- On the Add Permission page, select the permissions you want to federate for. Follow the principle of least privileges. For the purpose of this exercise, we chose Administrator Access. Select Next, and on the next screen review and choose Create Role.
. - Navigate back to the AWS Account Federation app you created earlier in your Okta console. Navigate to the Sign On tab and scroll down to Advanced Sign-on Settings Override the Assertion Consumer Service (ACS) to the region of your choice (e.g. https://us-west-2.signin.aws.amazon.com/saml).
.
Paste the ARN of the IdP you created in your IAM console. Make sure that while copying the ARN there are no trailing or leading whitespaces, and it is case sensitive. Select Save.
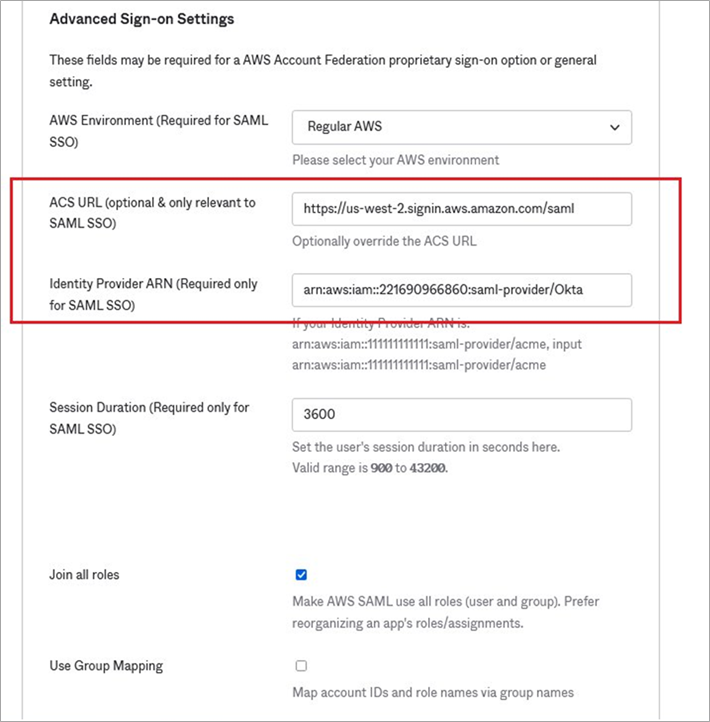
Figure 7 – Advanced Sign-On settings.
- Now, you need to create an AWS user with specific permissions so Okta can dynamically fetch a list of roles from your accounts. Navigate to your IAM console and select Users and then Add user.
.
In Select AWS credential type, select Access Key – Programmatic Access, and then select Next: Permissions.
. - On the Set Permissions page, select Attach existing policies directly and then Create policy. On the Create Policy page, select the JSON tab.
.
Enter the following code in the JSON tab:
- Select Review policy and provide policy a name (e.g. OktaIAMPolicy) and create policy.
. - Navigate back to the tab where you are the creating the IAM user. Click the refresh button next to Create Policy, and search for the policy you just created. Select it and then choose Next: Tags.
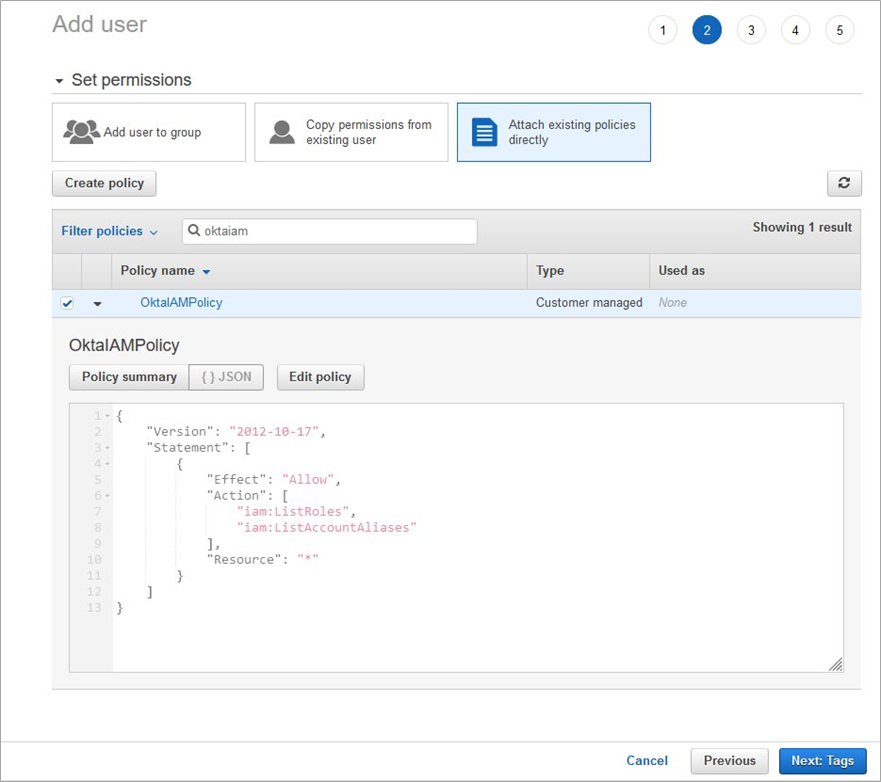
Figure 8 – Policy configuration.
- Download the CSV file as you’ll need it for Access key ID and Secret access key in later steps.
. - Navigate back to the AWS Account Federation app you created earlier in your Okta console. This time, navigate to the Provisioning tab and select Configure API Integration. Select Enable API Integration, enter Access Key and Secret Key, and then select Save.
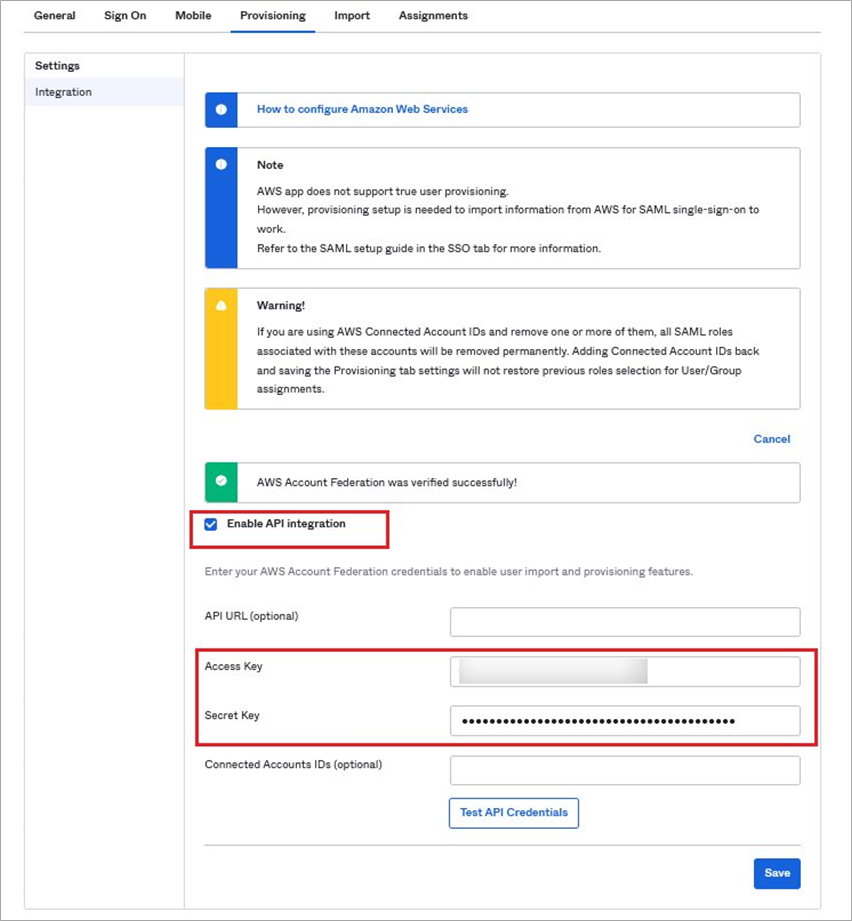
Figure 9 – API integration.
- Next, go to the Provisioning to App section, click Edit and Enable Create Users and Update User Attributes, and then select Save.
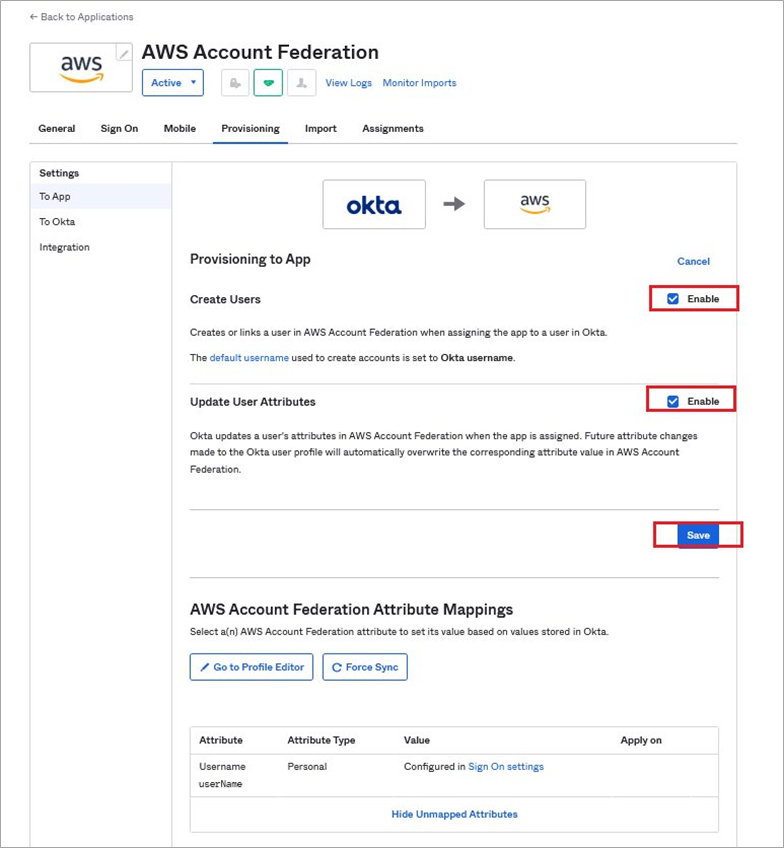
Figure 10 – Provisioning settings.
- Navigate to the Assignment tab and select Assign > Assign to People. Select a user, click Assign, accept the default, select roles, and then select Save and Go Back.
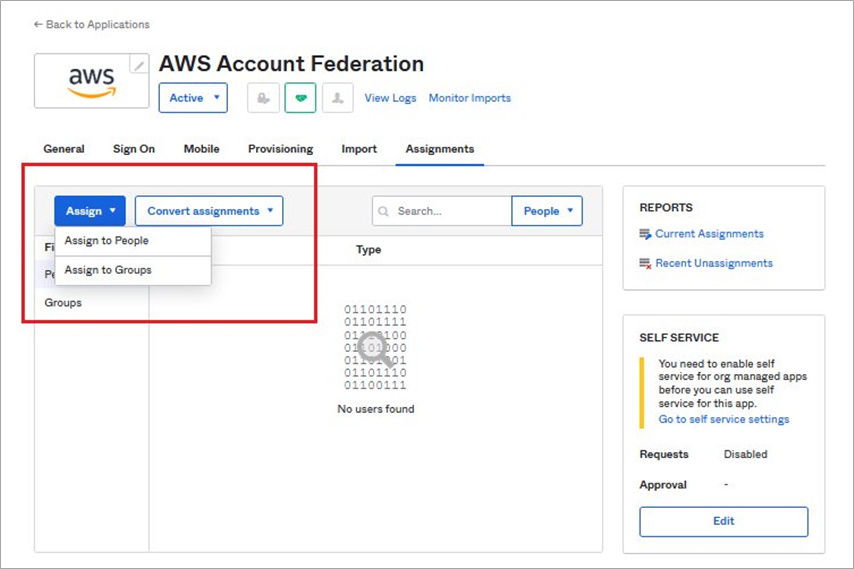
Figure 11 – User/group assignment.
- Login to your Okta account as a user (not admin). Navigate to MyApp and you should see the AWS Federation App you just created. Select it to login to your AWS account.
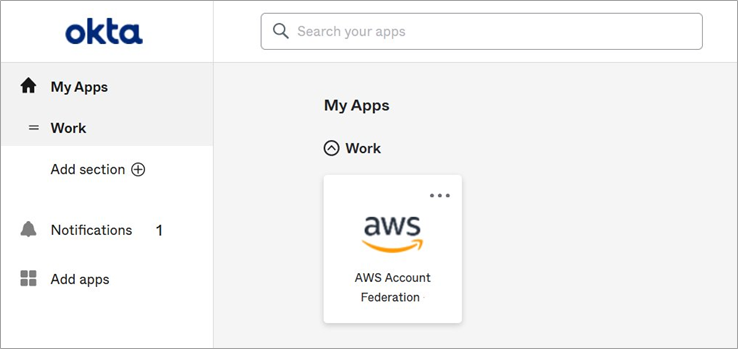
Figure 12 – AWS login using Okta app.
Cleanup
To clean up the resource we created in this post, follow the below steps:
- Navigate to your Okta console and delete the application you had created in Step 1.
- Navigate to your IAM console and delete the identity provider you created in Step 4.
- In your IAM console, navigate to roles and delete the role that was created for the IdP in Step 5.
- In your IAM console, navigate to users and delete the user you created in Step 9.
Conclusion
In this post, we showed how to configure an alternate endpoint for Okta’s IAM federation that could be used for access to AWS accounts in the unlikely event of an endpoint disruption.
Learn more about AWS IAM federation and try this out with an Okta dev account.
.

.
Okta – AWS Partner Spotlight
Okta is an AWS Security Competency Partner and leading independent provider of identity for the enterprise. The Okta Identity Cloud enables organizations to securely connect the right people to the right technologies at the right time.