AWS Partner Network (APN) Blog
Using Amazon OpenSearch Service with Kibana for Identity Federation – Active Directory
Editor’s note: This is the first of a two-part series on the APN Blog. Read Part 2 >>
By Najah Naaji, Solutions Architect at AWS
By Tatsuro Handa, Cloud Support Engineer at AWS
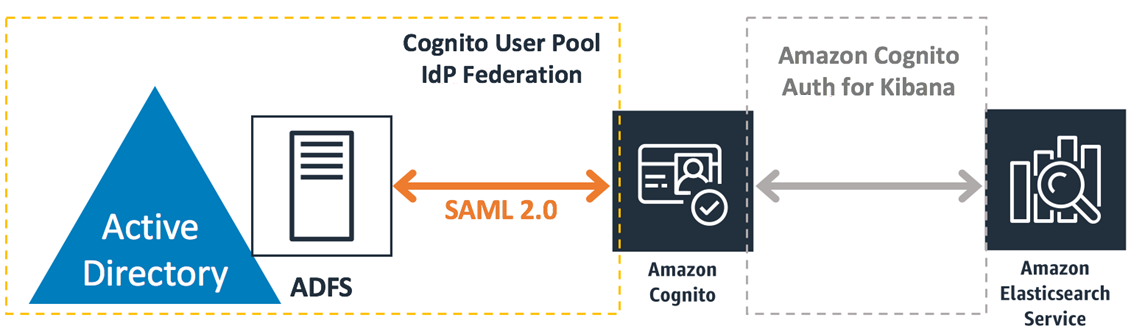
With the 2018 release of Amazon OpenSearch Service integration with Amazon Cognito, you can enable corporate users to access OpenSearch with Kibana using your corporate directory credentials through identity federation.
In this two-part series, we’ll set up different identity providers with Amazon Cognito User Pool, including Microsoft Active Directory (SAML 2.0), Auth0 (OIDC), and Okta credentials.
Here, we share a step-by-step integration of Active Directory (AD) and Amazon Cognito. Active Directory is a service that manages user identities. With Amazon Cognito User Pool, you can extend your directory so AD users are able to log in to Kibana with the same security credentials.
The following diagram shows a brief architectural image, which we’ll build through this post.
Step 1: Create an Active Directory Domain for Storing User Identities
In this post, we will be using Active Directory Domain for user authentication. AD can be hosted by AWS Managed Microsoft AD or an on-premises Domain controller. Active Directory Domain is provided as a role in Microsoft Windows Server products.
If you don’t have any existing directory, you can install and configure the role in your on-premises environment, or launch AWS Managed Microsoft AD.
Step 2: Install ADFS on the Windows Server in Your Domain
Active Directory Federation Service (ADFS) is a component of Windows Server that allows you to use AD as the SAML Identity Provider. You can configure ADFS with your on-premises AD or AWS Managed Microsoft AD. To set up ADFS server with AWS Managed Microsoft AD, follow the steps in this post from the AWS Security Blog.
Step 3: Set up Cognito User Pool and Identity Pool
Kibana integration with Amazon OpenSearch Service works with Amazon Cognito User Pool and Identity Pool. Before federating AD authentication with user pool, we need to prepare both the user pool and identity pool.
This post from the AWS Database Blog shows how to set up a user pool and identity pool for Kibana on OpenSearch. Follow the steps in the article to create the OpenSearch domain. We will be updating user pool configuration after we configure ADFS.
Step 4: Configure ADFS
In this step, we’ll add ADFS as an external identity provider for the Amazon Cognito user pool.
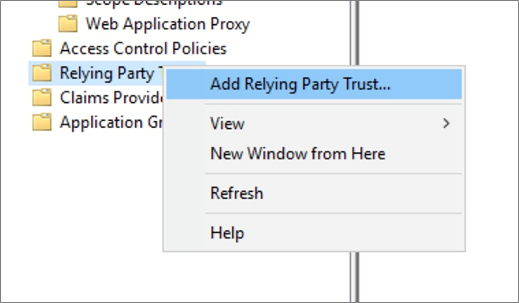
Add relying party to ADFS:
- Sign in to the Active Director Federation Services (ADFS) server.
- In Server Manager, choose Tools > ADFS Management.
- Choose Trust Relationships > Relying Party Trusts > Add Relying Party Trust.
- The Add Relying Party Trust Wizard opens, and on the Welcome page select Claims Aware.
- Click Start.
- On the Select Data Source page, choose Enter Data About the Relying Party Manually and click Next.
- On the Specify Display Name page, type the display name of the relying party (i.e. Cognito User Pool) and click Next.
- Click Next to move past the Configure Certificate page (you do not need to configure a certificate).
- On the Configure URL page, do the following:
- Select the Enable Support for SAML 2.0 WebSSO Protocol option.
- In the URL field, add the Amazon Cognito POST Endpoint using the format: https://<yourCognitoDomainPrefix>.auth.<region>.amazoncognito.com/saml2/idpresponse
- Click Next.

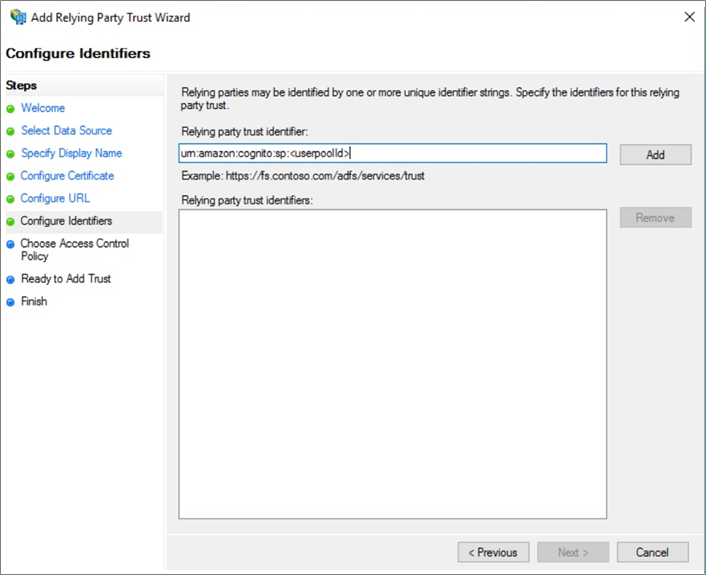
- On the Configure Identifiers page, do the following:
- In the Relying Party Trust Identifier field, type the trust identifier using the format: urn:amazon:cognito:sp:<userpoolId>
- Click Add > Next.
- On the Choose Access Control Policy page, choose the appropriate access for your domain:
- Choose Permit Specific Group and specify one or more groups in your AD domain to restrict access based on the AD group.
- Choose Permit Everyone to allow all AD domain users to access Kibana.
- Note that Amazon Cognito also has a feature to restrict access based on user information passed from identity providers. See the Amazon OpenSearch Service documentation for details.

- Click Next, and on the Ready to Add Trust page click Next > Close.
Step 5: Add Claim Issuance Rule to the Relying Party
- In the Relying Party Trusts window, right-click the relying party trust (i.e. Cognito User Pool) and select Edit Claim Issuance Policy.

- In the Edit Claim Issuance Policy dialog box, click Add Rule. The Add Transform Claim Rule Wizard opens.
- On the Select Rule Template page, for Claim Rule Template choose Send LDAP Attributes as Claims, and click Next.
- On the Configure Rule page, do the following:
- Type a claim rule name (i.e. email).
- For Attribute Store, choose Active Directory.
- Select an LDAP Attribute and then select an Outgoing Claim Type to map the attribute.
- Make sure to map attributes for NameId and Email. These attributes are required for Amazon Cognito User Pool with default configuration.
- Make sure the login user has source LDAP attributes for NameId and Email. In the following user properties example, Display name is passed as the NameId attribute and E-mail is passed as the Email attribute.

- Click OK, and in the Edit Claim Rules dialog box, click OK again.
Step 6: Add ADFS to Cognito User Pool as a SAML IdP
Before you start this task, confirm the following URL is available on the ADFS server. You can download the metadata document here: https://<yourADFSserverName>/FederationMetadata/2007-06/FederationMetadata.xml
- In the Amazon Cognito console, access Identity Providers and choose SAML.
- For Metadata Document, click Select File and upload the metadata document you downloaded to the AD FS server. Or, you can specify the URL directly, but your AD FS SAML metadata document must be accessible from the internet.
- For Provider Name, type the name of your Identify Provider, such as ADFS.
- Choose Create Provider.

Step 7: Add Mapping Rule to Provide Email Attribute
- On the Attribute Mapping tab, for SAML attribute, type the following string: http://schemas.xmlsoap.org/ws/2005/05/identity/claims/emailaddress

- For User Pool Attribute, choose Email > Save.
Step 8: Enable SAML Login with Application Client
- In the left navigation pane of Amazon Cognito, choose App Client Settings.
- For Enabled Identity Providers, select the Identity Provider name (i.e. ADFS) check box.
- If you want to disable non-federated user login, clear the Cognito User Pool check box.

Step 9: Confirm Access with Active Directory User
- Access the Kibana endpoint.
- Select ADFS IdP for federated login.
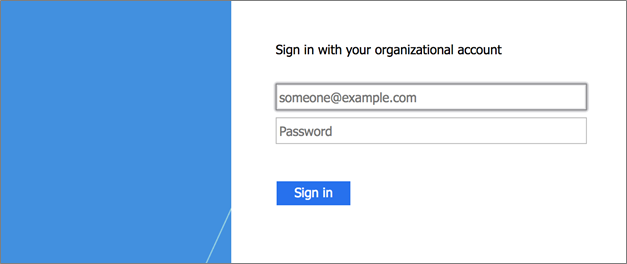
- If you disable non-federated user login, you’re prompted to sign in with the following dialog box:

- Choose ADFS to be redirected to ADFS authentication console.
- If you keep allowing non-federated user login, you’re prompted to sign in with the following dialog box. You can choose identity provider to use when signing in. Choose ADFS, to be redirected to the ADFS authentication console.

- After you sign in with ADFS, you will be redirected to the Kibana console and you can start working with it.

Summary
In this post, we provided a step-by step procedure to integrate Active Directory with Amazon OpenSearch Service and Kibana with Amazon Cognito authentication through ADFS and SAML 2.0.
Kibana is a powerful tool for data analytics use cases, such as application monitoring, log analytics, and clickstream analytics. We hope this article helps you integrate OpenSearch with your AD infrastructure.
Please check out the second post in our APN Blog series: Use Amazon OpenSearch Service with Kibana for Identity Federation – Auth0.