AWS Marketplace
Building a real-time recommendation engine with Amazon MSK and Rockset
The ability to provide users with instant, personalized product recommendations is critical for ecommerce businesses today. Leveraging real-time data on user activity and preferences, along with machine learning algorithms, allows recommendation engines to deliver relevant suggestions that resonate with individual customers.
To enable such an architecture, we need a streaming service that captures and processes data, which can be ingested at high velocity and indexed for millisecond-latency search and AI applications. Amazon Managed Streaming for Apache Kafka (Amazon MSK) and Rockset can be used to build such recommendation engines.
Amazon MSK is a fully-managed service for Apache Kafka that captures, stores, processes, and delivers real-time data for recommendation engines. Amazon MSK eliminates the need to provision servers, configure clusters, orchestrate upgrades, architect for high availability and establish monitoring and alerting.
Rockset is an AWS Technology partner whose search and analytics database in the cloud is used for recommendation engines at scale. Rockset acts as a sink for streaming data from Amazon MSK. Rockset ingests high-velocity streaming data and indexes it, providing customers the ability to build recommendation engines on demand.
We’ll now go through how to build a recommendation engine.
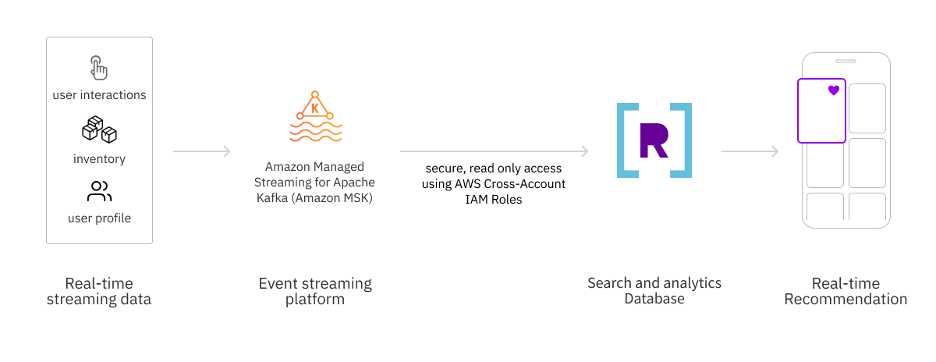
Figure 1 – How Amazon MSK integrates with Rockset to serve recommendations
Prerequisites
Before setting up the demonstration, the following prerequisites are required:
- An AWS account with appropriate IAM roles and permissions.
- Create a new key pair or have access to an existing key pair.
- Permissions to subscribe to Rockset via AWS Marketplace.
Implementation Steps
We’ll now setup an Amazon MSK cluster using an AWS CloudFormation template, and then integrate it with Rockset, using an AWS IAM Cross account role.
1. Set up Amazon MSK cluster
To setup the Amazon MSK cluster, use the provided AWS CloudFormation template that generates the following resources:
- An Amazon MSK cluster in the N. Virginia Region (us-east-1) using Apache Kafka version 2.8.1. The instance type is kafka.m5.large.
- Three broker nodes in the Amazon MSK cluster.
- Amazon Elastic Compute Cloud (Amazon EC2) with Kafka libraries, used to create the topics and produce messages.
Follow the steps below to provision resources using the AWS CloudFormation template:
- Choose Launch Stack.
- Enter the Stack name.
- Under Parameters, enter the KeyName by selecting an existing EC2 KeyPair. Add the SSHLocation (IP address range, for example 10.0.0.0/24) that can be used to SSH to the EC2 instances.

Figure 2 – AWS CloudFormation stack configuration as per steps 1 to 3 for configuring the Keyname and SSH Location
- Choose Next
- Under Configure Stack options, use the defaults for Tags, Permissions, Stack failure options and Choose Next.
- By checking the checkbox, acknowledge that the AWS CloudFormation might create IAM resources with custom names.
- Choose Submit.
- After creating your cluster in the AWS MSK Management Console, enable public access on your cluster under networking settings.
- Next, navigate to View client information, under Bootstrap servers, and note the Public endpoint. Note – Public endpoint information will be required to create topics and publish the messages in later steps.
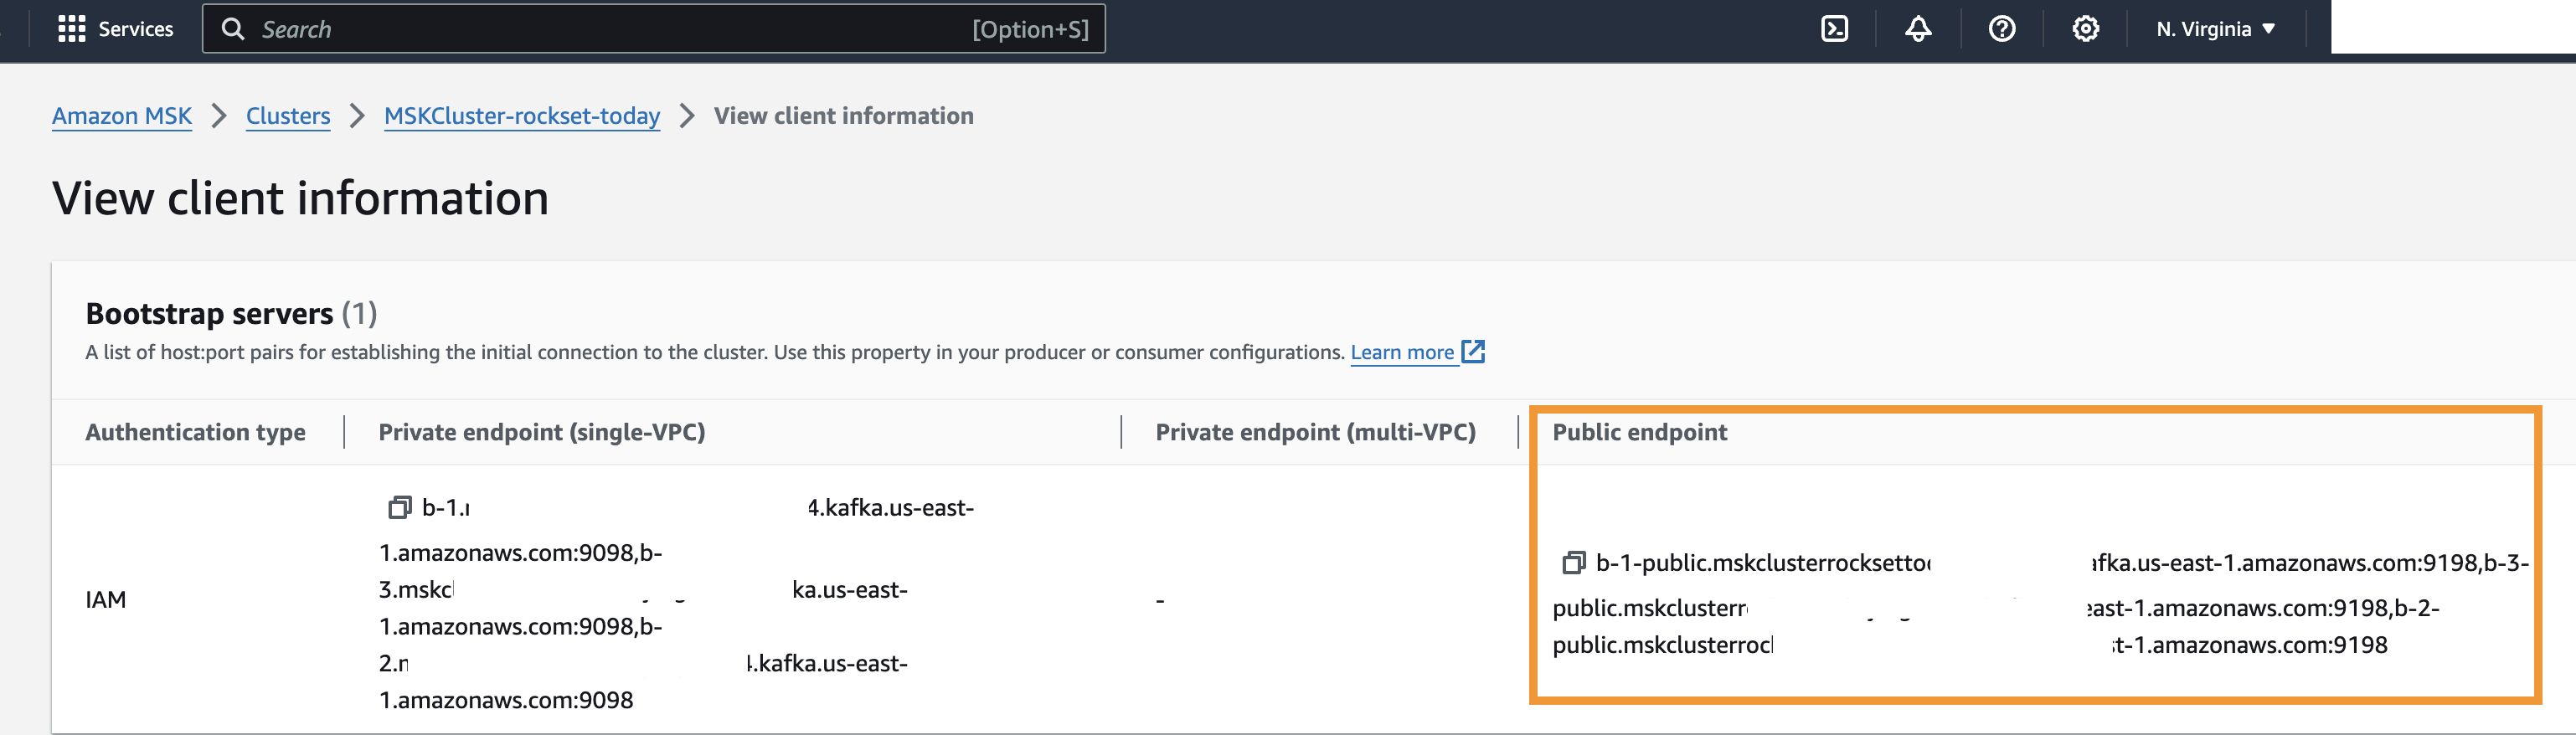
Figure 3 – Gathering Public Endpoint from View Client Information section from Amazon MSK console
2. Subscribe to Rockset
Follow the steps below to subscribe and setup Rockset through the AWS Marketplace:
- Navigate to the Rockset offering in AWS Marketplace.
- In the upper right, choose Try for free.
- Select Create Contract.
- Select Set up the account, and complete the Rockset account registration.
- On the Rockset console login page, choose Sign up now and add in your credentials to authenticate.
3. Initialize Rockset integration
Now that you have subscribed to Rockset, initialize the integration between Rockset and Amazon MSK to locate and pass the Rockset Account ID and external ID to AWS IAM:
- In the Rockset console, under Integrations, choose Amazon MSK.
- Initialize the integration by providing an Integration name and Description.
- Under Configure AWS IAM Role, note the Rockset Account ID and External ID values. These will be used to complete the AWS Cross-Account IAM role setup in subsequent steps.
4. Setup the AWS IAM cross-account role for authentication
Create the AWS Identity and Access Management (IAM) cross account role that is required to establish secure access to Amazon MSK:
- Navigate to the AWS IAM console.
- Navigate to Roles and choose Create role.
- Under Trusted entity Type, select AWS account.
- Select Another AWS account and tick the box for Require External ID.
- Use Rockset account ID and External ID from the Rockset Console in the subsequent console page.
- Note the Amazon Resource Names (ARN) of the IAM Role.
- Next, choose Policies, then select Create Policy.
- Under Policy editor, choose JSON.
- Use the script below, replacing <your cluster> with the name of your Amazon MSK cluster provisioned.
- Save the IAM policy by giving it a descriptive name, e.g., MSK-Rockset-Policy.
{
  "Version": "2012-10-17",
  "Statement": [
    {
      "Effect": "Allow",
      "Action": [
        "kafka-cluster:Connect",
        "kafka-cluster:ReadData",
        "kafka-cluster:DescribeCluster",
        "kafka-cluster:DescribeTopic",
        "kafka-cluster:DescribeGroup",
        "kafka-cluster:AlterGroup"
      ],
      "Resource": [
        "arn:aws:kafka:*:*:cluster/<your-cluster>/<your-cluster-uuid>",
        "arn:aws:kafka:*:*:topic/<your-cluster>/*",
        "arn:aws:kafka:*:*:group/<your-cluster>/*"
      ]
    }
  ]
}
11. To attach this policy to an AWS IAM role, navigate to Roles under Access management.
12. Search for the role name created previously (MSK-Rockset-Policy) and attach the newly created policy using Attach policies, under AddPermissions.
13. Choose Add Permissions to finish setup of the Cross-Account IAM role for authenticating the two environments.
5. Finalize Rockset and Amazon MSK integration
Once the AWS IAM cross account role is created, you can use the ARN information to complete the integration between Rockset and Amazon MSK:
- In the Rockset console, navigate back to the integrations setup page for Rockset and Amazon MSK.
- Provide the role ARN, you noted in Step 4.5 to establish the trusted relationship.
- Paste the Public endpoint under BootStrap Servers URL noted from the Amazon MSK cluster creation.
- Choose Save Integration.
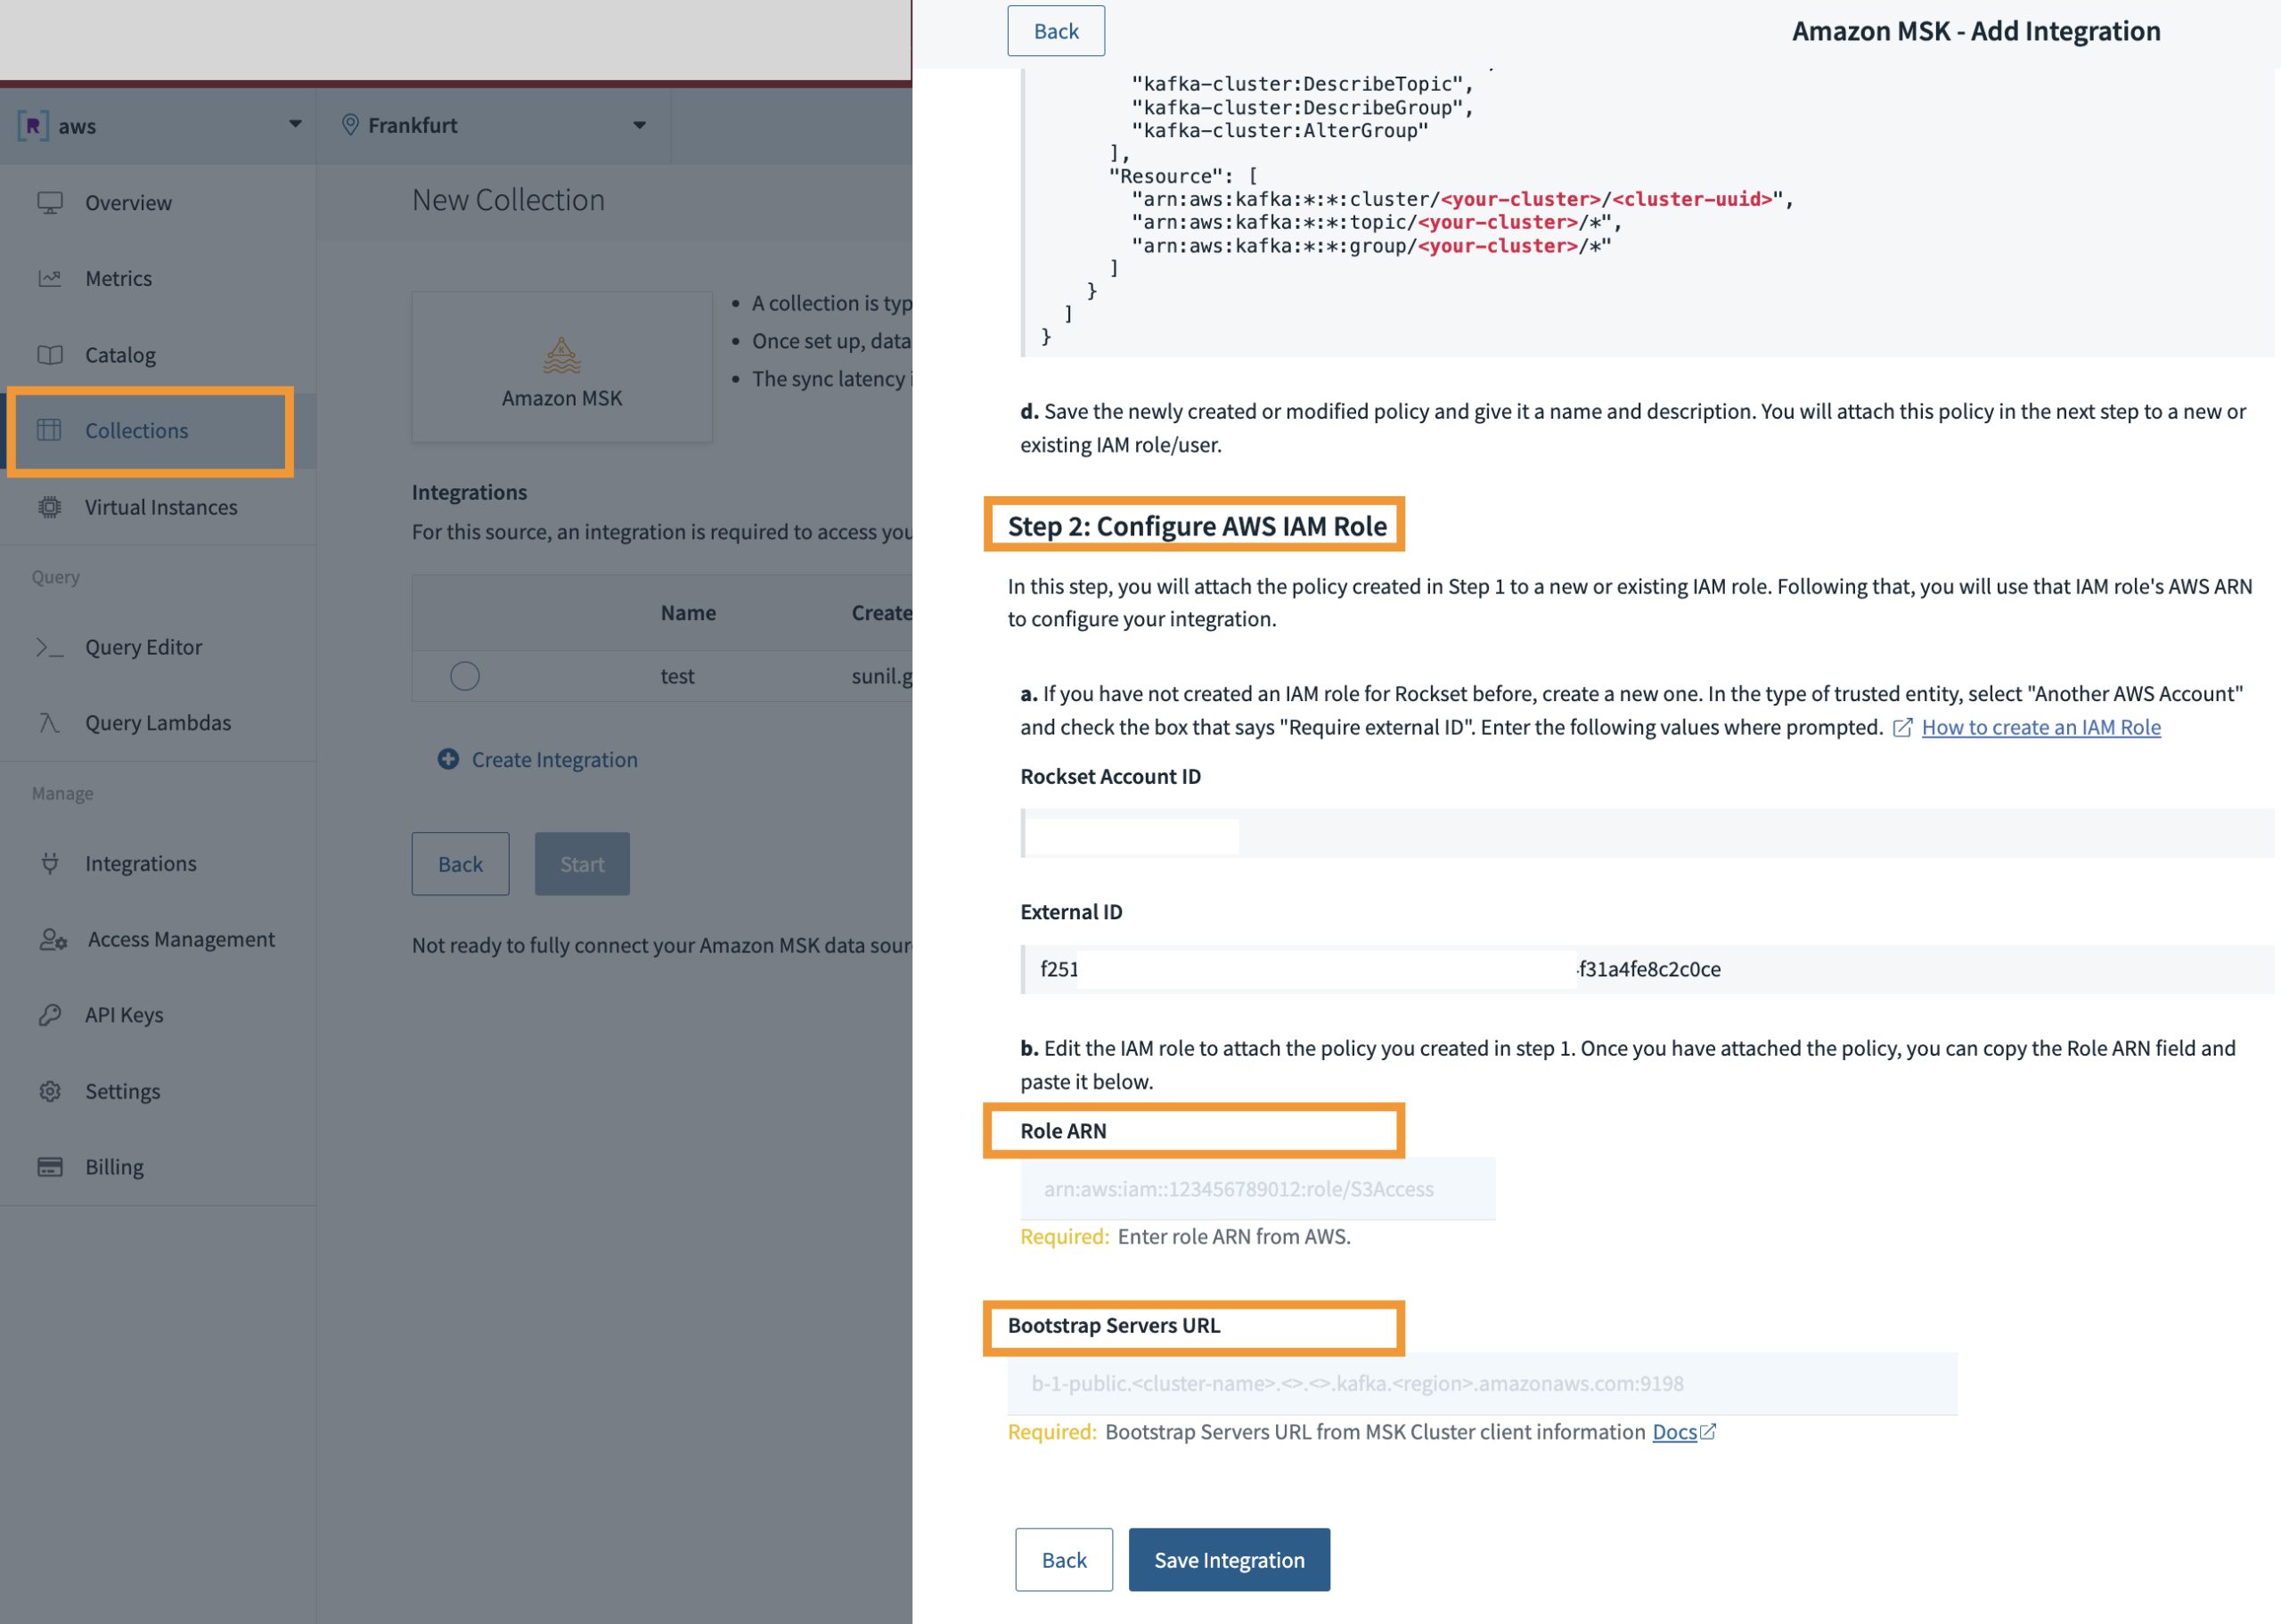
Figure 4 – Using Rockset console establish an integration with Amazon MSK
Implementation Verification
Now that we have Amazon MSK and Rockset integrated using AWS IAM Cross account IAM Role, we’ll now walkthrough the steps required to verify the integration.
We’ll generate data that will be published to the following three Amazon MSK topics.
- Customer topic- recommended products and personalized discount rates based on preferences and price sensitivity.
- Product topic – descriptions and maximum allowed discounts.
- Product updates topic – real-time inventory counts, reflecting recent purchases.
For this demonstration, the Amazon EC2 provisioned by the AWS CloudFormation template will be used for data generation. The Amazon EC2 already hosts the required Kafka client libraries and scripts to publish messages to the Amazon MSK cluster
1. Create Amazon MSK message topics
- Navigate to the Amazon EC2 Console .
- Select the Amazon EC2 instance provisioned and choose Connect.
- From the available options, choose Session Manager.
- Select Connect.
- Post connection, open a terminal.
- Navigate to /home/ec2-user/kafka/bin/.
Note – For the following Amazon MSK topic creation commands, ensure $SOURCEBROKERS is replaced with the Public endpoint gathered during Amazon MSK creation.
- Create a topic called customer in your Amazon MSK cluster to store the messages for recommended products and personalized discount rates based on preferences and price sensitivity.
./bin/kafka-topics.sh --create --topic customer --bootstrap-server $SOURCEBROKERS --replication-factor 3 --partitions 10- Create a topic called product in your Amazon MSK cluster to store the messages for product data that includes product descriptions and the maximum allowed discounts for each product.
./bin/kafka-topics.sh --create --topic product --bootstrap-server $SOURCEBROKERS --replication-factor 3 --partitions 10- Create a topic called productupdates in your Amazon MSK cluster to store the messages for real-time inventory counts and recent purchases.
./bin/kafka-topics.sh --create --topic productupdates --bootstrap-server $SOURCEBROKERS --replication-factor 3 --partitions 102. Publish messages to the topics
- Navigate to /home/ec2-user/kafka/bin.
- Execute kafka-console-producer.sh to publish a message to Amazon MSK’s customer topic. Note : Replace <publicbrokerListID> with the Public endpoint gathered during MSK cluster creation in all subsequent commands.
./kafka-console-producer.sh --broker-list <publicbrokerListID> --topic customer --producer.config client.properties --property "key.separator=:" --property "parse.key=true"- Provide the following sample customer data in the prompt to publish the message to the customer topic.
{"customer_id":8,"first_name":"Garek","last_name":"Yoxall","email":"gyoxall7@google.de","segment":"saver","recommended_products":[{"product_id":3,"proposed_discount_percent":12,"interest_score":17}]}</code></pre><pre><code class="lang-json">{"customer_id":9,"first_name":"Glynda","last_name":"Normanvell","email":"gnormanvell8@geocities.com","segment":"spender","recommended_products":[{"product_id":2,"proposed_discount_percent":25,"interest_score":20},{"product_id":20,"proposed_discount_percent":30,"interest_score":12},{"product_id":22,"proposed_discount_percent":11,"interest_score":11},{"product_id":5,"proposed_discount_percent":29,"interest_score":2}]}</code></pre><pre><code class="lang-json">{"customer_id":10,"first_name":"Darb","last_name":"Hardbattle","email":"dhardbattle9@washingtonpost.com","segment":"saver","recommended_products":[{"product_id":8,"proposed_discount_percent":17,"interest_score":1},{"product_id":36,"proposed_discount_percent":24,"interest_score":13},{"product_id":23,"proposed_discount_percent":30,"interest_score":12}]}- Execute the following command to publish a message to Amazon MSK’s product topic.
./kafka-console-producer.sh --broker-list <publicbrokerListID> --topic product --producer.config client.properties --property "key.separator=:" --property "parse.key=true"- Provide the following sample product data in the prompt to publish the data to the product topic.
{"product_id":5,"description":"Puree - Kiwi","max_discount_percent":13} {"product_id":6,"description":"Chef Hat 25cm","max_discount_percent":25} {"product_id":7,"description":"Puff Pastry - Sheets","max_discount_percent":18} {"product_id":8,"description":"Onions - Cooking","max_discount_percent":29} {"product_id":9,"description":"Island Oasis - Banana Daiquiri",","max_discount_percent":22}- Execute the following command to publish a message to Amazon MSK’s productupdates topic.
./kafka-console-producer.sh --broker-list <publicbrokerListID> --topic product --producer.config client.properties --property "key.separator=:" --property "parse.key=true"- Provide the following sample productupdate data in the prompt to publish the data into the productupdates topic.
{"product_id":17,"on_hand_quantity":0,"on_order_quantity":5} {"product_id":10,"on_hand_quantity":4,"on_order_quantity":14} {"product_id":3,"on_hand_quantity":7,"on_order_quantity":18} {"product_id":50,"on_hand_quantity":9,"on_order_quantity":14} {"product_id":2,"on_hand_quantity":6,"on_order_quantity":13}- Execute the following command to verify if the published messages were successfully stored in their respective MSK topics. The command should return the payload that was previously published. Repeat for other topics by inputting the respective topic name.
./kafka-console-consumer.sh --broker-list <publicbrokerListID> --topic productupdates3. Create collections in Rockset for each of the Amazon MSK topics
In Rockset, create three collections, one for each of the Amazon MSK topics. We will give each collection a name as well as select the Amazon MSK topic name and data format. Rockset ingests and indexes data in real-time to support latency sensitive use cases. Data streams from Kafka topics will appear in Rockset collections as soon as they are created.
How to create a collection:
- In the Rockset console, navigate to Collections, and choose Create Collection.
- From the available list of Managed Integrations, choose Amazon MSK.
- Select Data Source, enter the Kafka Topic name to subscribe to. We’ll first subscribe to the customer Kafka topic.
- In Starting Offset, choose Latest.
- In Data Format, choose JSON from the dropdown.
- Configure the collection by providing a Collection name and workspace. For the demonstration, the collection name is grocery_customers and the workspace is sandbox.
Repeat steps above to create collections for the product (use collection name grocery_products) and productupdates (use collection name grocery_product_updates) topics.
4. Create a recommendation query in Rockset
In the query below, we’re providing a recommendation based on data from multiple collections, including nested data, using SQL joins. The query takes into account the customer segment, product availability and discount percentage. Rockset has an UNNEST function that makes it possible to expand arrays into several rows for analytical queries.
WITH
    _customer_products AS (
        SELECT
            c.customer_id,
            c.segment,
            p.pr.product_id,
            p.pr.interest_score,
            p.pr.proposed_discount_percent
        FROM
            sandbox.grocery_customers c,
            UNNEST(recommended_products as pr) as p
        WHERE
            -- lookup by customer_id
            c.customer_id IN (14)
            -- or lookup by product_id
            -- p.pr.product_id = 27
    )
SELECT
    cp.customer_id,
    cp.segment,
    cp.product_id,
    gp.description,
    CASE
        WHEN cp.segment = 'saver'
        AND cp.proposed_discount_percent <= gp.max_discount_percent
        AND g.on_hand_quantity > 0 THEN gp.max_discount_percent
        WHEN cp.segment = 'spender'
        AND cp.proposed_discount_percent <= gp.max_discount_percent
        AND g.on_hand_quantity > 0 THEN cp.proposed_discount_percent
        ELSE 0
    END AS discount
FROM
    _customer_products cp
    INNER JOIN sandbox.grocery_product_updates_v3 g ON cp.product_id = g.product_id
    INNER JOIN sandbox.grocery_products gp ON cp.product_id = gp.product_id
ORDER BY cp.interest_score desc
How to run the recommendation query in Rockset:
- Navigate to the query editor from the Rockset console page.
- Copy the SQL query.
- Choose Run.
5. Serve product recommendations
The recommendation query can be saved as a REST endpoint to create an API, also known as a Query Lambda.
How to create a Query Lambda from the query editor in Rockset:
- Create a Rockset Query Lambda by selecting save at the top of the navigation. Choose the Query lambda from the drop down.
- Specify the Name of the Query Lambda. For this example, the query lambda is named test-grocery-recommendations. Choose create Query Lambda to save.
- To create an API key, in the Rocket console left navigation, choose API Keys. Select Create API Key and copy the API Key.
- To access the Query Lambda endpoint, choose Query Lambdas from the Rockset console left navigation. Copy the code snippet to the app or CLI in the terminal. Add the API key.
- The example Query Lambda request and response is below.
Here is a sample command (and JSON response received) to invoke the Rockset Query Lambda named test-grocery-recommendations using an API key and the response from the CLI:
curl --request POST \ --url https://api.euc1a1.rockset.com/v1/orgs/self/ws/commons/lambdas/test-grocery-recommendations/tags/latest \ -H "Authorization: ApiKey {your key here}" \ -H 'Content-Type: application/json' \ 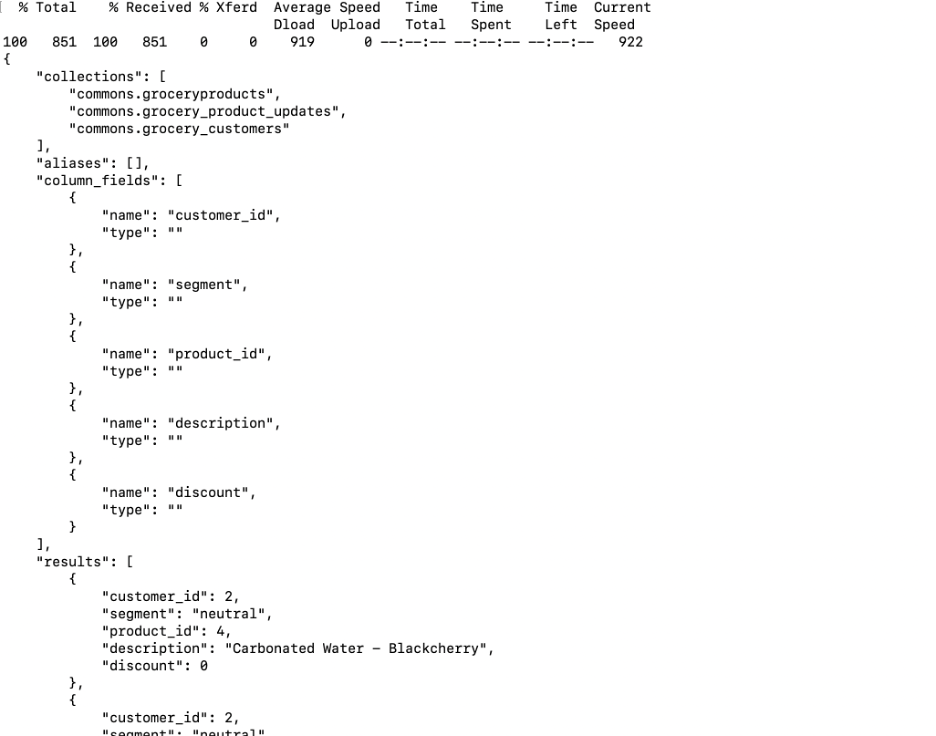
Figure 5 – The test-grocery-recommendations Query Lambda executed from the CLI and its response
6. Scale product recommendations
Create virtual instances ,or dedicated clusters of compute and memory resources, to isolate query execution from data ingestion and indexing within Rockset:
- In Rockset’s query editor, navigate to the Virtual Instance dropdown at the top right of the screen. From the dropdown, select create to create a new Virtual Instance.
- Give the new Virtual Instance a name, description and select the size of compute and memory resources (Small, Medium, Large, etc.). For the demonstration, the Virtual Instance name is recommendation and the virtual instance size is Small.
- Mount the collections used in the query to the Virtual Instance. The collections used are grocery_customers, grocery_products and grocery_product_updates.
- Run the query on the newly created Virtual Instance, recommendation, to isolate the compute used for query execution from the compute used for streaming data ingestion. By default, the query will now run on the newly created virtual instance.
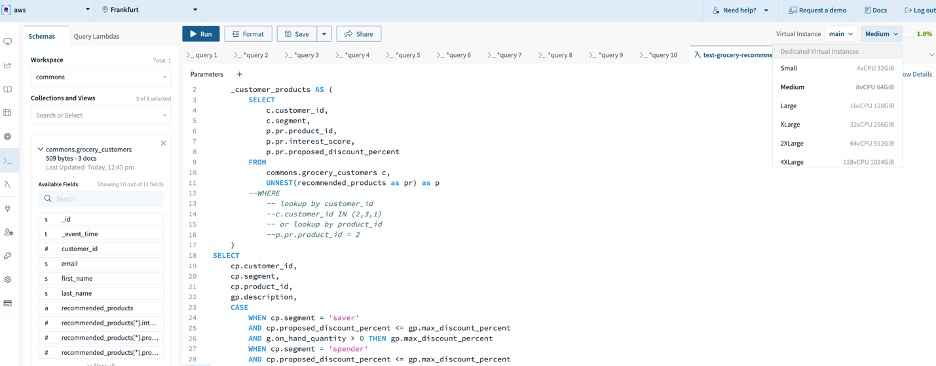
Figure 6 – Isolate compute for ingestion and indexing
Cleanup
Follow the steps below to remove services and avoid associated runtime charges:
- Delete the CloudFormation stack via the AWS console or CLI.
- In Rockset, delete the collections to remove storage resources and scale down the virtual instances.
Summary
In this post, we demonstrated how to build a real-time recommendation system on streaming data from Amazon MSK. With Amazon MSK and Rockset, developers can deliver predictable millisecond-latency performance for their recommendation engine without compromising on the data freshness. Rockset’s ability to support high-velocity streaming ingestion from Amazon MSK, real-time indexing and SQL joins enabled us to build product recommendations on a number of signals including product availability and user preferences.
Using Amazon MSK and Rockset, you can build search and analytics applications without the need to manage any infrastructure.
Start a free trial of Rockset through AWS Marketplace to build your own search and analytics application.