AWS Marketplace
New 2023: Best practices guide to successfully list your SaaS contract solution in AWS Marketplace
AWS Marketplace is a curated digital catalog that makes it easy for customers to find, test, buy, and deploy third-party software, data products, and services that customers need to build solutions and run their businesses.
In this post, I aim to help you create a SaaS contract product in AWS Marketplace. I take the current SaaS pricing tiered model and match it with the specific AWS Marketplace SaaS contract pricing model. I also explain the AWS Marketplace features that are relevant based on sales motions as well as best practices for structuring your product detail page.
Finally, I detail marketing best practices that you should think about as you approach listing in AWS Marketplace. Listing your solution in AWS Marketplace is the starting point, and how you promote the offering is a good predictor of how successful you will be.
Prerequisites
I assume you have registered as a seller in AWS Marketplace. If you have not, review the AWS Marketplace blog post Checklist to successfully registering as a seller in AWS Marketplace. Out of scope for this post is API integration with AWS Marketplace, which SaaS products in AWS Marketplace require.
Solution overview
Listing a SaaS contract product in AWS Marketplace allows you sell your SaaS solution to AWS customers using an upfront contract or you can provide them the ability to pay over time for the life of the contract. This provides AWS customers a way to consolidate the billing of their AWS services and software services onto their AWS invoice. By having a SaaS contract product in AWS Marketplace you also gain the ability to create private offers with customers where you can have custom terms and pricing that is not public-facing. Private offers is available on other AWS Marketplace product delivery methods as well.
Solution walkthrough: Best practices guide to successfully list your SaaS contract solution in AWS Marketplace
Step 1: Define your pricing model
The first step in defining your pricing model for AWS Marketplace is to look at your current pricing model and find the AWS Marketplace pricing model that most closely matches it. For this example we are going to use the SaaS Contract model.
The following screenshot shows the current tiered pricing model. It includes Standard, Pro, and Enterprise tiers. The Standard tier starts at $1,000 a month and offers up to 1,000 monthly API calls. The Pro tier starts at $2,500 a month and offers up to 10,000 monthly API calls as well as some advanced features. The Enterprise tier has custom pricing and offers unlimited API calls, full feature access, and premium support.
A key item to note is that the Enterprise tier does not display pricing, and I show how to address that in your AWS Marketplace product detail page.
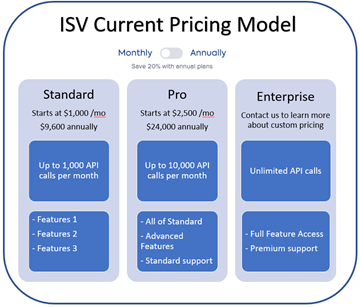
Figure 1: ISV Pricing model
Since my sample product uses a tiered model with monthly and annual pricing, I match that with the SaaS Contract pricing model. In this model, you may choose only one tier from the list of tiers you create in AWS Marketplace.
Step 2: Draft your product listing page in AWS Marketplace
A. Generate product ID and product code
- Navigate to the AWS Marketplace management portal.
- Select the Products tab dropdown menu and choose SaaS – Software as a service.
- On the right side of the page, select the Create SaaS product dropdown menu and choose SaaS product.
- A pop-up window appears to create your SaaS-based product.
- Select the Generate product ID and product code
- Once those assets are generated, select the Continue
B. Create your SaaS contract product
Next, complete an eight-step process to provide all the required product information.
- Provide product information
- This is where you enter metadata for the product detail page, including your product title, description, logo, video, highlights, support information, and product categories.
- As a best practice, be sure you display the value propositions for your solution that address customer challenges, communicate the benefits, capabilities, and differentiation of your offering, and explain why customers should buy it in AWS Marketplace.
- Once you have completed the required fields, select the Next
- Note: You can select the Save and exit button at any time to save your work and come back at a later time to complete the listing. Keep in mind you must complete all the required fields in the step you are working on to do so. When you are ready to come back and complete the listing process, you can access the product on the SaaS products page and select the Resume product creation button.
- This is where you enter metadata for the product detail page, including your product title, description, logo, video, highlights, support information, and product categories.
- Configure fulfillment options
- Here you provide the URL for the web page that buyers are redirected to after subscribing to your product in AWS Marketplace. This is typically your customer registration or sign-up page.
- Enter the URL for your registration page and select the Next
- Configure product pricing
- This is where you determine your pricing model. For the purpose of this blog post, select the radio button for Contract-based pricing.
- Set the dimension unit type for your product. This is how you charge your customer. In this case, I charge based on the number of API requests. API request is not an available option, so either choose Units or Requests. Units is the catchall if the unit type you charge by is not listed in the dropdown menu.
- From the dropdown menu, select Requests.
- Contract dimensions
- Complete the dimensions or tiers for your product to match the tiers you have today. Even though you have three tiers in your pricing structure, I only list two dimensions for the product. As discussed earlier in this post, public-facing pricing for each tier is required, and since your Enterprise tier does not have public-facing pricing, I omit that tier.
- Contract dimension 1: Enter the following details that align with your current pricing.
- API identifier: standard
- Display name: Standard
- Description: Up to 1,000 API requests per month
- Contract dimension 2: Enter the following details that align with your current pricing.
- API identifier: pro
- Display name: Professional
- Description: Up to 10,000 API requests per month
- Once you have entered your dimensions, select the Next
- Note: You must enter public-facing pricing before you request to go live. AWS Marketplace products must have public-facing pricing on the listing pages. Since your pricing model has a tier (Enterprise) without public pricing, call out to your customer base that you offer custom terms and pricing (high-touch sales).
- Contract dimension 1: Enter the following details that align with your current pricing.
- Complete the dimensions or tiers for your product to match the tiers you have today. Even though you have three tiers in your pricing structure, I only list two dimensions for the product. As discussed earlier in this post, public-facing pricing for each tier is required, and since your Enterprise tier does not have public-facing pricing, I omit that tier.
This is best implemented at the end of the Product Description field. Your best practice would be to enter language like, “We also offer custom pricing plans, so if one of the plans listed in our pricing section does not meet your needs, please contact us by email (sales@awsmptesting.com) or use our contact us page here: https://www.awsmptesting.com/contactus.”
You can use the AWS Marketplace feature Private offers to extend custom terms and pricing to your customers. Private offers enable you to implement the Enterprise tier of your product without listing it along with public-facing pricing.
- Set prices
- This is where you determine the purchasing options and the length of the contracts you wish to have public-facing.
- First we set the purchasing options. You have two options, Multiple dimensions per contract and Single dimension per contract. For the purpose of this blog post, we are selecting Single dimension per contract.
- For contract duration, we select 1 month and 12 months.
- The actual pricing is grayed out and set to $0.01. This is to ensure you can test subscribe to your own product and incur minimal charges.
- Select the Next button.
- This is where you determine the purchasing options and the length of the contracts you wish to have public-facing.
- Specify refund policy
- This is where you set your refund policy. You specify the terms here, a link to terms, or an email to contact you regarding your refund policy.
- Enter your refund policy and select the Next
- Configure EULA
- This is where you choose the end user license agreement (EULA) between you and the buyer of your solution. This is your public-facing EULA and the terms any self-service subscribers are agreeing to.
- You can select the Standard Contract for AWS Marketplace (SCMP) or choose to upload your own custom EULA.
- For more information on SCMP, please review Standardized contracts.
- Select your EULA configuration and select the Next
- Configure offer availability
- This is where you identify countries where buyers can or cannot purchase your product from.
- For the purpose of this blog post, select All countries and select the Next
- Configure allow list – Optional
- This is where you can add additional AWS account IDs to view your product listing. All new product listings published to AWS Marketplace start out with limited visibility. This is essentially a private preview mode. The AWS seller account you’re currently signed in to is allow listed by default.
- Enter any additional AWS account IDs or leave the allow list blank and select the Submit
Congratulations! Your product has been successfully submitted for publishing. You can view the status of your submission by viewing the Requests tab in the AWS Marketplace Management Portal. When you first submit the product, the Request status is set to Applying changes. Once the changes have been successfully completed, the status changes to Succeeded.
In the event your Request status changes to Failed, follow the Request name link and review the issues. If you have additional questions, please use the Contact us link in the footer of the AWS Marketplace Management Portal to contact the AWS Marketplace Catalog Operations (MCO) team.
What’s next?
1. API integration
To complete the API integration today, you have three possible routes:
- Complete the full integration using our SaaS integration guide. The estimated time to complete a full integration is 3–5 weeks using two development engineers. The work can typically be completed in an engineering sprint.
- Use the AWS Marketplace – Serverless SaaS API Integration Deployment Guide. The estimated time to complete the serverless integration is 1–2 hours using one development engineer.
- Blog: Using AWS Marketplace SaaS Quick Start to simplify your SaaS integration
- Video: AWS Quick Start for AWS Marketplace Serverless SaaS Integration
- Review the AWS Marketplace seller workshop labs. The AWS Marketplace Solutions Architect team has published 14 self-service labs to help you integrate, package, and sell your products in AWS Marketplace. These labs provide step-by-step guides for publishing AMI, container, and SaaS-based products. They include code examples on billing integration and packaging, using the Quick Start for SaaS listings, and submitting product metadata using product-load-form spreadsheets, where required.
- Use a third-party integrator such as:
2. Marketing planning
Start to think about marketing activities to drive demand for your solution. Think of AWS Marketplace as a procurement channel for you to transact with AWS customers. It is critical that you have plans to market your solution. To do that, consider completing the following activities:
- Review the AWS Marketplace blog post Best practices for driving traffic to your AWS Marketplace listing.
- Join the AWS Partner Network (APN), which is a program focused on providing members of the APN with programmatic, technical, business, and go-to-market support.
- If you are already part of the APN, consider co-selling with AWS by participating in the APN Customer Engagement Program (ACE).
- Review the blog posts:
- Create a press release regarding your launch in AWS Marketplace.
- Consider authoring a blog post for the AWS Marketplace blog. These blog posts should be a tutorial that shows how to solve a common customer challenge using your product and other AWS services.
3. Getting answers
If you have questions about listing and getting started, use the following resources:
- Get registered as a seller. In the AWS Marketplace Management Portal, use the Contact Us form to request to speak with a member of our AWS Marketplace Business Development team.
- Contact your AWS account manager and have them get in contact with the AWS Marketplace Emerging Tech Business Development Team.
Conclusion
In this post, I showed how to successfully list your SaaS contract solution in AWS Marketplace to match your current pricing structure. I showed how AWS Marketplace can facilitate both low- and high-touch sales motions with free trials, tiers, and private offers. I also touched on some of the marketing best practices you should consider, as well as the three different routes available to complete the SaaS API integration.
Once you have defined your pricing model, sign in to the AWS Marketplace Management Portal and follow the directions outlined in Step 2 of this post. If you have additional questions, contact us using the channels listed in the “Getting answers” section.