AWS Big Data Blog
Anonymize and manage data in your data lake with Amazon Athena and AWS Lake Formation
April 2024: This post was reviewed for accuracy.
Organizations collect and analyze more data than ever before. They move as fast as they can on their journey to become more data driven by using the insights from their data.
Different roles use data for different purposes. For example, data engineers transform the data before further processing, data analysts access the data and produce reports, and data scientists with domain and technical expertise can train machine learning algorithms. Those roles require access to the data, and access has never been easier to grant.
At the same time, most organizations have to comply with regulations when dealing with their customer data. For that reason, datasets that contain personally identifiable information (PII) is often anonymized. A common example of PII can be tables and columns that contain personal information about an individual (such as first name and last name) or tables with columns that, if joined with another table, can trace back to an individual.
You can use AWS Analytics services to anonymize your datasets. In this post, I describe how to use Amazon Athena to anonymize a dataset. You can then use AWS Lake Formation to provide the right access to the right personas.
Use case
To better understand the concept, we use a straightforward use case: analysts in your organization need access to a dataset with sales data, some of which contains PII information. As the data lake admin, you’re not comfortable with all personnel having access to customers’ PII. To address this, you can use an anonymized dataset.
This use case has two users:
- datalake_admin – Responsible for data anonymization and making sure the right permissions are enforced. They classify the data, generate anonymized datasets, and configures the required permissions.
- datalake_analyst – Only has access to the anonymized dataset. They can extract patterns for users without tracing the request back to an individual customer.
The following AWS CloudFormation template generates the AWS Glue tables that you use later in this post:
![]()
However, the template doesn’t create the datalake_admin and datalake_analyst users. For more information about personas in Lake Formation, see Lake Formation Personas and IAM Permissions Reference.
Solution architecture
For this solution, you use the following services:
- Lake Formation – Lake Formation makes it easy to set up a secure data lake—a centralized, curated, and secured repository that stores all your data, both in its original form and prepared for analysis. The data lake admin can easily label the data and give users permission to access authorized datasets.
- Athena – Athena is an interactive query service that makes it easy to analyze data in Amazon S3 using standard SQL. Athena is serverless, so there is no infrastructure to manage, and you pay only for the queries you run. For this use case, the data lake admin uses Athena to anonymize the data, after which the data analyst can use Athena for interactive analytics over anonymized datasets.
- Amazon S3 – Amazon Simple Storage Service (Amazon S3) is an object storage service that offers industry-leading scalability, data availability, security, and performance. For this use case, you use Amazon S3 as storage for the data lake.
The following diagram illustrates the architecture for this solution.
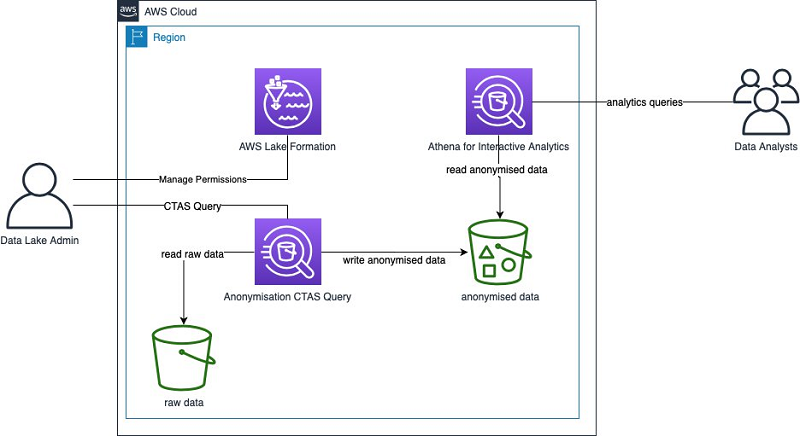
In this architecture, there are no servers to manage. You only pay what you use. You can use the same solution for small or large datasets. The scaling happens behind the scenes but in a transparent way.
In the following sections, you look in more detail on how to do the following:
- Label sensitive data with AWS Lake Formation
- Anonymize data with Athena
- Apply permissions with Lake Formation
- Analyze the anonymized datasets
Labeling the sensitive data with Lake Formation
As a data lake admin, the first task is to label the personal information. Tags don’t enforce any security controls, but applying a good tagging strategy is a great way to describe the data. Tags are key-value pairs that you can apply for your AWS resources, including table and columns in your data lake. For this use case, you apply a very simple tagging strategy: for the columns that contain PII, you give the value PII.
You interact with the following tables from the tcp-ds dataset, which both have their data stored in Amazon S3 in CSV format:
- store_sales – Stores sales data and references other tables that you can join together for more sophisticated business queries. The table has a foreign key with the
customertable on thess_customer_skThis key, when joined with the customer table, can uniquely identify a user. For that reason, treat this column as personal information. - customer – Stores customer data, a lot of which is PII. In addition to
c_customer_sk, you could use data such as customer ID, (c_customer_id), customer name (c_first_name), customer last name (c_last_name), login (c_login), and email (c_email_address) to uniquely identify a customer.
To start tagging your columns (starting with the store_sales table), complete the following steps:
- As the data lake admin user, log in to the Lake Formation console.
- Choose Data Catalog Tables.
- Select store_sales.
- Choose Edit schema.
- Select the column you want to edit (
ss_customer_sk). - Choose Edit.
- For Key, enter
Classification. - For Value, enter
PII. - Choose Save.

To verify that you can apply the added column properties, use the Lake Formation API to get the table description.
- On the Data Catalog Tables page, select
store_sales. - Choose View properties.
The table properties look like the following JSON object:
The additional column properties are now in the table metadata.
- Repeat the preceding steps for the
customertable and label the following columns:
-
c_customer_skc_customer_idc_first_namec_last_namec_loginc_email_address
Adding a tag also allows you to perform metadata searches by tag attributes. For more information, see Discovering metadata with AWS Lake Formation: Part 1 and Discover metadata with AWS Lake Formation: Part 2.
Anonymizing data with Athena
The data lake admin now needs to provide the data analyst anonymized datasets for analytics. For this use case, you want to extract patterns on the customer table and the store_sales table separately, but you also want to join the two tables so you can perform more sophisticated queries.
The first step is to create a database in Lake Formation to organize tables in AWS Glue.
- On the Lake Formation console, under Data Catalog, choose Databases.
- Choose Create database.
- For Name, enter a name, such as
anonymised_tcp_ds_1tb. - Optionally, enter an Amazon S3 path for the database and a description.
- Choose Create database.

The next step is to create the tables that contain the anonymized data. Before you do so, consider the significance of each anonymized column from an analytics point of view. For columns that have little or no value in the analytics process, omitting the column altogether might be the right approach. You might use other columns as primary keys to join with other tables. To make sure that you can join the tables, you can apply a hash function to the table foreign keys.
A common approach to anonymize sensitive information is hashing. A hash function is any function that you can use to map data of arbitrary size to fixed-size values. For more information, see Hash function.
The following table summarizes your strategy for each column.
| Table | Column | Strategy |
customer |
customer_first_name |
hash |
customer |
customer_last_name |
hash |
customer |
c_login |
omit |
customer |
customer_id |
hash |
Customer |
c_email_address |
omit |
customer |
c_customer_sk |
hash |
store_sales |
ss_customer_sk |
hash |
If you use the same value as the input of your hash function, it always returns the same result. In addition, and contrary to encryption, you can’t reverse hashing.
- Use Athena string functions to hash individual columns and generate anonymized datasets.
- After you create those datasets, you can use Lake Formation to apply security controls. See the following code:
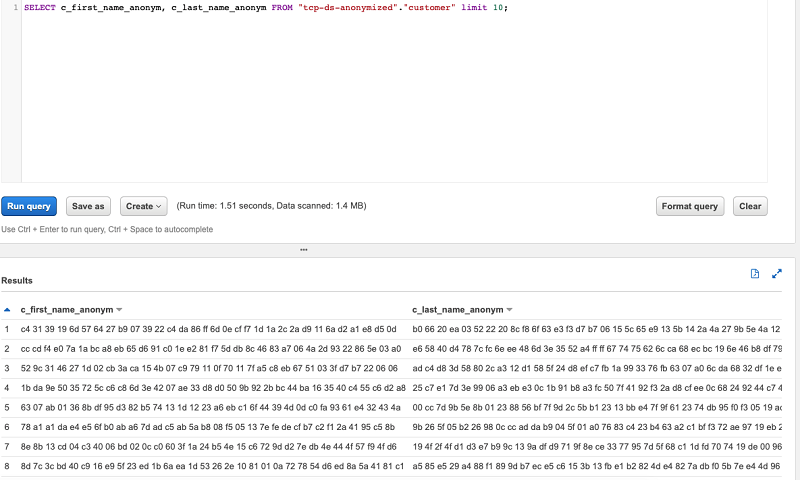
- To preview the data, enter the following code:
The following screenshot shows the output of your query.
- To repeat these steps for the
stores_salestable, enter the following code:
One of the challenges you need to overcome when working with CTAS queries is that the query’s Amazon S3 location should be unique for the table you’re creating. You can add some incremental value or timestamp to the path of the table, for example, s3:/<bucket>/<table_name>/<version>, and make sure you use a different version number every time.
You can delete older data programmatically using Amazon S3 APIs or SDK. You can also use Amazon S3 lifecycle configuration to tell Amazon S3 to transition objects to another Amazon S3 storage class. For more information, see Object lifecycle management.
You can automate the anonymization of the CTAS query with AWS Glue jobs. AWS Glue provides a lightweight Python shell job option that can call the Amazon Athena API programmatically.
Applying permissions with Lake Formation
Now that you have the table structures and anonymized datasets, you can apply the required permissions using Lake Formation.
- On the Lake Formation console, under Data Catalog, choose Tables.
- Select the tables that contain the anonymized data.
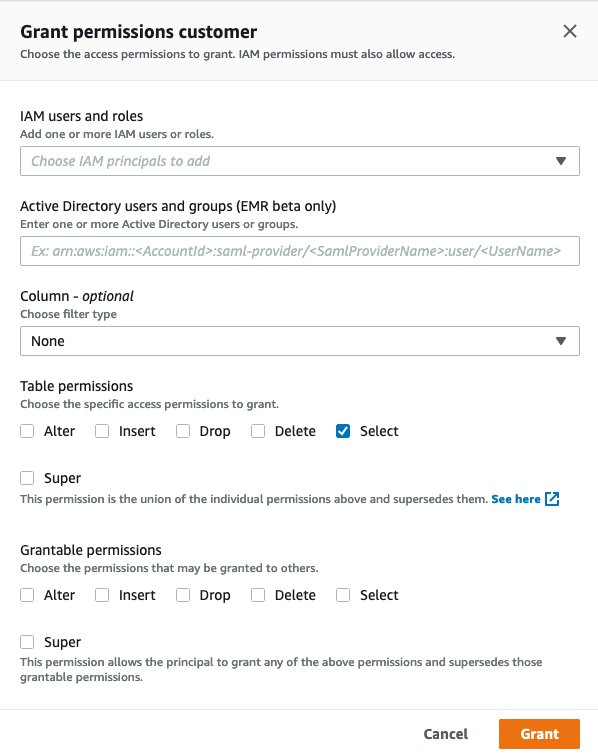
- From the Actions drop-down menu, under Permissions, choose Grant.
- For IAM users and roles, choose the IAM user for the data analyst.
- For Table permissions, select Select.
- Choose Grant.
You can now view all table permissions and verify the permissions granted to a particular principal.
Analyzing the anonymized datasets
To verify that the role can access the right tables and query the anonymized datasets, complete the following steps:
- Sign in to the AWS Management Console as the data analyst.
- Under Analytics, choose Amazon Athena.
You should see a query field, similar to the following screenshot.

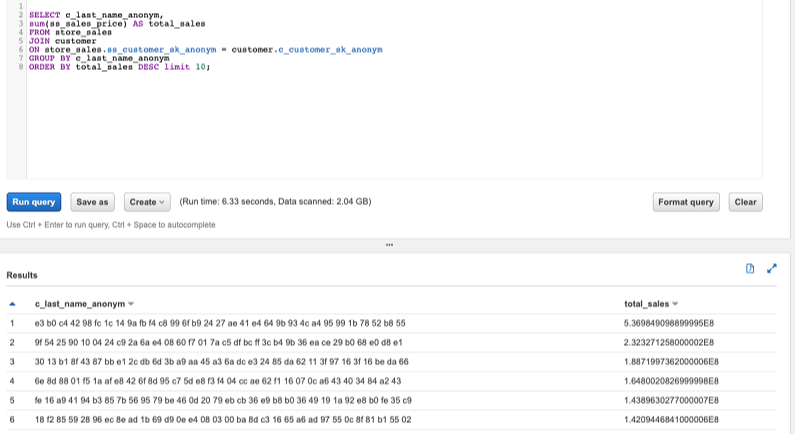
You can now test your access with queries. To see the top customers by revenue and last name, enter the following code:
The following screenshot shows the query output.
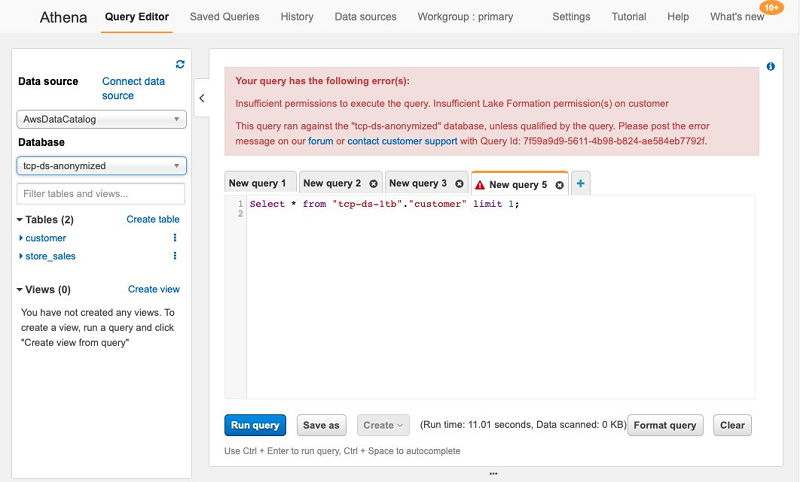
You can also try to query a table that you don’t have access to. You should receive an error message.
Conclusion
Anonymizing dataset is often a prerequisite before users can start analyzing a dataset. In this post, we discussed how data lake admins can use Athena and Lake Formation to label and anonymize data stored in Amazon S3. You can then use Lake Formation to apply permissions to the dataset and allow other users to access the data.
The services we discussed in this post are serverless. Building serverless applications means that your developers can focus on their core product instead of worrying about managing and operating servers or runtimes, either in the cloud or on-premises. This reduced overhead lets developers reclaim time and energy that they can spend on developing great products that scale and that are reliable.
About the Author
 Manos Samatas is a Specialist Solutions Architect in Big Data and Analytics with Amazon Web Services. Manos lives and works in London. He is specialising in architecting Big Data and Analytics solutions for Public Sector customers in EMEA region.
Audit History
Last reviewed and updated in April 2024 by Fabrizio Napolitano | Principal Analytics Solutions Architect