AWS Big Data Blog
Build a blockchain analytic solution with AWS Lambda, Amazon Kinesis, and Amazon Athena
August 30, 2023: Amazon Kinesis Data Analytics has been renamed to Amazon Managed Service for Apache Flink. Read the announcement in the AWS News Blog and learn more.
There are many potential benefits to using a blockchain. A blockchain is a distributed data structure that can record transactions in a verifiable and immutable manner. Depending upon the use case, there are opportunities for reducing costs, improving speed and efficiency, stronger regulatory compliance, and greater resilience and scalability.
Early adopters of the blockchain are finding innovative ways of using it in such areas as finance, healthcare, eGovernment, and non-profit organizations. The blockchain was even initially pioneered as the key technology behind the cryptocurrency Bitcoin.
Many of the opportunities to use blockchains arise from their design. They are typically large-scale distributed systems that often consist of many thousands of nodes. It can be challenging to gain insight into user activity, events, anomalies, and other state changes on a blockchain. But AWS analytics services provide the ability to analyze blockchain applications and provide meaningful information about these areas.
Walkthrough
In this post, we’ll show you how to:
- Deploy an Ethereum blockchain using the AWS Blockchain Templates
- Deploy a smart contract
- Build a serverless analytics pipeline for that contract based around AWS Lambda, Amazon Kinesis, and Amazon Athena.
You can readily adapt this Ethereum deployment and the blockchain analytics for use with a wide range of blockchain scenarios.
Prerequisites
This post assumes that you are familiar with AWS and Ethereum. The following documentation provides background reading to help you perform the steps described in this post:
- An introduction to Ethereum
- Deploying a smart contract to Ethereum
- An Introduction to Solidity Smart Contracts
Additionally, it’s useful to be familiar with Amazon Kinesis, AWS Lambda, Amazon QuickSight, and Amazon Athena to get the most out of this blog post. For more information, see:
- Writing SQL on Streaming Data with Amazon Kinesis Analytics – Part 1
- Analyzing Data in S3 using Amazon Athena
- Build a Community of Analysts with Amazon QuickSight
For an introduction to serverless computing with AWS Lambda, see Introduction to AWS Lambda – Serverless Compute on Amazon Web Services.
Blockchain 101
Before we proceed with the solution in this post, we’ll provide a short discussion regarding blockchains and Ethereum, which is the blockchain implementation used in this solution.
In short, blockchains are a means for achieving consensus. The motivation behind blockchain was in allowing the Bitcoin network to agree upon the order of financial transactions while resisting vulnerability, malicious threats, and omission errors. Other blockchain implementations are used to agree upon the state of generic computation. This is achieved through a process called mining, whereby an arbitrary computational problem is solved to make falsifying transactions computationally challenging.
Ethereum is a major blockchain implementation. Unlike Bitcoin and other earlier blockchain systems, Ethereum is not solely a cryptocurrency platform, though it does have its own cryptocurrency called Ether. Ethereum extends the blockchain concept by building an Ethereum virtual machine (VM) that is Turing-complete on top of the blockchain. This allows for the development of smart contracts, which are programs that run on the blockchain. The appeal of smart contracts is the ability to translate natural language contracts, such as insurance contracts, into code that can run on Ethereum. This allows contractual agreements to be built without the need for a centralized authority, such as a bank or notary, potentially decreasing time to market and reducing costs.
An overview of the blockchain solution
The following is an overview of the solution provided in this post. The solution consists of:
- An Ethereum blockchain running on Amazon Elastic Container Service (Amazon ECS) via the AWS Blockchain Template
- An Application Load Balancer, providing access to the various Ethereum APIs.
- A Lambda function, which deploys a smart contract to the blockchain
- A Lambda function, which runs transactions against the smart contract
- A Lambda function, which listens for events on the smart contract and pushes those events to Amazon Kinesis
- An Amazon DynamoDB table used to share the blockchain state between Lambda functions
- A blockchain analytics pipeline that uses Amazon Kinesis Data Firehose, Amazon Kinesis Data Analytics, Amazon Kinesis Data Streams, and Amazon Athena.
- An analytics dashboard built using Amazon QuickSight
The solution is presented in the following architectural diagram:
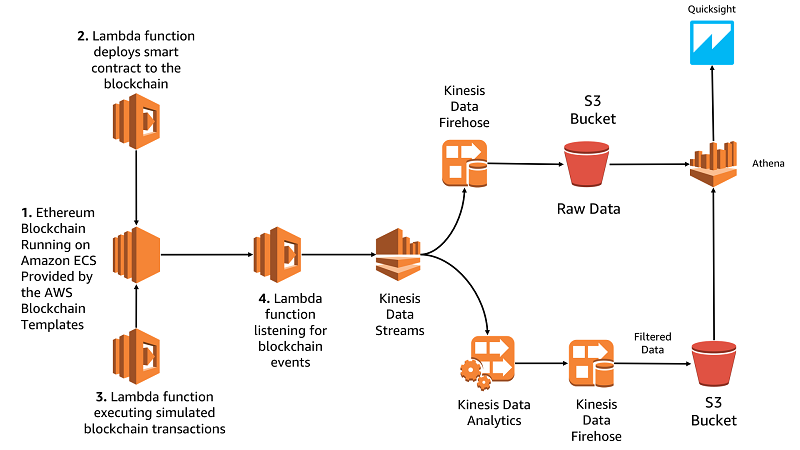
As shown, the solution is comprised of two main portions:
- The blockchain hosted on Amazon Elastic Compute Cloud (Amazon EC2) and the Lambda functions that interact with the blockchain.
- The analytics pipeline based around Kinesis that consumes data from the blockchain.
The AWS CloudFormation template we provide deploys the left side of that architecture diagram up to and including Kinesis Data Streams. It is the right side of the diagram that we’re going to build in this post.
Create the initial resources
- First, download the AWS CloudFormation template from: https://s3.amazonaws.com/blockchainblog/blockchainblogpost.template
- Use AWS CloudFormation to launch the template. The AWS CloudFormation stack deploys a virtual private cloud (VPC), two subnets, and a series of Lambda functions, which interact with the blockchain. This provides a foundation on which to build the analytics pipeline. You can either provide your own CIDR blocks or use the default parameters. Each subnet must have at least eight IP addresses.
- Deploy the AWS Blockchain Templates. The AWS Blockchain Templates make it efficient to deploy Ethereum and Hyperledger blockchain networks on AWS. In this case, we’re deploying an Ethereum network into the VPC created by the AWS CloudFormation template in step 2.
- Launch the following AWS CloudFormation template: https://aws-blockchain-templates-us-east-1.s3.us-east-1.amazonaws.com/ethereum/templates/latest/ethereum-network.template.yaml This template requires a number of parameters:
- Set the Initial List of Accounts to the following predefined accounts the Lambda functions use:
- In VPC Network Configuration:
- Set the VPC ID to the blockchainblog VPC created by the first AWS CloudFormation template.
- Add the blockchainblog-public subnet to the list of subnets to use.
- Add blockchainblog-public and blockchainblog-private to the list of ALB subnets.
- In Security Configuration:
- Choose your Amazon EC2 key pair.
- Provide the blockchainblog security group.
- Provide the blockchainblog-ec2-role for the Amazon EC2 role.
- Provide the blockchainblog-ecs-role for the Amazon ECS role.
- Set the ALB security group to the blockchainblog security group.
- Leave all other variables unchanged, create the template, and wait for all resources to be deployed. This deploys an Ethereum blockchain, starts the mining process, and exposes the Web3 API through an Application Load Balancer.
After the resources are created, move on to deploying the smart contract.
Deploy a smart contract
To use the blockchain, deploy a smart contract to it. This smart contract is not complex — it provides the functions for holding an auction.
The auction contract represents a public auction, which is an auction whereby all parties involved can be identified. The user offering the item to be auctioned deploys the contract and other users can bid using the contract. The auction is considered completed after a pre-defined number of blocks have been mined. When the auction ends, losing bids can then be withdrawn and the funds returned to the bidders. Later, the user who created the auction can withdraw the funds of the winning bid.
Note that the contract does nothing to ensure that the winner receives the commodity in question. In fact, this contract is entirely separate from what is being auctioned. The contract could be extended to provide this functionality, but for the scope of this post, we’re keeping the contract simple.
The auction contract is located at https://s3.amazonaws.com/blockchainblog/Auction.sol.
Examine the auction contract
The auction contract is automatically pulled by our Lambda function and deployed to our blockchain. This contract is written in a domain-specific language called Solidity. The syntax is inspired by the C family of languages; however, unlike C it doesn’t compile to object code. Instead, it compiles to bytecode, which runs on the Ethereum VM.
This smart contract has two functions: bid and withdraw. Bid allows users to bid in the auction, and withdraw allows users to withdraw funds from the contract when the auction has finished. The auction owner can obtain the winning bid and the losers can recoup their funds. Note that the data structure BidEvent is similar to a C struct, and is how we’ll trigger Solidity events. The Solidity events are captured and sent to our analytics pipeline.
Now it’s time to deploy our smart contract, run transactions against it, and listen for events by using pre-built Lambda functions. The following diagram shows the interactions of these Lambda functions:

DeployContract is a Lambda function created by the AWS CloudFormation stack that we deployed earlier. This function takes our Solidity source code from the Amazon Simple Storage Service (Amazon S3) bucket, compiles it to EVM bytecode using the solc compiler, deploys that to our blockchain, and stores the blockchain address of the contract in a DynamoDB table. The function interacts with the Ethereum blockchain on our Amazon EC2 instance via the web3 1.0.0 API. You can see the source code for this function at https://s3.amazonaws.com/blockchainblog/DeployContract.zip.
After deploying the AWS CloudFormation template, wait about 5 minutes before deploying the contract to give the blockchain time to start the mining process. The majority of this time is the blockchain generating the initial directed acyclic graph (DAG).
DeployContract can be invoked in the Lambda console by testing it with an empty test event. Before invoking the function, provide it with the address of the blockchain. To do this, locate the output of the AWS Blockchain Template and obtain the EthJSONRPCURL value from the output. Later, provide this value in an environment variable named BLOCKCHAIN_HOST, for the DeployContract function, as shown in the following example:

Now invoke the DeployContract function. It should print various states, including the blockchain address of the deployed contract and the JSON ABI of the contract. After the function completes, the contract is deployed to our private blockchain and available for use. If the function produces an error, it’s likely because the blockchain has not yet been initialized. Wait a few minutes after creating the AWS CloudFormation template before invoking DeployContract.
Execute Transactions
To generate some transaction data to analyze, we must first have some transactions. To get transactions, we are using a second Lambda function named ExecuteTransactions.
In the smart contract, an event is specified at the start of the file. Events are a useful mechanism in Solidity that can be used as a callback to code outside of the blockchain. The final Lambda function, ListenForTransactions, listens for events occurring against the contract and then sends those events to Kinesis for analysis.
Ethereum currently does not support sending events directly to Kinesis. So we’ll run the ListenForTransactions function to pull events from the blockchain. We can do this manually by invoking the function with an empty test event. ListenForTransactions pulls all events from the blockchain since the last time it was run. However, if we wanted transactions to be pulled from the blockchain in real time, we’d want the function running perpetually. In the following section, you can optionally schedule the Lambda function to run periodically or regularly. Once again, provide the address of the Ethereum RPC endpoint via the BLOCKCHAIN_HOST environment variable, per DeployContract for both ListenForTransactions and for ExecuteTransactions.
Optional: Use an Amazon CloudWatch event to schedule ListenForTransactions
To have ListenForTransactions run continually, we’ll use Amazon CloudWatch Events as a trigger for our Lambda function. In the Amazon CloudWatch console, choose the Triggers tab, and add a new Amazon CloudWatch Events trigger, with the schedule pattern rate(5). This ensures that the function is continually running and thus ensure that all events are sent to Kinesis as soon as they occur. This allows us to do near real-time processing of events against our smart contract. However, if we want to reduce costs, or if real-time analytics isn’t a key objective, we could run our ListenForTransactions function periodically. Running the function periodically fetches all events since the last time it was run; however, this is less timely than having it wait for events to occur.
To configure a CloudWatch event to trigger ListenForTransactions:
- In the designer section on the Lambda console for ListenForTransactions, select CloudWatch events
- Click on configure and scroll down to the CloudWatch event configuration
- Select Create New Rule from the rule dropdown menu
- Name the rule and provide a description
- Select schedule expression
- Provide the expression: rate(5)
- Select enable trigger
- Click add

After the function is scheduled, we can then generate some events against our contract. We can run ExecuteTransactions, with an empty test event. We can do this any number of times to generate more transactions to send to our analytics pipeline. ExecuteTransactions produces batches of 10 transactions at a time.
Analyze Transactions with Kinesis Data Analytics
Because our Lambda function is listening to events on our smart contract, all voting activity is sent to a Kinesis Data Stream that was already by an AWS CloudFormation called BlockchainBlogEvents.
Right now, all events go to Kinesis but no further. We’ll persist our events for analysis with Athena later on. To do so, navigate to the Kinesis Data Streams console and choose the BlockchainBlog stream that was created for you.
![]()
- In the upper right-hand corner, choose Connect to Firehose. This forwards all events to a Kinesis Data Firehose stream, which delivers them to an S3 bucket.
- Name the delivery stream choose Next, and don’t enable record transformation.
- Provide an S3 bucket in which to store your results. Remember so you can use it later with Athena.
All events coming from the blockchain should now be persisted to Amazon S3.

Now that our events are being persisted, we’ll use Kinesis Data Analytics to perform a series of real-time analytics on the Kinesis Data Stream. Later, we’ll perform batch analytics on the data stored in Amazon S3 via Athena.
First, look at Kinesis Data Analytics. Our ListenForTransactions Lambda function sends a message to a stream each time a transaction is run against our Auction smart contract.
The message is a JSON object. It contains the address of the bidder who initiated the transaction, how much they bid, the contract they bid on, when the transaction was run, and which block the transaction was added to.
Kinesis Data Analytics processes each incoming message to the stream and lets us perform analysis over the stream. In this example, we use Kinesis Data Analytics to:
- Calculate the amount of Ether being bid in each block within a sliding window of 15 seconds.
- Detect the number of unique bidders occurring within a sliding window of 15 seconds.
Our sliding window is 15 seconds because this is the Ethereum target block time. This is the measure of how long it takes to add a block to the blockchain. By setting the sliding window to 15 seconds, we can gain insight into transactions occurring within the mining interval. We could also set the window to be longer to learn how it pertains to our auction application.
To start with our real time analytics, we must create a Kinesis data analytics application. To do so:
- Navigate to the Kinesis data analytics application console on the AWS Management Console.
- Create a new Kinesis data analytics application with appropriate name and description, then specify the pre-made blockchainblog Kinesis Data Stream as the source.
- Run ExecuteTransactions to send a set of transactions to Kinesis and automatically discover the schema.
- Open the SQL editor for the application.
Next, we’re going to add SQL to our Kinesis data analytics application to find out the amount of Ether being sent in each block. This includes all bids sent to the contract and all funds withdrawn from a completed auction.
Copy the following SQL, paste it into the SQL editor in Kinesis Data Analytics, then execute it.
This simple piece of SQL provides some insight into our smart contract. The output of SPEND_PER_BLOCK_STREAM yields the block number and the volume of funds, from our contract, in that block. This output explains how much cryptocurrency is spent in relation to our smart contract and when it’s spent.
Make sure that there is data for the Kinesis data analytics application to process by running the ExecuteTransactions and ListenForTransactions functions. You can run these functions either with an Amazon CloudWatch event or manually.
Now, we’ll modify our application to detect the number of unique bidders placing bids within a 15-second window. This is about the time required to add a block to the blockchain. To do so, add the following code to our Kinesis data analytics application:
The resulting output of this code is the count of unique bidders occurring within the 15-second window. This is useful in helping us understand who is running transactions against our contract. For example, if it’s a large number of blockchain addresses responsible for the bids or if it is a smaller number of addresses bidding.
Finally, as denoted in our architectural diagram, we can add a destination stream to our Kinesis data analytics application. We’ll send the output of our application to Kinesis Data Firehose to persist the results. Then we’ll enable the resulting data to be used in batch analytics with Athena or other tools. To send the output, create a destination for the analytics output stream and point it at a Kinesis Data Firehose stream.
This section has shown real time analytics that can be run on blockchain transactions. The next section shows using Athena to run batch analytics against our stored transactions.
Analyze Transactions with Athena
In this section, we’ll create a table in Athena so we can query our transaction data in batch form.
- Create a database in Athena and then create a table, specifying the location that you provided earlier to Kinesis Data Firehose. Your configuration should look like the following example:

- Choose Next, choose JSON as the input format, then click next.
- In Columns, provide the data types for each of our columns. Choose Bulk add columns, then copy and paste the following column information:
| Column | Description |
| Block | The block that this event pertains to. |
| Auction | Which auction smart contract the event pertains to |
| ContractOwner | The address of the owner of the contract |
| Bidder | The address of the bidder |
| BlockHash | The SHA hash of the block |
| Address | The address of the transaction |
| MaxBidder | The address of the currently winning bidder (current to when the event was generated) |
| Amount | The amount of the bid |
- Click next and then create the table.
After you configure Athena, you can then explore the data. First, look at whether the user who created the auction has bid in their own auction. Most auctions typically disallow this bidding, but our smart contract doesn’t prohibit this. We could solve this by modifying the contract, but for now let’s see if we can detect this via Athena. Run the following query:
The result should resemble the following:

You should see at least one instance where the contract owner has bid on their own contract. Note that the Lambda function running transactions does this at random. Bidding on one’s own contract could be permissible or it might violate the terms of the auction. In that scenario, we can easily detect this violation.
This scenario is an example of using analytics to detect and enforce compliance in a blockchain-backed system. Compliance remains an open question for many blockchain users, as detecting regulatory and compliance issues involving smart contracts often involves significant complexity. Analytics is one way to gain insight and answer these regulatory questions.
Useful queries for analyzing transactions
This section provides some other queries that we can use to analyze our smart contract transactions.
Find the number of transactions per block
This query yields results similar to the following:

Find the winning bid for each auction
This query yields a set of results such as the following:

The results show each auction that you’ve created on the blockchain and the resulting highest bid.
Visualize queries with Amazon QuickSight
Instead of querying data in plain SQL, it is often beneficial to have a graphical representation of your analysis. You can do this with Amazon QuickSight, which can use Athena as a data source. As a result, with little effort we can build a dashboard solution on top of what we’ve already built. We’re going to use Amazon QuickSight to visualize data stored in Amazon S3, via Athena.
In Amazon QuickSight, we can create a new data source and use the Athena database and table that we created earlier.
To create a new data source
- Open the Amazon QuickSight console, then choose New Dataset.
- From the list of data sources, choose Athena, then name your data source.

- Choose the database and table in Athena that you created earlier.

- Import the data into SPICE. SPICE is instrumental for faster querying and visualization of data, without having to go directly to the source data. For more information about SPICE, see the Amazon QuickSight Documentation.
- Choose Visualize to start investigating the data.
With Amazon QuickSight, we can visualize the behavior of our simulated blockchain users. We’ll choose Amount as our measurement and Auction as our dimension from teh QuickSight side pane. This shows us how much ether has been bid in each auction. Doing so yields results similar to the following:

The amount depends on the number of times you ran the ExecuteTransactions function.
If we look at MaxBidder, we see a pie chart. In the chart, we can see which blockchain address (user) is most often our highest bidder. This looks like the following:

This sort of information can be challenging to obtain from within a blockchain-based application. But in Amazon QuickSight, with our analytics pipeline, getting the information can be easier.
Finally, we can look at the mining time in Amazon QuickSight by choosing Eventtimestamp as the x-axis, choosing block as the y-axis, and using the minimum aggregate function. This produces a line graph that resembles the following:

The graph shows that we start at around block 9200 and have a steady rate of mining occurring. This is roughly consistent with around a 15 to 20 second block mining time. Note that the time stamp is in Unix time.
This section has shown analysis that can be performed on a blockchain event to understand the behavior of both the blockchain and the smart contracts deployed to it. Using the same methodology, you can build your own analytics pipelines that perform useful analytics that shed light on your blockchain-backed applications.
Conclusion
Blockchain is an emerging technology with a great deal of potential. AWS analytics services provide a means to gain insight into blockchain applications that run over thousands of nodes and deal with millions of transactions. This allows developers to better understand the complexities of blockchain applications and aid in the creation of new applications. Moreover, the analytics portion can all be done without provisioning servers, reducing the need for managing infrastructure. This allows you to focus on building the blockchain applications that you want.
Important: Remember to destroy the stacks created by AWS CloudFormation. Also delete the resources you deployed, including the scheduled Lambda function that listens for blockchain events.
Additional Reading
If you found this post useful, be sure to check out Analyze Apache Parquet optimized data using 10 visualizatinos to try in Amazon QuickSight with sample data and Analyzing Bitcoin Data: AWS CloudFormation Support for AWS Glue.
About the Author
 Dr. Jonathan Shapiro-Ward is an AWS Solutions Architect based in Toronto. He helps customers across Canada to build industry leading cloud solutions. He has a background in distributed systems and big data and holds a PhD from the University of St Andrews.