AWS Business Intelligence Blog
Centrally manage permissions for tables and views accessed from Amazon QuickSight with trusted identity propagation
| All your trusted BI capabilities of Amazon QuickSight now come with powerful new AI features that integrate chat agents, deep research, and automation in one seamless experience with Amazon Quick Suite! Learn more » |
Prior to the launch of trusted identity propagation, when an Amazon QuickSight author created a connection to an Amazon Redshift data source, they had to provide Amazon Redshift database user credentials. These credentials are used for all subsequent queries that are processed on Redshift when users interact with QuickSight dashboards. User credentials had to be maintained in multiple services and data owners could not enable and maintain fine grained access control to data centrally.
This blog post shows how data owners and business intelligence (BI) administrators can centrally manage fine-grained data permissions on Amazon Redshift tables and views and enforce them on all users in Amazon QuickSight with AWS IAM Identity Center trusted identity propagation.
This challenge is addressed by configuring QuickSight and Amazon Redshift with IAM Identity Center. With trusted identity propagation, a business analyst can connect to Amazon Redshift from QuickSight with a single sign-on experience and create direct query datasets. When QuickSight assets such as dashboards are shared with other users, the permissions at schema, table, row, and column levels are enforced by propagating their user identity from QuickSight to Amazon Redshift (and to AWS Lake Formation if using Redshift Spectrum). This eliminates the need to create additional row-level and column-level security rules in QuickSight for user data access. Administrators can now enable trusted identity propagation across these services and allow user identities to propagate across applications.
Trusted identity propagation simplifies data governance by enabling secured access to data based on user permissions for all assets in QuickSight, including QuickSight datasets and data sources.
Solution overview
This architecture uses IAM Identity Center. Identity Center enables you to securely create or connect to workforce identities and manage user access across AWS applications. Identity Center is the recommended approach for workforce authentication and authorization on AWS for organizations of any size and type. With Identity Center, you can either create and manage user identities directly in the Identity Center directory, or you can connect your existing third-party enterprise identity provider, including Microsoft Entra ID, Okta, and Ping Identity. In this post, we’re using Okta as the enterprise identity provider. Okta stores the user identities and works with Identity Center to authenticate and authorize users based on user or group assignment. Okta and Identity Center can be set up to automatically sync users and groups from Okta to Identity Center. After this is configured, Identity Center is used to manage access to AWS applications. (QuickSight supports account instances of IAM Identity Center, so an organization-level Identity Center instance is not a requirement.)
The authentication and authorization flow for this solution is summarized in the following and illustrated in figure 1.
- A user navigates to QuickSight.
- QuickSight then initiates the authentication flow through IAM Identity Center.
- Identity Center redirects the authentication to Okta.
- Okta authenticates the user and passes the SAML token, which Identity Center processes and uses to create an access token.
- QuickSight uses the access token to get the AWS Identity and Access Management (IAM) role that includes the user’s identity along with the access token context.
- Amazon Redshift receives that token and gets the group assignment for that user from Identity Center.
- Amazon RedShift uses received group membership for access to schema, table, row, and column level data and passes the authorized data to the user in QuickSight.
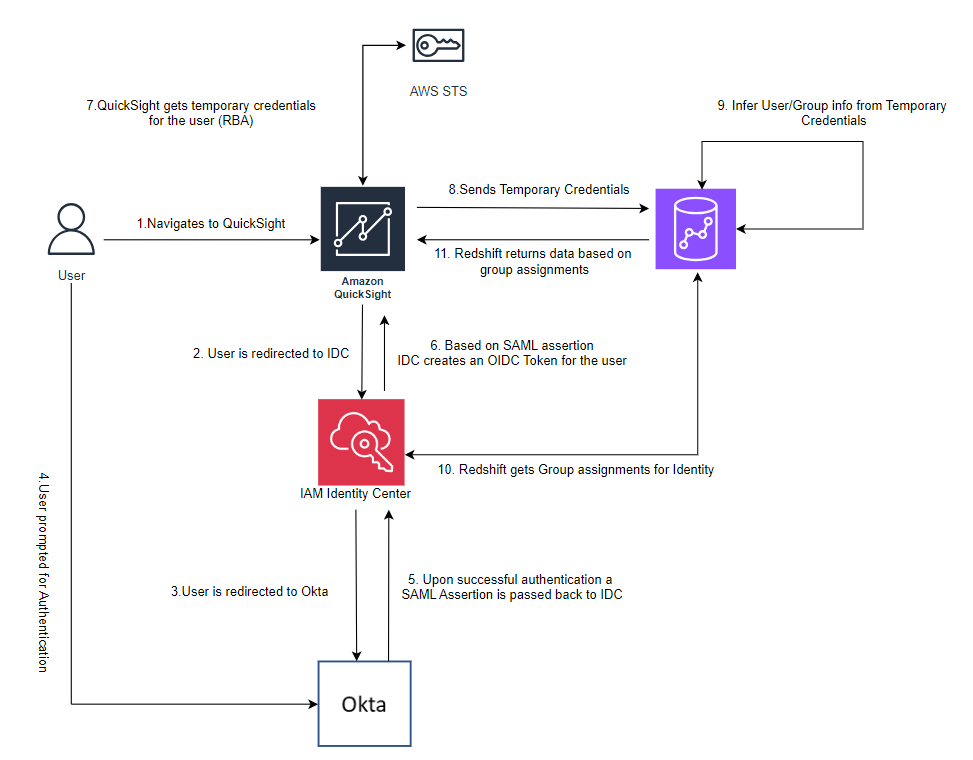
Figure 1: Authentication and authorization flow for QuickSight, Redshift, and Identity Center
Solution walkthrough
The rest of this post walks through the steps involved in configuring trusted identity propagation from QuickSight to Amazon Redshift using IAM Identity Center.
Prerequisites:
- Configure IAM Identity Center with Okta
- Configure Amazon Redshift with IAM Identity Center
- Configure QuickSight with IAM Identity Center
After completing the prerequisites, configure and test trusted identity propagation with QuickSight and Amazon Redshift. The steps are as follows:
- Configure Redshift row and column level security with IAM Identity Center users and groups
- Configure access to your Redshift cluster in a VPC from QuickSight
- Configure QuickSight trusted identity propagation scope for Amazon Redshift
- Connect to a Redshift data source in QuickSight using trusted identity propagation
- Validate that Redshift row level security is applied in QuickSight
Configure Redshift row-level and column-level security with IAM Identity Center users and groups
To apply row-level and column-level security to users who will be accessing Redshift data from QuickSight, you must create rules in Amazon Redshift. For more information, see Row level security.
Note: The following steps are required only If you want to secure access to Redshift data for your users by specifying row-level and column-level security.
Use the following sample code to create, attach, and activate a row-level security policy on a table to an IAM Identity Center user:
SQL command to create a row level security policy (in this case you are creating a policy to restrict access to data based on values in column sr_store_sk. Replace sr_store_sk with your column from your database)
SQL command to create a policy that does not restrict access to any data.
SQL commands to attach the policies (replace the table name with your table name and Identity Center user from your list of users)
SQL command to activate a row-level security policy on a table (replace the table name with your table name)
Configure access to your Redshift cluster in a VPC from QuickSight
QuickSight supports Amazon Virtual Private Cloud (Amazon VPC) connections to securely connect to Redshift clusters.
Note: The following steps are required only if you have a private Redshift instance.
To create and manage a VPC connection in QuickSight, you must have an IAM role that contains a trust policy that allows QuickSight to establish a connection to a VPC. See Configuring the VPC connection in the QuickSight console for more information about how to create the required role and policy.
In the VPC used by your Redshift instance, create two security groups:
Redshift SecGrpQuickSight SecGrp
Rules for the Redshift security group (Redshift SecGrp):
| Rule type | Type | Protocol | Port range | Source |
| Inbound | Custom TCP | TCP | 5439 | Custom: QuickSight SecGrp ID |
| Outbound | All TCP | TCP | (0-65535) | Custom: QuickSight SecGrp ID |
Rules for the QuickSight security group (QuickSight SecGrp):
| Rule type | Type | Protocol | Port range | Source |
| Inbound | All TCP | TCP | (0-65535) | Custom: Redshift SecGrp ID |
| Outbound | Custom TCP | TCP | 5439 | Custom: Redshift SecGrp ID |
In the QuickSight console, add a VPC connection:
- Go to Manage QuickSight, select Manage VPC connections, and choose ADD VPC CONNECTION.

- On the next screen, enter the following:
- Enter a name for your VPC in the VPC Connection name field.
- Choose the appropriate VPC ID for your Redshift instance from dropdown.
- Choose an Execution role with permission to create a VPC connection.
- Add at least two subnets for high availability.
- Choose Security Group ID for the QuickSight security group created in prior steps.
- Choose ADD at the bottom of the screen.

Configure QuickSight trusted identity propagation scope for Amazon Redshift
To allow QuickSight users to connect to Redshift data sources using trusted identity propagation, an administrator must create a scope that allows QuickSight to propagate user identities to Amazon Redshift. This requires the AWS account ID of the QuickSight subscription. You must specify the service that you’re authorizing identity propagation with, in this case REDSHIFT, and the Redshift identity application Amazon Resource Name (ARN) that you’re authorizing QuickSight to propagate user identities to.
Note: This information can be found in the Amazon Redshift console or by calling the describe-redshift-idc-applications API. If you don’t specify authorized targets for the Redshift scope, QuickSight can authorize users from any Redshift cluster in the same organization.
The following are sample AWS Command Line Interface (AWS CLI) calls to manage identity propagation configuration in QuickSight.
To create OAuth scopes on the QuickSight account replace <your account id> with your account and <your applicationARNn> with your Redshift application ARNs:
To list OAuth scopes on the QuickSight account:
If you need to delete OAuth scopes on the QuickSight account, run the following command. For this post, we don’t recommend that you delete scopes:
Connect to Amazon Redshift using a trusted identity propagation data source in QuickSight
To connect to Amazon Redshift using trusted identity propagation in QuickSight:
- In the QuickSight console, navigate to the Datasets page.
- Choose New dataset.

Create a Redshift data source by choosing Redshift (Auto discovered) tile
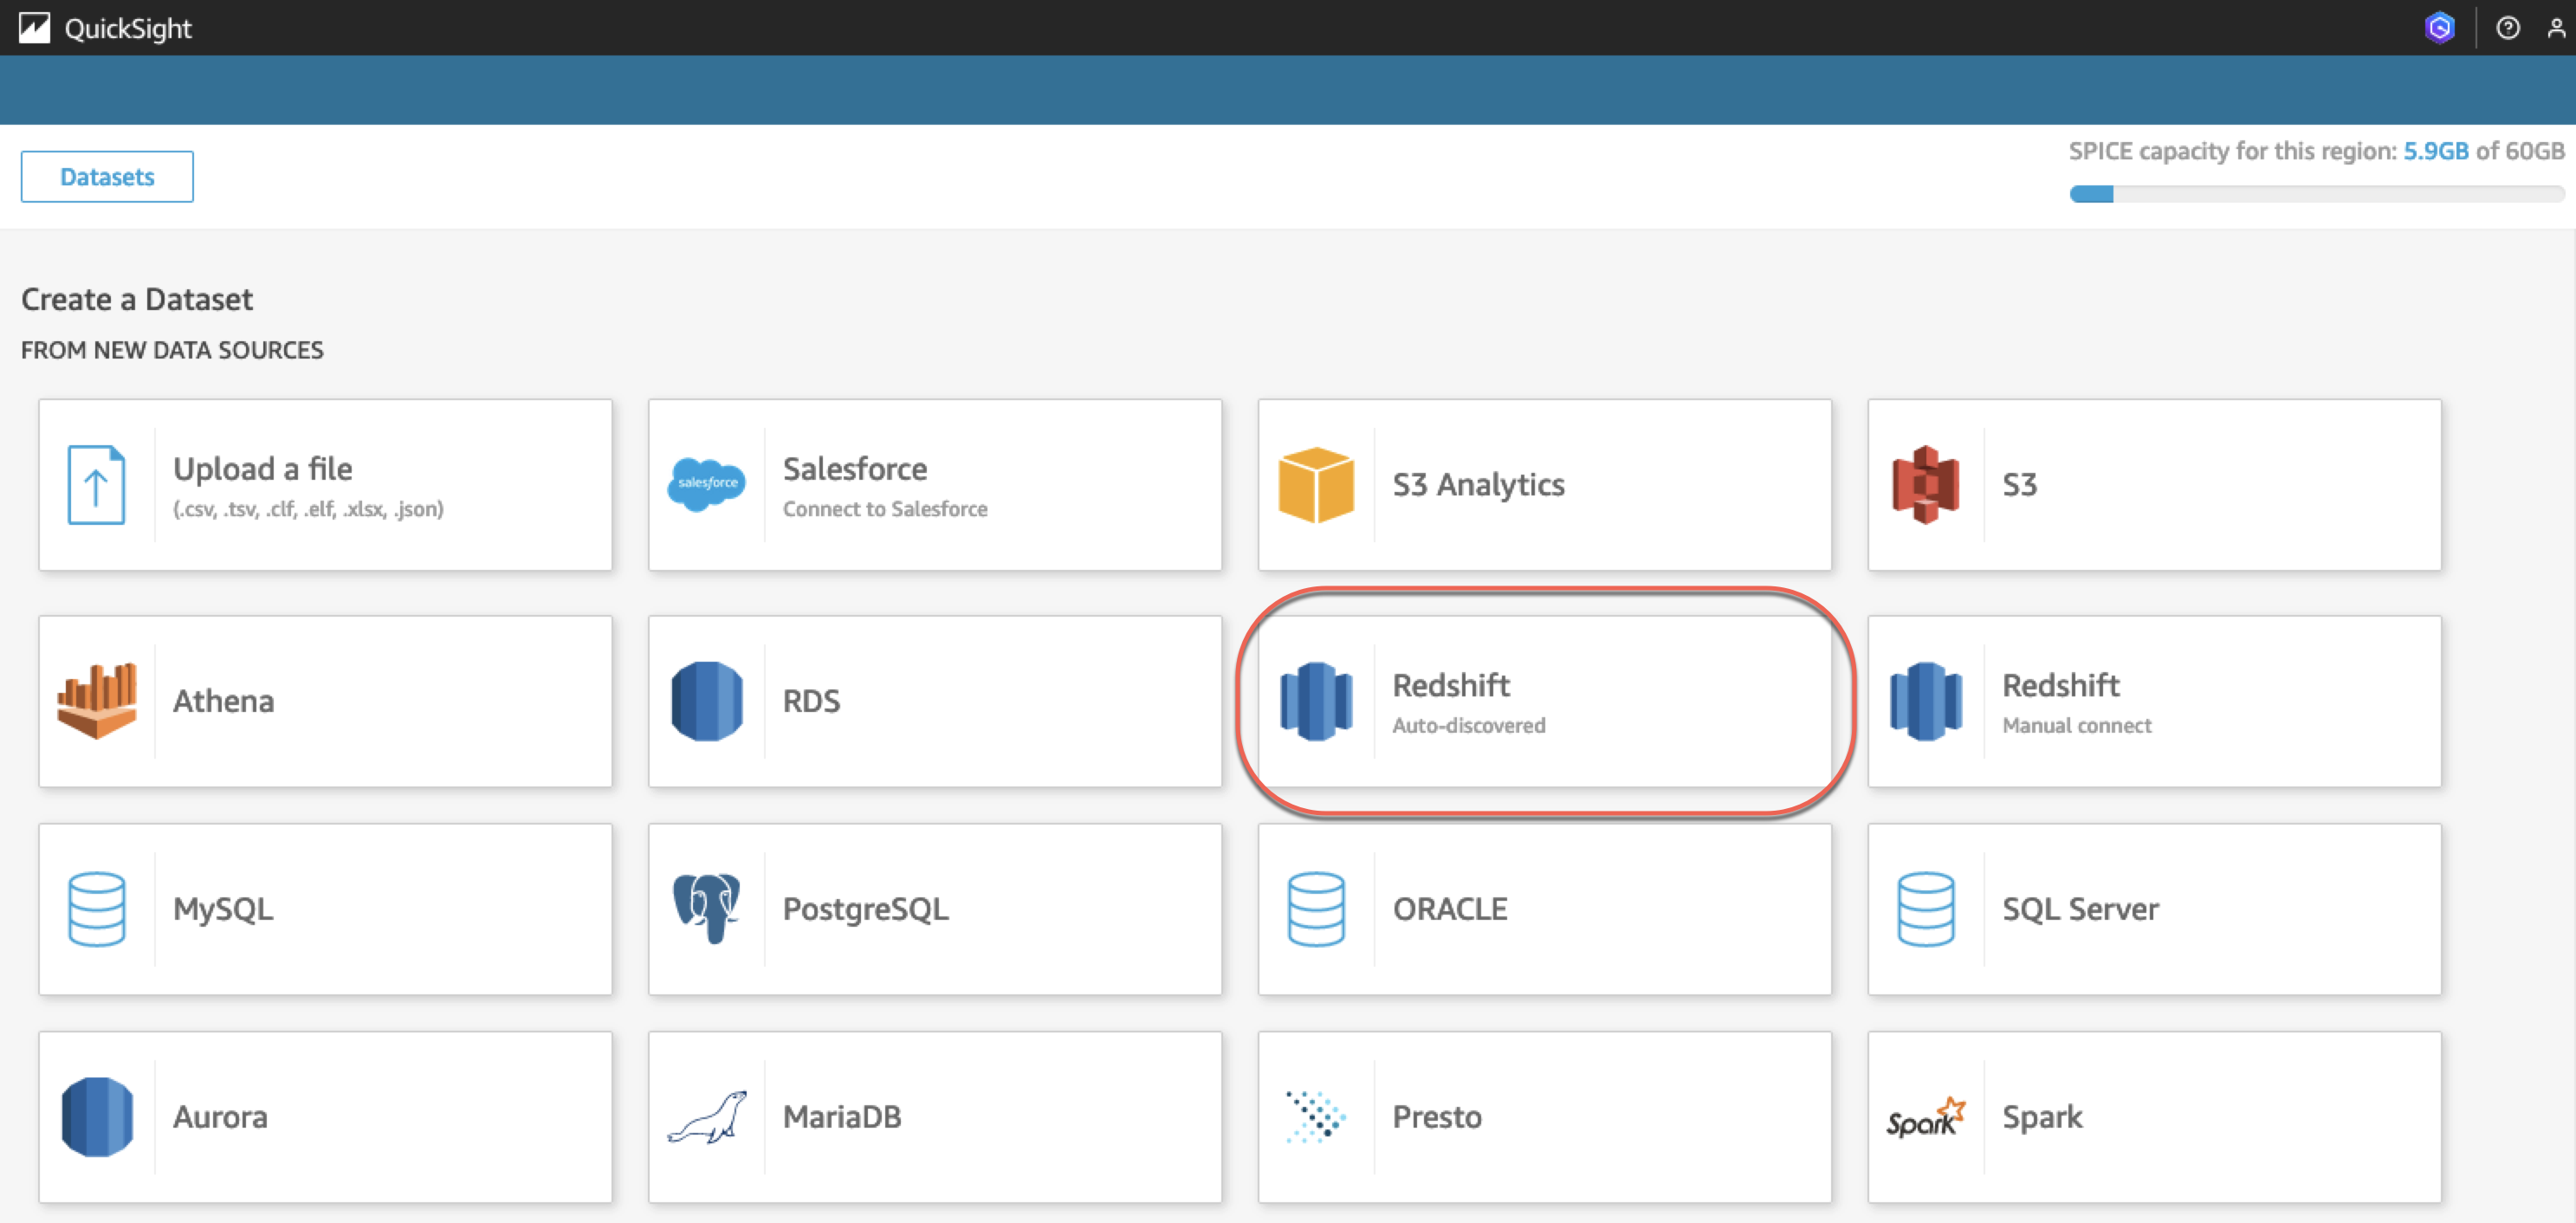
Figure 5: Choose Redshift (Auto-discovered) for the data source type
- Enter a name for your data source in the Data source name field.
- For Connection type, choose the VPC that was added in the prior steps from the Connection type dropdown.
Note: For a public database instance that doesn’t require a VPC connection, you can choose Public network.
- Enter the Database server information and the Database name to connect to.
- Select Single sign-on as the identity option and choose Validate connection.

Figure 6: Enter data source connection details
- Upon successful connection validation, choose Create data source.
- Select a table that you want to connect to.

Figure 7: Choose a table for the dataset
- Choose Visualize, choose the Interactive sheet or Paginated report option, and then choose CREATE. Configure your analysis by selecting fields from the Redshift table.

Figure 8: Create an analysis
Validate that row-level security is applied in QuickSight
When a user without row-level security defined signs in (for example, user xyz_all_admin@example.com from our previous example that had the policy attached to allow all data access), they see all data from sr_store_sk:

Figure 9: All data shown for a user without row-level security rules
When another user with row-level security defined (for example user xyz_restrict_admin@example.com from our previous example that had the row-level security policy attached), they can only see data for the store they have access to. In this case sr_store_sk=1. QuickSight will display data for just the one store as shown in the following figure:
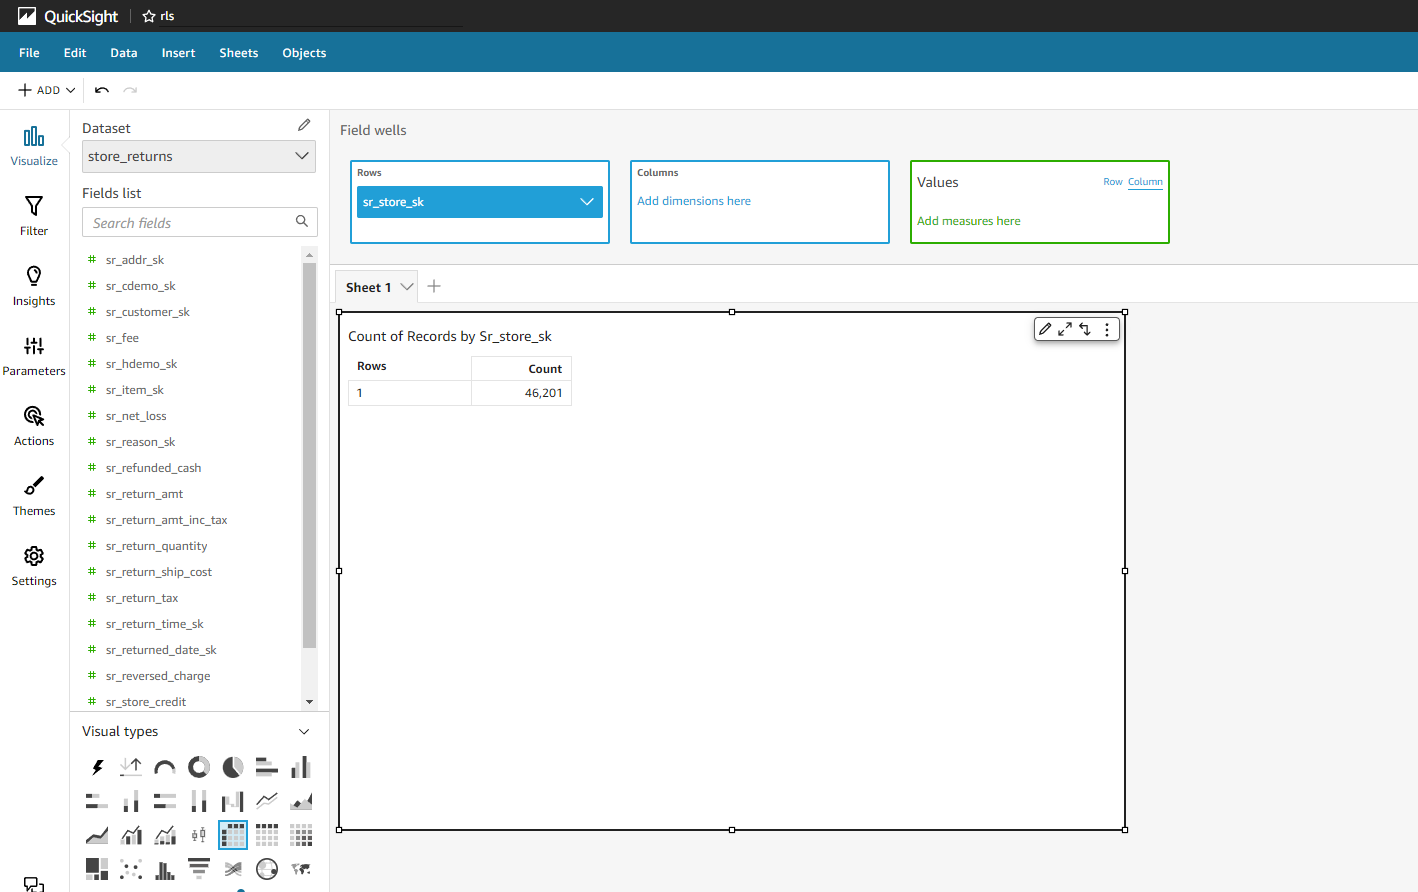
Figure 10: Data restricted for users with row-level security restrictions applied
The data rules apply across QuickSight, including in the dataset editor screen, analyses, and dashboards.
Use case
AnyBank, a fictional financial services customer, aims to centralize data access management for their analytics solutions built on AWS services. They used QuickSight for data analysis and enforce fine grained access controls for all users. Their goal was to restrict users within each department to access only the data relevant to departmental use cases they are working on, which are defined by groups in their identity provider. They needed to have data security rules defined at the data source level, in this case Amazon Redshift, and propagate those rules to any downstream applications such as QuickSight.
With the new architecture, users signing in to QuickSight are authenticated with the identity provider, and IAM Identity Center is used to propagate these identities seamlessly across authorized applications. Data access rules for schema, table, row, and column levels are defined in Amazon Redshift, which controls data being passed to QuickSight dashboards based on user identity and group assignments.
By adopting this architecture, AnyBank eliminated the need for redundant user management operations in multiple systems. Changes in group membership in the identity provider are automatically reflected in QuickSight and other applications configured with IAM Identity Center. Not having to maintain a duplicate set of data security rules in Quicksight also reduced their development time. Overall, this architecture streamlined user authentication and authorization, providing Anybank with a scalable and efficient solution for managing access to their data.
Limitations
Trusted identity propagation has some limitations on the QuickSight features it supports. The latest information can be found in Authorizing connections from Amazon QuickSight to Amazon Redshift clusters.
Conclusion
In this post, we covered how to simplify access management for analytics by propagating user identity across QuickSight and Amazon Redshift using IAM Identity Center. You learned how to get started with trusted identity propagation with Amazon Redshift and QuickSight. First, you configured Amazon Redshift row and column level security with Identity Center users and groups. Then, you configured QuickSight trusted identity propagation scopes with Amazon Redshift and connected to a data source.
If you have any questions or feedback, leave a comment. For additional discussion and help getting answers to your questions, check out the QuickSight Community.
Join the QuickSight Community to ask, answer, and learn with others and explore additional resources.
About the authors
 Asem Akhtar is Sr. GTM Specialist Solutions Architect at AWS focusing on Analytics. As an experienced leader with almost 30 years of professional experience, he has successfully guided fortune 500 and public sector customers in delivering state-of-the-art business intelligence and data analytics solutions.
 Ashok Dasineni is a Solutions Architect for Amazon QuickSight. Before joining AWS, Ashok worked with clients and organizations in Banking and financial domain, focusing on fraud research and prevention. He designed and implemented innovative solutions to improve business process, reduce cost and increase revenue, enabling companies around the world to achieve their highest potential through data.
 Raji Sivasubramaniam is a Principal Solutions Architect at AWS, focusing on Analytics and AIML. Raji is specialized in architecting end-to-end Enterprise Data Management, Business Intelligence and AIML solutions for Fortune 500 and Fortune 100 companies across the globe. She has in-depth experience in integrated healthcare data and analytics with wide variety of healthcare datasets including managed market, physician targeting and patient analytics.
 Srikanth Baheti is a Specialized World Wide Principal Solution Architect for Amazon QuickSight. He started his career as a consultant and worked for multiple private and government organizations. Later he worked for PerkinElmer Health and Sciences & eResearch Technology Inc, where he was responsible for designing and developing high traffic web applications, highly scalable and maintainable data pipelines for reporting platforms using AWS services and Serverless computing.
 Camille Taylor is a Sr. Technical Product Manager focused on Amazon QuickSight administration, identity management, and governance at AWS. Her career has been focused on helping Fortune 500 companies derive value from their data and scale adoption of their business intelligence investments across industries.