AWS Compute Blog
Automating rollback of failed Amazon ECS deployments
Contributed by Vinay Nadig, Associate Solutions Architect, AWS.
With more and more organizations moving toward Agile development, it’s not uncommon to deploy code to production multiple times a day. With the increased speed of deployments, it’s imperative to have a mechanism in place where you can detect errors and roll back problematic deployments early. In this blog post, we look at a solution that automates the process of monitoring Amazon Elastic Container Service (Amazon ECS) deployments and rolling back the deployment if the container health checks fail repeatedly.
The normal flow for a service deployment on Amazon ECS is to create a new task definition revision and update an Amazon ECS service with the new task definition. Based on the values of minimumHealthyPercent and maximumHealthyPercent, Amazon ECS replaces existing containers in batches to complete the deployment. After the deployment is complete, you typically monitor the service health for errors and make a call on rolling back the deployment.
In March 2018, AWS announced support for native Docker health checks on Amazon ECS. Amazon ECS also supports Application Load Balancer health checks for services that are integrated with a load balancer. Leveraging these two features, we can build a solution that automatically rolls back Amazon ECS deployments if health checks fail.
Solution overview
The solution consists of the following components:
· An Amazon CloudWatch event to listen for the UpdateService event of an Amazon ECS cluster
· An AWS Lambda function that listens for the Amazon ECS events generated from the cluster after the service update
· A Lambda function that calculates the failure percentage based on the events in the Amazon ECS event stream
· A Lambda function that triggers rollback of the deployment if there are high error rates in the event
· An AWS Step Functions state machine to orchestrate the entire flow
The following diagram shows the solution’s components and workflow.

Assumptions
The following assumptions are important to understand before you implement the solution:
· The solution assumes that with every revision of the task definition, you use a new Docker tag instead of using the default “latest” tag. As a best practice, we advise that you do every release with a different Docker image tag and a revision of the task definition.
· If there are continuous healthcheck failures even after the deployment is automatically rolled back using this setup, another rollback is triggered due to the health check failures. This might introduce a runaway deployment rollback loop. Make sure that you use the solution where you know that a one-step rollback will bring the Amazon ECS service into a stable state.
· This blog post assumes deployment to the US West (Oregon) us-west-2 Region. If you want to deploy the solution to other Regions, you need to make minor modifications to the Lambda code.
· The Amazon ECS cluster launches in a new VPC. Make sure that your VPC service limit allows for a new VPC.
Prerequisites
You need the following permissions in AWS Identity and Access Management (IAM) to implement the solution:
· Create IAM Roles
· Create ECS Cluster
· Create CloudWatch Rule
· Create Lambda Functions
· Create Step Functions
Creating the Amazon ECS cluster
First, we create an Amazon ECS cluster using the AWS Management Console.
1. Sign in to the AWS Management Console and open the Amazon ECS console.
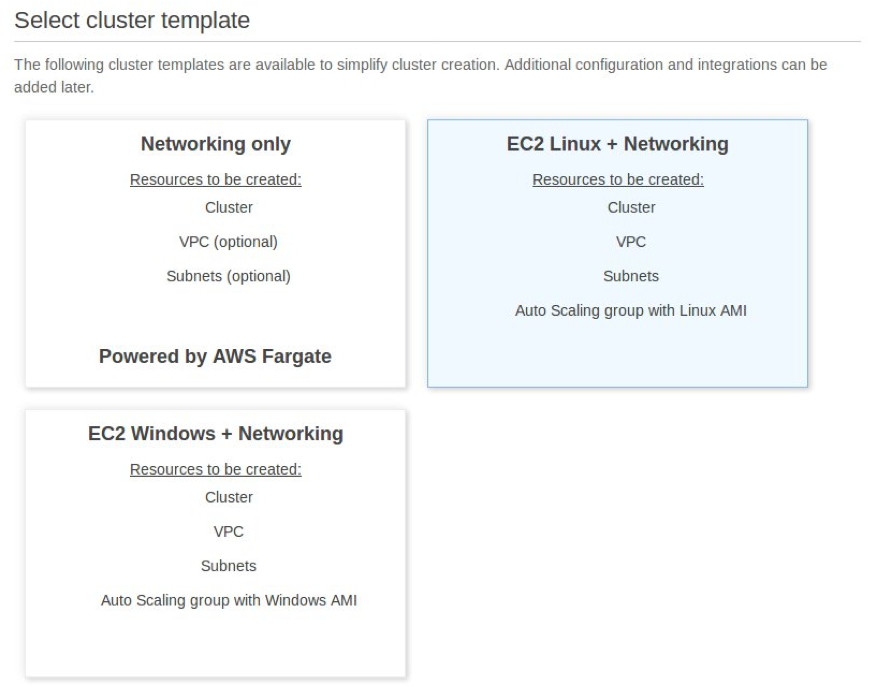
2. For Step 1: Select cluster template, choose EC2 Linux + Networking and then choose Next step.
3. For Step 2: Configure cluster, under Configure cluster, enter the Amazon ECS cluster name as AutoRollbackTestCluster.
4. Under Instance configuration, for EC2 instance type, choose t2.micro.

5. Keep the default values for the rest of the settings and choose Create.
This provisions an Amazon ECS cluster with a single Amazon ECS container instance.
Creating the task definition
Next, we create a new task definition using the Nginx Alpine image.
1. On the Amazon ECS console, choose Task Definitions in the navigation pane and then choose Create new Task Definition.
2. For Step 1: Select launch type compatibility, choose EC2 and then choose Next step.

3. For Task Definition Name, enter Web-Service-Definition.

4. Under Task size, under Container Definitions, choose Add Container.
5. On the Add container pane, under Standard, enter Web-Service-Container for Container name.
6. For Image, enter nginx:alpine. This pulls the nginx:alpine Docker image from Docker Hub.
7. For Memory Limits (MiB), choose Hard limit and enter 128.

8. Under Advanced container configuration, enter the following information for Healthcheck:
· Command:
· Interval: 10
· Timeout: 30
· Start period: 10
· Retries: 2

9. Keep the default values for the rest of the settings on this pane and choose Add.
10. Choose Create.
Creating the Amazon ECS service
Next, we create an Amazon ECS service that uses this task definition.
1. On the Amazon ECS console, choose Clusters in the navigation pane and then choose AutoRollbackTestCluster.
2. On the Services view, choose Create.
3. For Step 1: Configure service, use the following settings:
· Launch type: EC2.
· Task Definition Family: Web-Service-Definition. This automatically selects the latest revision of the task definition.
· Cluster: AutoRollbackTestCluster.
· Service name: Nginx-Web-Service.
· Number of tasks: 3.

4. Keep the default values for the rest of the settings and choose Next Step.
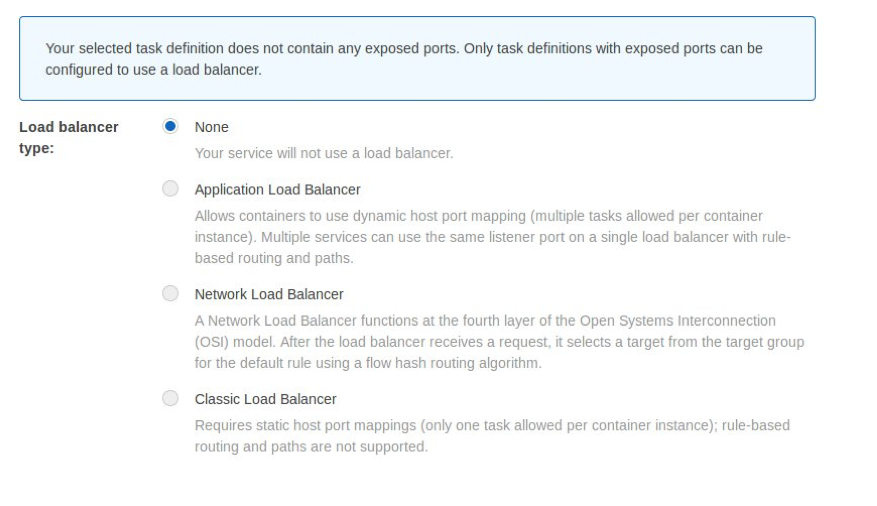
5. For Step 2: Configure network, keep the default value for Load balancer type and choose Next Step.
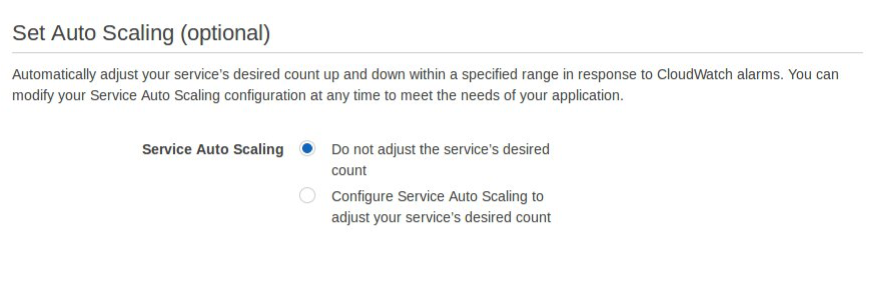
6. For Step 3: Set Auto Scaling (optional), keep the default value for Service Auto Scaling and choose Next Step.
7. For Step 4: Review, review the settings and choose Create Service.
After creating the service, you should have three tasks running in the cluster. You can verify this on the Tasks view in the service, as shown in the following image.

Implementing the solution
With the Amazon ECS cluster set up, we can move on to implementing the solution.
Creating the IAM role
First, we create an IAM role for reading the event stream of the Amazon ECS service and rolling back any faulty deployments.
1. Open the IAM console and choose Policies in the navigation pane.
2. Choose Create policy.
3. On the Visual editor view, for Service, choose EC2 Container Service.
4. For Actions, under Access Level, select DescribeServices for Read and UpdateServices for Write.

5. Choose Review policy.
6. For Name, enter ECSRollbackPolicy.
7. For Description, enter an appropriate description.
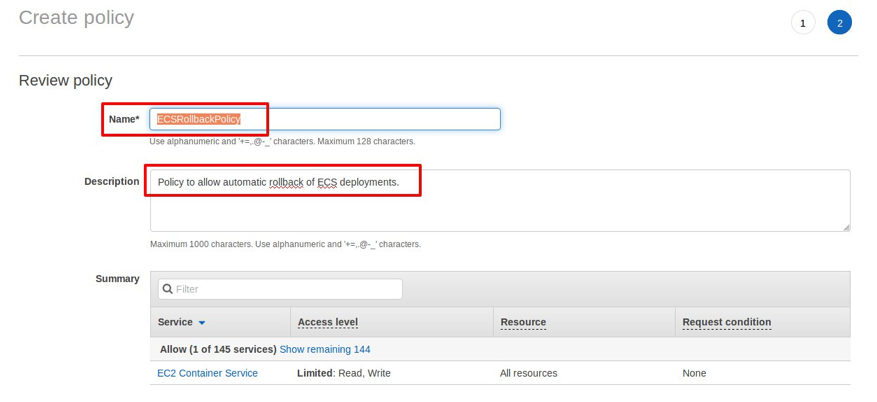
8. Choose Create policy.
Creating the Lambda service role
Next, we create a Lambda service role that uses the previously created IAM policy. The Lambda function to roll back faulty deployments uses this role.
1. On the IAM console, choose Roles in the navigation pane and then choose Create role.
2. For the type of trusted entity, choose AWS service.
3. For the service that will use this role, choose Lambda.

4. Choose Next: Permissions.
5. Under Attach permissions policies, select the ECSRollbackPolicy policy that you created.

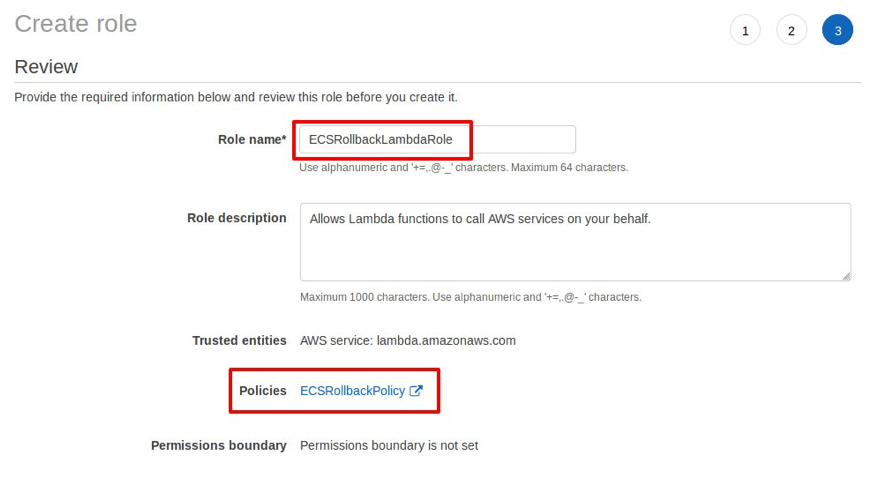
6. Choose Next: Review.
7. For Role name, enter ECSRollbackLambdaRole and choose Create role.
Creating the Lambda function for the Step Functions workflow and Amazon ECS event stream
The next step is to create the Lambda function that will collect Amazon ECS events from the Amazon ECS event stream. This Lambda function will be part of the Step Functions state machine.
1. Open the Lambda console and choose Create function.
2. For Name, enter ECSEventCollector.
3. For Runtime, choose Python 3.6.
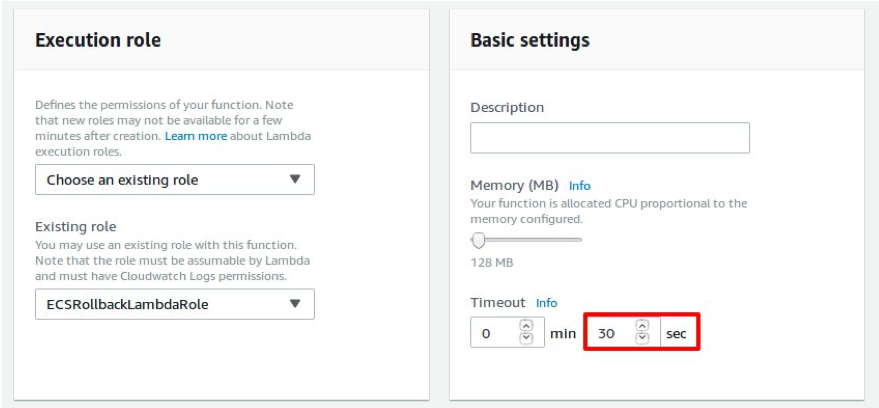
4. For Existing role, choose the ECSRollbackLambdaRole IAM role that you created.

5. Choose Create function.
6. On the Configuration view, under Function code, enter the following code.

7. Under Basic Settings, set Timeout to 30 seconds.
8. Choose Save.
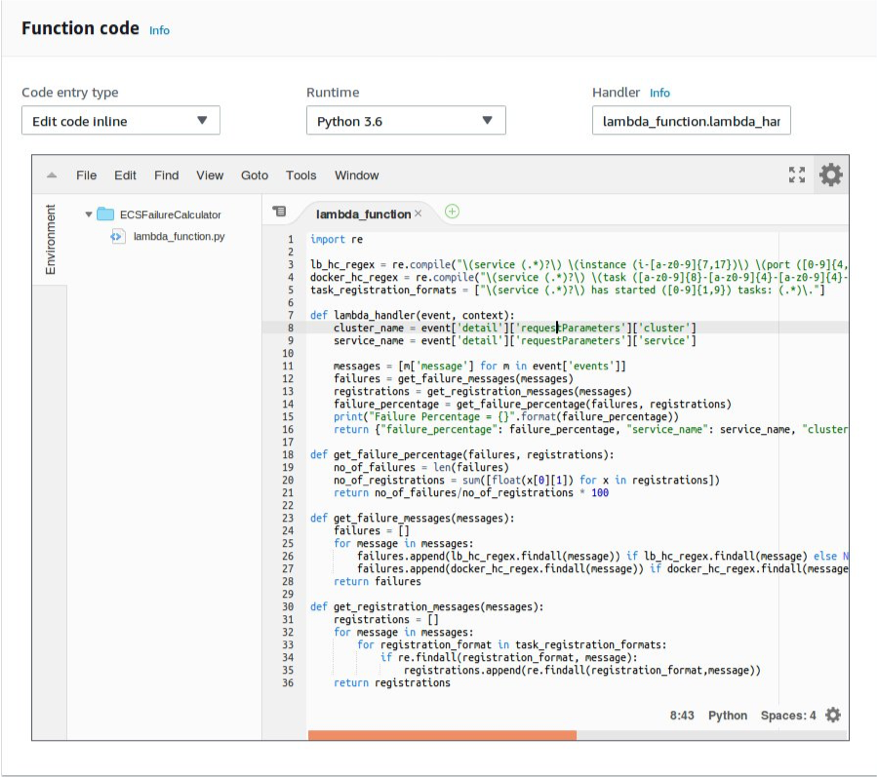
Creating the Lambda function to calculate failure percentage
Next, we create a Lambda function that calculates the failure percentage based on the number of failed container health checks derived from the event stream.
1. On the Lambda console, choose Create function.
2. For Name, enter ECSFailureCalculator.
3. For Runtime, choose Python 3.6.
4. For Existing role, choose the ECSRollbackLambdaRole IAM role that you created.

5. Choose Create function.
6. On the Configuration view, under Function code, enter the following code.
7. Under Basic Settings, set Timeout to 30 seconds.

8. Choose Save.
Creating the Lambda function to roll back a deployment
Next, we create a Lambda function to roll back an Amazon ECS deployment.
1. On the Lambda console, choose Create function.
2. For Name, enter ECSRollbackfunction.
3. For Runtime, choose Python 3.6.
4. For Existing role, choose the ECSRollbackLambdaRole IAM role that you created.

5. Choose Create function.
6. On the Configuration view, under Function code, enter the following code.

7. Under Basic Settings, set Timeout to 30 seconds.

8. Choose Save.
Creating the Step Functions state machine
Next, we create a Step Functions state machine that performs the following steps:
1. Collect events of a specified service for a specified duration from the event stream of the Amazon ECS cluster.
2. Calculate the percentage of failures after the deployment.
3. If the failure percentage is greater than a specified threshold, roll back the service to the previous task definition.
To create the state machine:
1. Open the Step Functions console and choose Create state machine.
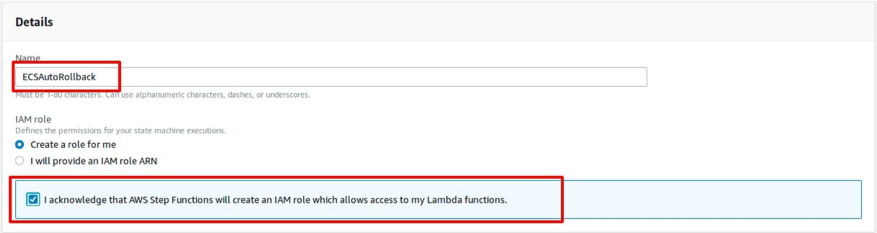
2. For Name, enter ECSAutoRollback.
For IAM role, keep the default selection of Create a role for me and select the check box. This will create a new IAM role with necessary permissions for the execution of the state machine.
Note
If you have already created a Step Functions state machine, IAM Role is populated.
3. For State machine definition, enter the following code, replacing the Amazon Resource Name (ARN) placeholders with the ARNs of the three Lambda functions that you created.
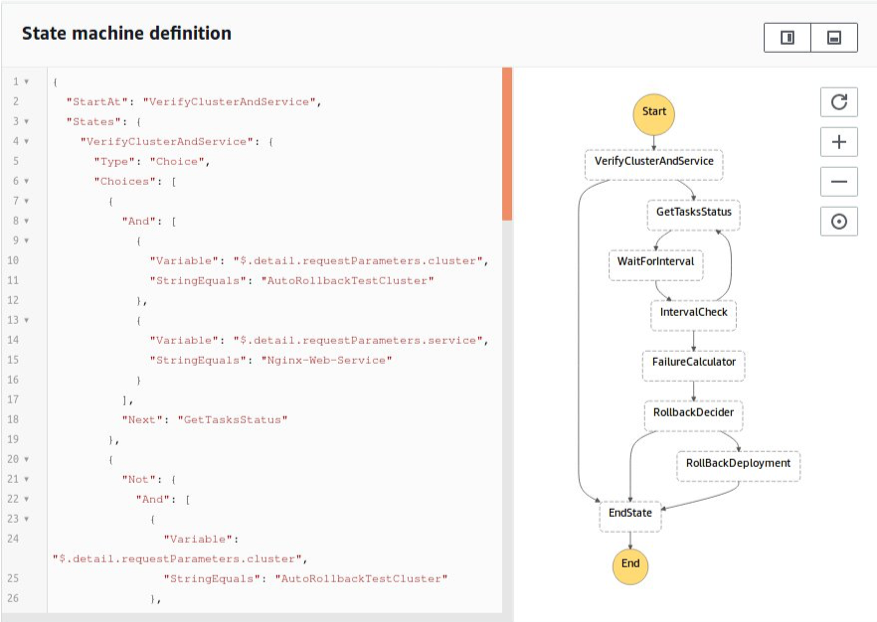
4. Choose Create state machine.
Now we have a mechanism to roll back a deployment if there are more than a configurable percentage of errors after a deployment to a specific Amazon ECS service.
(Optional) Monitoring and rolling back all services in the Amazon ECS cluster
Step Functions hard-codes the Amazon ECS service name in the state machine so that you monitor only a specific service in the cluster. The following image shows these lines in the state machine’s definition.

If you want to monitor all services and automatically roll back any Amazon ECS deployment in the cluster based on failures, modify the state machine definition to verify only the cluster name and to not verify the service name. To do this, remove the service name check in the definition, as shown in the following image.
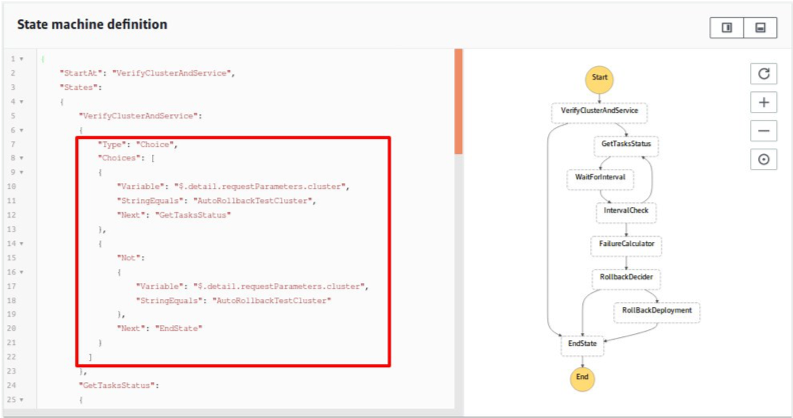
The following code verifies only the cluster name. It monitors any Amazon ECS service and performs a rollback if there are errors.
Configuring the state machine to execute automatically upon Amazon ECS deployment
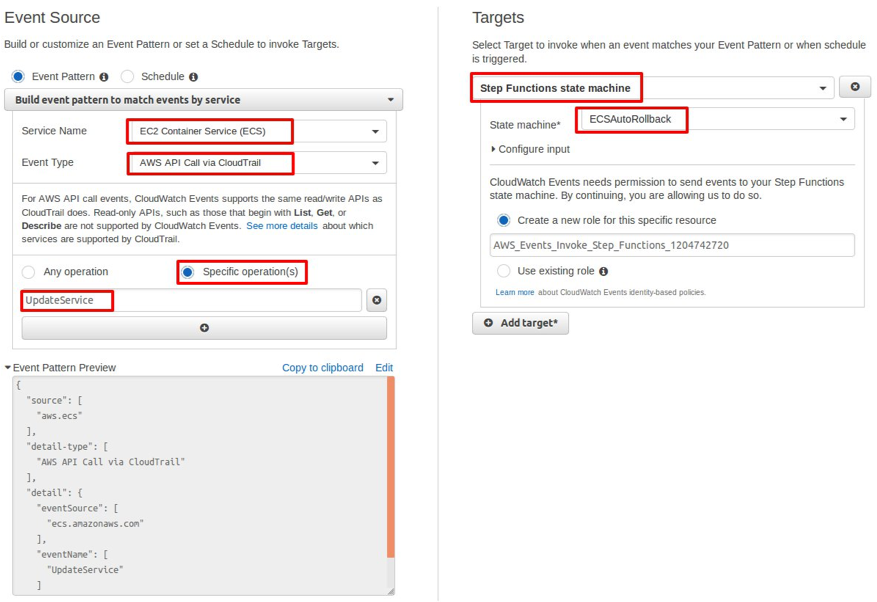
Next, we configure a trigger for the state machine so that its execution automatically starts when there is an Amazon ECS deployment. We use Amazon CloudWatch to configure the trigger.
1. Open the CloudWatch console and choose Rules in the navigation pane.
2. Choose Create rule and use the following settings:
· Event Source
o Service Name: EC2 Container Service (ECS)
o Event Type: AWS API Call via CloudTrail
o Operations: choose ‘Specific Operations and enter UpdateService
· Targets
o Step Functions state machine
o State machine: ECSAutoRollback
3. Choose Configure details.
4. For Name, enter ECSServiceUpdateRule.
5. For Description, enter an appropriate description.
6. For State, make sure that Enabled is selected.
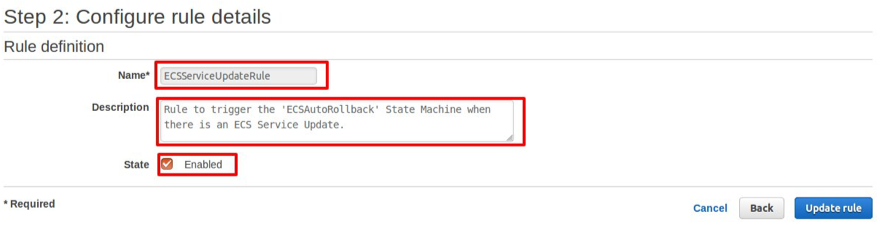
7. Click Create rule.
Setting up the CloudWatch trigger is the last step in linking the Amazon ECS UpdateService events to the Step Functions state machine that we set up. With this step complete, we can move on to testing the solution.
Testing the solution
Let’s update the task definition and force a failure of the container health checks so that we can confirm that the deployment rollback occurs as expected.
To test the solution:
1. Open the Amazon ECS console and choose Task Definitions in the navigation pane.
2. Select the check box next to Web-Service-Definition and choose Create new revision.

3. Under Container Definitions, choose Web-Service-Container.
4. On the Edit container pane, under Healthcheck, update Command to
and choose Update.

5. Choose Create. This creates the task definition revision.
6. Open the Nginx-Web-Service page of the Amazon ECS console and choose Update.
7. For Task Definition, select the latest revision.

8. Keep the default values for the rest of the settings by choosing Next Step until you reach Review.
9. Choose Update Service. This creates a new Amazon ECS deployment.

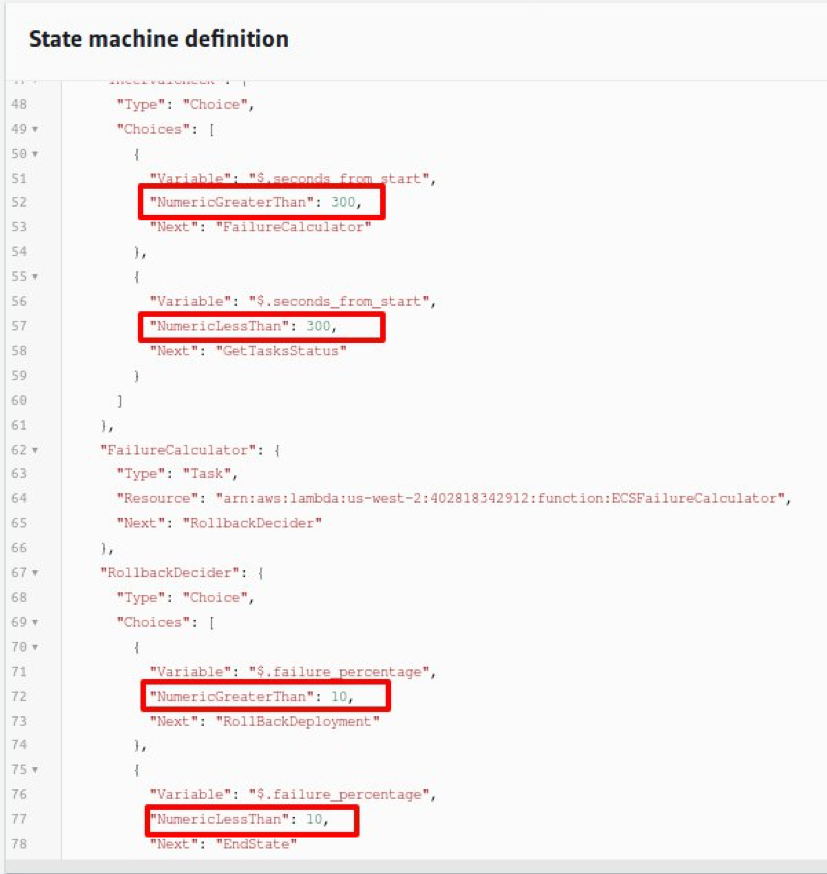
This service update triggers the CloudWatch rule, which in turn triggers the state machine. The state machine collects the Amazon ECS events for 300 seconds. If the percentage of errors due to health check failures is more than 10%, the deployment is automatically rolled back. You can verify this on the Step Functions console. On the Executions view, you should see a new execution that the deployment is triggering, as shown in the following image.

Choose the execution to see the workflow in progress. After the workflow is complete, you can check the outcome of the workflow by choosing EndState in Visual Workflow. The output should show {“Rollback”: true}.

You can also verify in the service details that the service has been updated with the previous version of the task definition.
Conclusion
With this solution, you can detect issues with Amazon ECS deployments early on and automate failure responses. You can also integrate the solution into your existing systems by triggering an Amazon SNS notification to send email or SMS instead of rolling back the deployment automatically. Though this blog uses Amazon ECS, you can follow similar steps to have automatic rollback for AWS Fargate.
If you want to customize the duration for monitoring your deployments before deciding to rollback and the error percentage threshold beyond which a rollback should be triggered, modify the values highlighted in the following image of the state machine definition.