AWS Compute Blog
GPU workloads on AWS Batch
Contributed by Manuel Manzano Hoss, Cloud Support Engineer
I remember playing around with graphics processing units (GPUs) workload examples in 2017 when the Deep Learning on AWS Batch post was published by my colleague Kiuk Chung. He provided an example of how to train a convolutional neural network (CNN), the LeNet architecture, to recognize handwritten digits from the MNIST dataset using Apache MXNet as the framework. Back then, to run such jobs with GPU capabilities, I had to do the following:
- Create a custom GPU-enabled AMI that had installed Docker, the ECS agent, NVIDIA driver and container runtime, and CUDA.
- Identify the type of P2 EC2 instance that had the required amount of GPU for my job.
- Check the amount of vCPUs that it offered (even if I was not interested on using them).
- Specify that number of vCPUs for my job.
All that, when I didn’t have any certainty that the instance was going to have the GPU required available when my job was already running. Back then, there was no GPU pinning. Other jobs running on the same EC2 instance were able to use that GPU, making the orchestration of my jobs a tricky task.
Fast forward two years. Today, AWS Batch announced integrated support for Amazon EC2 Accelerated Instances. It is now possible to specify an amount of GPU as a resource that AWS Batch considers in choosing the EC2 instance to run your job, along with vCPU and memory. That allows me to take advantage of the main benefits of using AWS Batch, the compute resource selection algorithm and job scheduler. It also frees me from having to check the types of EC2 instances that have enough GPU.
Also, I can take advantage of the Amazon ECS GPU-optimized AMI maintained by AWS. It comes with the NVIDIA drivers and all the necessary software to run GPU-enabled jobs. When I allow the P2 or P3 instance types on my compute environment, AWS Batch launches my compute resources using the Amazon ECS GPU-optimized AMI automatically.
In other words, now I don’t worry about the GPU task list mentioned earlier. I can focus on deciding which framework and command to run on my GPU-accelerated workload. At the same time, I’m now sure that my jobs have access to the required performance, as physical GPUs are pinned to each job and not shared among them.
A GPU race against the past
As a kind of GPU-race exercise, I checked a similar example to the one from Kiuk’s post, to see how fast it could be to run a GPU-enabled job now. I used the AWS Management Console to demonstrate how simple the steps are.
In this case, I decided to use the deep neural network architecture called multilayer perceptron (MLP), not the LeNet CNN, to compare the validation accuracy between them.
To make the test even simpler and faster to implement, I thought I would use one of the recently announced AWS Deep Learning containers, which come pre-packed with different frameworks and ready-to-process data. I chose the container that comes with MXNet and Python 2.7, customized for Training and GPU. For more information about the Docker images available, see the AWS Deep Learning Containers documentation.
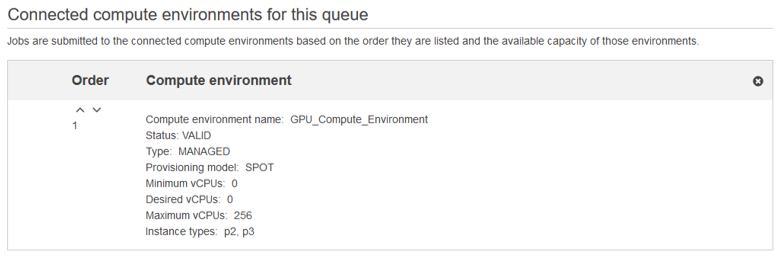
In the AWS Batch console, I created a managed compute environment with the default settings, allowing AWS Batch to create the required IAM roles on my behalf.
On the configuration of the compute resources, I selected the P2 and P3 families of instances, as those are the type of instance with GPU capabilities. You can select On-Demand Instances, but in this case I decided to use Spot Instances to take advantage of the discounts that this pricing model offers. I left the defaults for all other settings, selecting the AmazonEC2SpotFleetRole role that I created the first time that I used Spot Instances.
Finally, I also left the network settings as default. My compute environment selected the default VPC, three subnets, and a security group. They are enough to run my jobs and at the same time keep my environment safe by limiting connections from outside the VPC.
I created a job queue, GPU_JobQueue, attaching it to the compute environment that I just created:
Next, I registered the same job definition that I would have created following Kiuk’s post. I specified enough memory to run this test, one vCPU, and the AWS Deep Learning Docker image that I chose, in this case mxnet-training:1.4.0-gpu-py27-cu90-ubuntu16.04. The amount of GPU required was in this case, one. To have access to run the script, the container must run as privileged, or using the root user.
Finally, I submitted the job. I first cloned the MXNet repository for the train_mnist.py Python script. Then I ran the script itself, with the parameter –gpus 0 to indicate that the assigned GPU should be used. The job inherits all the other parameters from the job definition:
sh -c 'git clone -b 1.3.1 https://github.com/apache/incubator-mxnet.git && python /incubator-mxnet/example/image-classification/train_mnist.py --gpus 0'
That’s all, and my GPU-enabled job was running. It took me less than two minutes to go from zero to having the job submitted. This is the log of my job, from which I removed the iterations from epoch 1 to 18 to make it shorter:
14:32:31     Cloning into 'incubator-mxnet'...

14:33:50     Note: checking out '19c501680183237d52a862e6ae1dc4ddc296305b'.

14:33:51     INFO:root:start with arguments Namespace(add_stn=False, batch_size=64, disp_batches=100, dtype='float32', gc_threshold=0.5, gc_type='none', gpus='0', initializer='default', kv_store='device', load_epoch=None, loss='', lr=0.05, lr_factor=0.1, lr_step_epochs='10', macrobatch_size=0, model_prefix=None, mom=0.9, monitor=0, network='mlp', num_classes=10, num_epochs=20, num_examples=60000, num_layers=No

14:33:51     DEBUG:urllib3.connectionpool:Starting new HTTP connection (1): yann.lecun.com:80

14:33:54     DEBUG:urllib3.connectionpool:http://yann.lecun.com:80 "GET /exdb/mnist/train-labels-idx1-ubyte.gz HTTP/1.1" 200 28881

14:33:55     DEBUG:urllib3.connectionpool:Starting new HTTP connection (1): yann.lecun.com:80

14:33:55     DEBUG:urllib3.connectionpool:http://yann.lecun.com:80 "GET /exdb/mnist/train-images-idx3-ubyte.gz HTTP/1.1" 200 9912422

14:33:59     DEBUG:urllib3.connectionpool:Starting new HTTP connection (1): yann.lecun.com:80

14:33:59     DEBUG:urllib3.connectionpool:http://yann.lecun.com:80 "GET /exdb/mnist/t10k-labels-idx1-ubyte.gz HTTP/1.1" 200 4542

14:33:59     DEBUG:urllib3.connectionpool:Starting new HTTP connection (1): yann.lecun.com:80

14:34:00     DEBUG:urllib3.connectionpool:http://yann.lecun.com:80 "GET /exdb/mnist/t10k-images-idx3-ubyte.gz HTTP/1.1" 200 1648877

14:34:04     INFO:root:Epoch[0] Batch [0-100] Speed: 37038.30 samples/sec accuracy=0.793472

14:34:04     INFO:root:Epoch[0] Batch [100-200] Speed: 36457.89 samples/sec accuracy=0.906719

14:34:04     INFO:root:Epoch[0] Batch [200-300] Speed: 36981.20 samples/sec accuracy=0.927500

14:34:04     INFO:root:Epoch[0] Batch [300-400] Speed: 36925.04 samples/sec accuracy=0.935156

14:34:04     INFO:root:Epoch[0] Batch [400-500] Speed: 37262.36 samples/sec accuracy=0.940156

14:34:05     INFO:root:Epoch[0] Batch [500-600] Speed: 37729.64 samples/sec accuracy=0.942813

14:34:05     INFO:root:Epoch[0] Batch [600-700] Speed: 37493.55 samples/sec accuracy=0.949063

14:34:05     INFO:root:Epoch[0] Batch [700-800] Speed: 37320.80 samples/sec accuracy=0.953906

14:34:05     INFO:root:Epoch[0] Batch [800-900] Speed: 37705.85 samples/sec accuracy=0.958281

14:34:05     INFO:root:Epoch[0] Train-accuracy=0.924024

14:34:05     INFO:root:Epoch[0] Time cost=1.633

...  LOGS REMOVED

14:34:44     INFO:root:Epoch[19] Batch [0-100] Speed: 36864.44 samples/sec accuracy=0.999691

14:34:44     INFO:root:Epoch[19] Batch [100-200] Speed: 37088.35 samples/sec accuracy=1.000000

14:34:44     INFO:root:Epoch[19] Batch [200-300] Speed: 36706.91 samples/sec accuracy=0.999687

14:34:44     INFO:root:Epoch[19] Batch [300-400] Speed: 37941.19 samples/sec accuracy=0.999687

14:34:44     INFO:root:Epoch[19] Batch [400-500] Speed: 37180.97 samples/sec accuracy=0.999844

14:34:44     INFO:root:Epoch[19] Batch [500-600] Speed: 37122.30 samples/sec accuracy=0.999844

14:34:45     INFO:root:Epoch[19] Batch [600-700] Speed: 37199.37 samples/sec accuracy=0.999687

14:34:45     INFO:root:Epoch[19] Batch [700-800] Speed: 37284.93 samples/sec accuracy=0.999219

14:34:45     INFO:root:Epoch[19] Batch [800-900] Speed: 36996.80 samples/sec accuracy=0.999844

14:34:45     INFO:root:Epoch[19] Train-accuracy=0.999733

14:34:45     INFO:root:Epoch[19] Time cost=1.617

14:34:45     INFO:root:Epoch[19] Validation-accuracy=0.983579
Summary
As you can see, after AWS Batch launched the instance, the job took slightly more than two minutes to run. I spent roughly five minutes from start to finish. That was much faster than the time that I was previously spending just to configure the AMI. Using the AWS CLI, one of the AWS SDKs, or AWS CloudFormation, the same environment could be created even faster.
From a training point of view, I lost on the validation accuracy, as the results obtained using the LeNet CNN are higher than when using an MLP network. On the other hand, my job was faster, with a time cost of 1.6 seconds in average for each epoch. As the software stack evolves, and increased hardware capabilities come along, these numbers keep improving, but that shouldn’t mean extra complexity. Using managed primitives like the one presented in this post enables a simpler implementation.
I encourage you to test this example and see for yourself how just a few clicks or commands lets you start running GPU jobs with AWS Batch. Then, it is just a matter of replacing the Docker image that I used for one with the framework of your choice, TensorFlow, Caffe, PyTorch, Keras, etc. Start to run your GPU-enabled machine learning, deep learning, computational fluid dynamics (CFD), seismic analysis, molecular modeling, genomics, or computational finance workloads. It’s faster and easier than ever.
If you decide to give it a try, have any doubt or just want to let me know what you think about this post, please write in the comments section!