AWS Contact Center
Automatically evaluate agent interactions using Amazon Connect APIs
Introduction
Contact center managers are frequently challenged with accurately identifying coaching needs for agents in order to improve agent-customer interactions. In order to address this issue, Amazon Connect provides set of a set of performance evaluation capabilities that allow automating both form creation and evaluation processes to further reduce manual processes required in evaluating agents. Additionally, Amazon Connect also includes public API’s for technical evaluation capabilities now allow automating both form creation and evaluation processes to further reduce manual processes required to evaluate agents.
Using these APIs allows incorporating data from external sources, that reflects other aspects of agent performance, into the agent evaluation process. They can thus be used to supplement performance insights with information retrieved from systems which are external to Amazon Connect. This blog post describes how these APIs may be used.
Overview
We use the following scenario to demonstrate API (Application Programming Interface) usage:
- AnyCompany is an auto insurance company and has 1000+ agents across their contact centers, who routinely handle customer contacts for policy services. The company requires their agents to follow company policies and maintain a positive sentiment throughout customer service calls.
- Consequently, contact center supervisors are required to periodically evaluate agent performance to ensure they are adhering to company policy. In order to evaluate agent performance, the supervisors have to listen to agent-customer calls, read chat transcripts and use an electronic form to answer questions about the agents’ performance during a phone call or chat interaction.
- However, due to the large number of calls and the large number of agents, the number of evaluations conducted are too low to drive meaningful insights and improve an agents’ performance. AnyCompany therefore needs a system to automatically evaluate these agents, and display the results of this evaluation to supervisors without them having to listen to calls or read call transcriptions.
In this blog post, we will walk through a solution that programmatically creates an electronic evaluation form and evaluates agent performance against the form by using API’s that were recently released by Amazon Connect. The diagrams and steps noted below demonstrate the workflow this post follows (FIG 1 and FIG 2).
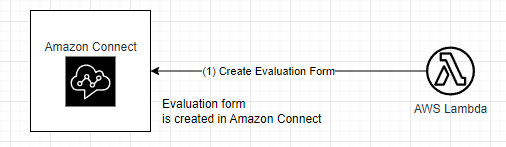
FIG 1: Create an evaluation form via the API
Step 1: Leverage the API’s to build an evaluation form and store it within Amazon Connect. This workflow is shown in FIG 1 above. The customer interaction for this workflow is shown in FIG 2 below.
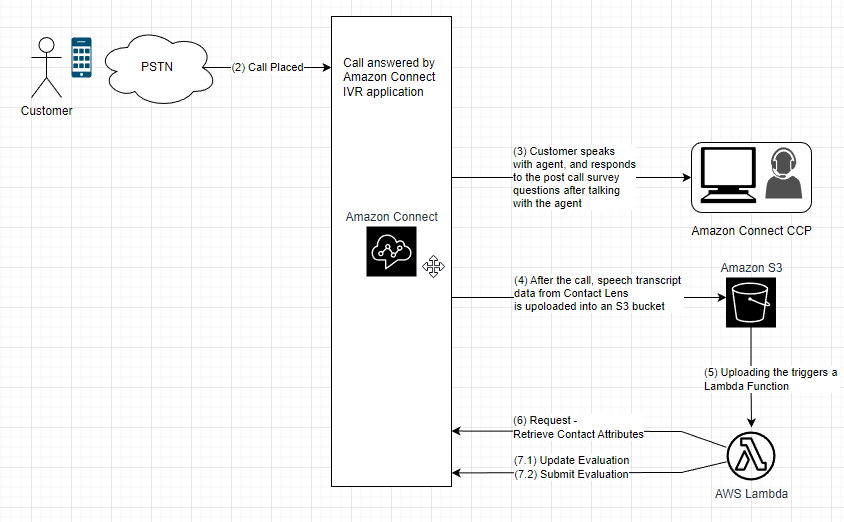
FIG 2: High level diagram demonstrating customer interaction.
Step 2: A caller calls to obtain service on their existing auto insurance policy
Step 3: Caller speaks with the agent, after the transaction is complete and the agent hangs up the phone call, the caller takes a post call survey option and responds to the survey questions. The responses are captured as Contact Attributes and are stored in the Contact Trace Record for that call
Step 4: Amazon Connect automatically uploads the speech transcript from this call to an S3 bucket
Step 5: Uploading the transcript file triggers a Lambda function
Step 6: The Lambda function extracts the survey score from the contact attributes. It also extracts the sentiment from the transcript file
Step 7.1: The Lambda Function updates the evaluation form questions with responses to the survey question and the sentiment score of the call
Step 7.2: The Lambda function submits the evaluation for this call
Prerequisites
For this walkthrough, it is assumed that you understand and have access to the following resources:
- An AWS account
- An Amazon Connect instance
- A phone number claimed in your Amazon Connect instance
- AWS IAM to create policies and roles
- Amazon S3 to create buckets
- AWS CloudFormation to run the stack
- Amazon Connect Contact Lens
Deploy the solution
Note: We use a set of nested CloudFormation templates (CFT) for this post. The main CFT automatically calls three other dependent CFT’s to complete the deployment.
Overview of the steps: The solution deployment consists of the following two steps:
- Deploy the CloudFormation stack from here
- Exercise the functionality: Placing test calls and observing the results
Deploy the CloudFormation stack
Step 1: Log in to your AWS Management Console
Step 2: Deploy the CloudFormation stack.
Step 2.1: Go to CloudFormation → Stacks → Create stack → With new resources (standard) (See FIG 3 below)
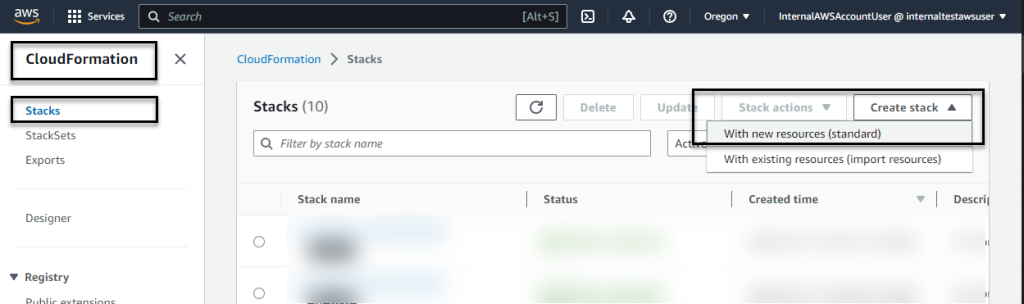
FIG 3: Launching CloudFormation
Step 2.2: Enter a unique stack name for e.g. create-ef-assets (see FIG 4 below):
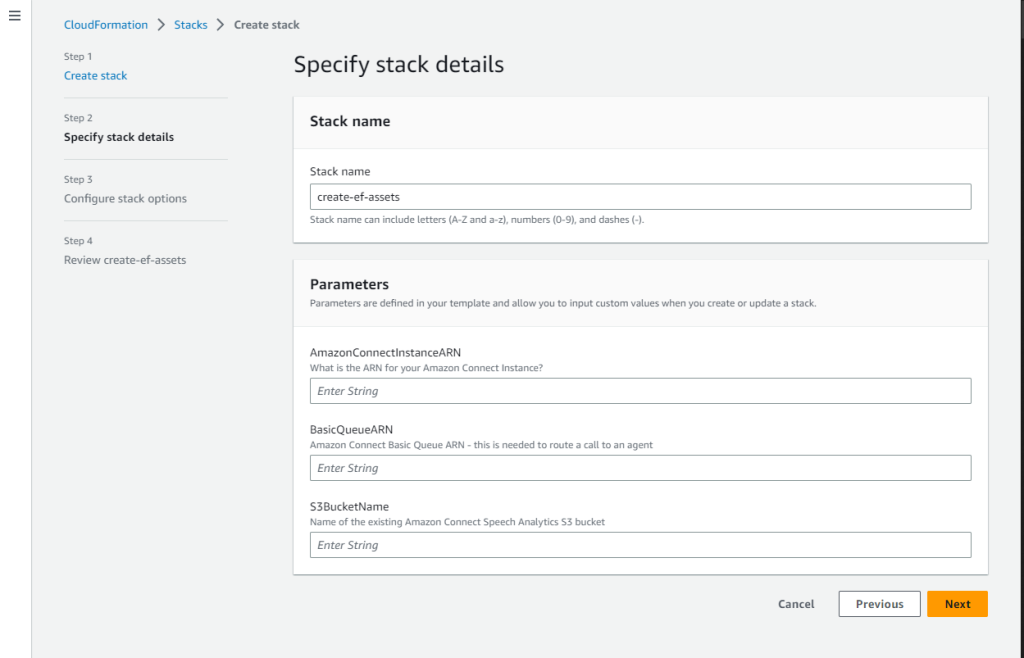
FIG 4: Input parameters for CloudFormation
The parameters ‘AmazonConnectInstanceARN’ and ‘BasicQueueARN’ need to be copied from your Amazon Connect instance. The steps below walk through how these can be retrieved:
Step 2.3: AmazonConnectInstanceARN: See here on how the ARN for an Amazon Connect instance can be retrieved. Copy the ARN, paste it in the CloudFormation form as shown in shown in FIG 5 below.
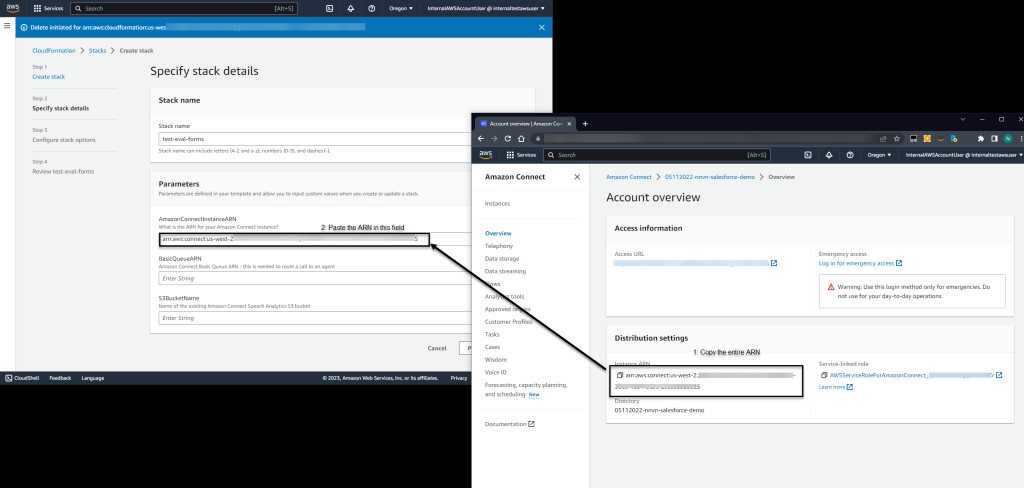
FIG 5: Amazon Connect Instance ARN
Step 2.4: BasicQueueARN: Refer FIG 6 below how to retrieve a Queue’s ARN from your Amazon Connect console. If you don’t have a Queue setup in Amazon Connect, see here on how to setup queues. ‘Basic Queue’ is created by default when an Amazon Connect instance is created. The sample flows installed for this blog uses this queue to illustrate API usage. Once you have a queue setup, copy that queue’s ARN and paste it in the CloudFormation form as shown in FIG 6 below.
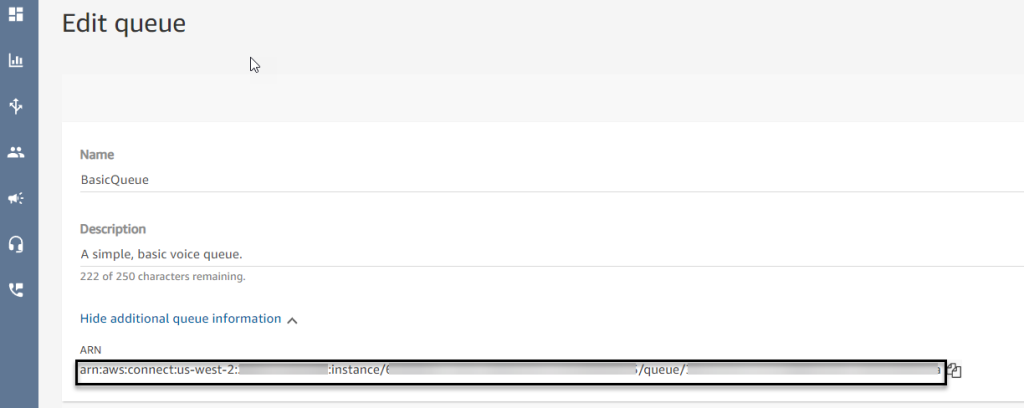
FIG 6: Retrieve a Queue ARN
Step 2.5: S3BucketName: Name of S3 bucket where call recordings are stored. Navigate to the instance page as shown here. The S3 bucket for storing call recordings is listed under ‘Data storage’ → ‘Call recordings’ (See FIG 7 below). Only the bucket name is required for this field – for example, amazon-connect-beXXXXXXXXXX (refer FIG 7 below, everything before the first “/” is part of the S3 bucket name and must be provided as input to the CloudFormation template).
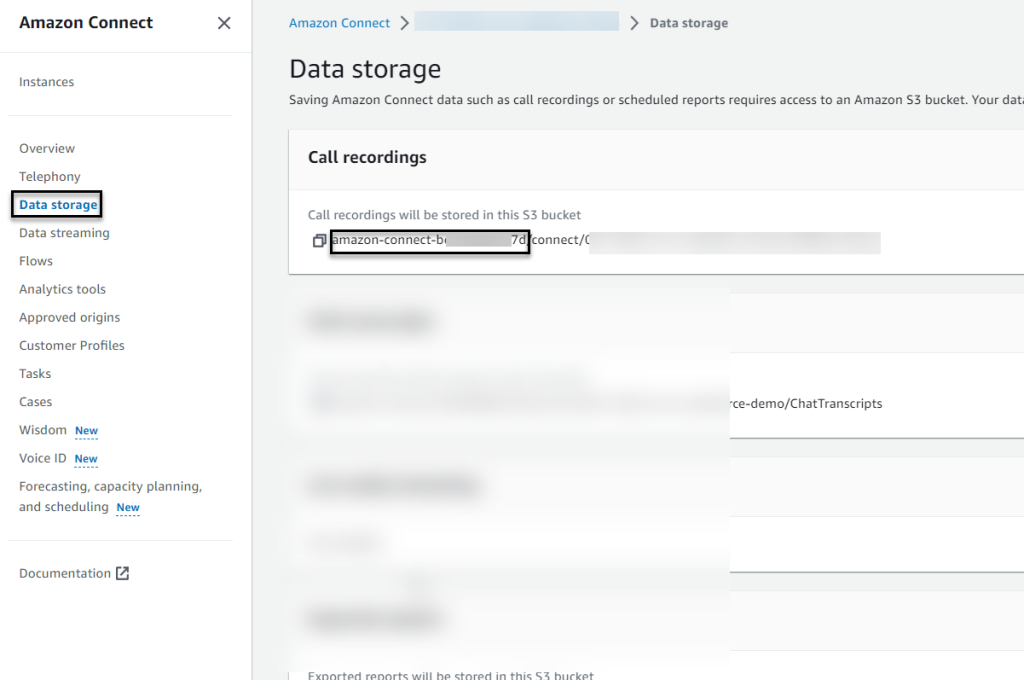
FIG 7: Call Recording S3 Bucket
See FIG 8 on where this needs to be pasted in the CloudFormation template
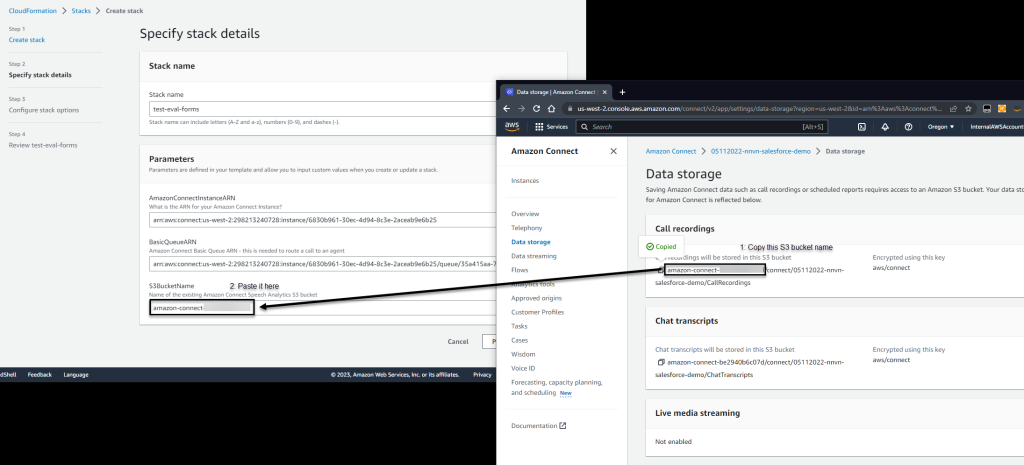
FIG 8: Paste S3 bucket name in the CloudFormation input field
Step 3: Click ‘Next’, followed by ‘Next’ again, in the next page
Step 4: Scroll to the bottom of the next page
Step 4.1: Check the box for “I acknowledge that AWS CloudFormation might create IAM resources.”
Step 4.2: Check the box for “I acknowledge that AWS CloudFormation might require the following capability: CAPABILITY_AUTO_EXPAND”
Step 4.3: Click ‘Submit’
Step 5: The AWS CloudFormation template may take 5-10 minutes to create all the resources. Once done, it will show the status as CREATE_COMPLETE.
NOTE:
This is a nested CloudFormation template. The main stack relies on 3 other stacks. FIG 9 below shows the resources that are created by each of these stacks. You only need to execute the base stack (install_ef_api_assets.yml). The other stacks are automatically invoked by the base stack.
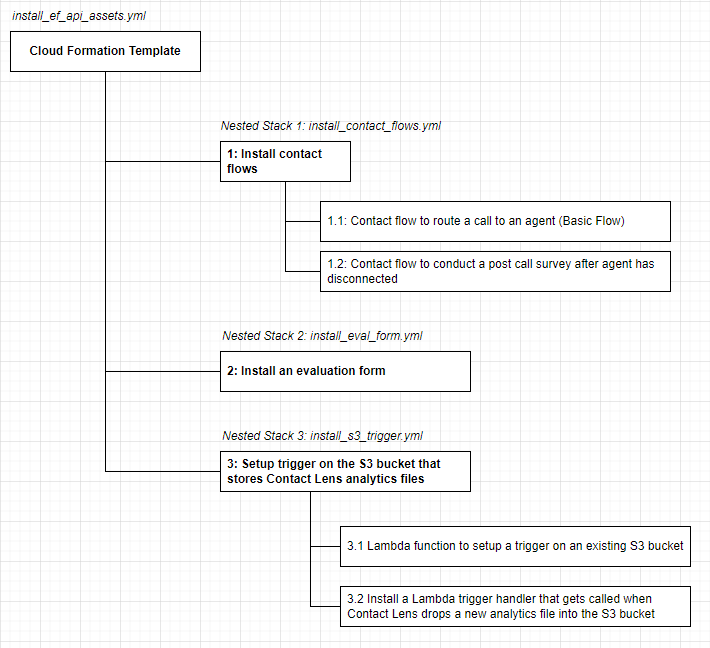
FIG 9: Assets installed by the Cloud Formation Template
Step 6: This blog post relies on Amazon Connect Contact Lens. Login to your Amazon Connect instance and ensure Contact Lens is enabled (see FIG 10 below)
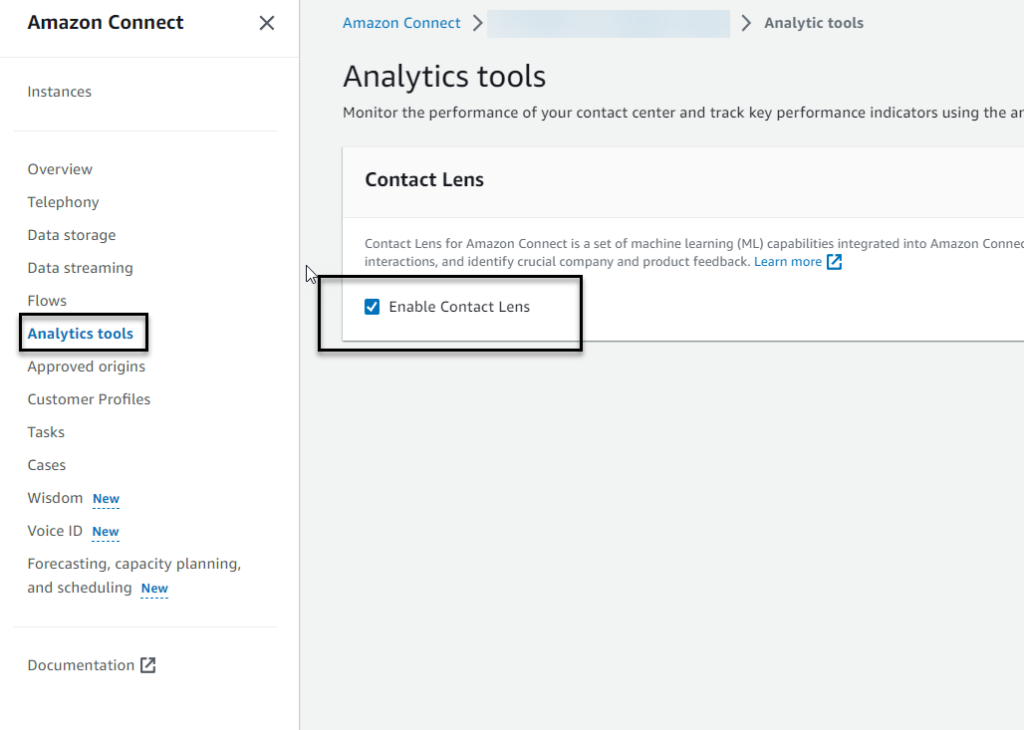
FIG 10: Enable Contact Lens
Exercise the functionality
This section provides a walkthrough of the assets deployed by the CloudFormation template followed by testing and validating the results.
Assets deployed by the CloudFormation template
Asset 1: The evaluation form:
Step 1: Navigate to Evaluation forms within the console, and locate the from that has been created by the CloudFormation template (see FIG 11 and FIG 12 below)
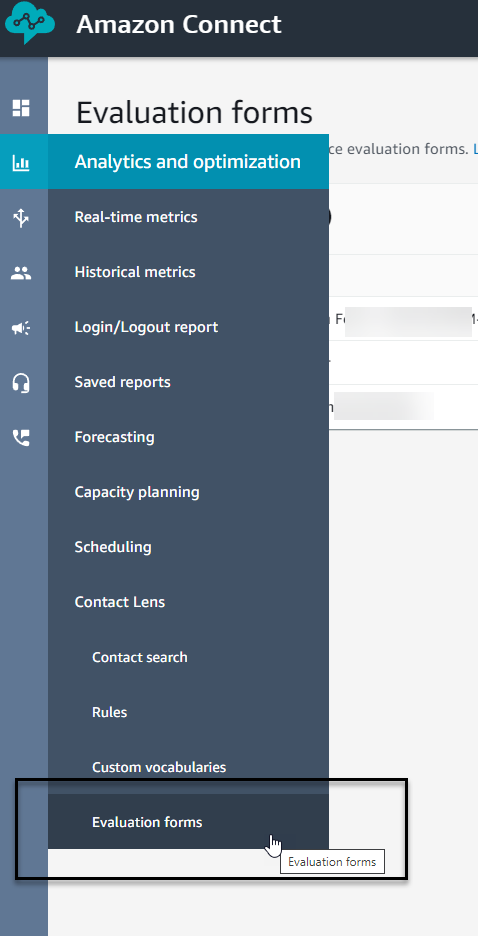
FIG 11: Evaluation form placement within Amazon Connect console menu system
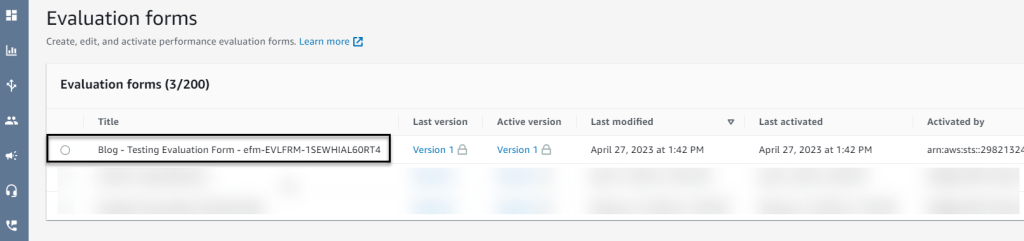
FIG 12: Evaluation form template that was automatically created
Step 2: Open the evaluation form by clicking on ‘Version 1’ to examine the questions that were created (See FIG 13 below)
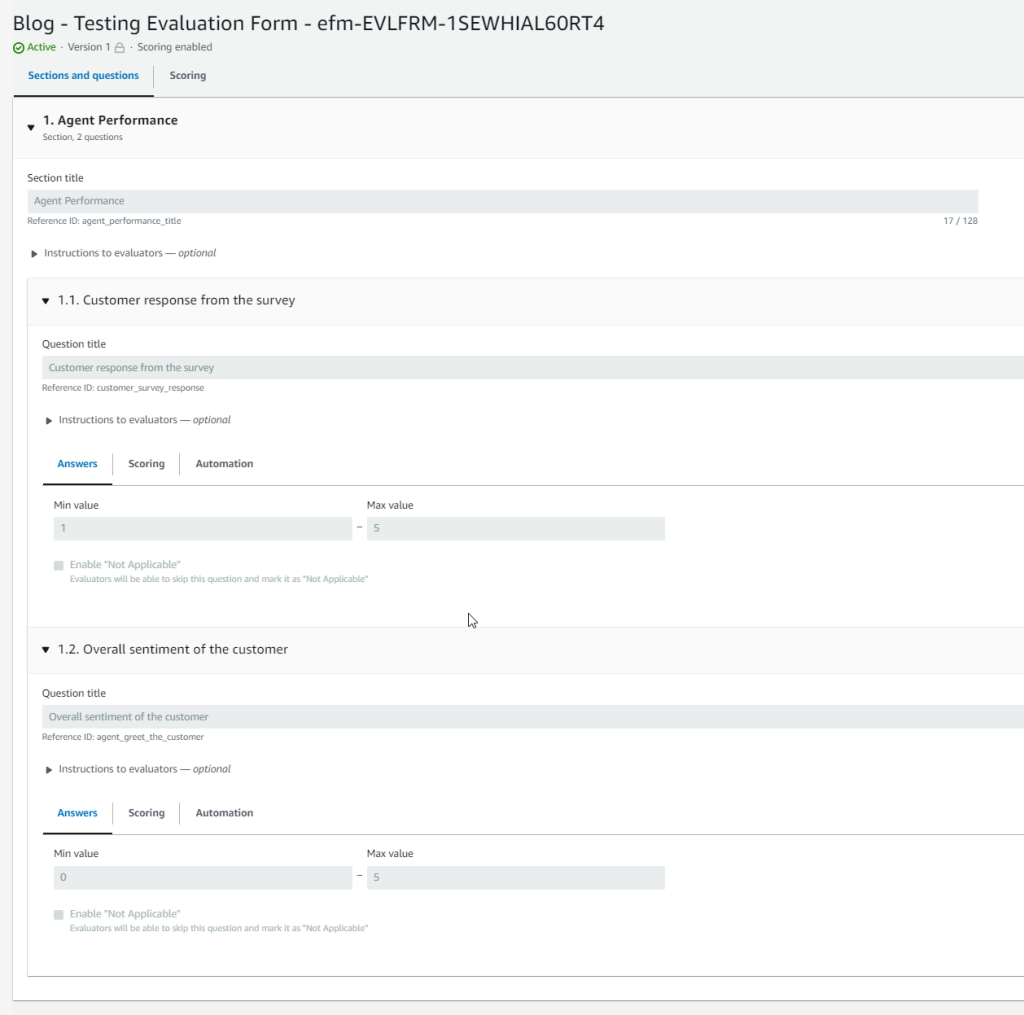
FIG 13: Evaluation form that was created via the API
Asset 2: The contact flows
Navigate to the ‘Flows’ section and view the two flows that were created by the template (FIG 14)
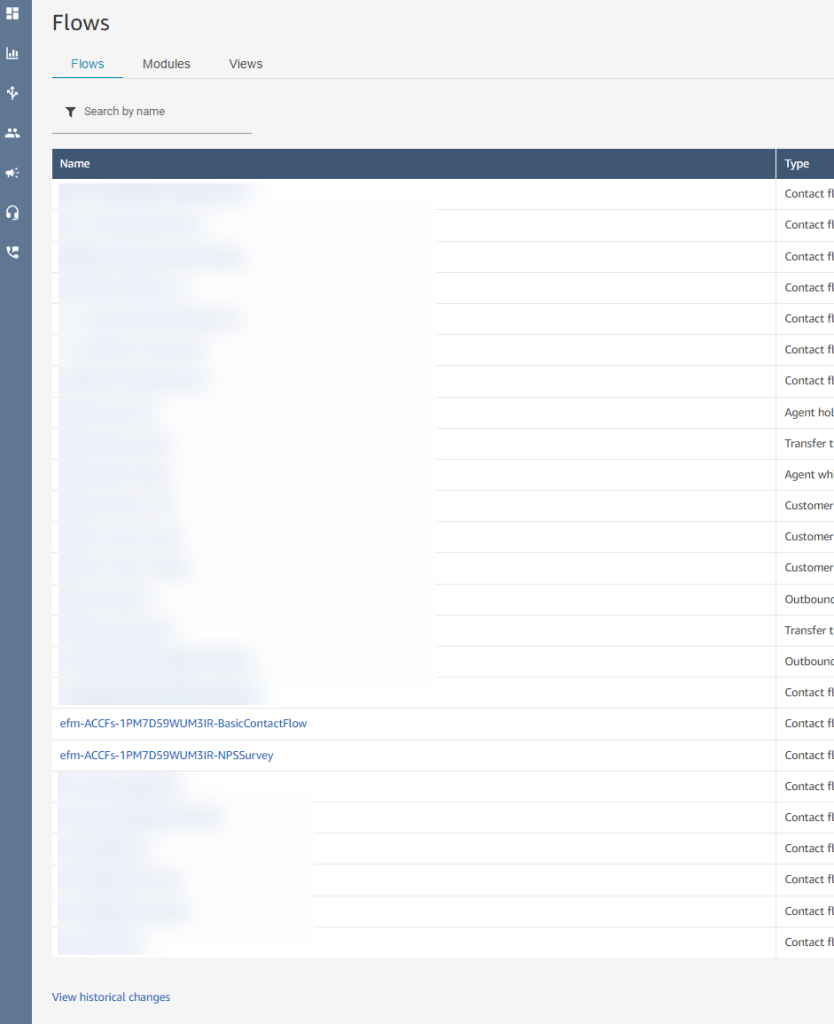
FIG 14: The two flows created by the template
Testing and validating the results
The following steps outline how the solution can be tested.
Step 1: Assign a phone number to the contact flow that ends with BasicContactFlow as shown here
Step 2: Create a user, assign them to Basic Queue as shown here
Step 3: Login an agent into a Contact Control Panel as shown here
Step 4: Place a phone call as a Customer using the phone number in step (1) above, and answer the call as an agent via the CCP. Continue conversation for at least 45-50 seconds. Follow the steps below after this.
Step 5: Agent: Hang up the call and go back to Available
Step 6: Customer: Continue on the call. You will hear survey messaging: “How did we perform, on a scale of one to five. One being bad and five being amazing.”
Step 7: Press a number between 1 and 5 on their phone keypad – for example, “3”
Step 8: System responds with “Thank you for rating us 3. Good bye.” and disconnects the call.
Step 9: Wait 1-3 minutes and navigate to Contact Search as shown here and search for the phone call you placed (FIG 11), open the call to view details
Step 10: The Contact details page shows that the contact was evaluated and the evaluation was submitted automatically – see FIG 15-a and FIG 15-b. It also shows a score assigned to the evaluation (10% in this case, shown in FIG 15-c below)
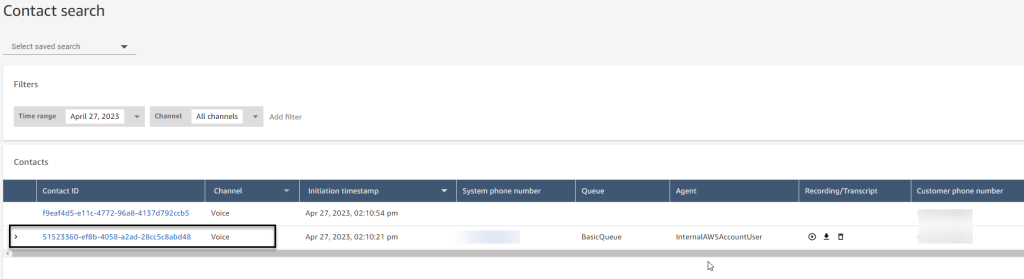
FIG 15-a: Contact Search Screen
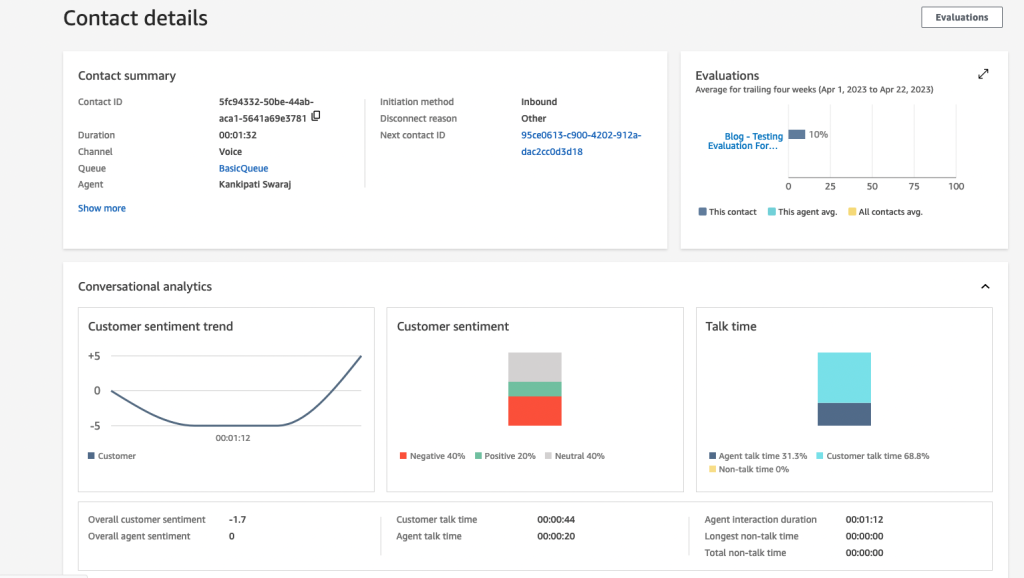
FIG 15-b: Contact Details, showing automatic evaluation results
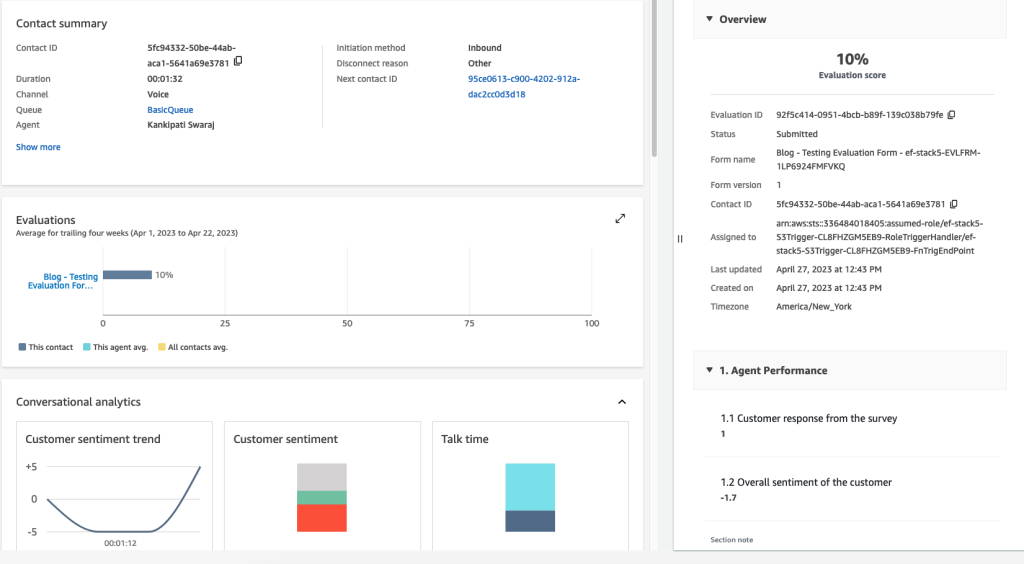
FIG 15-c: Automatic evaluation – details
API calling sequence
Once a contact has ended, the following diagram (FIG 16) shows the sequence in which the evaluation form API’s are invoked.
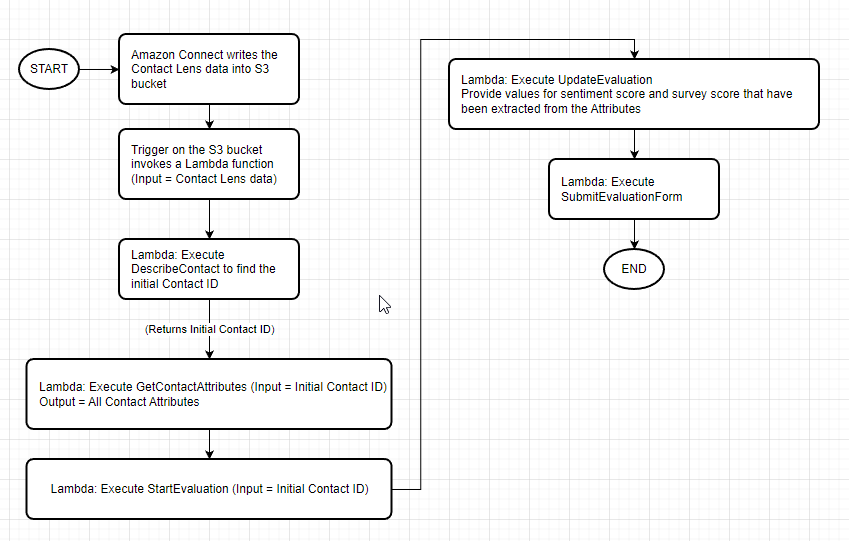
FIG 16: API invocation sequence
Cleanup
There is a cost associated with evaluating contacts via evaluation forms. Additionally, there is also a cost associated with receiving phone calls and Contact Lens. Amazon Connect pricing is noted here. To avoid incurring future charges:
Step 1: Disassociate the phone number from the contact flow.
Step 2: Navigate to ‘View phone numbers’ from the console (FIG 17)

FIG 17: View phone numbers
Step 3: Select the phone number you acquired for this test (FIG 18)
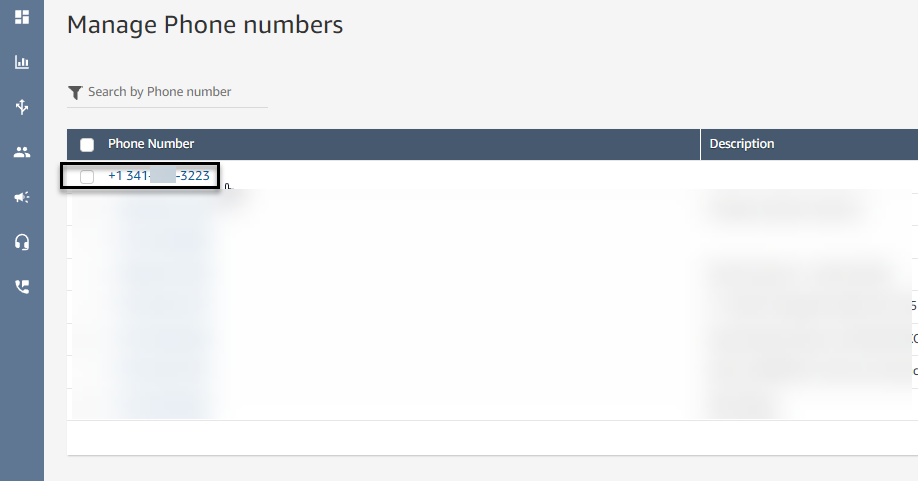
FIG 18: Select phone number
Step 4: Disassociate the phone number from the contact flow by clicking on the ‘x’ next to the contact flow (FIG 19) and click Save
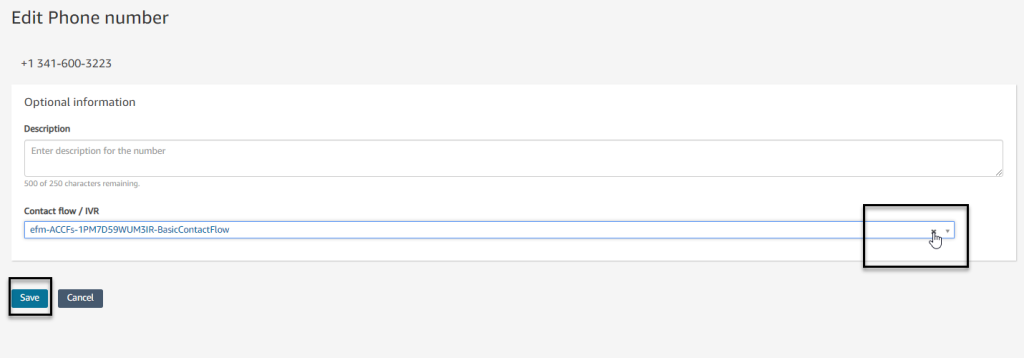
FIG 19: Disassociate phone number from contact flow
Step 5: Remove all created resources by deleting the AWS CloudFormation stack.
Conclusion
Scoring and evaluations are an integral part of contact center operations to manage agent quality. This blog post demonstrated an example of how you can use Amazon Connect API’s create evaluation forms, evaluate contacts and submit the evaluation. The full list of Evaluation From API’s are located here.