Containers
Amazon Elastic Beanstalk introduces support for shared load balancers
AWS customers love using managed services because they can offload the undifferentiated heavy lifting associated with deploying applications while they focus on innovating to support their business. Throughout the years, this is why so many customers have opted to use Amazon Elastic Beanstalk to deploy their software artifacts. Customers can pick a runtime environment, point to their software, and Elastic Beanstalk will deploy the required infrastructure components, including databases if required, to run the application adhering to known best practices. You can have multiple Elastic Beanstalk environments per Elastic Beanstalk application, and each environment is completely independent from each other. This is helpful if you need to create classic patterns with test, staging, and production deployments for your application, or if your application is comprised of multiple distinct components.
When creating an environment, customers can leverage the default “single instance” Elastic Beanstalk configuration, which is often good enough for test deployments, or they can pick specific configuration options. For example, they can pick a “high availability” configuration that deploys their Elastic Beanstalk environment across multiple EC2 instances behind Elastic Load Balancing. This is typically suggested, if not required, to run production grade workloads.
Traditionally, load balancers are objects embedded into each Elastic Beanstalk environment, created and managed on the customer behalf. This is a visual representation of the common deployment model in Elastic Beanstalk:

While this has some benefits and will continue to be a viable option, Elastic Beanstalk customers have been very vocal about wanting more configuration flexibility, as well as a way to optimize costs across their Elastic Beanstalk applications and Elastic Beanstalk environments.
We listened; starting today, it is possible to share a single Application Load Balancer (ALB) across multiple Elastic Beanstalk applications and environments. This new feature has two significant advantages for our customers:
- Sharing a single ALB, instead of having a dedicated ALB per environment, enables customers to reduce their running costs.
- Sharing an entry-point (single ALB) into a monolithic application positions customers to more easily modernize code by breaking it into smaller code modules and configuring the shared ALB to route traffic properly across new microservices.
The routing is based on conditions you can set on the ALB and they can be configured as a combination of the Listener port, the Host header, and the Path. To learn more about all the configuration options, please refer to this page of the Elastic Beanstalk documentation.
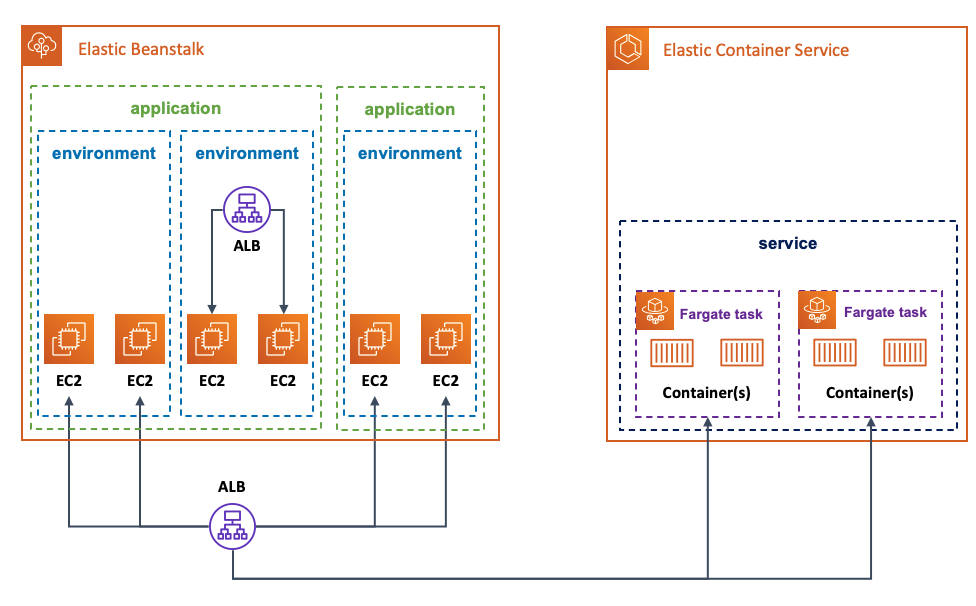
A convenient result of externalizing the ALB lifecycle from the Elastic Beanstalk environment is that, you can not only share the same ALB across multiple Elastic Beanstalk applications and Elastic Beanstalk environments, but you can share the same ALB across different AWS services, such as Amazon Elastic Container Services (ECS) and AWS Fargate, for example.
This is a visual representation of an example scenario that the new ALB sharing feature enables Elastic Beanstalk customers to implement:
With the high level theory set, we will now walk through a potential example that leverages this new feature. This example will be deployed in three phases. In the first phase, we deploy, on Elastic Beanstalk in a highly available setup, a fictitious monolithic Python application that exposes two API endpoints. All traffic hitting the load balancer will be spread across the two EC2 instances backing the application, which in turn, responds to the two API requests. In the second phase, we will break the monolith by implementing one of the APIs in a separate Ruby program, which will be running on ECS/Fargate. At this point, all traffic hitting the load balancer will be directed to the proper AWS service based on the API being requested. In the first and last phase, we will hint about how to tie the setup together with proper DNS and ALB rules configurations.
Below are the prerequisites to follow along:
- You need to have an active AWS account and proper credentials. If you don’t have an account, follow these instructions.
- You need to have both the latest AWS CLI and the latest Elastic Beanstalk CLI installed on a client. Follow these instructions for the AWS CLI and these instructions for the EB CLI.
- You need to have proper credentials configured for your AWS CLI.
- You need to have Docker installed to be able to create container images.
A couple of notes before we dive into the actual example.
The commands we use throughout the exercise will save some information (e.g. resources ARN) in system variables and print them on screen. Try to work from the same terminal session or at least take note of them because they become handy for the cleanup.
Also, what you see in this blog has been done in a development environment. The Elastic Beanstalk-related URL and endpoints you will see are different from what you will see in your own account.
Phase 1: deploy the monolithic application on Elastic Beanstalk
On the workstation that has been configured to satisfy the prerequisites above, create a dedicated folder to host the files you will be creating. This is the first file and represents the fictitious monolithic Python application. Call it monolith.py.
from flask import Flask
import random
import os

app = Flask(__name__)

@app.route('/')
def root():
    return 'This is the site root. Navigate to /city or /color'

@app.route('/city')
def city():
    cities = ["Milan", "Seattle", "Paris"]
    return random.choice(cities) + " [ this web service is powered by ELASTIC BEANSTALK ]"

@app.route('/color')
def color():
    color = ["Green", "White", "Red"]
    return random.choice(color) + " [ this web service is powered by ELASTIC BEANSTALK ]"

if __name__ == '__main__':
    app.run(debug=True, host='0.0.0.0')
As you can see, this application serves two distinct APIs (/city and /colors) that return a random city name and a random color, respectively. In addition, this application also informs us that these services are powered by Elastic Beanstalk so that you know, when you query the APIs, that the process is occurring on code running as an Elastic Beanstalk application.
The Python application needs specific packages to run. You need to create a requirements.txt file in the same folder with the following content:
-i https://pypi.org/simple
click==7.1.2; python_version >= '2.7' and python_version not in '3.0, 3.1, 3.2, 3.3, 3.4'
flask==1.1.2
gunicorn==20.0.4
itsdangerous==1.1.0; python_version >= '2.7' and python_version not in '3.0, 3.1, 3.2, 3.3'
jinja2==2.11.2; python_version >= '2.7' and python_version not in '3.0, 3.1, 3.2, 3.3, 3.4'
markupsafe==1.1.1; python_version >= '2.7' and python_version not in '3.0, 3.1, 3.2, 3.3'
werkzeug==1.0.1; python_version >= '2.7' and python_version not in '3.0, 3.1, 3.2, 3.3, 3.4'
Lastly, you need a Procfile file to start the application. Save a file called Procfile with this content in the same folder:
web: gunicorn --bind 127.0.0.1:8000 --workers=1 —threads=15 application:appYou are now ready to deploy the monolithic application as an Elastic Beanstalk environment. Usually you would just do this all from within the context of the EB CLI. However, given we want to use the new shared ALB feature, you need to create the ALB out of band first with the AWS CLI. Once you have done that, you can then hook the externally created ALB later when you deploy the Elastic Beanstalk environment.
You will leverage the default VPC for demonstration purposes. The first thing you need to do is to export, in your terminal, the values for the VPC ID, the subnets, and the Region you are using. You will be using these variables in the commands embedded in this blog:
export VPC_ID=<id of your VPC>
export PUBLIC_SUBNET1=<your first public subnet>
export PUBLIC_SUBNET2=<your second public subnet>
export AWS_REGION=<your region>
Now, you can create the security groups and the load balancer. Since you need to create a listener and you need to have at least a forward rule, you will configure this ALB to send everything hitting port 80 to a 503 page. Also, take note of the ARN of the ALB, you will use it later.
MYAPP_SG=$(aws ec2 create-security-group --group-name my-app-SG --description "My app SG" --vpc-id $VPC_ID --region $AWS_REGION)
MYAPP_SG_ID=$(echo $MYAPP_SG | jq --raw-output .GroupId)
aws ec2 authorize-security-group-ingress --group-id $MYAPP_SG_ID --protocol tcp --port 80 --cidr 0.0.0.0/0 --region $AWS_REGION

LOAD_BALANCER=$(aws elbv2 create-load-balancer --name my-app-LB --subnets $PUBLIC_SUBNET1 $PUBLIC_SUBNET2 --security-groups $MYAPP_SG_ID --region $AWS_REGION)
LOAD_BALANCER_ARN=$(echo $LOAD_BALANCER | jq --raw-output .LoadBalancers[0].LoadBalancerArn)
echo The LOAD_BALANCER_ARN is: $LOAD_BALANCER_ARN
LOAD_BALANCER_LISTENER=$(aws elbv2 create-listener --load-balancer-arn $LOAD_BALANCER_ARN --protocol HTTP --port 80 --default-actions Type=fixed-response,FixedResponseConfig={StatusCode=503} --region $AWS_REGION)
LOAD_BALANCER_LISTENER_ARN=$(echo $LOAD_BALANCER_LISTENER | jq --raw-output .Listeners[0].ListenerArn)
echo The LOAD_BALANCER_LISTENER_ARN is: $LOAD_BALANCER_LISTENER_ARN
You can check on the AWS console (in the EC2 section) that the ALB has been properly created.
You are now ready to dive into the Elastic Beanstalk world and deploy the monolithic Python application. From the same directory where you have the application files, run the following command to create the definition of the Elastic Beanstalk application monolith:
sh-4.2$ eb init -p "Python 3.7 running on 64bit Amazon Linux 2" monolith --region $AWS_REGION
Application monolith has been created.
Now, you can run the the eb create command to create an Elastic Beanstalk environment. This is going to be an interactive command where you will have to answer some questions (for this test you can keep all defaults provided). The snippet below is a snapshot of my terminal after going through the interaction. Note how I opted to use application as a load balancer type and then opted to visualize externally created ALBs. The EB CLI proposed that I used the ALB created in the step above and I accepted the default. If you have more than one ALB in your account, make sure you pick the right ARN:
sh-4.2$ eb create
Enter Environment Name
(default is monolith-dev):
Enter DNS CNAME prefix
(default is monolith-dev):

Select a load balancer type
1) classic
2) application
3) network
(default is 2):

Your account has one or more sharable load balancers. Would you like your new environment to use a shared load balancer? (y/N): y
Select a shared load balancer
1) my-app-LB - arn:aws:elasticloadbalancing:us-east-1:693935722839:loadbalancer/app/my-app-LB/bef77b110db48304
(default is 1):


Would you like to enable Spot Fleet requests for this environment? (y/N): N
Creating application version archive "app-200829_154354".
Uploading monolith/app-200829_154354.zip to S3. This may take a while.
Upload Complete.
Environment details for: monolith-dev
  Application name: monolith
  Region: us-east-1
  Deployed Version: app-200829_154354
  Environment ID: e-mpjbdaazsf
  Platform: arn:aws:elasticbeanstalk:us-east-1::platform/Python 3.7 running on 64bit Amazon Linux 2/3.1.0
  Tier: WebServer-Standard-1.0
  CNAME: monolith-dev.devo-2.elasticbeanstalk-internal.com
  Updated: 2020-08-29 15:43:57.346000+00:00
Printing Status:
2020-08-29 15:43:55    INFO    createEnvironment is starting.
2020-08-29 15:43:57    INFO    Using elasticbeanstalk-us-east-1-693935722839 as Amazon S3 storage bucket for environment data.
2020-08-29 15:44:03    INFO    Created security group named: awseb-AWSEBManagedLBSecurityGroup-tmeeg2x4pt.
2020-08-29 15:44:21    INFO    Created target group named: arn:aws:elasticloadbalancing:us-east-1:693935722839:targetgroup/eb-dv-monolith-default-3eivp/63a243afe94b7fc4
2020-08-29 15:44:21    INFO    Created security group named: eb-dv-e-mpjbdaazsf-stack-AWSEBSecurityGroup-1JP8NJJ7N2Q9F
2020-08-29 15:44:37    INFO    Created Auto Scaling launch configuration named: eb-dv-e-mpjbdaazsf-stack-AWSEBAutoScalingLaunchConfiguration-5RYEQKJJM1WZ
2020-08-29 15:44:38    INFO    Created Load Balancer listener rule named: arn:aws:elasticloadbalancing:us-east-1:693935722839:listener-rule/app/my-app-LB/bef77b110db48304/391b4f1619a89bc9/cec17c4d60363275
2020-08-29 15:45:25    INFO    Created Auto Scaling group named: eb-dv-e-mpjbdaazsf-stack-AWSEBAutoScalingGroup-LJ0E0P948C4W
2020-08-29 15:45:25    INFO    Waiting for EC2 instances to launch. This may take a few minutes.
2020-08-29 15:45:40    INFO    Created Auto Scaling group policy named: arn:aws:autoscaling:us-east-1:693935722839:scalingPolicy:8fec2b58-5a38-463d-bced-300083365a28:autoScalingGroupName/eb-dv-e-mpjbdaazsf-stack-AWSEBAutoScalingGroup-LJ0E0P948C4W:policyName/eb-dv-e-mpjbdaazsf-stack-AWSEBAutoScalingScaleUpPolicy-BLYM6BUB8KUV
2020-08-29 15:45:40    INFO    Created Auto Scaling group policy named: arn:aws:autoscaling:us-east-1:693935722839:scalingPolicy:a2de79c3-b6ba-49e0-a6dc-78d626921ca5:autoScalingGroupName/eb-dv-e-mpjbdaazsf-stack-AWSEBAutoScalingGroup-LJ0E0P948C4W:policyName/eb-dv-e-mpjbdaazsf-stack-AWSEBAutoScalingScaleDownPolicy-ONFC663PZRZB
2020-08-29 15:45:40    INFO    Created CloudWatch alarm named: eb-dv-e-mpjbdaazsf-stack-AWSEBCloudwatchAlarmLow-1U68UA8AQI419
2020-08-29 15:45:40    INFO    Created CloudWatch alarm named: eb-dv-e-mpjbdaazsf-stack-AWSEBCloudwatchAlarmHigh-YRBQE7LB7LMX
2020-08-29 15:45:46    INFO    Instance deployment successfully used commands in the 'Procfile' to start your application.
2020-08-29 15:45:48    INFO    Instance deployment completed successfully.
2020-08-29 15:46:04    INFO    Successfully launched environment: monolith-dev

sh-4.2$
As you can see from the Elastic Beanstalk console, our environment is up and running. Note the URL on the top-left of the image below: behind the scenes, Elastic Beanstalk has created a “Host header” rule on the ALB. This configuration intercepts all requests made to the monolith-dev.devo-2.elasticbeanstalk-internal.com host name and forwards them to the target group that has registered the EC2 instances running our monolithic Python program:

Once your monolith application environment is up and running on Elastic Beanstalk, you can start querying the two APIs using that URL:
sh-4.2$ for i in {1..5}; do curl monolith-dev.devo-2.elasticbeanstalk-internal.com/city && echo; done

Paris [ this web service is powered by ELASTIC BEANSTALK ]
Milan [ this web service is powered by ELASTIC BEANSTALK ]
Milan [ this web service is powered by ELASTIC BEANSTALK ]
Milan [ this web service is powered by ELASTIC BEANSTALK ]
Seattle [ this web service is powered by ELASTIC BEANSTALK ]

sh-4.2$ for i in {1..5}; do curl monolith-dev.devo-2.elasticbeanstalk-internal.com/color && echo; done
Green [ this web service is powered by ELASTIC BEANSTALK ]
White [ this web service is powered by ELASTIC BEANSTALK ]
Red [ this web service is powered by ELASTIC BEANSTALK ]
White [ this web service is powered by ELASTIC BEANSTALK ]
Green [ this web service is powered by ELASTIC BEANSTALK ]
Note how they all consistently report that [ this web service is powered by ELASTICBEANSTALK ].
This concludes the first deployment phase. Below is a graphical summary of what you have implemented:

Phase 2: extract one of the two API endpoints and redeploy it on ECS/Fargate
Now that you have an Elastic Beanstalk environment that is serving both APIs via an externally created shared ALB, you will mimic how to extract part of that code and deploy it somewhere else, while maintaining the same user experience. As we discussed previously, the external ALB pattern would allow us to run this separate code as a separate Elastic Beanstalk environment of the same application. We will go a step further in our scenario and make it run as an ECS service on Fargate.
In the true spirit of this being a completely separate microservice, we will be rewriting one of the two APIs in Ruby using the Sinatra framework. Create another dedicated folder on your workstation to host this new project. With your editor of choice, create a file called colors.rb and paste this content:
require 'sinatra'

get '/color' do
  color = ["Green", "White", "Red"]
  color.sample + " [ this web service is powered by ECS / Fargate ]"
end
As you can see, this is the exact same logic that existed before in the monolithic.py file for the /colors API. Similarly to the Python application, this code also informs us that “this web service is powered by ECS / Fargate” so you know what AWS service is actually backing the /colors API endpoint.
Because this code needs to be run as a containerized application on ECS, you also need a Dockerfile to create the container image. In the same folder create a Dockerfile with this content:
FROM bitnami/ruby:2.4.2-r1
WORKDIR /app
COPY . /app
RUN gem install sinatra --no-ri --no-rdoc
WORKDIR /
EXPOSE 4567
CMD ["ruby", "/app/colors.rb", "-o", "0.0.0.0"]
You are now ready to:
- create an ECR repository called
colors-module. - build the image.
- push the container image to the ECR repository.
ECR_COLORS_MODULE_REPO=$(aws ecr create-repository --repository-name colors-module --region $AWS_REGION)
ECR_COLORS_MODULE_REPO_URI=$(echo $ECR_COLORS_MODULE_REPO | jq --raw-output .repository.repositoryUri)
echo The ECR_COLORS_MODULE_REPO_URI is: $ECR_COLORS_MODULE_REPO_URI
docker build -t $ECR_COLORS_MODULE_REPO_URI:1.0 .
echo $(aws ecr get-login-password --region $AWS_REGION) | docker login --password-stdin --username AWS $ECR_COLORS_MODULE_REPO_URI
docker push $ECR_COLORS_MODULE_REPO_URI:1.0
Take note of the value of ECR_COLORS_MODULE_REPO_URI because you will need it later.
You now need to create an IAM policy document that allows the tasks to assume an execution role. Create a policy document called ecs-tasks-trust-policy.json and add the following content:
{
  "Version": "2012-10-17",
  "Statement": [
    {
      "Effect": "Allow",
      "Principal": {
        "Service": [
          "ecs-tasks.amazonaws.com"
        ]
      },
      "Action": "sts:AssumeRole"
    }
  ]
}
Now you can create a task definition called colors-module.json with the following content. Please make sure you edit the image with the content of the variable $ECR_COLORS_MODULE_REPO_URI, the account id, and the Region.
{"family": "colors-module",
    "networkMode": "awsvpc",
    "executionRoleArn": "arn:aws:iam::ACCOUNT_ID:role/colors-module-task-exec-role",
    "containerDefinitions": [
        {"name": "colors-module",
            "image": "<xxxxxxxxxxxxxxxxxxxxx>:1.0",
            "portMappings": [
                {
                    "containerPort": 4567
                }
            ],
            "logConfiguration": {
                "logDriver": "awslogs",
                    "options": {
                       "awslogs-group": "/aws/ecs/colors-module",
                       "awslogs-region": "REGION",
                       "awslogs-stream-prefix": "colors-module"
                       }
            }
        }
    ],
    "requiresCompatibilities": [
        "FARGATE",
        "EC2"
    ],
    "cpu": "256",
    "memory": "512"
}
In the next batch of commands, you:
- create an ECS cluster to hold the Fargate tasks.
- create a task execution role (
colors-module-task-exec-role). - assign the AWS managed
AmazonECSTaskExecutionRolePolicypolicy to the role. - register the task definition above.
- create a log group.
- create and configure a security group (
colors-module-SG) to allow access toport 80.
aws ecs create-cluster --cluster-name colors-module-cluster --region $AWS_REGION

aws iam create-role --role-name colors-module-task-exec-role --assume-role-policy-document file://ecs-tasks-trust-policy.json --region $AWS_REGION
aws iam attach-role-policy --role-name colors-module-task-exec-role  --policy-arn "arn:aws:iam::aws:policy/service-role/AmazonECSTaskExecutionRolePolicy"

aws ecs register-task-definition --cli-input-json file://colors-module.json --region $AWS_REGION

aws logs create-log-group --log-group-name /aws/ecs/colors-module --region $AWS_REGION

COLORS_MODULE_SG=$(aws ec2 create-security-group --group-name colors-module-SG --description "Colors module SG" --vpc-id $VPC_ID --region $AWS_REGION)
COLORS_MODULE_SG_ID=$(echo $COLORS_MODULE_SG | jq --raw-output .GroupId)
aws ec2 authorize-security-group-ingress --group-id $COLORS_MODULE_SG_ID --protocol tcp --port 4567 --cidr 0.0.0.0/0 --region $AWS_REGION
Before you can implement implement the final step of defining the ECS service that will run the colors-module tasks, you need to create a new ALB target group that will contain these tasks and a new forward rule on the ALB listener on port 80. To do so, you need to create a file called conditions-pattern.json with the following content:
[
    {
        "Field": "path-pattern",
        "PathPatternConfig": {
            "Values": ["/color"]
        }
    }
]
Launch these commands to create the target group and the new forwarding rule:
TARGET_GROUP=$(aws elbv2 create-target-group --name colors-TG --protocol HTTP --port 4567 --health-check-path /color --target-type ip --vpc-id $VPC_ID --region $AWS_REGION)
TARGET_GROUP_ARN=$(echo $TARGET_GROUP | jq --raw-output .TargetGroups[0].TargetGroupArn)
aws elbv2 create-rule --listener-arn $LOAD_BALANCER_LISTENER_ARN --priority 1 --conditions file://conditions-pattern.json --actions Type=forward,TargetGroupArn=$TARGET_GROUP_ARN
We are now ready to create the ECS service for the colors-module:
aws ecs create-service --service-name colors-module --cluster colors-module-cluster --load-balancers "targetGroupArn=$TARGET_GROUP_ARN,containerName=colors-module,containerPort=4567" --task-definition colors-module --desired-count 2 --launch-type FARGATE --platform-version 1.4.0 --network-configuration "awsvpcConfiguration={subnets=[$PUBLIC_SUBNET1, $PUBLIC_SUBNET2],securityGroups=[$COLORS_MODULE_SG_ID],assignPublicIp=ENABLED}" --region $AWS_REGIONThe two ECS tasks are now running as part of the ECS colors-module service in the ECS colors-module-cluster:

If you’ve followed so far, you should now have an ALB rule that intercepts and redirects traffic sent to the /color path (and to the ALB DNS name) to the ECS service you have just created. You can check this by running the following command:
sh-4.2$ for i in {1..5}; do curl my-app-LB-380797520.us-east-1.elb.amazonaws.com/color && echo; done
Green [ this web service is powered by ECS / Fargate ]
White [ this web service is powered by ECS / Fargate ]
Red [ this web service is powered by ECS / Fargate ]
Green [ this web service is powered by ECS / Fargate ]
Green [ this web service is powered by ECS / Fargate ]
Note how they all consistently report that [ this web service is powered by ECS / Fargate ].
This concludes the second deployment phase. Below is a visual summary of what you have implemented:

Phase 3: tie the Elastic Beanstalk and ECS deployments together
So far we have deployed the two stacks on Elastic Beanstalk and ECS separately, and they have different and incompatible inbound connectivity. Also, we know that customers rarely use the Elastic Beanstalk service-generated URL or the out of the box ALB DNS name. Rather, they create custom aliases in their DNS (such as Amazon Route53).
So far, the Elastic Beanstalk stack responds to all calls made to the Elastic Beanstalk created Host header (for me that is monolith-dev.devo-2.elasticbeanstalk-internal.com), and the ECS stack responds to calls made to the ALB native DNS name (for me that is my-app-LB-380797520.us-east-1.elb.amazonaws.com). These are the options I have to solicit my two APIs:
monolith-dev.devo-2.elasticbeanstalk-internal.com/color
monolith-dev.devo-2.elasticbeanstalk-internal.com/city
my-app-LB-380797520.us-east-1.elb.amazonaws.com/color
Because our goal is to make Elastic Beanstalk serve the /city API and the ECS stack serve the /color API, we will have to:
- create a custom DNS name to send all application traffic (regardless of APIs being solicited) to the ALB.
- create rules on the ALB to forward traffic accordingly and properly.
In an effort to keep this blog post as short as possible, we will simulate the creation of a custom DNS name (e.g. myapp.mycompany.com) and use curl with the -H 'Host:' option to pretend the client is resolving that specific custom DNS name.
We will, however, create two new forwarding rules on the load balancer to properly direct traffic. Note that the rules need to be specified with the proper weight because we want the rule that goes to the ECS service (for the /color API) to come before the catch-all rule that goes to the Elastic Beanstalk “monolithic” environment.
Before we create the two rules, you need to create the two files to pass to the --conditions flag.
Create a file called ecs-conditions.json with this content:
[
    {
        "Field": "path-pattern",
        "PathPatternConfig": {
            "Values": ["/color"]
        }
    },
    {
        "Field": "host-header",
        "HostHeaderConfig": {
            "Values": ["myapp.mycompany.com"]
        }
    }
]
Create a file called eb-conditions.json with this content:
[
    {
        "Field": "host-header",
        "HostHeaderConfig": {
            "Values": ["myapp.mycompany.com"]
        }
    }
]
Now take note of the ARNs of the two ALB target groups that we created along the way in the previous steps of this blog post. In my account, they show up like this:

You are now ready to create the two ALB rules running the following two commands. Note how we prioritize the first rule:
ECS_FORWARD_RULE=$(aws elbv2 create-rule \
    --listener-arn arn:aws:elasticloadbalancing:us-east-1:693935722839:listener/app/my-app-LB/bef77b110db48304/391b4f1619a89bc9 \
    --priority 10 \
    --conditions file://ecs-conditions.json \
    --actions Type=forward,TargetGroupArn=arn:aws:elasticloadbalancing:us-east-1:693935722839:targetgroup/colors-TG/6b2e480ce3204e4e)
ECS_FORWARD_RULE_ARN=$(echo $ECS_FORWARD_RULE | jq --raw-output .Rules[0].RuleArn)
echo The ECS_FORWARD_RULE_ARN is: $ECS_FORWARD_RULE_ARN
EB_FORWARD_RULE=$(aws elbv2 create-rule \
    --listener-arn arn:aws:elasticloadbalancing:us-east-1:693935722839:listener/app/my-app-LB/bef77b110db48304/391b4f1619a89bc9 \
    --priority 20 \
    --conditions file://eb-conditions.json \
    --actions Type=forward,TargetGroupArn=arn:aws:elasticloadbalancing:us-east-1:693935722839:targetgroup/eb-dv-monolith-default-3eivp/63a243afe94b7fc4)
EB_FORWARD_RULE_ARN=$(echo $EB_FORWARD_RULE | jq --raw-output .Rules[0].RuleArn)
echo The EB_FORWARD_RULE_ARN is: $EB_FORWARD_RULE_ARN
You can now test this setup by simulating the calls to myapp.mycompany.com/city and myapp.mycompany.com/color using the two commands below:
sh-4.2$ for i in {1..5}; do curl -H 'Host:myapp.mycompany.com' my-app-LB-380797520.us-east-1.elb.amazonaws.com/city && echo; done
Paris [ this web service is powered by ELASTIC BEANSTALK ]
Paris [ this web service is powered by ELASTIC BEANSTALK ]
Milan [ this web service is powered by ELASTIC BEANSTALK ]
Seattle [ this web service is powered by ELASTIC BEANSTALK ]
Milan [ this web service is powered by ELASTIC BEANSTALK ]

sh-4.2$ for i in {1..5}; do curl -H 'Host:myapp.mycompany.com' my-app-LB-380797520.us-east-1.elb.amazonaws.com/color && echo; done
Red [ this web service is powered by ECS / Fargate ]
Green [ this web service is powered by ECS / Fargate ]
Green [ this web service is powered by ECS / Fargate ]
Green [ this web service is powered by ECS / Fargate ]
White [ this web service is powered by ECS / Fargate ]
Note how you are calling (or simulating the call to) the same custom DNS name and which stack is serving the API request based on the API being solicited.
This concludes the third and last phase of our scenario. Below is a typical graphical summary of what you have implemented (the Route53 configuration has only been simulated):

It’s now time to tier down the environment we created. Note that the scripts below use some of the environment variables we saved running the commands in the post. If you lost your session on your workstation, you may need to provide the exact ARN IDs of the resources. You can easily do so by referring to the ALB, ECS, and Elastic Beanstalk consoles.
First, we will start by deleting the ALB forwarding rules we have created in the last step:
aws elbv2 delete-rule --rule-arn $ECS_FORWARD_RULE_ARN
aws elbv2 delete-rule --rule-arn $EB_FORWARD_RULE_ARN
Then we will move to the compute environments. Below is a list of commands that delete the ECS related resources we have deployed in this blog post:
aws ecs update-service --service colors-module --desired-count 0 --cluster colors-module-cluster --region $AWS_REGION
sleep 120
aws ecs delete-service --service colors-module --cluster colors-module-cluster --region $AWS_REGION

aws logs delete-log-group --log-group-name /aws/ecs/colors-module --region $AWS_REGION

aws ecr delete-repository --repository-name colors-module --force --region $AWS_REGION

aws ecs delete-cluster --cluster colors-module-cluster --region $AWS_REGION

aws iam detach-role-policy --role-name colors-module-task-exec-role --policy-arn "arn:aws:iam::aws:policy/service-role/AmazonECSTaskExecutionRolePolicy"
aws iam delete-role --role-name colors-module-task-exec-role --region $AWS_REGION

aws ec2 delete-security-group --group-id $COLORS_MODULE_SG_ID --region $AWS_REGION
Now you can terminate your Elastic Beanstalk environment. You can do this via the Elastic Beanstalk console or you can run this command in the directory that contains the original Python monolithic application: eb terminate (note that you need to be in that specific folder for this command to recognize the Elastic Beanstalk environment and delete it).
Once the Elastic Beanstalk environment has been deleted completely, you can delete the ALB we created at the beginning.
aws elbv2 delete-listener --listener-arn $LOAD_BALANCER_LISTENER_ARN
aws elbv2 delete-target-group --target-group-arn $TARGET_GROUP_ARN
aws elbv2 delete-load-balancer --load-balancer-arn $LOAD_BALANCER_ARN
sleep 30
aws ec2 delete-security-group --group-id $MYAPP_SG_ID --region $AWS_REGION
Conclusion
In this post, we have discussed the benefits of the newly announced feature of Elastic Beanstalk that will allow customers to consume externally created ALBs for their Elastic Beanstalk applications and environments. These benefits include optimized running costs and more modernization flexibility. We have also provided a walkthrough with an example of how you could modernize a monolithic application by deploying it on Elastic Beanstalk and later extracting logic to run it on a different service, such as ECS/Fargate. At AWS, we think that one size does not fit all and that having different deployment options provides a great level of flexibility for our customers who have different needs and come from very diverse backgrounds. In addition to optimizing for costs by sharing the ALB across Elastic Beanstalk environments, this new feature represents a solid step for Elastic Beanstalk customers towards integrating as seamlessly as possible with additional AWS services. If you are new to Elastic Beanstalk, there is no better way to learn it than launching your first sample app using the language of your choice. If you want to learn about ECS, the getting started guide is a great place to start your journey.