AWS Database Blog
Deploy Amazon RDS Proxy for SQL Server with IAM authentication
Amazon RDS Proxy is a fully managed, highly available database proxy service. You don’t need to provision or manage any additional infrastructure to start using RDS Proxy. In addition to this, Amazon Relational Database Service (Amazon RDS) completely manages maintenance activities for RDS Proxy such as upgrades and patching, which are carried out gradually in a rolling manner to avoid application downtime.
In this post, we explain how to make your database instances more secure by avoiding using plain text password and connect to your RDS for SQL Server instances from PowerShell as well as from .Net based Applications using IAM Authentication with RDS Proxy.
Benefits of using RDS Proxy
Modern-day applications are becoming more demanding than ever and exponentially moving towards microservices, serverless architectures which has allowed them to scale rapidly.
RDS Proxy for SQL Server cater to the needs of such Applications with following benefits
- Scalability & Improved performance
Applications built on technologies, such as serverless, PHP, or Ruby on Rails may open and close database connections frequently to serve application requests. Establishing thousands of new connections frequently consumes database resources, which otherwise could have been used to process your queries.RDS Proxy specifically helps such applications that maintain idle connections or have sufficient think time between different transactions in a session. By sharing the same database connections with multiple application connections, RDS Proxy can help reduce the number of connections to the backend database, which in turn helps reduce the CPU and memory consumption of your database.
- Availability
Connecting through RDS Proxy makes your application more resilient to database failovers. RDS Proxy improves failover time by up to 66% because it doesn’t rely on DNS propagation. Also, when the original DB instance becomes unavailable, RDS Proxy connects to the standby database without dropping idle application connections. Doing so helps to speed up and simplify the failover process. - Security
Connecting to database instances using plain text passwords are still widely used mechanism for database authentication but there are several challenges associated with it such as vulnerability to security risks, compliance issues, and increased management overhead. With RDS Proxy for SQL Server, you can now manage database credentials and access through AWS Secrets Manager and AWS Identity and Access Management (IAM), removing the need to embed database credentials in the application. This post shows how to set up RDS Proxy for SQL Server with IAM authentication for PowerShell and .Net Framework based Applications
Prerequisites
Your RDS Proxy must be in the same Amazon Virtual Private Cloud (Amazon VPC) as the database instance and can’t be publicly accessible (although the database instance can be). In order to establish IAM connectivity via RDS Proxy for SQL Server, you can either use a client which is located within the same VPC or setup dedicated networking.
For the purpose of this post and to test the IAM connectivity, setup a Windows Based Amazon Elastic Compute Cloud (Amazon EC2) instance within the same VPC as of your RDS for SQL Server Instance and RDS Proxy. You also need to set up the AWS Command Line Interface (AWS CLI) to test connectivity through PowerShell and .Net sample code. In this section, we walk through the prerequisite configuration steps before you can dive into using the solution.
Configure a SQL Server DB instance
The basic building block of Amazon RDS is the DB instance. Your RDS DB instance is similar to your on-premises SQL Server. For instructions on provisioning a SQL Server DB instance, refer to Creating a Microsoft SQL Server DB instance and connecting to it. Make a note of the endpoint.
Configure RDS Proxy for SQL Server
For instructions to configure RDS Proxy for SQL Server, refer to Scale modern serverless applications with Amazon RDS Proxy for SQL Server.
Configure the AWS CLI
Install and configure the AWS CLI for a Windows-based Amazon EC2 instance that is in the same VPC as the RDS for SQL Server instance and RDS Proxy for SQL Server.
Enable TLS/SSL for RDS Proxy
To use IAM authentication with Amazon RDS for SQL Server via RDS Proxy, enable the Require TLS setting while creating RDS Proxy for SQL Server.
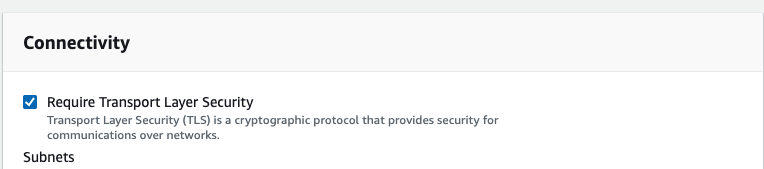
RDS Proxy uses certificates from the AWS Certificate Manager (ACM). If you are using RDS Proxy, you don’t need to download Amazon RDS certificates or update applications that use RDS Proxy connections.
Configure IAM authentication for PowerShell
Application connectivity to RDS Proxy via IAM authentication uses an authentication token instead of a password field. However, the connection from RDS Proxy to the underlying database is established by retrieving the user name and password details from Secrets Manager.
Run the following AWS CLI script to generate the authentication token:
Note that the user name is case-sensitive. Additionally, the authentication token lifetime is 15 minutes. Now we can test connectivity via IAM authentication.
In order to connect to an RDS for SQL Server instance via IAM authentication, we need to use the appropriate token property of the database drivers. For this example, we use the AccessToken property for the .Net SqlClient driver.
Replace the parameter values in accordance to your environment and run the following PowerShell script from an EC2 instance created within the same VPC:
If the connection is successful, you should see the output of SELECT * FROM sys.databases.
Configure IAM authentication for .NET Framework
.NET Framework works with applications developed in C#, F#, Visual Basic, and other popular programming languages, therefore it’s popular for web-based applications. For our demo, we first build a basic console app for .NET Framework to test IAM authentication with Amazon RDS for SQL Server. A console application is simple to deploy and can be run via the Windows cmd prompt.
In this section, we explore the RDSAuthTokenGenerator class of the AWS SDK for Amazon RDS to generate a DB authentication token and AccessToken property of the SQLConnection class of .Net Framework to authenticate our connection via the DB authentication token. A similar example can be used to create other applications such as forms, web apps, MVC, and more.
- Install and configure Visual Studio on you EC2 instance.
- Create a new project and choose Console App (.NET Framework).
- Choose Next.

- For Project name, enter a name (for example,
RDSProxy_IAMAuth_RDSSQL). - For Framework, choose .NET Framework version 4.6 or above.
- Choose Create.

- We can now view our project.

Now we need to add the AWS SDK for Amazon RDS to expose the RDSAuthTokenGenerator class and generate the DB authentication token.
- Choose (right-click) your project name in Solution Explorer and choose Manage NuGet Packages.

- Browse for AWSSDK.RDS and choose Install.

- Choose OK in the pop-up message to complete the installation.

- Close the NuGet window and go back to your main program file (
Program.cs). - Enter the following code inside your Main class (follow the comments in the sample code and change the parameter values in accordance to your environment details):

- Build the solution and make a note of the build path of the project executable.

- Open the cmd prompt, navigate to the build path, and run the .exe file of the solution.

If successful, you will see the output of your specified query, for example the server name if you used the sample code above.
Clean up
To clean up your Visual Studio project, complete the following steps:
- In Visual Studio, choose View, Application Explorer to open the Application Explorer if it is not visible.
- Navigate to your project under the Visual Studio Projects folder.
- Choose (right-click) the project and choose Delete.
- In the confirmation pop-up, choose OK.
You can delete a DB instance using the AWS Management Console, the AWS CLI, or the Amazon RDS API. The time required to delete a DB instance can vary depending on the backup retention period (how many backups to delete), how much data is deleted, and whether a final snapshot is taken. To delete the RDS for SQL Server DB instance, you must do the following:
- On the Amazon RDS console, in the navigation pane, choose Databases, and then choose the DB instance that you want to delete.
- On the Actions menu, choose Delete.
- To create a final DB snapshot for the DB instance, choose Create final snapshot.
- If you chose to create a final snapshot, enter a name for Final snapshot name.
- To retain automated backups, choose Retain automated backups.
- Enter delete me in the text field.
- Choose Delete.
Summary
In this post, we demonstrated the benefits of using IAM Authentication with RDS Proxy for SQL Server and showed how you can set up connectivity from PowerShell and .NET based Applications. If you have questions or feedback, leave them in the comments section.
About the Authors
 Sudarshan Roy is a Senior RDS Specialist Cloud Solution Architect with the AWS Worldwide Database Services Organization (DBSO). His core area of expertise is in designing, building, and implementing Database Modernization Platform for enterprise customers with AWS RDS Services. In his spare time, he loves to play cricket and spend time with his family.
 Sikandra Chaudhary is a RDS PostgreSQL Solutions Architect at AWS. Sikandra helps AWS customers with their architecture design and provides efficient solutions to migrate and run their database workloads on AWS. He has expertise with PostgreSQL and Microsoft SQL Server Database technologies.