AWS Database Blog
Migrate Microsoft SQL Server to Babelfish for Aurora PostgreSQL with minimal downtime using AWS DMS
In this post, we show how you can migrate from Microsoft SQL Server to a Babelfish for Aurora PostgreSQL cluster with minimal downtime using AWS Database Migration Service (AWS DMS).
Customers using Microsoft SQL Server may want to migrate to open-source databases like PostgreSQL; however, the significant effort to required migrate the application itself, including re-writing application code that interacts with the database can be barrier to the modernization.
With Babelfish for Aurora PostgreSQL, Amazon Aurora PostgreSQL-Compatible Edition now understands T-SQL, Microsoft SQL Server’s proprietary SQL dialect, and supports the TDS communications protocol, so your applications that were originally written for SQL Server can now work with Amazon Aurora with little or no code changes. As a result, the effort required to modify and move applications running on SQL Server to Amazon Aurora is significantly reduced, leading to faster, low-risk, and more cost-effective migrations.
Data migration options
Babelfish comes with an assessment tool called Babelfish Compass to assist with determining the complexity of an application and the feasibility of migrating to Babelfish. The first step is to run an assessment with Babelfish Compass. Run the Babelfish Compass tool on the DDL and determine to what extent the T-SQL code will be supported by Babelfish, and identify T-SQL code that may require changing before running against Babelfish.
For details on the additional steps to run the Babelfish Compass report and create the objects on the target Babelfish instance, refer to Migrate from SQL Server to Amazon Aurora using Babelfish.
After the schema is created on Babelfish, you can use the following options to migrate the data from SQL Server onto a Babelfish for Aurora PostgreSQL database:
- Migrate using AWS DMS with a Babelfish endpoint as target – In this approach, AWS Database Migration Service (AWS DMS) is set up with the Babelfish endpoint for the Aurora cluster as the target endpoint. The Babelfish endpoint supports Babelfish for Aurora PostgreSQL compatibility version 13.6 (Babelfish version 1.2.0) or later and as of this writing only supports full load migration; as such it is primarily suitable for databases that can support extended downtime.
- Migrate with an Amazon Aurora PostgreSQL endpoint as target (minimal downtime) – In this approach, the writer endpoint for the Amazon Aurora cluster is configured as the target endpoint for AWS DMS, and the data is migrated directly to the PostgreSQL tables. This method supports both Full Load only and Full Load and CDC (Change Data Capture) tasks. Using Full Load and CDC tasks allows you to migrate with Minimal downtime.
- Export and import using SQL Server tools
- You can use SQL Server Integration Services (SSIS) with Babelfish-enabled databases as targets for data migration, but it must be self-hosted or hosted on an Amazon Elastic Compute Cloud (Amazon EC2) instance. AWS Schema Conversion Tool (AWS SCT) may convert SSIS Packages to AWS Glue for cloud-native support in Babelfish versions 2.4 and later.
- Use the SSMS Import/Export Wizard for Babelfish versions 2.1.0 and later. This tool is available through the SSMS, but it’s also available as a standalone tool.
- BCP Utility – Babelfish now supports the data migration using the BCP client and the bcp utility now supports -E flag (for identity columns) and -b flag (for batching inserts).
This migration strategy using Export/ Import tools are manual and suitable primarily for smaller databases that can withstand extended downtime.
Solution overview
To migrate the database from SQL Server to Babelfish for Aurora PostgreSQL with minimal downtime, we use AWS DMS with the Amazon Aurora writer endpoint and use CDC for continuous replication post-full load. For this post, we use the School Sample Database, available on GitHub.
The following diagram illustrates our solution architecture.
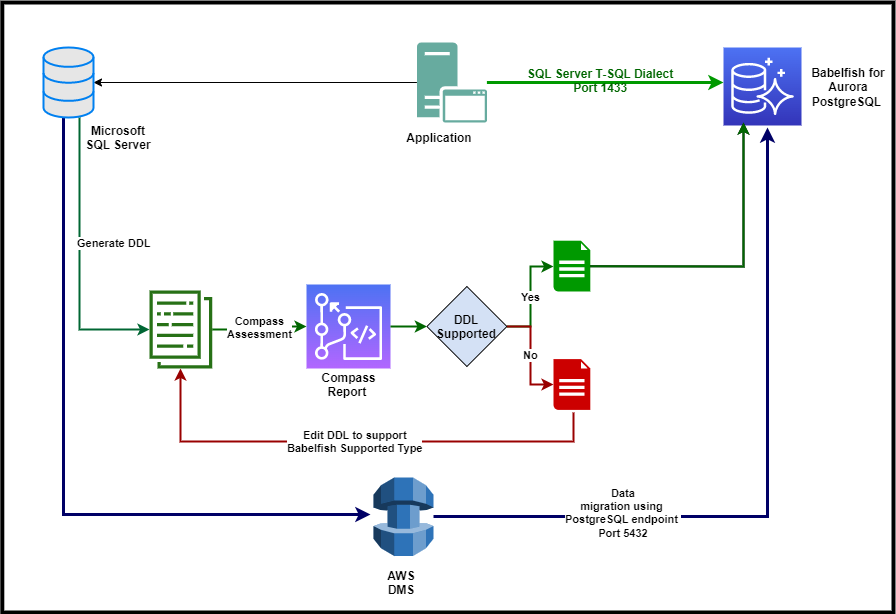
The steps in this post are for migrating SQL Server to Babelfish for Aurora PostgreSQL, but you can use the same steps for migrating to a self-managed Babelfish instance. The following is an outline of the migration process with Babelfish:
- Export the data definition language (DDL) for the databases you want to migrate from SQL Server. For detailed steps, refer to Migrate from SQL Server to Amazon Aurora using Babelfish.
- Run the Babelfish Compass tool to determine whether the application contains any SQL features not currently supported by Babelfish.
- Review the Babelfish Compass assessment report and rewrite or remove any unsupported SQL features (this could be an iterative process depending on your application).
- Create the Amazon Aurora PostgreSQL cluster with the Babelfish feature enabled.
- Connect to the Amazon Aurora cluster using the Babelfish endpoint using any SQL Server client tool.
- Run the DDL within your specified T-SQL database to create the objects.
- Create an AWS DMS instance.
- Create a source endpoint to connect to SQL Server.
- Create target engine endpoint as Amazon Aurora PostgreSQL-Compatible Edition and use the database
babelfish_db. (Note: do not specify the database name used in SQL Server; we specify this later.) For more details, refer to Using a PostgreSQL database as an AWS DMS Target. - Specify the settings to use
session_replication_roleas specified in Using a PostgreSQL database as a target for AWS Database Migration Service for the parameter group in Aurora Postgres, This is necessary to prevent Foreign Key constraints and triggers from getting fired. - Create the AWS DMS replication task.
- Add transformation rules and start the migration task.
- Reseed the sequences.
- Validate the data.
- Reconfigure your client application to connect to the Babelfish endpoint instead of your SQL Server database.
- Modify your application as needed and retest.
- Test and iterate until the migrated application’s functionality is correct.
- Perform cutover.
Prerequisites
To deploy this solution, you need the following prerequisites set up:
- SQL Server Management Studio (SSMS)
- SQL Server as source
- Babelfish Compass
- An AWS DMS replication instance
- A Babelfish for Aurora PostgreSQL cluster
- The sample database has been downloaded populated with tables
Additionally, we assume that DDLs have been extracted, analyzed, and modified with the Compass tool. For instructions, refer to Migrate from SQL Server to Amazon Aurora using Babelfish.
You should use the latest version of Babelfish, the Compass assessment tool, and AWS DMS. The latest version of Babelfish available as of this writing is 3.1 and is available with Amazon Aurora PostgreSQL-Compatible Edition 15.2. The latest version of AWS DMS as of this writing is 3.4.7.
For the current version; identity and timestamp data types are not supported
Configure the source database
You first need to configure the source database for ongoing replication. For instructions, refer to Setting up ongoing replication using the sysadmin role with self-managed SQL Server. To create the distributor in the source, complete the following steps:
- On SSMS, choose (right-click) Replication and choose Configure distribution.

- When configuration is complete, choose Close.

Configure the source endpoint
Now you can create the source endpoint to connect to the source database.
- On the AWS DMS console, choose Endpoints in the navigation pane.
- Choose Create endpoint.
- For Endpoint type, select Source endpoint.
- For Endpoint identifier, enter an appropriate name.
- For Source engine, choose Microsoft SQL Server.
- Provide the server name or IP address of the source server, the SQL Server port, and the user name and password to connect to the source database.
- For Database name, enter an appropriate name (for this post, school).
- Expand Endpoint settings and select Use endpoint connection attributes.
- Create the connection attribute
SetUpMsCdcForTables=trueto set up CDC for your database automatically. - Choose Create endpoint.

Configure the target endpoint
Next, we create the target endpoint.
- On the AWS DMS console, choose Endpoints in the navigation pane.
- Choose Create endpoint.
- Select Target endpoint.
- Select Select RDS DB instance and choose the Babelfish cluster.
- For Endpoint identifier, enter an appropriate name or leave as default.
- For Target engine, choose Amazon Aurora PostgreSQL.
- If you’re not using AWS Secrets Manager, enter the access information manually.
- For Database name, enter
babelfish_db. - Choose Create endpoint.

Create and run the migration task
Now we can create an AWS DMS migration task.
- On the AWS DMS console, choose Database migration tasks in the navigation pane.
- Choose Create task.
- For Task identifier, enter a name.
- Specify your replication instance, source endpoint, and target endpoint.
- For Migration type, choose Migrate existing data and replicate ongoing changes to migrate the full database and replication ongoing changes for minimal downtime.
- For Target table preparation mode, select Do nothing.
- AWS DMS offers 2 settings for migrating LOB Objects when using replicate ongoing changes option, The LOB mode determines how LOBs are handled:
Full LOB mode – In full LOB mode AWS DMS migrates all LOBs from source to target regardless of size. In this configuration, AWS DMS has no information about the maximum size of LOBs to expect. Thus, LOBs are migrated one at a time, piece by piece. Full LOB mode provides the convenience of moving all LOB data in your tables, but the process can have a significant impact on performance.
Limited LOB mode – In limited LOB mode, you set a maximum LOB size for AWS DMS to accept. That enables AWS DMS to pre-allocate memory and load the LOB data in bulk. LOBs that exceed the maximum LOB size are truncated, and a warning is issued to the log file. In limited LOB mode, you can gain significant performance over full LOB mode. We recommend that you use limited LOB mode whenever possible. The maximum recommended value is 102400 KB (100 MB).
In some cases, Full LOB mode might result in a table error. If that happens, create a separate task for the tables that failed to load. Then use Limited LOB mode to specify the appropriate value for the Maximum LOB size (KB).
Connect to the Source SQL Server instance, and run the following script to identify the Maximum lob size:-
Use the value from the previous above to specify the Maximum LOB Size.
- Leave the remaining values as default.
- Select Turn on CloudWatch logs to enable the logging, and keep the default logging levels.

- In the Table mapping section, expand Selection rules.
- Create a rule to include all tables in the
dboschema.

- Add two transformation rules to align with the schema mapping in Babelfish (If you are using single-database migration mode you can skip step b) :
- Rename all tables to lowercase.
- Rename the schema from
dbotoschool_dbo.

- Leave the remaining options as default and choose Create task to start the task.
- On the task details page, navigate to the Table statistics tab to monitor the migration.

Test the ongoing replication
After the AWS DMS task has completed the full load, test the ongoing replication by inserting more rows in the source database. Then monitor the AWS DMS task and validate the data in the target Babelfish database.
- Run the following insert queries in the source database; In this post, we are using the DDL’s are from the School Database which have an identity column on the Person table for the column
personid
The Insert succeeds on SQL Server source database but fails in AWS DMS during CDC phase with an error: “ERROR: cannot insert a non-DEFAULT value into column "personid";”
Babelfish 3.1.0 Amazon Aurora Postgres 15.2, does not support the replication of Identity column. To fix this, create the table in the target Babelfish database as Serial datatype.
The Limitations section of this post discusses the limitation if the table definition on the target Babelfish Endpoint does not have the identity column updated as Serial.
When you create the table in Babelfish, change the column definition from the following.
On SQL Server:
To Serial on Babelfish:
- Restart the Task or Reload the Table on the AWS DMS task.
- Monitor the AWS DMS task and check for the table Person.
The inserts and applied inserts should show 2 and the total rows will also increment by 2.

- Connect to the target Babelfish cluster and query the Person table to validate the inserted rows.

Reseed Sequences
You must run the following script to reseed the sequences to ensure correct values for sequences is updated, during the cutover window, before changing the application to use the Babelfish endpoint;
Connect to Babelfish endpoint of the Amazon Aurora cluster using the SQL Server client and run the following query generate the SQL to update the sequence values:
From the result of the preceding query, rerun it in the SQL Server client as a new query.
After confirming that the source and target are in sync, you can cut over and start using the Amazon Aurora cluster.
Limitations
We wrote this post using with Babelfish for Aurora PostgreSQL 15.2 and AWS DMS 3.4.7. Some of the current limitations are:
- Babelfish only supports migrating BINARY, VARBINARY, and IMAGE data types with Amazon Aurora PostgreSQL version 15.2 and higher, using the BYTEA data type.
- If you create a migration task for ongoing replication from SQL Server to Babelfish using the PostgreSQL target endpoint, you need to assign the SERIAL data type to any tables that use IDENTITY columns
- In some cases. the Full LOB mode may result in table migration error and it is recommended to use Limited LOB Mode for those specific tables.
- AWS DMS Data validation is not supported for the Babelfish Endpoint.
- AWS DMS Data validation to the Postgres endpoint may fail for certain datatypes like Datetime because of precision difference.
For more information, refer to – Limitations to using a PostgreSQL target endpoint with Babelfish tables, for Data type limitations with AWS Database migration service using the Postgres Endpoint for Babelfish Tables.
Clean up
To avoid incurring unwanted charges, delete the resources you created as part of this post. Refer to the following instructions:
Summary
In this post, we showed how you can use Amazon Aurora PostgreSQL-Compatible Edition as the target engine for continuous migration from a source SQL Server database using Babelfish for Aurora PostgreSQL. You can use AWS DMS with a PostgreSQL target endpoint to migrate your SQL Server database to Babelfish for Aurora PostgreSQL with minimal downtime.
Try out this solution in your AWS account and if you have any comments or questions, leave them in the comments section.
About the Authors
 Roneel Kumar is an Amazon Web Services Senior Database Specialist Solutions Architect who specializes in Relational Database Engines. He provides Technical Assistance, operational, and database practices to customers in APJ.
 Taranjit Singh is a database migration specialist with AWS Professional Services. He works closely with customers by providing technical assistance to migrate and modernize their existing databases to AWS Cloud.
 Sandeep Rajain is a database specialist Solutions Architect having keen interest and expertise in relational as well as non-relational AWS cloud databases and services to migrate databases to cloud. He works with organizations to help them build their Data strategy and modernize their databases using AWS services.