AWS Database Blog
Set Access Control for Amazon Elasticsearch Service
September 8, 2021: Amazon Elasticsearch Service has been renamed to Amazon OpenSearch Service. See details.
Securing your Amazon Elasticsearch Service (Amazon ES) domain helps ensure your data cannot be accessed or altered by unauthorized users. Most customers want the security of IP address- or identity-based access policies, but choose open access out of convenience. Because a domain with open access will accept requests to create, view, modify, and delete data from the Amazon ES domain from any party on the Internet, this option is not appropriate for most customers.
In an earlier blog post, How to Control Access to Your Amazon Elasticsearch Service Domain, we explored access control in depth. In this blog post, we’ll share some easy ways to get started with IAM policies for your domain. Although it takes some work to set up an AWS Identity and Access Management (IAM) policy, this “ounce of prevention” can prevent a ton of work later.
Key access control concepts in Amazon Elasticsearch Service

The domain Amazon ES creates for you includes the nodes in the Elasticsearch cluster and resources from several AWS services. When Amazon ES creates your domain, it launches instances into a service-controlled VPC. Those instances are fronted by Elastic Load Balancing (ELB), and the endpoint for the load balancer is published through Route 53. Requests to the domain pass through the ELB load balancer, which routes them to the domain’s EC2 instances. No matter where the request goes, the instance contacts IAM to determine whether the request is authorized. Unauthorized requests are blocked and dropped.
The key to understanding how IAM policies are applied and resolved rests on the following:
- Policy location: IAM policies can be attached to your domain or to individual users or roles. If a policy is attached to your domain, it’s called a resource-based policy. If it’s attached to a user or role, it’s called a user-based policy.
- Policy resolution: IAM collects all user-based and resource-based policies that apply to a request in order to determine whether the request is authorized. For more information, see How to Control Access to Your Amazon Elasticsearch Service Domain blog post.
Whether you create a resource-based policy, a user-based policy, or a mix of the two, IAM will respect all policies in place for a given request.
If you use the wizard in the Amazon ES console to create your domain, Amazon Elasticsearch Service provides several template IAM policies for different kinds of access.
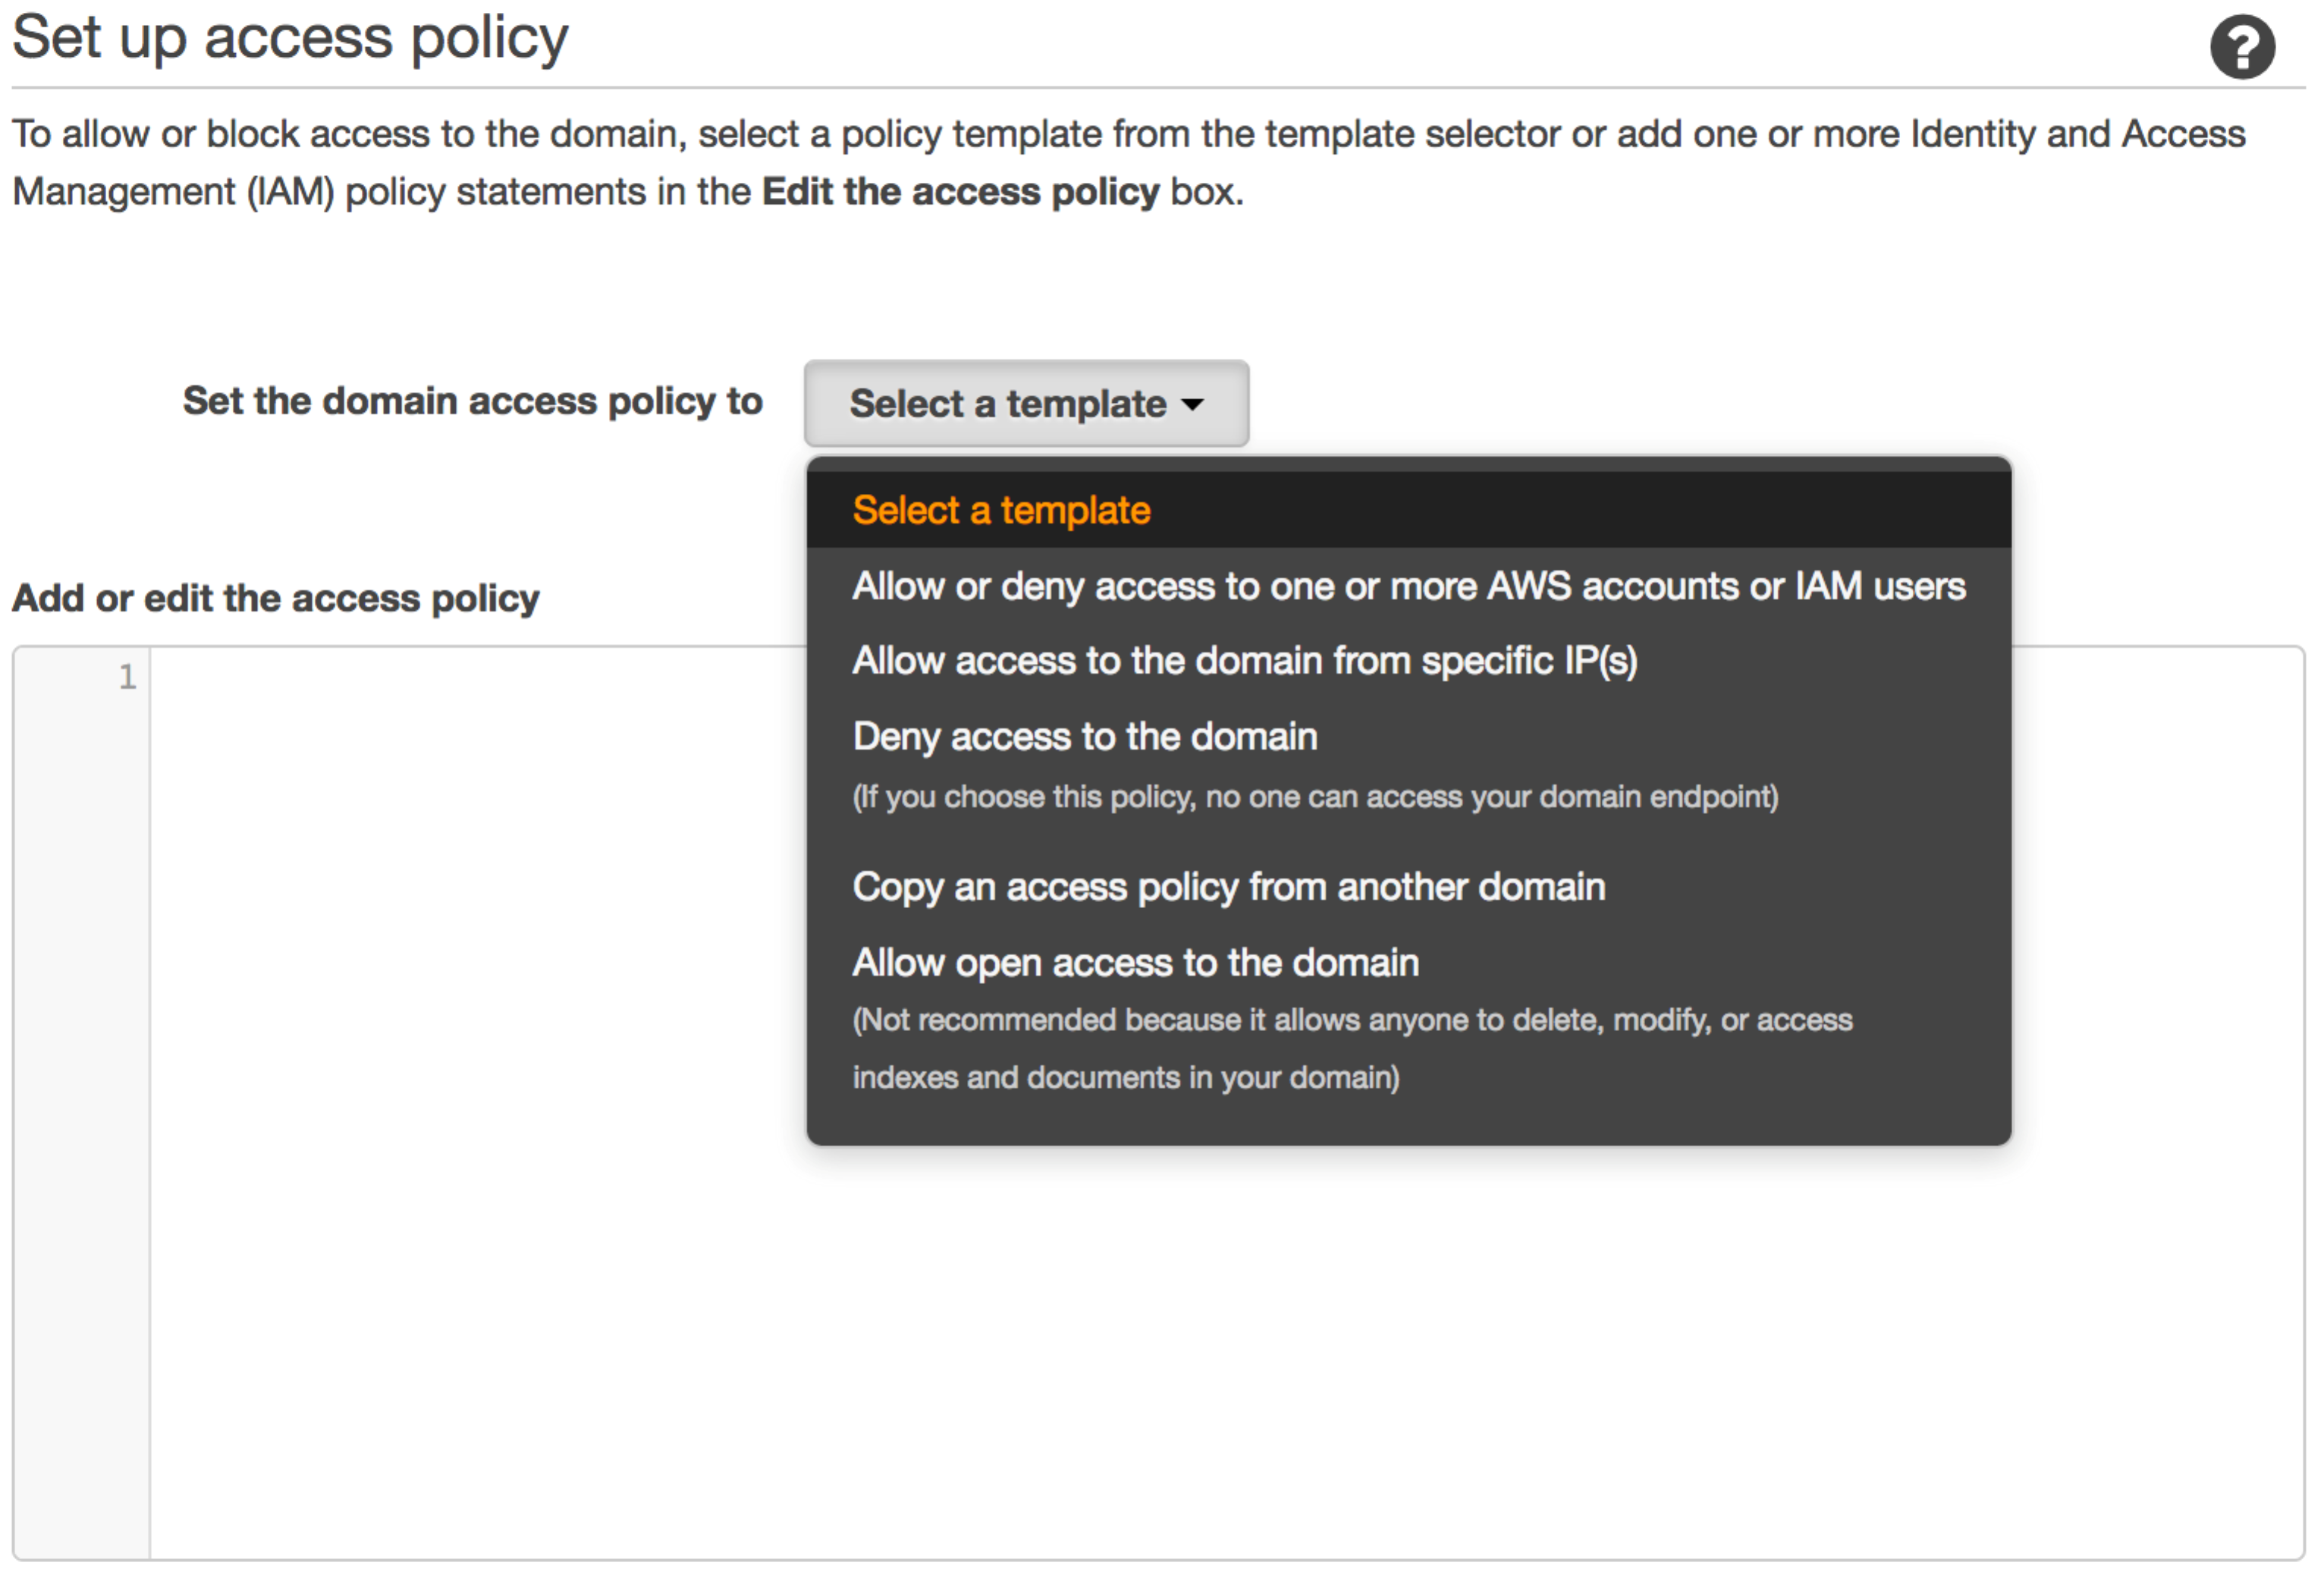
- If you select Allow or deny access to one or more AWS accounts or IAM users: You specify which IAM users or roles should have access to your domain. All requests to the domain must be signed with AWS Signature Version 4 signing. When a request reaches the domain, it is forwarded to IAM for signature verification and access control.
- If you select Allow access to the domain from specific IP(s): You specify an IP or CIDR block. Anonymous (unsigned) requests from that IP address range are allowed.
- If you select Deny access to the domain: No request, signed or unsigned, is allowed.
- If you select Allow open access to the domain: All requests from all users are allowed. If you select this template, you will receive a pop-up warning from Amazon ES.
Simple IP address-based setup
When you’re just getting started with Amazon Elasticsearch Service, you want to load some data quickly, run a few queries (either from the command line or using Kibana), and do some deeper-dive inspection and monitoring from the command line. An open-access policy is the fastest way to get started because it allows tools like native Elasticsearch clients, curl, and your web browser to interact with the cluster.
By its nature, open access is not secure. We do not recommend an open-access policy. With IP address-based access control, you can secure your domain. Unauthorized visitors or port scanners will be rejected with messages like:
{“Message”: “User: anonymous is not authorized to perform: es:ESHttpGet on resource:<domain ARN>”}
If you are doing your development from an EC2 instance, you can set up your VPC to assign it a public IP address or an elastic IP address (EIP).

With this simple setup, you can choose the Allow access to the domain from specific IPs option to generate a policy like this one:
Be sure to replace the IP address, account ID, and domain name (in red) with your own values.
This setup supports the basic activities you need to do for development and testing. You can send commands to the cluster directly with tools like curl. You can run Kibana on that EC2 instance, and your IP address-based access policy will allow full access. All other requests to the domain, whether signed or anonymous, from a different IP address will be denied by IAM.
Setup for use with Kinesis Firehose, Amazon CloudWatch Logs, or AWS IoT
Sending data from another AWS service is an easy way to get started with Amazon Elasticsearch Service. To create a Kinesis Firehose stream or to stream CloudWatch Logs data to Amazon ES, you’ll need to create a role to allow these services to write to a domain. IAM’s policy resolution will allow access from the other service to write data to your domain. An IP address-based policy will allow access to your EC2 instance for your commands and Kibana. It will deny access to all other requests.
For information about setting up secure access for AWS IoT, see the Analyze Device-Generated Data with AWS IoT and Amazon Elasticsearch Service blog post, which discusses how to use an IP address-based policy.
Setup for when you don’t know the IP address
In many cases, you don’t have a static IP address for the source of your requests. You could be running Kibana on a set of nodes in your data center, supporting a mobile application, or sending requests from an auto-scaled set of web servers or Logstash instances.

In these cases, you can use a reverse proxy at a known IP address in your VPC to forward requests to your Amazon Elasticsearch Service domain from Kibana and use Signature Version 4 signing with user-based authentication to send requests from your application servers.
Substitute the IP address of the proxy server into the IP address-based policy to allow your requests from the proxy. You can also add another IP address to the policy to open access for your command line and Kibana.
In the preceding example policy, we have restricted the Action allowed for the web server role to HTTP GET calls. The IAM policies that you write allow a range of commands and HTTP methods, so you to set up access controls for a range of actors. For more information, see the How to Control Access to Your Amazon Elasticsearch Service Domain blog post.
Use a proxy to simplify request signing
Creating a proxy allows you to control access to your domain by using the IP address of the proxy as a source of identity. You control access by emitting only authorized requests from your proxy. You can also use Signature Version 4 request signing to provide the identity behind the request. Amazon ES uses IAM to authenticate these requests and allow or deny them.
To implement request signing, you need to write code, and that can be an additional hurdle for development, for command-line or Kibana access. There are open-source projects that provide a small application that accepts requests, signs them with Signature Version 4, and then forwards them to AWS.
You can find one such signing proxy here: https://github.com/abutaha/aws-es-proxy. This small application listens on port 9200 and forwards signed requests to Amazon Elasticsearch Service.
Note: This signing proxy was developed by a third party, not AWS. It is suitable for development and test, but not for production workloads. AWS is not responsible for the functioning or suitability of external content. With this signing proxy, you can use the Allow or deny access to one or more AWS accounts or IAM users template to set the policy on your domain to the following:
Replace the user ARN and domain ARN in red with those from the generated policy. Run the proxy, and have it listen on 127.0.0.1:9200. Then you can use curl to send Elasticsearch API calls to http://127.0.0.1:9200/ and they will be forwarded to your domain. If you want to run Kibana locally, on your development machine, point it at http://127.0.0.1:9200/ in kibana.yml.
Use CloudTrail to monitor for changes to access policies
Amazon CloudTrail provides logs of the requests you send to AWS when you interact with various services. Amazon Elasticsearch Service sends CloudTrail events for all administrative actions, like creating domains, updating domain configuration, adding tags, and so on. We recommend that you monitor CloudTrail events for the CreateElasticsearchDomain and UpdateElasticsearchDomainConfig API calls to validate access policies as people in your organization create or modify domains. You can use these logs to review all access policies and ensure they conform to the practices we’ve discussed.
Conclusion
We hope we’ve shown you that it’s easy to set up access policies that meet your needs during test and development. If you have questions or comments, please leave your feedback in the comments.
About the Author
 Dr. Jon Handler (@_searchgeek) is an AWS solutions architect specializing in search technologies. He works with our customers to provide guidance and technical assistance on database projects, helping them improve the value of their solutions when using AWS.