AWS Database Blog
Supercharge your knowledge graph using Amazon Neptune, Amazon Comprehend, and Amazon Lex
Knowledge graph applications are one of the most popular graph use cases being built on Amazon Neptune today. Knowledge graphs consolidate and integrate an organization’s information into a single location by relating data stored from structured systems (e.g., e-commerce, sales records, CRM systems) and unstructured systems (e.g., text documents, email, news articles) together in a way that makes it readily available to users and applications. In reality, data rarely exists in a format that allows us to easily extract and connect relevant elements.
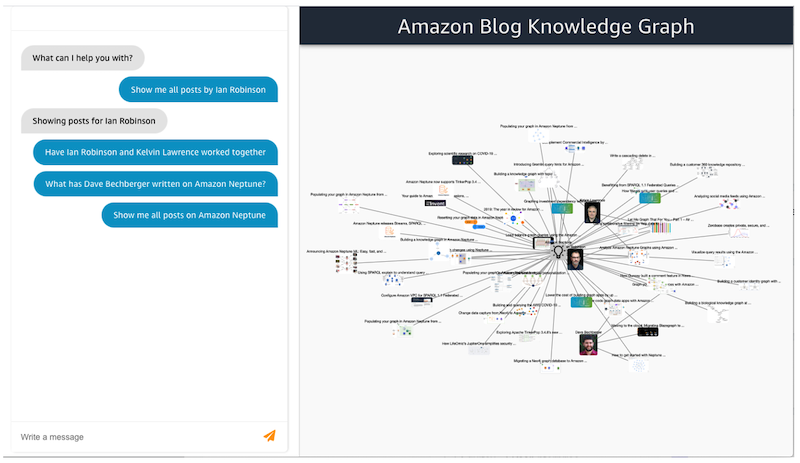
In this post we’ll build a full-stack knowledge graph application that demonstrates how to provide structure to unstructured and semi-structured data, and how to expose this structure in a way that’s easy for users to consume. We’ll use Amazon Neptune to store our knowledge graph, Amazon Comprehend to provide structure to semi-structured data from the AWS Database Blog, and Amazon Lex to provide a chatbot interface to answer natural language questions as illustrated below.
Deploy the application
Let’s discuss the overall architecture and implementation steps used to build this application. If you want to experiment, all the code is available on GitHub.
We begin by deploying our application and taking a look at how it works. Our sample solution includes the following:
- A Neptune cluster
- Multiple AWS Lambda functions and layers that handle the reading and writing of data to and from our knowledge graph
- An Amazon API Gateway that our web application uses to fetch data via REST
- An Amazon Lex chatbot, configured with the appropriate intents, which interacts with via our web application
- An Amazon Cognito identity pool required for our web application to connect to the chatbot
- Code that scrapes posts from the AWS Database blog for Neptune, enhances the data, and loads it into our knowledge graph
- A React-based web application with an AWS Amplify chatbot component
Before you deploy our application, make sure you have the following:
- A machine running Docker, either a laptop or a server, for running our web interface
- An AWS account with the ability to create resources
With these prerequisites satisfied, let’s deploy our application:
- Launch our solution using the provided AWS CloudFormation template in your desired Region:
us-east-1 
us-west-2 
Costs to run this solution depend on the Neptune instance size chosen with a minimal cost for the other services used.
- Provide the desired stack name and instance size.
- Acknowledge the capabilities and choose Create stack.

This process may take 10–15 minutes. When it’s complete, the CloudFormation stack’s Outputs tab lists the following values, which you need to run the web front end:
ApiGatewayInvokeURLIdentityPoolId
Run the following command to create the web interface, providing the appropriate parameters:
After this container has started, you can access the web application on port 3000 of your Docker server (http://localhost:3000/). If port 3000 is in use on your current server, you can alter the port by changing -p <SERVER PORT>:3000.
Use the application
With the application started, let’s try out the chatbot integration using the following phrases:
- Show me all posts by Ian Robinson
- What has Dave Bechberger written on Amazon Neptune?
- Have Ian Robinson and Kelvin Lawrence worked together
- Show me posts by Taylor Rigg
(This should prompt for Taylor Riggan; answer “Yes”.)
- Show me all posts on Amazon Neptune
Refreshing the browser clears the canvas and chatbox.
Each of these phrases provides a visual representation of the contextually relevant connections with our knowledge graph.

Build the application
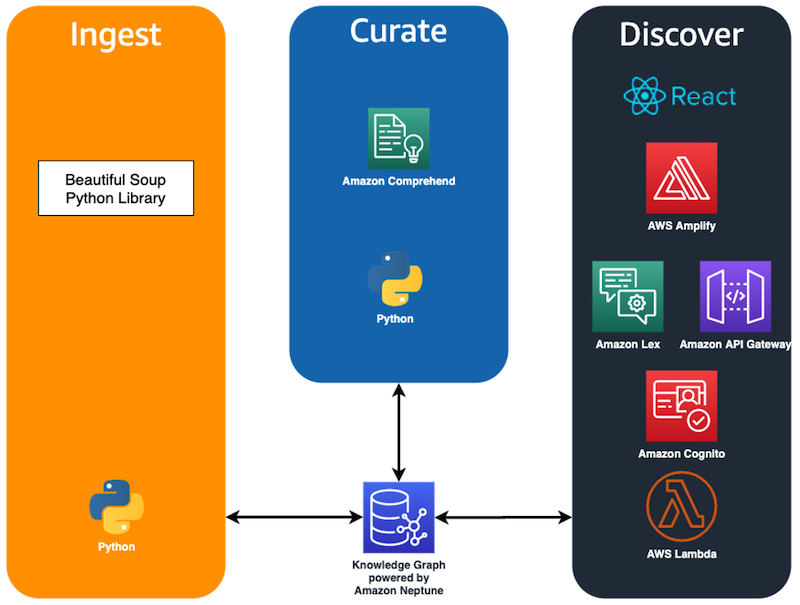
Now that we know what our application is capable of doing, let’s look at how the AWS services are integrated to build a full-stack application. We built this knowledge graph application using a common paradigm for developing these types of applications known as ingest, curate, and discover.
This paradigm begins by first ingesting data from one or more sources and creating semi-structured entities from it. In our application, we use Python and Beautiful Soup to scrape the AWS Database blog website to generate and store semi-structured data, which is stored in our Neptune-powered knowledge graph.
After we extract these semi-structured entities, we curate and enhance them with additional meaning and connections. We do so using Amazon Comprehend to extract named entities from the blog post text. We connect these extracted entities within our knowledge graph to provide more contextually relevant connections within our blog data.
Finally, we create an interface to allow easy discovery of our newly connected information. For our application, we use a React application, powered by Amazon Lex and Amplify, to provide a web-based chatbot interface to provide contextually relevant answers to the questions asked. Putting these aspects together gives the following application architecture.
Ingest the AWS Database blog
The ingest portion of our application uses Beautiful Soup to scrape the AWS Database blog. We don’t examine it in detail, but knowing the structure of the webpage allows us to create semi-structured data from the unstructured text. We use Beautiful Soup to extract several key pieces of information from each post, such as author, title, tags, and images:
After we extract this information for all the posts in the blog, we store it in our knowledge graph. The following figure shows the what this looks like for the first five posts.
Although this begins to show connections between the entities in our graph, we can extract more context by examining the data stored within each post. To increase the connectedness of the data in our knowledge graph, let’s look at additional methods to curate this semi-structured data.
Curate our semi-structured data
To extract additional information from our semi-structured data, we use the DetectEntity functionality in Amazon Comprehend. This feature takes a text input and looks for unique names of real-world items such as people, places, items, or references to measures such as quantities or dates. By default, the types of entities returned are provided a label of COMMERCIAL_ITEM, DATE, EVENT, LOCATION, ORGANIZATION, OTHER, PERSON, QUANTITY, or TITLE.
To enhance our data, the input is required to be UTF-encoded strings of up to 5,000-byte chunks. We do this by dividing each post by paragraph and running each paragraph through the batch_detect_entities method in batches of 25. For each entity that’s detected, the score, type, text, as well as begin and end offsets are returned, as in the following example code:
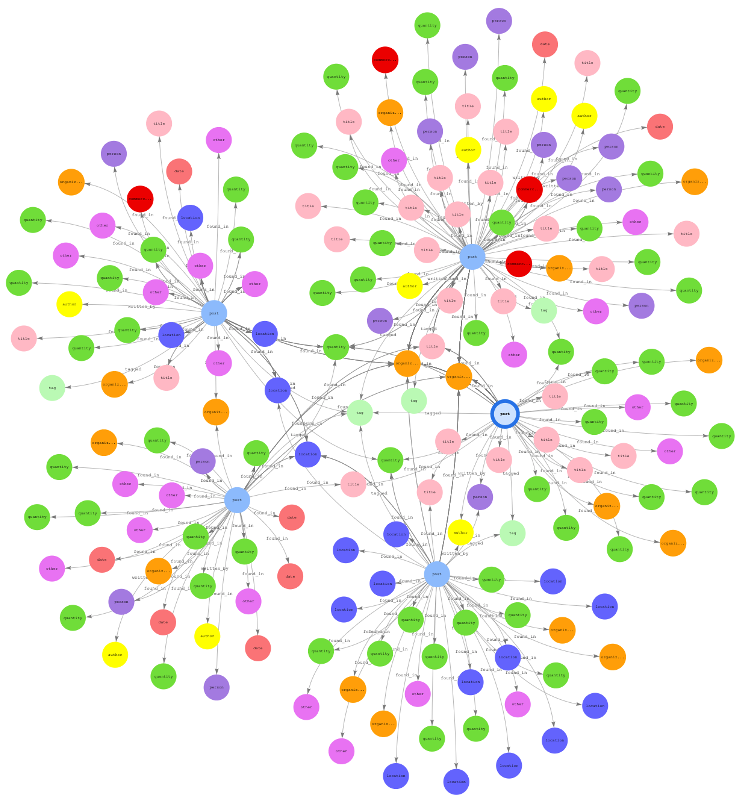
Associating each of these detected entities with our semi-structured data in our knowledge graph shows even more connections, as seen in a subset in the following graph.
When we compare this to our previous graph, we see that a significant number of additional connections have been added. These connections not only link posts together, they allow us to provide additional relevant answers by linking posts based on contextual relevant information stored within the post.
This brings us to the final portion of this sample application: creating a web-based chatbot to interact with our new knowledge graph.
Discover information in our knowledge graph
Creating a web application to discover information in our knowledge graph has two steps: defining our chatbot and integrating the chatbot into a web application.
Defining our chatbot
Our application’s chatbot is powered by Amazon Lex, which makes it easy to build conversational interfaces for applications.
The building block for building any bot with Amazon Lex is an intent. An intent is an action that responds to natural language user input. Our bot has four different intents specified:
CoAuthorPostsPostByAuthorPostByAuthorAndTagPostByTag
Each intent is identified by defining a variety of short training phrases for that intent, known as utterances. Each utterance is unique and when a user speaks or types that phrase, the associated intent is invoked. The phrases act as training data for the Lex bot to identify user input and map it to the appropriate intent. For example, the PostsByAuthor intent has a few different utterances that can invoke it, as shown in the following screenshot. The best practice is to use 15–20 sample utterances to provide the necessary variations for the model to perform with optimum accuracy.
One or more slot values are within each utterance, identified by the curly brackets, which represent input data that is needed for the intent. Each slot value can be required or not, has a slot type associated with it, and has a prompt that used by the chatbot for eliciting the slot value if it’s not present.
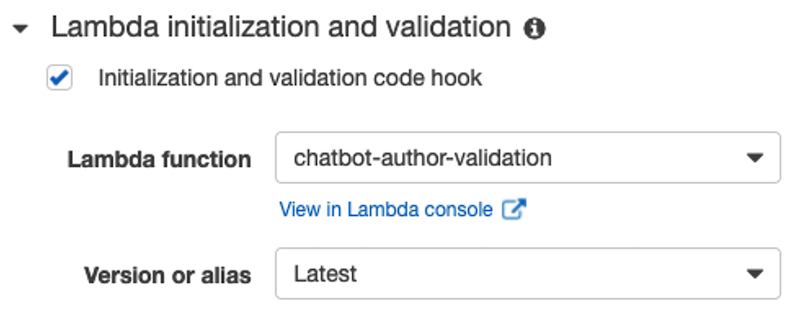
In addition to configuring the chatbot to prompt the user for missing slot values, you can specify a Lambda function to provide a more thorough validation of the inputs (against values available in the database) or return potential options back to the user to allow them to choose.
For our PostsByAuthor intent, we configure a validation check to ensure that the author entered a valid author in our knowledge graph.
The final piece is to define the fulfillment action for the intents. This is the action that occurs after the intent is invoked and all required slots are filled or validation checks have occurred. When defining the fulfillment action, you can choose from either invoking a Lambda function or returning the parameters back to the client.
After you define the intent, you build and test it on the provided console.
Now that the chatbot is functioning as expected, let’s integrate it into our web application.
Integrate our chatbot
Integration of our chatbot into our React application is relatively straightforward. We use the familiar React paradigms of components and REST calls, so let’s highlight how to configure the integration between React and Amazon Lex.
Amazon Lex supports a variety of different deployment options natively, including Facebook, Slack, Twilio, or Amplify. Our application uses Amplify, which is an end-to-end toolkit that allows us to construct full-stack applications powered by AWS. Amplify offers a set of component libraries for a variety of front-end frameworks, including React, which we use in our application.
Amplify provides an interaction component that makes it simple to integrate a React front end to our Amazon Lex chatbot. To accomplish this, we need some configuration information, such as the chatbot name and a configured Amazon Cognito identity pool ID. After we provide these configuration values, the component handles the work of wiring up the integration with our chatbot.
In addition to the configuration, we need an additional piece of code (available on GitHub) to handle the search parameters returned as the fulfillment action from our Amazon Lex intent:
With the search parameters for our intent, we can now call our API Gateway as you would for other REST based calls.
Clean up your resources
To clean up the resources used in this post, use either the AWS Command Line Interface (AWS CLI) or the AWS Management Console. Delete the CloudFormation template that you used to configure the remaining resources generated as part of this application.
Conclusion
Knowledge graphs—especially enterprise knowledge graphs—are efficient ways to access vast arrays of information within an organization. However, doing this effectively requires the ability to extract connections from within a large amount of unstructured and semi-structured data. This information then needs to be accessible via a simple and user-friendly interface. NLP and natural language search techniques such as those demonstrated in this post are just one of the many ways that AWS powers an intelligent data extraction and insight platform within organizations.
If you have any questions or want a deeper dive into how to leverage Amazon Neptune for your own knowledge graph use case, we suggest looking at our Neptune Workbench notebook (01-Building-a-Knowledge-Graph-Application). This workbook uses the same AWS Database Blog data used here but provides additional details on the methodology, data model, and queries required to build a knowledge graph based search solution. As with other AWS services, we’re always available through your Amazon account manager or via the Amazon Neptune Discussion Forums.
About the author
 Dave Bechberger is a Sr. Graph Architect with the Amazon Neptune team. He used his years of experience working with customers to build graph database-backed applications as inspiration to co-author “Graph Databases in Action” by Manning.


