AWS Web3 Blog
Use Cosmos technology to deploy an enterprise consortium chain on AWS
This post is co-written with Haifeng Xi, Yelong Zhang and Weifeng Tang from Shanghai Bianjie AI Technology Inc.
Cosmos is a decentralized network of interoperable blockchain networks that serves as an open and highly scalable environment on which to build blockchain applications. With effective support for cross-chain interaction between homogeneous and heterogeneous blockchains, Cosmos aims to extend interoperability to a broader landscape.
Interoperability is essential for blockchains in the multichain era. Cosmos’s Interchain stack is an architecture enabling scalable, secure, interconnected blockchain-based applications and services that is well-suited for public chains specializing in vertical domains. it provides convenience to Decentralized application (dApp) builders by offering a modular Cosmos SDK tailored to their needs. Applications and protocols within the Cosmos ecosystem are interconnected using the Inter-Blockchain Communication (IBC) protocol, enabling sovereign assets and data exchange between sovereign blockchains. The ultimate goal of Cosmos is to create an Internet of Blockchains that allows for the extensive expansion and interaction of autonomous blockchains.
In this post, we discuss the value and technical architecture of Cosmos and provide a detailed tutorial on the quick deployment of the Cosmos enterprise framework (IRITA) within the AWS environment.
Value proposition
With the continuous development and prosperity of the Cosmos ecosystem, Cosmos-related technologies and communities have garnered increasing attention.
Cosmos addresses the three most challenging problems in the modern blockchain realm:
- Scalability – The CometBFT (formerly Tendermint Core) consensus can be seen as a voting consensus system. Proposers are selected based on Proof-of-Stake (PoS) and Byzantine Fault Tolerance (BFT) algorithms. A property of the BFT mechanism is instant finality, this means that as long as two-thirds of the nodes are honest, the consistency of voting results can be guaranteed.
- Usability – The modular framework (Cosmos SDK) allows for the convenient construction of highly interoperable application-specific blockchains. By providing reusable components and standards, the Cosmos SDK reduces the time and technical complexity required to build highly interoperable application-specific blockchain networks.
- Interoperability – Cosmos achieves cross-chain communication between L1 networks through the IBC protocol, similar to the role of TCP/IP.
With these unique designs, projects in the Cosmos ecosystem are granted more autonomy, flexibility, and superior performance.
The Cosmos ecosystem provides the necessary framework and infrastructure tools to realize an interoperable multi-chain world. With a focus on autonomy, sovereignty, and scalability, Cosmos offers developers and entrepreneurs a convenient way to experiment and innovate without significant upfront investment. The evolving community, on-chain governance, and decentralized development teams make Cosmos a truly decentralized ecosystem. Although Cosmos presents significant opportunities, competition between L1 networks is intensifying. In a minimalist world, Cosmos is constructing a more inclusive multi-chain world and steadily gaining traction.
Overview of solution
The core products of Cosmos include CometBFT consensus, Cosmos SDK, and the Inter-Blockchain Communication (IBC) protocol as well as Interchain Security.
CometBFT consensus
CometBFT consists of two main technical components: the blockchain consensus engine (CometBFT) and the Application Blockchain Interface (ABCI). CometBFT ensures all nodes record transactions in the same order. It adopts a typical Byzantine fault-tolerant approach and is a hybrid consensus combining PBFT (Practical Byzantine Fault Tolerance) and Bonded Proof of Stake (Bonded PoS). The following diagram illustrates its workflow.

Cosmos SDK
The Cosmos SDK is a toolkit that helps developers accelerate the development process, characterized by modularity and pluggability. With the Cosmos SDK, developers can build their own blockchains or functions based on the CometBFT consensus algorithm. The Cosmos SDK provides great convenience to developers by significantly shortening their development cycles. The Consensus and Networking parts necessary for the blockchain itself are handled by the CometBFT part in the Cosmos SDK as shown in the following diagram:

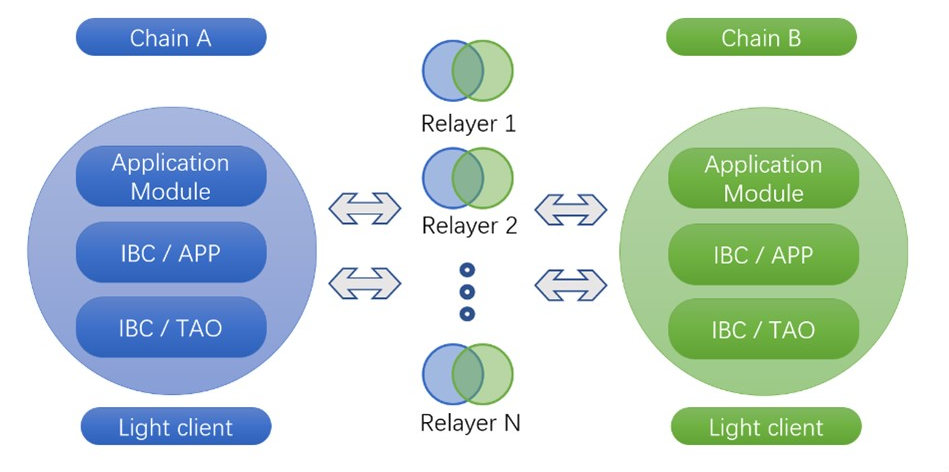
IBC Protocol
Cosmos is a decentralized network composed of multiple sovereign blockchains, which achieve cross-chain communication between different blockchains through the IBC protocol and relayers. Designed by Cosmos, IBC is the most crucial part of the Interchain landscape. The following diagram illustrates its architecture.
Interchain Security
Interchain Security is a complete security solution for Cosmos chains who want instant security at launch. With Interchain Security, consumer chains can be secured by the full validator set and multi-billion-dollar market cap of the provider chain (Cosmos Hub).
Deploying a consumer chain can be as seamless as deploying a smart contract on a platform such as Ethereum, or the chain can be customized at a very low level using the Cosmos SDK.
IRITA
The Inter-Realm Industry Trust Alliance (IRITA) is the first enterprise-level consortium chain product in Cosmos. Built with the modern blockchain framework of CometBFT and the IRIS SDK, and backed by the years of experience of the Bianjie in the Cross-chain, NFT, and big data privacy protection fields, IRITA supports next-generation distributed business systems in the form of an enterprise-level consortium chain product line.
IRITA has six core technological advantages: privacy-preserving data encryption and sharing, efficient consensus protocol, advanced cross-chain technology, highly practical on-chain/off-chain system interaction and multi-party collaborative business flow integration capabilities, flexible asset digital modeling and trusted exchange support, as well as big data storage. It can be widely applied in various business scenarios such as finance, healthcare, supply chain, and the Internet of Vehicles, providing value empowerment to the real economy based on blockchain trust machines.
IRITA supports the Chinese national cryptographic standards and provides a comprehensive SDK as well as operation and maintenance tool support. It meets enterprise-level application requirements in terms of performance, security, authentication and permissions, maintainability, scalability, and operational monitoring.
As a core contributor to the Cosmos technology, the Bianjie team has long been devoted to the field of cross-chain technology. Their open-source code has been adopted by dozens of global blockchain networks. The Bianjie team has contributed functional modules such as an NFT module to the Cosmos SDK, completed the implementation of ICS-20 code, and led the development of the ICS-721 Interchain NFTs standard and its code implementation. This functionality introduces cross-chain NFT interoperability based on IBC and extends the capabilities of IBC. The following figure illustrates the IRITA consortium chain product framework.

Prerequisites
For this walkthrough, you should have the following prerequisites:
- An AWS account
- AWS resources, such as Amazon Elastic Compute Cloud (Amazon EC2) instances
- Any third-party software, such as SSH client
- Any specialized knowledge about blockchain
Please note that following these steps below will incur AWS cloud resource usage fees that you will be charged.
Prepare blockchain nodes
The node hardware has the following requirements:
- Testing environment – 2 vCPUs, 8 GB RAM, 100 GB disk
- Recommended instance types – m6a.large, m5a.large, t3.large
- Production environment – 4 vCPUs, 16 GB RAM, 100 GB disk
- Recommended instance types – m6a.xlarge, m5a.xlarge, m6i.xlarge
To create four blockchain node servers, complete the following steps:
- Choose the operating system (for this post, Amazon Linux 2 AMI – Kernel 5.10).

- Select the instance type, for example, m6a.large.

- Configure local storage by creating one system disk (20 GB gp3 EBS volume) and one data disk (100 GB gp3 EBS volume). Mount the data disk to the
/datadirectory.

- Enter the following content in the user data field under the Advanced option. This script streamlines the process of installing Docker, configuring it, and preparing a data volume for Docker containers, by automating these tasks during initialization.
The four instances that will be used to deploy blockchain nodes will appear.
- Name the instances from node0, node1, node2, and node3, respectively.

- Configure security groups and enable the following port access for each node:
- 1317 – Provides external access to the RESTful API (consensus nodes may not open, full nodes optional).
- 8545–8546 – Provides RPC and WebSockets interfaces for EVM (consensus nodes may not open, full nodes optional).
- 9090 – External gRPC interface for nodes (consensus nodes may not open, full nodes optional).
- 26656 – P2P network between nodes.
- 26657 – External RPC interface for nodes (consensus nodes may not open, full nodes optional).
- 26660 – Provides monitoring metrics.
- Create a new security group and add inbound rules as shown in the following screenshot.

- Associate the security group with each node.

Install and deploy the solution
In this section, we go through the steps to install and deploy the solution.
Generate node data
Use the following code to generate node data on the first machine (node0) with chain-id as testnet:
Copy data
At this point, the /data directory of node0 will contain data for node0, node1, node2, and node3. Copy the data to the corresponding /data directory of each node and name it node:
Pay attention to the directory’s permission settings during the copying process.
Modify the configuration on each node
Perform the following steps on all four nodes:
- To configure the peers of other nodes, determine the internal IP and peer ID of each machine:
At the end of the code, we can obtain the peer configuration of each node in the format of node_peerid@node_ip:26656.
It’s recommended to organize the obtained information in a table for convenient modification of the configuration file later. The following table shows an example.
| Name | node_peerid@node_ip:26656 |
| Node0 | cf14286aef99e49c702cba4bd31d3529b8b3c01a@172.31.17.118:26656 |
| Node1 | 53aabd9bf37c54a2c21ece0671d08131e1b121cf@172.31.24.153:26656 |
| Node2 | a35ec424702ed479247c2a8adc546f238f9bc2d5@172.31.17.206:26656 |
| Node3 | 3368c48c13fb26ca0bcef27680c252877d94eddf@172.31.29.175:26656 |
- Modify the
persistent_peersconfiguration in/data/node/irita/config/config.toml, where each node needs to configure the peers of other nodes (excluding its own configuration). For example, the configuration for node0 should be as follows: - Modify
/data/node/irita/config/config.toml: - Start the nodes on each host:
Import validators
There is an iritacli directory in the /data/node directory of each node. Perform the following steps on each node:
- View the mnemonic:
- Recover the address using the mnemonic:

- List local addresses:

Check the status
Access http://node-ip-address:26657/status to view the blockchain status information.,

Node configuration guide
The main configuration files for nodes are config.toml, app.toml, and genesis.json. Among them, genesis.json is the genesis block file, which can be modified before chain startup and contains consensus parameters such as chain-id, block size, and the number of consensus nodes.
The following code shows common configurations in config.toml, effective after node restart:
The following code shows common configuration items for app.toml, effective after node restart:
Synchronize block data
For newly started nodes, besides synchronizing from the genesis block, there are three methods for fast synchronization:
- Stop a running node, package the
/root/.irita/datadirectory, and then copy and decompress it to the target host. - For nodes running on AWS, take a snapshot of the data disk (EBS volume) and use the snapshot to quickly restore data for other nodes. The snapshot can also be shared with other accounts to accelerate node data synchronization. Ensure that no other data or files outside the data are left in the snapshot.

- Use state sync to quickly start a new node. This method requires a node to enable block state snapshot as the data source for the new joining node. The new node can start with state sync mode and directly synchronize the latest block height state (skipping historical blocks) for fast startup.
Monitor the blockchain
In this section, we discuss the steps for blockchain monitoring.
Enable chain monitoring
Complete the following steps to enable chain monitoring:
- Modify the prometheus option in
/data/node/irita/config/config.toml, with the default port being 26660: - Save and restart the node service:
- Access http://<node-ip-address>:26660/metrics to view the monitored metrics. The metrics webpage should display various data like the example shown below:

Common monitoring rules are as follows:
Prometheus configuration
Use the following Prometheus configuration:
Grafana configuration template
You can use a fully managed Grafana service (such as Amazon Managed Grafana) to visualize and monitor metric data from the Prometheus data source:
- On the Amazon Managed Grafana console, create a new workspace for IRITA and complete the basic configuration.

- When it’s ready, log in with a user with admin privileges.
- On the Data sources tab, add the Prometheus data source.

- Create a dashboard template and add panels, select IRITA as the data source, and choose the desired metrics in the metric browser, such as block height, transaction count, block size, average block time, and other metrics.

The following screenshot is an example of an IRITA monitoring dashboard.

Clean up
To avoid incurring future charges, delete the resources.
Unmount the data volume
If you want to keep the block data, complete the following steps:
- Log in to the blockchain node instance through SSH and unmount the data disk:
- On the Amazon EC2 console, navigate to the instance.
- In the Storage section, locate the corresponding volume ID.
- Select the volume and choose Detach volume.
- If you want to delete the volume, select the volume and choose Delete on the Actions menu.
Delete the EC2 instances
On the EC2 console, navigate to the Instances page, select the Terminate instance on the Instance state menu.

Conclusion
Deploying Cosmos-based blockchain nodes with Amazon EC2 allows for convenient dynamic adjustment of resource configurations such as CPU, memory, and disk I/O based on the workload. Dynamic resource adjustment according to business needs can effectively achieve cost reduction and increased efficiency.
At the network level, interconnecting consortium chain nodes through the public network usually compromises security and performance while incurring high costs. By utilizing VPC peering connections, different node operators can deploy their nodes on the AWS Cloud and achieve interconnection across accounts through the internal backbone network, ensuring both security and performance, while virtually neglecting network traffic costs. The resource isolation and permission isolation between AWS accounts also effectively support the decentralized operation of the consortium chain.
In terms of data security, using the Amazon Data Lifecycle Manager allows for defining snapshot policies for node data disks and performing incremental snapshots on a scheduled basis without disrupting operations. Additionally, disk recovery based on snapshots can be completed in seconds, significantly improving fault recovery and the efficiency of new node startup. This approach avoids the time-consuming and resource-intensive process of synchronizing and running historical block data from scratch. Moreover, snapshots can be shared across AWS accounts, playing a crucial role in the deployment architecture of consortium chains involving multiple participants.
Using Amazon Managed Grafana as a managed service enables easier visualization and monitoring of node operation status. Facing increasing usage demands, it can automatically scale computing and database infrastructure and perform automatic version updates and security patches, thereby reducing the operational management burden of Grafana.
Bianjie combines multiple products from AWS to realize one-click deployment and automated operation and maintenance of enterprise-level consortium chains based on Cosmos, and plans to add the deployment of consortium chain nodes as a managed service to the AWS Marketplace, allowing enterprise customers to easily join existing networks or launch customized consortium chain networks with just a few clicks. To learn more and embark on your decentralized future with AWS, visit our AWS managed blockchain services and solutions as well as AWS marketplace for other partner solutions.
About the Authors
 Haifeng Xi is the Chairman and Co-Founder at Shanghai Bianjie AI Technology Inc. He has rich experience in large-scale internet product R&D and distributed application system integration. He has served as CTO of Wanxiang Blockchain, Vice President of Technology at China Finance Online Co., Ltd. (NASDAQ: JRJC), and Principal Architect at Tudor Investment and RBS Sempra. He has several pioneering blockchain technology patents, with profound technical R&D experience and innovative practical experience in Web 3 applications.
 Yelong Zhang is technical director at Shanghai Bianjie AI Technology Inc with more than 10 years of experience in software development, architectural design, and project management. He specializes in blockchain, container, DevOps, and internet architecture design and development. He also has an in-depth understanding of the underlying technology of blockchain.
 Weifeng Tang is a DevOps Engineer at Bianjie with many years of operation and maintenance experience. He is proficient in Linux OS, Shell scripting, Python, Kubernetes, and database services, as well as the operation and maintenance of blockchain and related products. He has a deep understanding of the architecture of distributed or decentralized applications.
 Aleck Xiao is a Solutions Architect of the GCR Startup team at AWS. He has 15 years of experience in designing, deploying, and managing enterprise-level data center infrastructure. He now mainly helps startups design and build scalable and secure cloud-based architectures that align to industry best practices utilizing AWS Cloud platforms. He is curious to explore emerging technology in terms of Web3.