AWS HPC Blog
Elastic visualization queues with NICE DCV in AWS ParallelCluster
Many HPC workloads require a graphical desktop, including cases like laying out the mesh for a CFD model, inspecting the output from a molecular-dynamics simulation, or simply running desktop software like Siemens StarCCM+ or Ansys Fluent.
In this blog post we’ll present a solution that combines the compute of AWS ParallelCluster with the remote desktop capabilities of NICE DCV to provide access to remote desktops connected to the same filesystems, user identities, and schedulers that HPC users expect.
Background
DCV is a high-performance desktop visualization package that provides a secure, low-latency, and high-performance solution for accessing remote desktops. It’s the streaming protocol beneath Amazon Appstream 2.0 and AWS Nimble Studio.
We include DCV in ParallelCluster already. It allows a single-user to connect visually to the head node using the same SSH keypair they used to connect to the cluster. This is a great solution for a single-user environment where the user wants a remote desktop session with no additional setup.
However, for environments with more than one user wanting to do visualization, we need to customize ParallelCluster a little more. The solution described in this post sets up a DCV session on instances in a compute queue. This has several advantages over the default DCV configuration:
- You can run multi-user sessions (i.e. an instance shared among many users) and multiple instances which are dedicated to individual
- You can run on hardware that’s optimized for remote-desktop applications like GPU-accelerated G4/G5 instances in a pay-as-you-go fashion, without adding that cost to the head node which is running all the time.
- You’ll be able to scale down graphical sessions when they’re not needed, to control costs.
Architecture of AWS ParallelCluster setup with a DCV queue
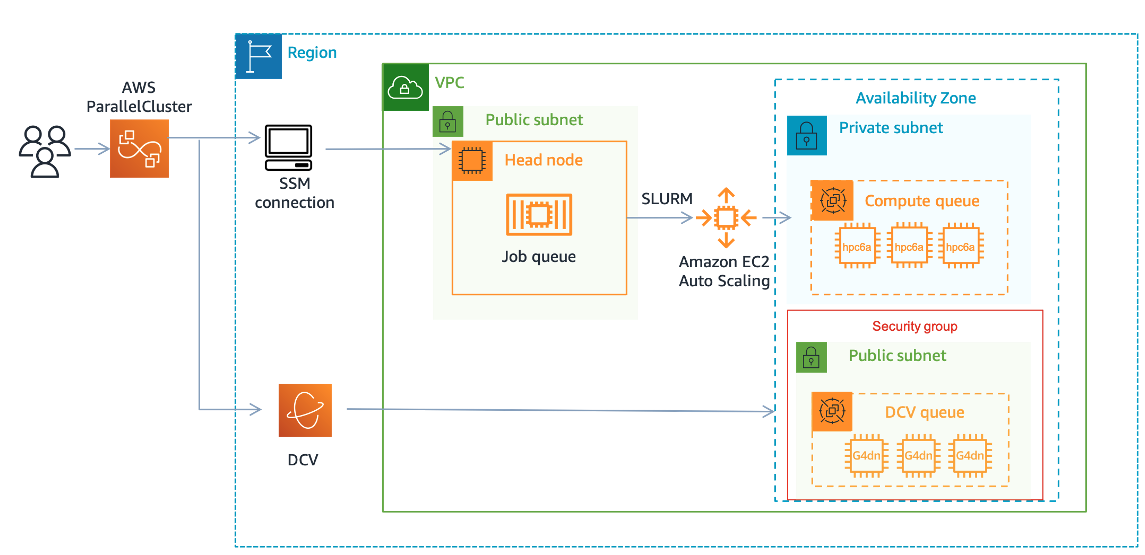
Figure 1 – AWS ParallelCluster Architecture with DCV Queue in a public subnet.
Setup
For this post, we’ll assume you’ve setup AWS ParallelCluster before using version 3.4.0 or later. If you haven’t, please follow the instructions in our AWS HPC Workshop. We’ll use the ability to specify multiple subnets, which was a new feature in 3.4.0. If you have an older version, you can still use the “No-Ingress DCV” section below.
In this scenario we’re going to setup a public subnet with a security group that allows users to connect to the DCV Instances on port 8443. If you’d prefer to keep the subnet private, see the section titled “No-Ingress DCV” below.
Step 1: Create a security group that allows you to connect to the compute nodes on port 8443. We’ll use this below in the AdditionalSecurityGroups parameter of the queue (Figure 2 shows a screenshot of this configuration):
- Go to EC2 Security Group > Create
- Name: DCV
- Add an Ingress rule, Custom TCP, Port
8443, 0.0.0/0

Figure 2 – Creating a security group that allows connections to the compute nodes on port 8443.
Step 2: Next, make sure you have a subnet in the same Availability Zone with Assign Public IP = True. This will allow users to resolve the IP address of the compute nodes. An alternative is to setup either a site-to-site VPN or AWS Direct Connect so users can resolve the private IP addresses of the compute nodes.
Step 3: Create a cluster with a queue called DCV and a graphics optimized instance type like the g4dn.xlarge
The key settings are described in this table.
| Parameters | Explanation |
| InstanceType | An instance type like a g4dn.xlarge optimized for the graphics workload. |
| AdditionalSecurityGroups | Allows users to connect on port 8443. |
| AdditionalIamPolicies | AmazonS3ReadOnlyAccess allows the compute nodes to fetch the DCV license. AmazonSSMManagedInstanceCore is needed for the No-Ingress DCV setup. |
| SubnetIds | This is a public subnet, i.e. one that assigns a public ipv4 address. |
You should have a cluster definition similar to this:
Region: us-east-2
Image:
  Os: alinux2
HeadNode:
  InstanceType: c5.xlarge
  Networking:
    SubnetId: subnet-123456789
  Ssh:
    KeyName: blah
  Iam:
    AdditionalIamPolicies:
      - Policy:arn:aws:iam::aws:policy/AmazonSSMManagedInstanceCore
Scheduling:
  Scheduler: slurm
  SlurmQueues:
    - Name: dcv
      ComputeResources:
        - Name: dcv-g4dnxlarge
          InstanceType: g4dn.xlarge
          MinCount: 0
          MaxCount: 4
      Networking:
        SubnetIds:
       - subnet-123456789
        AdditionalSecurityGroups:
          - sg-031b9cd973e8f62b0 # security group you created above
      Iam:
        AdditionalIamPolicies:
          - Policy: arn:aws:iam::aws:policy/AmazonSSMManagedInstanceCore
          - Policy:
        S3Access: arn:aws:iam::aws:policy/AmazonS3ReadOnlyAccess # needed for license access
Step 4: Next, create a job script desktop.sbatch using the listing that follows. This script:
- Launches in the DCV queue, which is the queue with the correct networking setup and instance type
- Sets a 12-hour timeout so the instance will automatically shut down after 12 hours
- Starts the DCV server
- Creates a DCV session with the job id as the unique identifier
- Creates a temporary password the user can use to connect (See the Multi-User section for more on this)
- Gives the user a URL that they’ll be able to connect to.
#!/bin/bash
#SBATCH -p dcv
#SBATCH -t 12:00:00
#SBATCH -J desktop
#SBATCH -o "%x-%j.out"
#SBATCH --exclusive

# magic command to disable lock screen
dbus-launch gsettings set org.gnome.desktop.session idle-delay 0 > /dev/null
# Set a password
password=$(openssl rand -base64 32)
echo $password | sudo passwd $USER --stdin > /dev/null
# start DCV server and create session
sudo systemctl start dcvserver
dcv create-session $SLURM_JOBID


TOKEN=$(curl -X PUT "http://169.254.169.254/latest/api/token" -H "X-aws-ec2-metadata-token-ttl-seconds: 21600")
instance_id=$(curl -sH "X-aws-ec2-metadata-token: $TOKEN" -v http://169.254.169.254/latest/meta-data/public-ipv4)
printf "\e[32mClick the following URL to connect:\e[0m"
printf "\n=> \e[34mhttps://$ip:8443?username=$USER&password=$password\e[0m\n"

while true; do
   sleep 1
done;
Now submit a job to spin up a DCV instance:
$ sbatch desktop.sbatch # take note of the job idStep 5: Once the job starts running, check the file referenced in desktop-[job-id].out for the connection details. You can input the URL in your browser to connect, although most terminal applications will also allow you to ctrl-click to connect.
![Figure 3 - The file desktop-[job-id].out contains the connection details you need to connect to the virtual desktop.](https://d2908q01vomqb2.cloudfront.net/e6c3dd630428fd54834172b8fd2735fed9416da4/2023/03/10/CleanShot-2023-03-10-at-11.32.09.png)
Figure 3 – The file desktop-[job-id].out contains the connection details you need to connect to the virtual desktop.
Setup for no-ingress DCV
There is an alternative to opening our security group to allow traffic from port 8443. This involves port-forwarding a session using AWS SSM. This allows us to lock down the security group and have no ingress.
It does, though, require the user to install the Session Manager Plugin on their desktop and run it locally each time they want to connect (shown in Figure 4). To make this process simpler, we’ll modify the desktop.sbatch script to output the command they need to run.
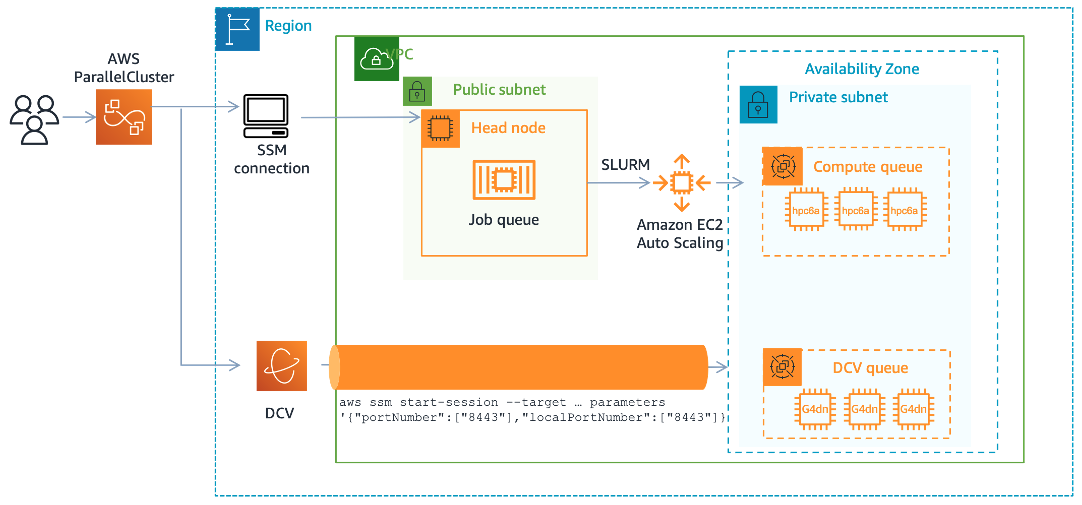
Figure 4 – An architecture for permitting access to DCV’s port 8443 without needing to open that port in a security group. This uses AWS SSM to tunnel traffic to this port via SSH.
First, install the Session Manager Plugin on the user’s local machine. Follow the instructions for the correct OS. You can install the plugin on supported versions of Microsoft Windows, macOS, Linux, and Ubuntu.
Next, submit a job using submission script that follows. This script:
- Launches in the DCV queue
- Starts the DCV server
- Creates a DCV session with the job id as the unique identifier
- Fetches the instance ID of the Amazon EC2 instance it’s running on and creates an SSM command which incorporates that.
- Gives the user a local URL that they’ll be able to connect to after running the port forwarding session.
#!/bin/bash
#SBATCH -p desktop
#SBATCH -t 12:00:00
#SBATCH -J desktop
#SBATCH -o "%x-%j.out"

# magic command to disable lock screen
dbus-launch gsettings set org.gnome.desktop.session idle-delay 0 > /dev/null
# Set a password
password=$(openssl rand -base64 32)
echo $password | sudo passwd $USER --stdin > /dev/null
# start DCV server and create session
sudo systemctl start dcvserver
dcv create-session $SLURM_JOBID

TOKEN=$(curl -X PUT "http://169.254.169.254/latest/api/token" -H "X-aws-ec2-metadata-token-ttl-seconds: 21600")
instance_id=$(curl -sH "X-aws-ec2-metadata-token: $TOKEN" -v http://169.254.169.254/latest/meta-data/instance-id)
printf "\e[32mFor a no-ingress cluster, you'll need to run the following command (on your local machine):\e[0m"
printf "\n=> \e[37m\taws ssm start-session --target $instance_id --document-name AWS-StartPortForwardingSession --parameters '{\"portNumber\":[\"8443\"],\"localPortNumber\":[\"8443\"]}'\e[0m\n"

printf "\n\n\e[32mThen click the following URL to connect:\e[0m"
printf "\n=> \e[34mhttps://localhost:8443?username=$USER&password=$password\e[0m\n"

while true; do
   sleep 1
done;
Now, run the output port-forwarding command locally on your desktop, like in Figure 5.

Figure 5 – Running output port-forwarding command locally on your desktop.
Finally, connect to the localhost URL for secure access to your DCV desktop.
DCV Client
DCV provides a native client for MacOS, Windows, and Linux. The client provides a better experience than the web client because it’s allowed to use more of the hardware capabilities of your workstation or laptop than the browser.
In the following steps we’ll show you how to modify the DCV queue to create and upload a DCV connection file so your users can connect using the native client.
First, download the client from the NICE DCV clients download page.
Next, you’ll need two additional IAM policies set in your DCV queue to enable the thin client. AWSCloudFormationReadOnlyAccess is used to describe the bucket created with the cluster, and we use AmazonS3FullAccess to allow uploading the connect file to that bucket.
Modify the IAM section of your cluster config file with this text:
      Iam:
        AdditionalIamPolicies:
          - Policy: arn:aws:iam::aws:policy/AWSCloudFormationReadOnlyAccess
          - Policy: arn:aws:iam::aws:policy/AmazonS3FullAccess
Update the cluster so those policies can take effect.
Now create a file called desktop.sbatch with this script:
#!/bin/bash
#SBATCH -p dcv
#SBATCH -t 12:00:00
#SBATCH -J desktop
#SBATCH -o "%x-%j.out"

# magic command to disable lock screen
dbus-launch gsettings set org.gnome.desktop.session idle-delay 0 > /dev/null
# Set a password
password=$(openssl rand -base64 32)
echo $password | sudo passwd $USER --stdin > /dev/null
# start DCV server and create session
sudo systemctl start dcvserver
dcv create-session $SLURM_JOBID

# params
source /etc/parallelcluster/cfnconfig
TOKEN=$(curl -X PUT "http://169.254.169.254/latest/api/token" -H "X-aws-ec2-metadata-token-ttl-seconds: 21600")
ip=$(curl -sH "X-aws-ec2-metadata-token: $TOKEN" -v http://169.254.169.254/latest/meta-data/public-ipv4)


port=8443
bucket=$(aws cloudformation describe-stacks --region $cfn_region --stack-name $stack_name --query "Stacks[0].Parameters[?ParameterKey=='ResourcesS3Bucket'].ParameterValue" --output text)

cat <<EOT > connect-$SLURM_JOB_ID.dcv
[version]
format=1.0

[connect]
host=$ip
port=$port
user=$USER
password=$password
sessionid=$SLURM_JOB_ID
EOT

aws s3 cp --region $cfn_region connect-$SLURM_JOB_ID.dcv s3://$bucket/
url=$(aws s3 presign --region $cfn_region s3://$bucket/connect-$SLURM_JOB_ID.dcv)
echo "$url"

printf "Connect using the DCV Client with the following file:\n"
printf "\e[34m=> %s \e[0m\n" "$url"

while true; do
   sleep 1
done;
Like the others, this script:
- Starts the DCV server
- Creates a DCV session with the job-id as the unique identifier
- Creates a DCV connection file with the IP, port, username, and session-id
- Uploads this DCV session file to the S3 Bucket associated with the cluster and creates a pre-signed URL to share this file
Once this script runs, you’ll see output like this:

Figure 6 – The output you’d expect from running the batch submission script when using the local client configuration.
Finally, copy and paste this long URL into your browser to download a session file. Double click on the session file to connect via the client.
Multi-User DCV
We’ve worked through an example which focused on a single user, i.e. the user that submitted the desktop.sbatch file. To work with multiple users, we first must re-configure the cluster to use Active Directory or another user-management system.
Once you’ve done this, you can remove the two lines that set a local password during your desktop.sbatch file execution:
password=$(openssl rand -base64 32)
echo $password | sudo passwd $USER --stdin > /dev/null
From now on, when users submit a job using that file, they’ll still get a URL to connect but it will expect them to authenticate with their Active Directory password.
Multiple DCV Sessions per Amazon EC2 Instance
In the above examples we set the –-exclusive flag, which tells Slurm to schedule only a single job on a machine. If we remove that flag, then Slurm will, by default, schedule each session on 1 vCPU.
This means that our g4dn.xlarge instance type (with its 4 vCPUs) can have four sessions scheduled to it. For example, if we submitted the desktop.sbatch file four times we’d see all the jobs being run on the same host dcv-st-dcvg4dnxlarge-1:
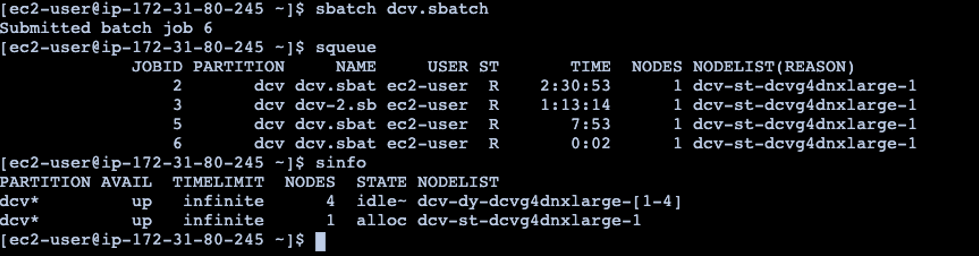
Figure 7 – Four jobs being run on the same DCV host.
To control how many sessions get scheduled per-machine, you can add a flag at the top of the desktop.sbatch script to specify the required resources. If each session needs 2 vCPUs:
#SBATCH -n 2To give each user their own GPU, just specify:
#SBATCH –-gpus 1To give each user a whole machine, specify the exclusive flag:
#SBATCH --exclusiveStopping Sessions
To cancel a running session before the time limit, users simply need to locate the job-id and run the slurm scancel command:
$ scancel [job-id]You can also accomplish this from the AWS ParallelCluster UI by clicking on the Stop Job button, as shown in Figure 8.

Figure 8 – Using the AWS ParallelCluster UI to stop a job, thus cancelling a DCV session.
Conclusion
This blog post showed you how to leverage AWS ParallelCluster and the Slurm scheduler to create on-demand graphical sessions for your users using NICE DCV. This ensures that DCV sessions are running on the right hardware, and can scale up and down based on user demand.
This will allow you to save on cost while providing great performance for your users’ needs. Let us know how you use this by reaching out to us at ask-hpc@amazon.com.