AWS HPC Blog
Scalable and Cost-Effective Batch Processing for ML workloads with AWS Batch and Amazon FSx
This post written by Michael Thies, DevOps Consultant, and Sai Sharanya Nalla, Data Scientist, from AWS Professional Services.
Batch processing is a common need across varied machine learning use cases such as video production, financial modeling, drug discovery, or genomic research. The elasticity of the cloud provides efficient ways to scale and simplify batch processing workloads while cutting costs. In this post, you’ll learn a scalable and cost-effective approach to configure AWS Batch Array jobs to process datasets that are stored on Amazon S3 and presented to compute instances with Amazon FSx for Lustre.
To demonstrate this solution, we will create a sample batch processing workload to train a machine learning model. Our sample workload will run a Random forest Machine Learning algorithm on an input dataset. Random forest is a supervised learning algorithm. Random forest builds multiple decision trees and merges them together to get a more accurate and stable prediction. We’ve trained a machine learning model based on a publicly-available direct marketing dataset that predicts customer behavior and have a provided training script. You can download the dataset as a ZIP file.
As our focus is on the scalability and cost-effectiveness of the batch processing approach, this post will not go into further details of the specific data, or how to build a machine learning model. We will, however, provide the necessary model file and test dataset that can be used for a “real world” batch processing task you might deploy on AWS.
Overview of the solution
The architecture we will create is depicted in Figure 1.
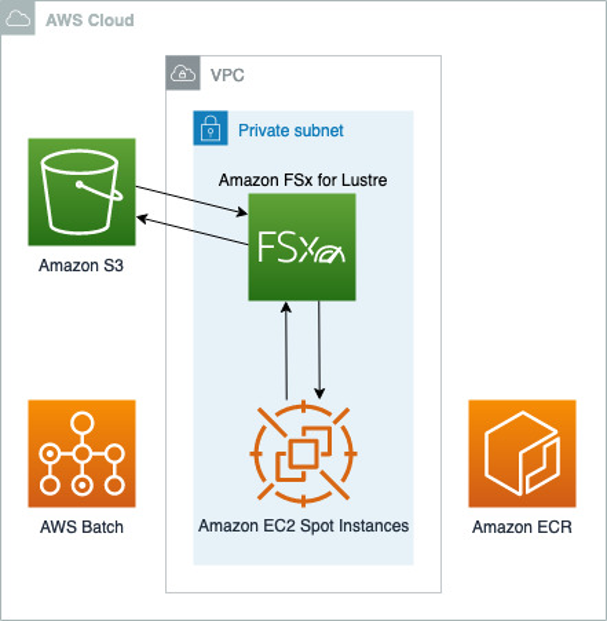
Figure 1. The solution architecture, showing AWS Batch managing EC2 Spot Instances that mount an Amazon FSx for Lustre shared filesystem to perform the analysis. Data are synced with Amazon S3 and containers images as pulled from on Amazon ECR registries.
We will use Amazon S3 to store the input and final output datasets. The advantages of using Amazon S3 for data management are its scalability, security, object lifecycle management, and integrations with other AWS services.
Using Amazon FSx for Lustre, we can access the input dataset on S3 from compute instances using normal POSIX file operations. We configure FSx for Lustre to import object metadata into the filesystem as objects are added to the S3 bucket. When applications access file data, FSx for Lustre fetches the S3 object data and saves it to the filesystem. For more information on FSx for Lustre, see https://docs.aws.amazon.com/fsx/latest/LustreGuide/what-is.html.
With the FSx for Lustre filesystem in place, we can access its data concurrently from multiple compute instances. We will use AWS Batch to manage those compute instances, as well as the batch processing job itself. AWS Batch enables developers, scientists, and engineers to easily and efficiently run batch computing jobs on AWS. AWS Batch dynamically provisions the optimal quantity and type of compute resources (e.g., CPU or memory-optimized instances) based on the volume and specific resource requirements of batch jobs submitted.
Our AWS CloudFormation template will create the following AWS Batch components:
- Compute Environment: The Compute Environment will provision EC2 Spot Instances to process the workload. Spot Instances can provide up to a 90% discount compared to On-Demand Instance prices. We will use an instance type setting of “optimal”, which instructs AWS Batch to select instances from the C, M, and R instance families to satisfy the demand of our Job Queue. We’ll also specify a Launch Template to apply on instance startup. This Launch Template installs the Lustre client software and mounts the FSx for Lustre filesystem to the instance.
- Job Definition: The Job Definition specifies how Jobs are to be run. We configure the vCPU and memory to allocate, and the Docker image repository location in Amazon ECR. We also specify the Docker volume and mount point used to mount the FSx for Lustre filesystem within the container and set required environment variables.
- Job Queue: We associate a Job Queue to the Compute Environment to enable us to submit Jobs for processing.
For more information on AWS Batch and its components, see https://docs.aws.amazon.com/batch/latest/userguide/what-is-batch.html.
Next, we’ll create this architecture and submit a couple test jobs.
Walkthrough
To create this architecture in your own AWS account, follow these steps.
The steps we will perform are as follows:
- Create the AWS CloudFormation stack
- Upload input dataset to S3
- Create and upload Docker image
- Submit sample AWS Batch jobs
- Create FSx for Lustre Data Repository export task
The link to GitHub repository containing necessary scripts and templates is located at https://github.com/aws-samples/scalable-and-cost-effective-batch-processing-using-aws-batch
To avoid unexpected charges, be sure to follow the clean-up procedures at the end of this post.
Prerequisites
For this walkthrough, you should have the following prerequisites:
- An AWS account
- The AWS CLI installed and configured
- Docker installed
Create the CloudFormation Stack
You can create the AWS CloudFormation stack using the console or AWS CLI. The stack creation should take about 20 minutes to complete.
To create the stack using the console
- Log in to the AWS CloudFormation console
- Create the stack following these steps. Select the
infra/template.ymlfile as the template to upload. Name the stackaws-hpc-blog-batch-processing. - Once stack creation is complete, select the Outputs tab to view the identifiers for the resources that were created. These values will be used in the proceeding steps.
To create the stack using the AWS CLI
- In a command line terminal, run the following command to create the stack:
aws cloudformation create-stack --stack-name aws-hpc-blog-batch-processing --template-body file://infra/template.yml --capabilities CAPABILITY_IAM- Run the following command to wait for stack creation to complete:
aws cloudformation wait stack-create-complete --stack-name aws-hpc-blog-batch-processing- Get the stack outputs to view the identifiers for the resources that were created. These values will be used in the proceeding steps:
aws cloudformation describe-stacks --stack-name aws-hpc-blog-batch-processing --query "Stacks[].Outputs[]" --output textUpload input dataset to S3
We will add 100 copies of the test-data1.csv file to the S3 bucket created in the CloudFormation stack. Recall that the FSx for Lustre filesystem is configured to import the S3 object metadata into the Lustre filesystem as these objects are created.
To upload the input dataset to S3
- Refer to the CloudFormation stack outputs to set a variable containing the value for
<BucketName>:
BucketName=<BucketName from stack outputs>- Upload the file:
aws s3 cp model/test-data1.csv s3://${BucketName}/input/- Create copies of the file:
for a in {2..100}; do aws s3 cp s3://${BucketName}/input/test-data1.csv s3://${BucketName}/input/test-data${a}.csv; doneCreate and upload Docker image
Next, create the Docker image and upload it to Amazon ECR, where it will be accessible to the Compute Environment.
To create and upload the Docker image
- Refer to the CloudFormation stack outputs to set a variable containing the value for
<RepositoryUri>:
RepositoryUri=<RepositoryUri from stack outputs>- Build the Docker image:
cd model
docker build -t $RepositoryUri .
cd ..- Push the Docker image to ECR:
aws ecr get-login-password | docker login --username AWS --password-stdin $RepositoryUri
docker push $RepositoryUri
Submit sample AWS Batch jobs
Before we submit the first test job, let’s review the Docker entrypoint bash script. This script demonstrates how each Array job worker selects its own discrete list of input files to process. It determines this list using the set of all input file names found on the FSx for Lustre filesystem, the number of workers assigned to the Array job, and the AWS Batch-provided AWS_BATCH_JOB_ARRAY_INDEX environment variable.
#!/bin/bash -e

# Get sorted list of all input file names
SORTED_FILELIST=($(find $INPUT_DIR -type f | sort))

# Calculate number of files for this worker to process:
#   ceiling(length(SORTED_FILELIST) / NUMBER_OF_WORKERS)
BATCH_SIZE=$(((${#SORTED_FILELIST[@]} + NUMBER_OF_WORKERS - 1) / NUMBER_OF_WORKERS))

# Select list of files for this worker to process
FILES_TO_PROCESS=(${SORTED_FILELIST[@]:$((AWS_BATCH_JOB_ARRAY_INDEX * BATCH_SIZE)):$BATCH_SIZE})

# Create worker output directory
WORKER_OUTPUT_DIR="${OUTPUT_DIR}/${AWS_BATCH_JOB_ID}"
mkdir -p $WORKER_OUTPUT_DIR

echo "job $(( AWS_BATCH_JOB_ARRAY_INDEX + 1 )) of ${NUMBER_OF_WORKERS}, processing ${#FILES_TO_PROCESS[@]} files"

for input_file in ${FILES_TO_PROCESS[@]}
do
  output_file="${WORKER_OUTPUT_DIR}/$(basename $input_file)"

  if [[ -f $output_file ]]
  then
    echo "output file $output_file already exists, skipping..."
    continue
  fi

  echo "processing $input_file"

  python predict.py --input_file $input_file --output_file $output_file
done
To submit Array job with two workers using AWS CLI
- Run the following command to submit a job with two workers:
aws batch submit-job --cli-input-json file://test-2-workers.json- Open the AWS Batch dashboard to view job status.
- In the left navigation pane, choose Jobs
- For Job queue, select
aws-hpc-blog-batch-processing-job-queue. - Select the
test-2-workersjob - Select the Job index link to view worker details.
- Click on the Log stream name to view worker logs in CloudWatch.
In our test, this job completed in 6 minutes and 22 seconds. Since we used an input dataset of 100 files, each worker processed 50 files. The two workers altogether processed about 16 files per minute.
To submit Array job with ten workers using AWS CLI
- Run the following command to submit a job with ten workers:
aws batch submit-job --cli-input-json file://test-10-workers.json- Open the AWS Batch dashboard to view job status.
- In the left navigation pane, choose Jobs.
- For Job queue, select
aws-hpc-blog-batch-processing-job-queue. - Select the
test-10-workers - Select the Job index link to view worker details.
- Click on the Log stream name to view worker logs in CloudWatch.
In our test, this job completed in 1 minute and 4 seconds. Since we used an input dataset of 100 files, each worker processed 10 files. The ten workers altogether processed about 94 files per minute. Table 1 has the job summary data.
| Job | Workers | Input files | Files per worker | Total time | Files per minute |
|---|---|---|---|---|---|
| test-2-workers | 2 | 100 | 50 | 6m 22s | 16 |
| test-10-workers | 10 | 100 | 10 | 1m 4s | 94 |
Create FSx for Lustre Data Repository export task
Now that the batch jobs have generated a set of predictions, let’s copy them to S3 by running an FSx for Lustre Data Repository export task.
To create Data Repository export task
- Refer to the CloudFormation stack outputs to set a variable containing the value for
<FSxFilesystemId>:
FSxFilesystemId=<FSxFilesystemId from stack outputs>- Run the following command to create the export task:
aws fsx create-data-repository-task --type EXPORT_TO_REPOSITORY --file-system-id $FSxFilesystemId --report Enabled=false- View progress of the Data Repository task following this procedure.
- When complete, log in to the S3 console to view the output files on the S3 bucket at the FSx for Lustre filesystem’s configured export path (
output/).
Cleaning up
To avoid incurring future charges, delete the resources using the following instructions:
- Follow this procedure to empty the S3 bucket created by the stack.
- Follow this procedure to delete the ECR repository created by the stack.
- Run the following command to delete the CloudFormation stack:
aws cloudformation delete-stack --stack-name aws-compute-blog-batch-processingConclusion
In this post, we’ve demonstrated a batch inference approach using AWS Batch and Amazon FSx for Lustre to create scalable, cost-effective batch processing. We’ve shared a design that enables simple scaling of the number of concurrent jobs deployed to process a set of input files.
To further enhance this process, you may consider wrapping it with a workflow orchestrator such as Amazon Managed Workflows for Apache Airflow, or using the AWS Batch integration provided by AWS Step Functions.
For analysis of batch inference results, consider cataloging them with AWS Glue for interactive querying with Amazon Athena.