The Internet of Things on AWS – Official Blog
Drive efficiencies in sustainable waste management using AWS IoT Core
According to the UK local government association, councils spend around £852 million per year on waste collection. Therefore, even a small savings of 5% is considerable, amounting to £42.6 million.
Additionally, when it comes to food, globally, we waste almost 1 billion tonnes of food each year. According to WRAP charity, businesses and governments are not doing enough to tackle food waste, which is responsible for emitting up to 10% of global greenhouse gases. The wider legislative context is driving councils to become greener and consider their carbon footprint and impact on air pollution. As a result, councils are increasingly reluctant to send waste to landfills, favoring disposal options higher up the waste hierarchy, including waste prevention, minimization, reuse, and recycling.
To support the waste minimization initiatives from councils and governments, it is important to collect reliable, comprehensive, and consistent waste data before the waste is sent to landfills because you cannot manage what you are not measuring. The connected waste bin solution example in this blog captures the weight and types of waste generated. Councils, communities, and private sectors (e.g., restaurant chains) can benchmark their performance to identify areas of success against sustainable waste management objectives and targets.
The monitoring of waste avoids potential stockpiling of waste at depots and supports greater transparency for regulators. The regulators can make informed decisions on what types of waste are going to landfills and target specific waste or areas to reduce environmental impact by maximizing landfill diversions based on types of waste sent to recycling facilities.
By knowing how much waste a particular area generates over a specific period, you can avoid scheduling unneeded waste pick-ups, which helps streamline the waste management process, makes them more cost effective, and in turn reduces carbon footprint.
By installing connected waste bins in kitchens, restaurant chains get complete transparency on their food waste and gain insights from historical data to reduce food waste and costs. In commercial buildings / offices, the solution can help to identify waste types and point to the correct waste bin. Overall, the connected waste bin solution can become a crucial tool for sustainable waste management initiatives.
This blog post provides an example of how to build a connected waste bin solution using AWS IoT Core and Amazon Rekognition to achieve sustainability goals.
Overview
This post describes AWS serverless key architecture components for provisioning devices, collecting waste weight data through AWS IoT Core into AWS IoT Analytics, and ingesting waste images directly into Amazon Simple Storage Service (S3). Once the data is in Amazon S3, the solution analyzes images using Amazon Rekognition to enrich waste data, which end users can then leverage to build reports such as area waste levels and waste heat maps using Amazon QuickSight.
This solution involves installing sensors and cameras, configuring AWS IoT Greengrass on a Raspberry Pi and connecting it to AWS IoT Core using fleet provisioning, building a machine learning model using Amazon Rekognition, and building a data pipeline and visualization using AWS IoT Analytics and Amazon QuickSight respectively.

End-to-end sensor data flow to the cloud
The following section explains the steps numbered in the previous architecture diagram.
- The IoT gateway provisions itself into AWS IoT Core using a fleet provisioning mechanism and authenticates from there on using a unique X.509 device certificate issued by AWS IoT Core. It also starts the custom application component to read sensors. I explain further the custom component deployment in the section, Test remote application deployment.
- The weight sensor monitors the waste bin. When weight goes up by a certain threshold, it triggers the camera.
- Camera takes a picture of the waste.
- Custom application then uploads waste image to an Amazon S3 bucket using AWS IoT Greengrass stream manager SDK.
- It also sends weight data over the MQTT channel to AWS IoT Core.
- AWS IoT Core receives weight data. It then executes AWS IoT rules to ingest data into the AWS IoT Analytics pipeline.
- The pipeline executes data transformation using an AWS Lambda function, which pulls uploaded waste images from the Amazon S3 bucket and analyses the image using pre-built machine learning models from Amazon Rekognition.
- Finally, store transformed payload in a data store backed by an Amazon S3 store
- Use Amazon QuickSight to generate the analytics reports.
Waste bin sensor installation
For demonstration, we use a Raspberry Pi as the IoT device gateway, a gravity sensor to measure the weight of the waste, and a camera to take the still picture of waste when you drop an item in the bin. To connect the waste bin to the cloud, we wire sensors to the waste bin for our demo use case, as shown in the following image.

Build ML Model
You can use a pre-built Amazon Rekogntion model to analyze waste images and detect items in the waste by checking the labels returned by Amazon Rekognition.
Alternatively, you can prepare custom labelled data sets for specific types of needs. Preparing those data sets involves collecting various waste images, e.g., typical waste in a household waste bin, and uploading those images to the custom project under the training and testing data set. After uploading, you need to label the waste images to train the model. You can use Amazon SageMaker Ground Truth Plus to automate data labeling.
In this blog post example, we use a pre-built model.
Prerequisites
- An AWS Account.
- AWS Identity and Access Management (IAM) administrator access.
- The AWS Command Line Interface (AWS CLI).
- An Amazon S3 bucket to upload all the artifacts from the cloned repository under src/greengrass-app-component directory.
- For local development, an IDE, e.g., vscode and python3.
- An IoT device with Linux OS to use as an AWS IoT Greengrass core device installed with JDK and other required dependencies for AWS IoT Greengrass core.
- Root access on an IoT device to run AWS IoT Greengrass core software.
- A basic understanding of setting up a Raspberry Pi.
- Hardware connections as explained in the section Waste bin sensor installation.
- A basic understanding of
Deploy the solution
First, upload AWS IoT Greengrass custom component artifacts to the Amazon S3 bucket. The solution source code is available on GitHub.
- Clone repository from GitHub to your local
- On AWS Console, choose Amazon S3 service
- Choose your bucket created as mentioned in prerequisite
- Choose Create folder
- Enter greengrass-app-component in folder name field and choose Create folder
- Choose the greengrass-app-component folder and choose Upload
- Choose Add files on the upload screen and choose all the files from the greengrass-app-component directory from the repository cloned on your local environment
- Finally, choose Upload
- Please make sure that all the artifacts are under s3://<your bucket name>/greengrass-app-component. This is very important to ensure the path is correct for successful deployment on an edge gateway.
With the AWS CloudFormation template, you can now deploy the solution which sets up the below resources on AWS.
- Amazon S3 buckets for storing waste images and weight sensor data
- Necessary IAM roles and policies to install AWS IoT Greengrass core software with fleet provisioning, AWS IoT Core, AWS Lambda functions and AWS IoT Analytics.
- AWS IoT Analytics to collect, transform, and store sensor data
- AWS IoT Core rules to read data from MQTT topics and ingest into downstream AWS IoT Analytics services
- AWS Lambda functions on AWS
- IdentifyWasteType – to analyze waste images using Amazon Rekognition
- Certificate provisioner – to create claim certs and store them in AWS Secrets
- RoleAliasProvisioner – to create a role that points to the token exchange role
- Create component software to be deployed on an IoT gateway to read sensors.
The smart bin demo app CloudFormation template automates the above steps for setting up cloud resources. If you run this script, please follow the steps on AWS Console to complete stack deployment. After the stack is deployed, please refresh the screen until status changes to CREATE_COMPLETE.
- Deploy the latest CloudFormation template by following the link below for your preferred AWS region.
| Region | Launch Template |
| US East (N. Virginia) (us-east-1) | |
| US West (Oregon) (us-west-2) | |
| EU (Ireland) (eu-west-1) | |
| EU (Frankfurt) (eu-central-1) | |
| AP (Sydney) (ap-southeast-2) |
- If prompted, login using your AWS account credentials.
- You should see a screen titled Create Stack at the Specify template step. The fields specifying the CloudFormation template are pre-populated. Choose Next at the bottom of the page.
- On the Specify stack details screen, you can customize the following parameters of the CloudFormation stack:
| Parameter label | Default | Description |
| Stack name | smart-bin-demo-app | This is the AWS CloudFormation name once deployed |
| ArtefactsBucketName | Provide the Amazon S3 bucket name where you uploaded the artifacts in step 4 of the prerequisite section. | |
| ProjectName | smart-bin-demo-app | smart bin app project name |
| ResourcePrefix | demo | The AWS resources are prefixed based on the value of this parameter. You must change this value when launching more than once within the same account. |
When completed, choose Next
- Configure stack options if desired, then choose Next.
- On the review screen, you must check the boxes for: These are required to allow CloudFormation to create a role to grant access to the resources needed by the stack and name the resources dynamically.
- I acknowledge that AWS CloudFormation might create IAM resources
- I acknowledge that AWS CloudFormation might create IAM resources with custom names
- I acknowledge that AWS CloudFormation might require the following capability: CAPABILITY_AUTO_EXPAND.
- Choose Create Stack
- Wait for the CloudFormation stack to launch. Completion is shown when the Stack status is CREATE_COMPLETE.
- You can monitor the stack creation progress in the Events tab.
Deploy AWS IoT Greengrass on IoT gateway
Now that we have set up all the required resources in the AWS account on cloud, we can prepare a package to install AWS IoT Greengrass v2 core software with AWS IoT fleet provisioning.
To prepare the package, all the steps are part of this script. You can execute this script on the IoT device gateway or your computer. Please make sure that you have installed AWS CLI v2 with access to your AWS account.
For this use case, I execute on my laptop to create a package in the build directory. You can then copy the package on your IoT gateway (e.g., Raspberry Pi). The script performs the following steps.
- Create build directory
mkdir build && cd build- Download AWS CA, claim certificates from AWS Secrets Manager
- Download AWS IoT Greengrass and fleet provisioning plugin
- Get the endpoints and fleet provisioning template for AWS IoT Core
- Prepare config.yml.
- Prepare AWS IoT Greengrass start up command
- Change execution permission
Test the solution
As we have configured the Raspberry Pi with AWS IoT Greengrass core software along with automatic fleet provisioning, let us now run the AWS IoT Greengrass service.
Test device provisioning
- Connect (ssh) to IoT device gateway (e.g., Raspberry Pi) command line terminal and run the following command to start the AWS IoT Greengrass service to auto provision, authenticate, and establish a connection to AWS IoT Core.
sudo build/fleet_provision.sh- On the AWS IoT Core Console, expand the Greengrass section from the left panel and choose the Core Devices option to verify the state of device. The device status should appear healthy as below.

- If the device does not appear healthy, then please check the AWS IoT Greengrass service log for any errors under /greengrass/v2/logs folder and follow troubleshooting documentation.
Test remote application deployment
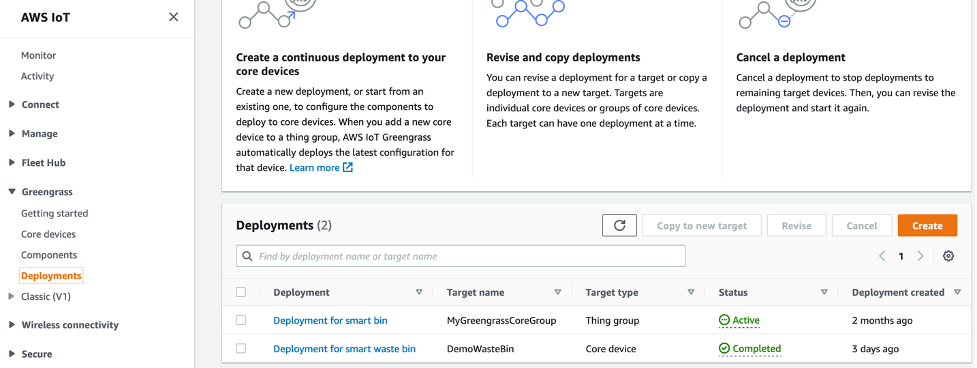
- Under the AWS IoT Greengrass section, choose Component for edge application deployment. Deploy monitor_wastebin_app custom component created in step 9 of the Deploy Cloud Section. Refer to the procedures in the diagram below.
 Verify the details of version 2.0.0 and choose Deploy.
- On deployment stage, select Create new deployment.

- On the specify target page, select Core device as target and enter the name of core device from step 2 in section Test Greengrass device provisioning. For the rest of fields, follow the instructions on the page.
- On the select components page, please select the following components (My components and Public components) as shown screen shot.
 Finally, check component configuration and select Next. Then on Configure advanced settings, only choose Next and move to Review. On the Review stage, choose Deploy to finish the deployment.
 Please note that if you are redeploying the same component, then select the changed component and select Configure component in the top right corner. Then in the Configuration to merge section as shown in the following screen shot, please enter some text, e.g., “deployment7.”
 On the AWS IoT Greengrass console, deployment should appear as completed. If not, then just restart greengrass service on Raspberry PI using below commands.
sudo systemctl stop greengrass.servicesudo systemctl start greengrass.service
Test data flow
- On the AWS IoT Core Console, choose Test from the left panel and subscribe to the “demo/smart-bin” MQTT topic.
- To test E2E flow, place waste bin on gravity sensor plates. Also, make sure you can focus the camera on the waste bin. Drop a waste item in the bin. As the weight of bin changes, app uploads the latest bin weight and picture of the waste to the AWS cloud.
- Verify that AWS IoT Core receives the waste data payload on MQTT topic as explained step 1.
Data Ingestion
On the AWS IoT Analytics Console, query demo_trash_dataset to verify the final enriched payload.


Prepare reports
If you are new to Amazon QuickSight, sign up here by following steps and choose Standard edition.
Create a SPICE dataset
Before you build dashboards, you need to first create a Super-fast, Parallel, In-memory Calculation Engine (SPICE) data set, which is the robust, in-memory engine that Amazon QuickSight uses. It’s engineered to perform advanced calculations and serve data.
- In the Amazon QuickSight console, choose New Dataset

- Choose AWS IoT Analytics as the data source.

- Enter the name. Choose AWS IoT Analytics demo_trash_dataset to import into SPICE dataset. Then you are all set to play with data using Amazon QuickSight.

Create dashboards
Beyond collecting waste data for reporting and analysis purposes, councils and restaurant chains can build waste analytics to justify several following rationales.
- Benchmarking performance against waste minimization targets periodically by aggregating data across different dimensions.
- Planning collections cycles and shaping future strategies around waste minimization.
- Identifying potential problems well in advance by understanding area wise waste heatmap and already stock piled waste at depots. Use this data for building the business case for securing funding for a new recycling facility.
- Reducing food waste: Restaurants can identify particular food waste across a chain of restaurants, define goals to reduce food waste, and evaluate the performance of these goals.
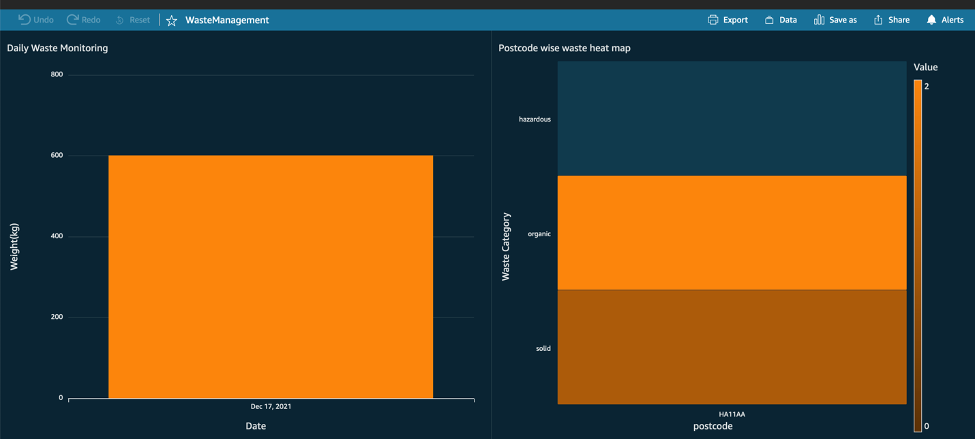
The below sample dashboard shows post code wise and date wise aggregated waste data.
Clean up
To avoid incurring future charges, please clean up the resources created.
To delete the cloud formation stack successfully, please carry out the following steps first. Otherwise, stack deletion might fail.
- Please delete all the contents of the demo-trash-bin to make them empty
- On the AWS IoT Core Console, choose Things under the Manage section. Then choose DemoWasteBin.
- Choose the Certificates tab. Then choose each certificate and choose Detach.
- Under the Secure section, choose Certificates
- Finally, revoke and delete all certificates one by one by selecting Revoke and Delete from the Actions drop down under the Secure section.
Remove the stack
Delete AWS IoT Greengrass from the IoT gateway (Raspberry Pi) using the steps explained in the Uninstall AWS IoT Greengrass section.
- Open the AWS CloudFormation Console.
- Choose the smart-bin-demo-app project under the stacks, then select Delete Stack.
- Your stack might take some time to delete. You can track its progress in the Events tab.
- When it is done, the status changes from DELETE_IN_PROGRESS to DELETE_COMPLETE. It then disappears from the list. Because the stack deletion takes time, please refresh until it shows status as DELETE_COMPLETE.
Conclusion
As the majority of landfills near capacity, there is a tremendous impact on the environment and health hygiene of urban areas. The monitoring and metering of waste enables understanding of what options meet environmental standards. For example, understanding the sheer volume of waste might help councils base waste collection charges on actual weight of waste instead of flat fee or bin volume. This will give consumers more sense of direct control over how much they are charged and help them make sustainable choices. Read more information on sustainable waste management from departments for communities and local government in the UK and the sustainability guide from the city of Westminster.
About the Authors
 Satish Mane is a Solutions Architect with the SMB team at AWS, based in London, UK. He provides technical guidance and helps customers innovate on AWS. He is passionate about analytics and IoT technologies. He loves building prototypes/demos around IoT, Streaming and AI/ML technologies. Outside of work, he enjoys spending time and traveling with his family, playing cricket, cooking and driving. Satish Mane is a Solutions Architect with the SMB team at AWS, based in London, UK. He provides technical guidance and helps customers innovate on AWS. He is passionate about analytics and IoT technologies. He loves building prototypes/demos around IoT, Streaming and AI/ML technologies. Outside of work, he enjoys spending time and traveling with his family, playing cricket, cooking and driving. |
 Manish Dhawaria is a Senior Solutions Architect at Amazon Web Services. Mani is passionate about Containers, observability, open-source tools and he enjoys helping customers solve their technology problems. He is based out of London and in his spare time, he likes to spend time with his family and enjoys outdoor activities. Manish Dhawaria is a Senior Solutions Architect at Amazon Web Services. Mani is passionate about Containers, observability, open-source tools and he enjoys helping customers solve their technology problems. He is based out of London and in his spare time, he likes to spend time with his family and enjoys outdoor activities. |