AWS for M&E Blog
AWS Artist Series: Rigging the characters for Picchu in Blender
This is the 6th post in our AWS Artist series, find the other five below:
AWS Artist Series: Laying out the opening shots of Spanner
AWS Artist Series: Compositing Spanner
AWS Artist Series: Creating characters with dynamic wrinkles
AWS Artist Series: Animating Noa
AWS Artist Series: Rigging the bridge for “Spanner”
Introduction
Picchu is the story of an Andean girl named Mayu on a journey to an unexpected destination to fulfill her destiny. She overcomes physical obstacles and her inner fears and doubts, with the teachings and unconditional support of her mother. The animated short film was written and directed by Amazon Web Services (AWS) Art Director, Amaru Zeas. It was created by FuzzyPixel, an internal creative team at Amazon that tests tools and services in development for animation and visual effects. The team produced the project in nine months with a small, geographically distributed team using Amazon Nimble Studio.
The finished short film can be viewed here: Animated Short Film: Picchu
Movie: Some final shots of the animated short film Picchu, created by the FuzzyPixel team
Why Blender
AWS joined the Blender Development Fund in 2020 as a Corporate Patron. The team wanted to support the Blender Foundation and the development of the open-source software in more ways by also providing feedback and suggestions for improvements. For that we were eager to learn, use, and evaluate Blender, while at the same time using Amazon Nimble Studio to produce a high quality animated short film that showcases what is possible when working and collaborating in the cloud.
For me, Picchu was the first time that I rigged in Blender, after having mostly worked in Maya for the past 20 years. While transitioning and learning Blender, I ran into a few challenges. In particular, those challenges related to weights painting, python scripting, and setting up drivers. Some of them were just a part of the learning curve of using a new tool and not being able to rely on my muscle memory.
Getting started with Blender
My first instinct was to look for similarities between Maya and Blender. This stemmed from a desire to work the same way that I was used to, by trying to port my previous rigging knowledge from Maya to Blender. This proved to be more difficult than I anticipated. Blender’s approach is quite different when compared to Maya or other digital content creation (DCC) applications. The lack of a node-graph for rigging in Blender, no access to a profiler to evaluate rig performance, and Blender’s bone layers and bone groups required some rethinking on my part.
When I began my Blender journey, other artists recommended keeping the default hotkeys to make it easier to learn and follow along with online tutorials. However, after using Blender for a while, I remapped some of my hotkeys and changed some of my preferences and Blender’s default settings to make it more similar to Maya. That made navigating in Blender much easier and allowed me to use more of the muscle memory that I had built in Maya over the years. There were a few good resources that I started with – one of them was the free video guide, “The Blender Rosetta Stone (Making the switch from Maya to Blender),” where Brad Clark from Rigging Dojo goes over setting up good preferences and changing some Blender defaults to make the switch for Maya users easier.
Body Rigging
When working in Maya, I used to do a lot of scripting and wrote my own auto-rigging tools. Blender comes with a built-in auto rigging solution, the add-on “Rigify.” While we were getting started on Picchu, the Blender foundation was working on its open-source movie, “Sprite Fright,” and released the add-on “CloudRig,” an extension to “Rigify.” I had been following the Blender Open Movie blog and seeing the quality of the cartoony and feature-rich rigs that CloudRig provided. It felt like a good fit for our short film as well.
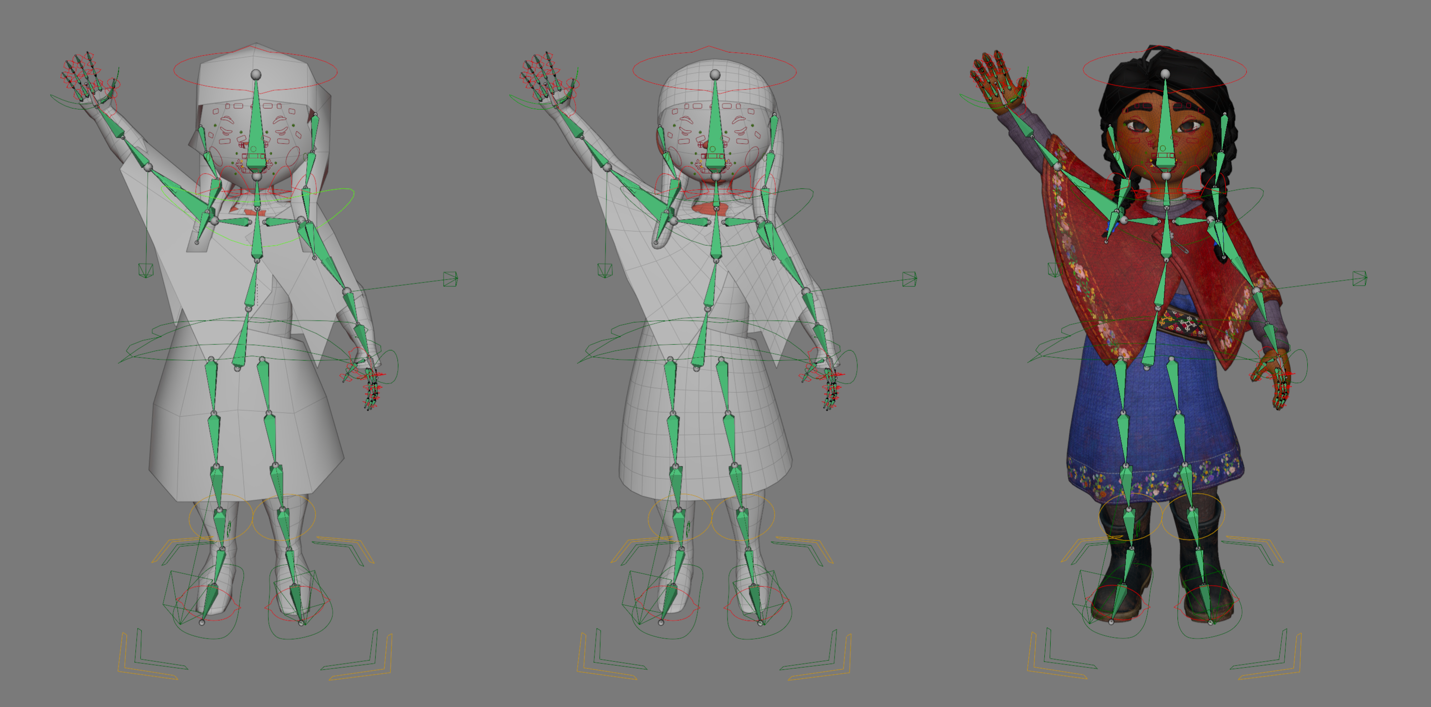
“Rigify” and its extension “CloudRig” are plug-ins inside Blender that consist of a collection of scripts. They aid in the creation of rigs by simplifying the process. The user loads a template skeleton and moves the bones to fit the skeleton to the proportions of the character. After that, another script is run to create the controls and the rig logic procedurally, based on the previously positioned guide skeleton. This speeds up the rigging process by automating the creation of all the rig logic such as inverse kinematics, limbs with FK-IK blending, foot rolls, and individual finger controls. Knowing that we had three characters to rig for this film, using an existing solution saved time and allowed us to focus on deformations instead.
CloudRig was used for the bodies, which helped speed up the body rigging process
Face Rigging
In discussions with Amaru, the animators, and the rest of the team, it became clear that the characters (in particular the main character Mayu) were going to experience various emotions over the course of the film. That meant that the facial performance and nuances in the rig would require a high level of fidelity. Cartoony squash and stretch, and subtle movements and acting were equally important, while still making the characters’ skin behave in a naturalistic way with fat- and skin-preserving volume.
Looking at existing examples of facial rigging in Blender, it looked like there were two options to achieve the fidelity required. The first approach was through bone-based rigging. I knew this option would be very difficult to control when balancing the weighting between the different bones in the face. Other examples of existing face rigs I found online prescribed shape keys as the way to go. This option offers good control, but it meant that each shape would have to be modeled by hand, as well as any combination corrective shapes that might be required.
I was curious to explore different techniques that would combine the flexibility of using joints, without having to carefully balance and normalize the armature weights of the face bones between each other. Coming from Maya, I was used to curves and wire deformers for facial rigging. Particularly for eyebrows and lips, this approach results in smooth deformations. The number of control points and their positions, in relation to the head geometry, can be modified without the need to change the overall skinning relationship between the geometry and the curves.
Running into limitations
Unfortunately, Blender did not support using curves for rigging at the time. The closest two options I found in my research were to either use bendy bones, or use bone chains that attach to a curve, similar to a ribbon setup in Maya. Both cases still require carefully balancing and normalizing the weighting between the deforming bones in the face, a process I found challenging for a couple of reasons. Among them was the fact that auto normalization only worked while painting weights, but not when manually selecting vertices and assigning weights. Painting weights on an arbitrary topology is challenging in general, but particularly for the face. As the number of bones involved increases, so does the complexity.
My approach
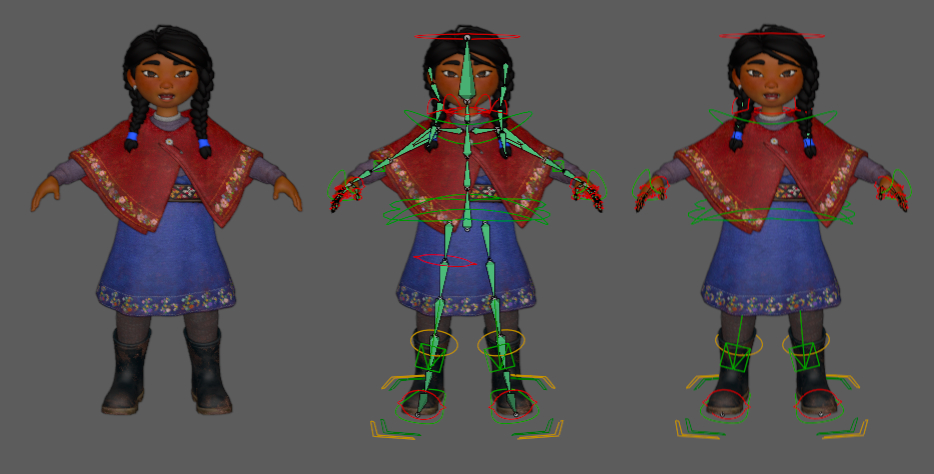
I decided to try a different approach. I started with the control rig structure. For this, I first created deform bones in the face for areas that I knew animators would want to have individual control over. Then I created controls to drive those deform bones, including space controls that drive a subset of those controls. The deform bones were driven by the controls through a mix of parenting, transformation constraints, and driver expressions.
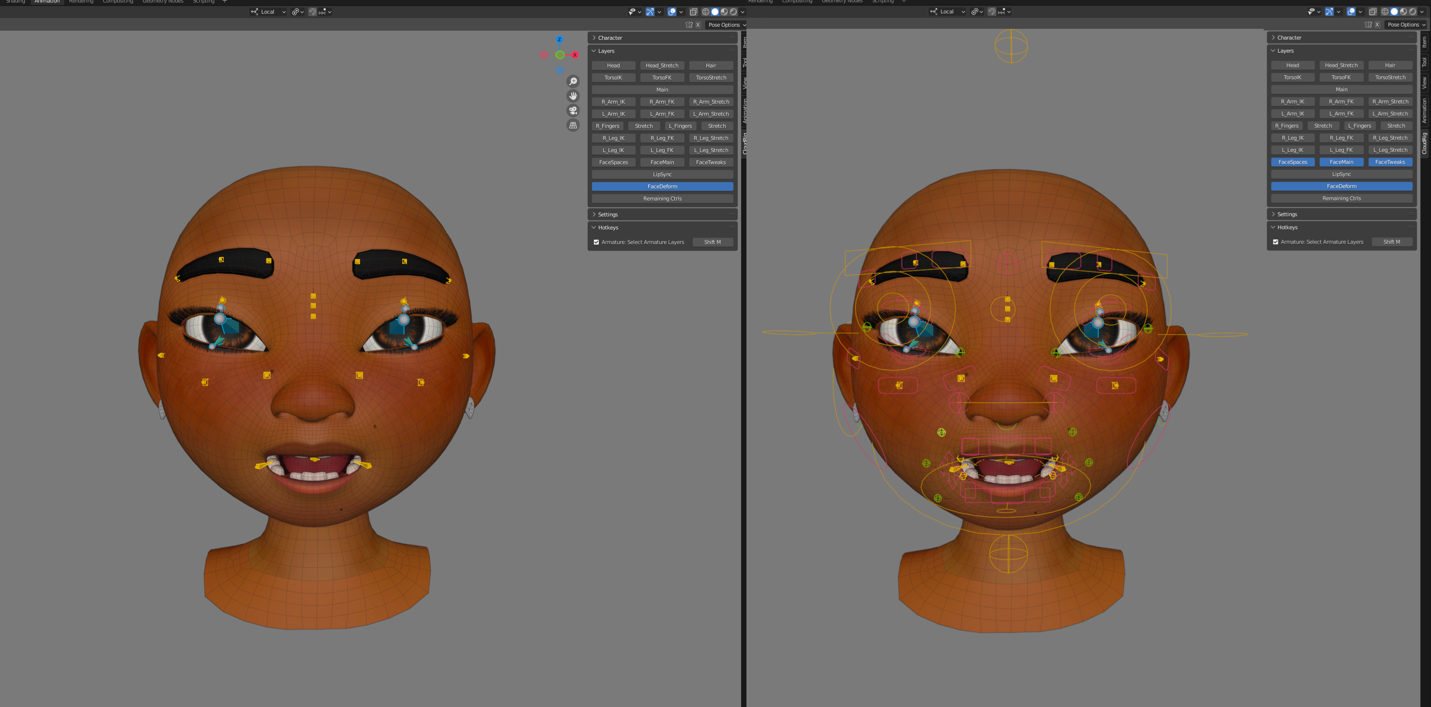
The deforming bones and animation controls that drive those bones
After that, I created a very low-resolution geometry for the face with only a few vertices per deforming bone. I started with the main feature lines, such as eyebrows, lips, and eyelids, and then connected those patches with edges and faces in between. In some cases, I only created two vertices per deforming bone. In other places, I added vertices between the deforming bones by placing them in the middle. I also made sure that the resulting geometry matched in terms of proportions with the original geometry of the head as closely as possible. That required a bit of back and forth. The end result was a very low-resolution head mesh that, when subdivided, matched closely with the original head model. I then skinned that low resolution head geometry to the deform bones of the face.
Because of the low resolution and the strategic placement of the vertices based on the deform bones, I was now able to paint each vertex either 100% to one deforming bone, or at a 50/50 or 25/75 ratio between two deforming bones. This made assigning weight and the normalization of skin weights pretty easy and straightforward. After the armature modifier, I applied a subdivision modifier to subdivide the low-res head geometry twice. Then, I attached the final head geometry to the subdivided driver mesh using a surface deform modifier. The result worked pretty well, in part because of the close match of the subdivided driver mesh and the actual head geometry.
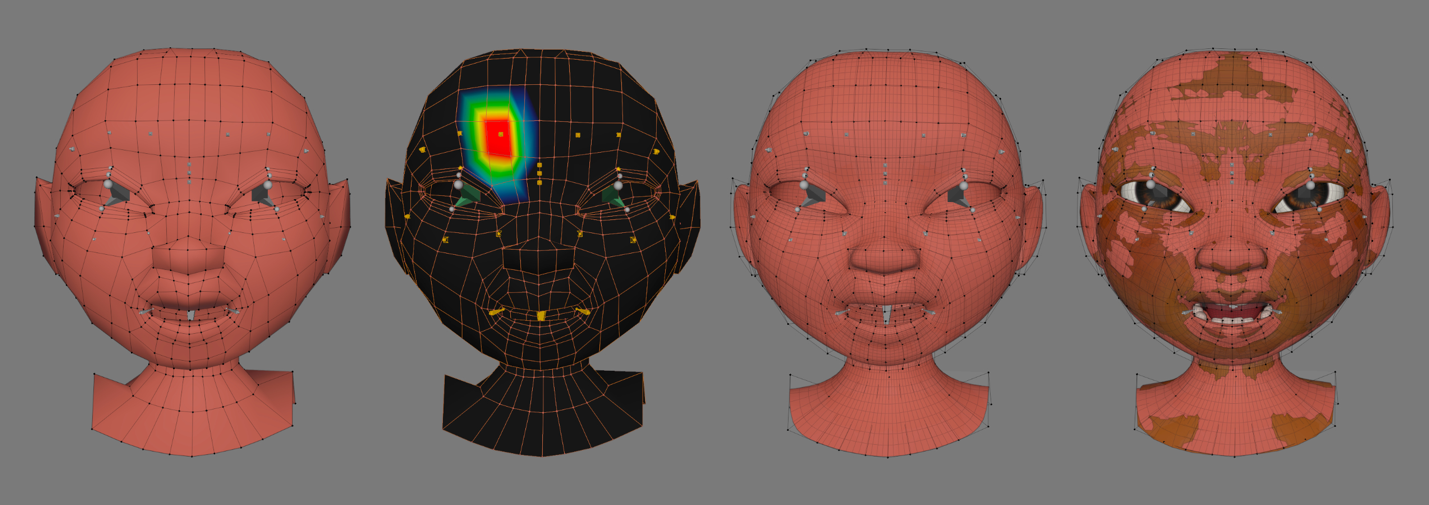
The low-res face driver geometry in its various stages
Performance and final look
Initially, I was concerned about the performance of this setup and using a surface deform modifier live in the rig during animation. However, Blender handled this quite well. If that had not been the case, I had a backup plan; transfer the skin weights from the low-res driver mesh onto the final head mesh. Thankfully, that was not necessary for this project. As an added bonus of this setup, we got a naturalistic, fleshy feeling of skin moving, and volume was preserved thanks to the subdivision modifier on the low-res driver mesh. Most of the volume preservation was achieved by setting up driver expressions for some of the deform bones based on the position of certain controls.
Movie: The deforming face in action
The setup for the face and head deformations worked so well that I utilized the same setup in other areas – the poncho, hair, and skirts of the characters.
Using the same technique for hair and clothing
Outcome and takeaways
The surface deform modifier in Blender turned out to be a lifesaver, and I was pleasantly surprised by how well it worked for our purposes. I am not sure our face rigs would have worked as well and looked as nice as they did without it.
As part of this project, we collected feedback on issues we encountered and made suggestions for workflows that could be improved. At the end of the production, we pitched our findings to the Blender Foundation. Hopefully, this can contribute to make rigging in Blender even stronger and more powerful in future releases. With Picchu, we provided an example for our customers of what is possible by collaborating and creating high-quality content using Blender in the cloud.
If you want to try out the Mayu rig for yourself in Blender, it is available as open-source and can be downloaded from the aws-samples/nimblestudio-demo-assets github repo.