AWS Messaging Blog
Updating opt-in status for Amazon Pinpoint channels
In many real-world scenarios, customers are using home-grown or 3rd party systems to manage their campaign related information. This includes user preferences, segmentation, targeting, interactions, and more. To create customer-centric engagement experiences with such existing systems, migrating or integrating into Amazon Pinpoint is needed. Luckily, many AWS services and mechanisms can help to streamline this integration in a resilient and cost-effective way.
In this blog post, we demonstrate a sample solution that captures changes from an on-premises application’s database by utilizing AWS Integration and Transfer Services and updates Amazon Pinpoint in real-time.
If you are looking for a serverless, mobile-optimized preference center allowing end users to manage their Pinpoint communication preferences and attributes, you can also check the Amazon Pinpoint Preference Center.
Architecture

In this scenario, users’ SMS opt-in/opt-out preferences are managed by a home-grown customer application. Users interact with the application over its web interface. The application, saves the customer preferences on a MySQL database.
This solution’s flow of events is triggered with a change (insert / update / delete) happening in the database. The change event is then captured by AWS Database Migration Service (DMS) that is configured with an ongoing replication task. This task continuously monitors a specified database and forwards the change event to an Amazon Kinesis Data Streams stream. Raw events that are buffered in this stream are polled by an AWS Lambda function. This function transforms the event, and makes it ready to be passed to Amazon Pinpoint API. This API call will in turn, change the opt-in/opt-out subscription status of the channel for that user.
Ongoing replication tasks are created against multiple types of database engines, including Oracle, MS-SQL, Postgres, and more. In this blog post, we use a MySQL based RDS instance to demonstrate this architecture. The instance will have a database we name pinpoint_demo and one table we name optin_status. In this sample, we assume the table is holding details about a user and their opt-in preference for SMS messages.
| userid | phone | optin | lastupdate |
| user1 | +12341111111 | 1 | 1593867404 |
| user2 | +12341111112 | 1 | 1593867404 |
| user2 | +12341111113 | 1 | 1593867404 |
Prerequisites
- AWS CLI is configured with an active AWS account and appropriate access.
- You have an understanding of Amazon Pinpoint concepts. You will be using Amazon Pinpoint to create a segment, populate endpoints, and validate phone numbers. For more details, see the Amazon Pinpoint product page and documentation.
Setup
First, you clone the repository that contains a stack of templates to your local environment. Make sure you have configured your AWS CLI with AWS credentials. Follow the steps below to deploy the CloudFormation stack:
- Clone the git repository containing the CloudFormation templates:
git clone https://github.com/aws-samples/amazon-pinpoint-rds-integration.git cd amazon-pinpoint-rds-integration - You need an S3 Bucket to hold the template:
aws s3 create-bucket –bucket <YOUR-BUCKET-NAME> - Run the following command to package the CloudFormation templates:
aws cloudformation package --template-file template_stack.yaml --output-template-file template_out.yaml --s3-bucket <YOUR-BUCKET-NAME> - Deploy the stack with the following command:
aws cloudformation deploy --template-file template_out.yaml --stack-name pinpointblogstack --capabilities CAPABILITY_AUTO_EXPAND CAPABILITY_NAMED_IAM
The AWS CloudFormation stack will create and configure resources for you. Some of the resources it will create are:
- Amazon RDS instance with MySQL
- AWS Database Migration Service replication instance
- AWS Database Migration Service source endpoint for MySQL
- AWS Database Migration Service target endpoint for Amazon Kinesis Data Streams
- Amazon Kinesis Data Streams stream
- AWS Lambda Function
- Amazon Pinpoint Application
- A Cloud9 environment as a bastion host
The deployment can take up to 15 minutes. You can track its progress in the CloudFormation console’s Events tab.
Populate RDS data
A CloudFormation stack will output the DNS address of an RDS endpoint and Cloud9 environment upon completion. The Cloud9 environment acts as a bastion host and allows you to reach the RDS instance endpoint deployed into the private subnet by CloudFormation.
- Open the AWS Console and navigate to the Cloud9 service.

- Click on the Open IDE button to reach your IDE environment.

- At the console pane of your IDE, type the following to login to your RDS instance. You can find the RDS Endpoint address at the outputs section of the CloudFormation stack. It is under the key name
RDSInstanceEndpoint.mysql -h <YOUR_RDS_ENDPOINT> -uadmin -pmypassword use blog_db; - Issue the following command to create a table that holds the user’s opt-in status:
create table optin_status ( userid varchar(50) not null, phone varchar(50) not null, optin tinyint default 1, lastupdate TIMESTAMP NOT NULL DEFAULT CURRENT_TIMESTAMP ); - Next, load sample data into the table. The following inserts nine users for this demo:
INSERT INTO optin_status (userid, phone, optin) VALUES ('user1', '+12341111111', 1); INSERT INTO optin_status (userid, phone, optin) VALUES ('user2', '+12341111112', 1); INSERT INTO optin_status (userid, phone, optin) VALUES ('user3', '+12341111113', 1); INSERT INTO optin_status (userid, phone, optin) VALUES ('user4', '+12341111114', 1); INSERT INTO optin_status (userid, phone, optin) VALUES ('user5', '+12341111115', 1); INSERT INTO optin_status (userid, phone, optin) VALUES ('user6', '+12341111116', 1); INSERT INTO optin_status (userid, phone, optin) VALUES ('user7', '+12341111117', 1); INSERT INTO optin_status (userid, phone, optin) VALUES ('user8', '+12341111118', 1); INSERT INTO optin_status (userid, phone, optin) VALUES ('user9', '+12341111119', 1); - The table’s opt-in column holds the SMS opt-in status and phone number for a specific user.
Start the DMS Replication Task
Now that the environment is ready, you can start the DMS replication task and start watching the changes in this table.
- From the AWS DMS Console, go to the Database Migration Tasks section.

- Select the Migration task named
blogreplicationtask. - From the Actions menu, click on Restart/Resume to start the migration task. Wait until the task’s Status transitions from Ready to Starting and Replication ongoing.
- At this point, all the changes on the source database are replicated into a Kinesis stream. Before introducing the AWS Lambda function that will be polling this stream, configure the Amazon Pinpoint application.
Inspect the AWS Lambda Function
An AWS Lambda function has been created to receive the events. The Lambda function uses Python and Boto3 to read the records delivered by Kinesis Data Streams. It then performs the update_endpoint API calls in order to add, update, or delete endpoints in the Amazon Pinpoint application.
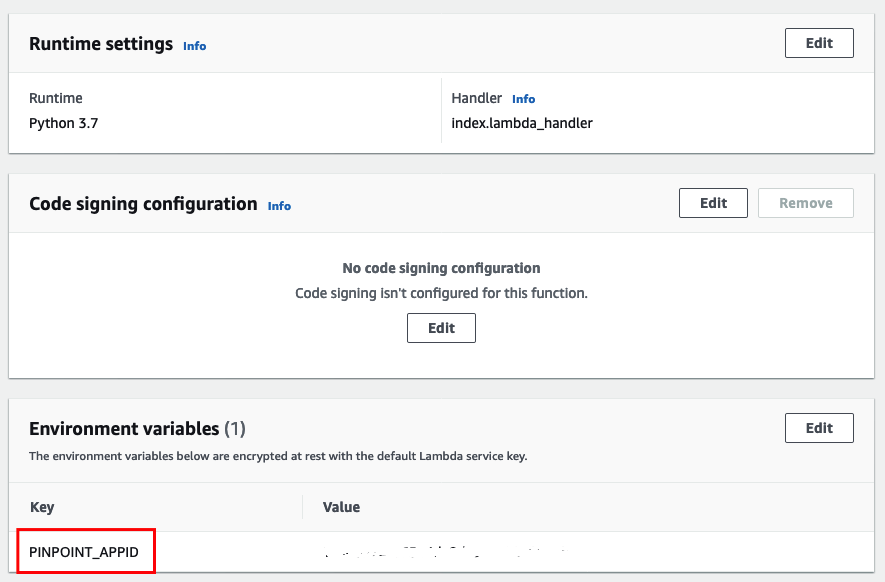
Lambda code and configuration is accessible through the Lambda Functions Console. In order to inspect the Python code, click the Functions item on the left side. Select the function starting with pinpointblogstack-MainStack by clicking on the function name.

Note: The PINPOINT_APPID under the Environment variables section. This variable provides the Lambda function with the Amazon Pinpoint application ID to make the API call.
Inspect Amazon Pinpoint Application in Amazon Pinpoint Console
A Pinpoint application is needed by the Lambda Function to update the endpoints. This application has been created with an SMS Channel by the CloudFormation template. Once the data from the RDS database has been imported into Pinpoint as SMS endpoints, you can validate this import by creating a segment in Pinpoint.

Testing
With the Lambda function ready, you now test the whole solution.
- To initiate the end-to-end test, go to the Cloud9 terminal. Perform the following SQL statement on the
optin_table:UPDATE optin_status SET optin=0 WHERE userid='user1'; UPDATE optin_status SET optin=0 WHERE userid='user2'; UPDATE optin_status SET optin=0 WHERE userid='user3'; UPDATE optin_status SET optin=0 WHERE userid='user4'; - This statement will cause four changes in the database which is collected by DMS and passed to Kinesis Data Streams stream.
- This triggers the Lambda function that construct an
update_endpointAPI call to the Amazon Pinpoint application. - The
update_endpointoperation is an upsert operation. Therefore, if the endpoint does not exist on the Amazon Pinpoint application, it creates one. Otherwise, it updates the current endpoint. - In the initial dataset, all the opt-in values are 1. Therefore, these endpoints will be created with an
OptOutvalue ofNONEin Amazon Pinpoint. - All OptOut=NONE typed endpoints are considered as active endpoints. Therefore, they are available to be used within segments.
Create Amazon Pinpoint Segment
- In order to see these changes, go to the Pinpoint console. Click on
PinpointBlogApp.

- Click on Segments on the left side. Then click Create a segment.

- For the segment name, enter
US-Segment. - Select Endpoint from the
Filterdropdown. - Under the Choose an endpoint attribute dropdown, select
Country. - For Choose values enter
US.
Note: As you do this, the right panel Segment estimate will refresh to show the number of endpoints eligible for this segment filter. - Click Create segment at the bottom of the page.

- Once the new segment is created, you are directed to the newly created segment with configuration details. You should see five eligible endpoints corresponding to database table rows.

- Now, change one row by issuing the following SQL statement. This simulates a user opting out from SMS communication for one of their numbers.
UPDATE optin_status SET optin=0 WHERE userid='user5'; - After the update, go to the Amazon Pinpoint console. Check the eligible endpoints again. You should only see four eligible endpoints.

Cleanup
If you no longer want to incur further charge, delete the Cloudformation stack named pinpointblogstack. Select it and click Delete.

Conclusion
This solution walks you through how opt-in change events are delivered from Amazon RDS to Amazon Pinpoint. You can use this solution in other use cases as well. Some examples are importing segments from a 3rd party application like Salesforce and importing other types of channels like e-mail, push, and voice. To learn more about Amazon Pinpoint, visit our website.