Microsoft Workloads on AWS
Automate the Upgrade of an Amazon FSx for Windows File Server to a Multi-AZ deployment
For many workloads, customers use Amazon FSx for Windows File Server (Amazon FSx), a fully managed storage service based on Windows File Server. For non-production workloads, a single Availability Zone (AZ) deployment may be sufficient. But sometimes, the need arises to add high availability to the storage in an environment. Customers need a simple way to migrate their Amazon FSx file systems to Multi-AZ, which provides the necessary level of availability. In this blog post, I will guide you through automating the upgrade of a Single-AZ Amazon FSx file share to Multi-AZ to use the high availability that the service offers.
Solution overview
Customers can use AWS CloudFormation and Automation, a capability of AWS Systems Manager, to implement a repeatable migration process that reduces the risk of human error when migrating an Amazon FSx file system to Multi-AZ. This is useful when testing a migration in a non-production environment, automating the steps for additional Amazon FSx file systems. Eliminating the manual steps of this process ensures it will perform the same steps each time.
The provided CloudFormation template will create an AWS DataSync instance to transfer the files. It will also provision an Amazon Elastic Compute Cloud (EC2) instance that will receive instructions from an AWS Systems Manager automation document to run PowerShell commands that copy the configuration settings.
A step in the Automation document will export the share configuration from the source Amazon FSx file system, along with any custom Access Control Lists, to an XML file. It will use it to recreate the share configuration on the destination Amazon FSx Multi-AZ file system. The only manual intervention required is to use the AWS Management Console or AWS Command Line Interface (AWS CLI) to start the file migration using AWS DataSync, and then run the settings migration document from the Systems Manager Console.

Figure 1: Amazon FSx File System Transfer Solution Architecture
These are the steps in the workflow (Figure 1):
- Launch the CloudFormation template to create the required resources in your account.
- Run the DataSync task that will to transfer the files and folders to the destination before creating the shares.
- Run the Systems Manager Automation document. It will join an Amazon EC2 instance to your Active Directory domain and connect to the source Amazon FSx file system using credentials stored in AWS Secrets Manger.
- Using Run Command, a capability of AWS Systems Manager, send a PowerShell command to the EC2 instance to describe all existing file shares on the source file system to write them to an XML file that is stored on the source file system. It then reads the XML file and recreates the shares on the destination file system.
- The command copies the SMB encryption, weekly maintenance window, backup settings, and DNS alias configuration from the source file server to the Multi-AZ Amazon FSx file system. If using CloudWatch logs to store file access auditing, the audit settings will be copied to the Multi-AZ Amazon FSx file system as well.
Prerequisites
Before deploying the solution, you will need to have the following resources deployed in your account:
- An Amazon FSx for Server Single-AZ file system (the source) and an Amazon FSx Multi-AZ file system (the destination) configured with solid state drive (SSD) storage. (Note: After the migration is complete, you can move the data to Amazon FSx file systems using hard disk drive (HDD) storage if that is suitable for your application. Refer to best practices for migrating existing file storage to Amazon FSx for Windows File Server).
- An Amazon VPC with a public subnet and a security group allowing TCP inbound traffic on port 8080 to the DataSync EC2 instance for activation.
- The subnet into which you launch the EC2 migration instance must be able to connect on port 443 to the following VPC public or private endpoints (region is the current region you are operating in).
- ssm.region.amazonaws.com
- ssmmessages.region.amazonaws.com
- ec2messages.region.amazonaws.com
- datasync.region.amazonaws.com
This solution uses a custom Systems Manager command document for the domain join, so it will work with both private VPC endpoints and public service endpoints as long as the DNS of the VPC resolves endpoint names.
Launch the CloudFormation template
- Download the CloudFormation template onto your local machine.
- Visit the AWS CloudFormation console in the AWS region where your prerequisite file systems are located.
- Choose Create stack and then choose With new resources (standard).
- On the Create stack page, select Upload a template and then select the CloudFormation template, Migrate-SingleAZ-MAZ.yaml, previously downloaded.
- Provide input for the following parameters. For this walkthrough, we recommend you keep the default values for all other parameters.
- Stack Name: The name of this stack.
- ADDnsIpAddress: The IPv4 address of your Active Directory DNS server.
- PublicSubnet: The subnet used by DataSync and Migration EC2 instances. Stack creation will not succeed if the subnet does not enable the auto-assignment of public IPv4 addresses or if the DataSync agent cannot reach the endpoint. Using a subnet in same AZ as the source Amazon FSx file share will enable optimal data transfer.
- DomainAdminUser: An existing service account used by the Amazon FSx service that has the required permissions.
- DestDNSName: The DNS name of the Multi-AZ Amazon FSx file system (destination).
- SourceDNSName: The DNS name of the Single-AZ Amazon FSx file system (source).
- SourcePSEndpoint: The PowerShell endpoint of the Single-AZ Amazon FSx file system.
- DestPSEndpoint: The PowerShell endpoint of the Multi-AZ Amazon FSx file system.
- AttachPublicIpAddress: Set to true if you want the migration EC2 instance to launch with a public ipv4 address for internet access. This is not required if EC2 instance can reach AWS Systems Manager, Amazon EC2 and AWS DataSync endpoints within the VPC using private endpoints.
- CidrIP: The IP Address or range that can access the migration EC2 instance via RDP.
- VPC: The VPC of the Amazon FSx file systems
- VPCCidr: The IP address range of the VPC.
- FileSystemId: The source (Single-AZ) Amazon FSx file system ID.
- DestFileSystemId: The destination (Multi-AZ) file system ID.
- Choose Next on the Configure stack options page.
- Select I acknowledge that AWS CloudFormation might create IAM resources.
- Choose Create stack. The stack will deploy in approximately 10 minutes. In the CloudFormation console, wait for the stack to have a status of CREATE_COMPLETE. Then select your stack and the Outputs tab. Copy the values for these outputs:
- SSMDocMigrateFSx: The name of the systems manager document that migrates the filesystem share settings, you’ll enter this name in a later step.
- DataSyncTask: The task ID starts with the prefix “task-“, followed by additional characters.
- CleanupMigrateFSx: The name of the SSM automation document that removes FSx DNS alias SSM parameter store parameters and removes the EC2 migration instance from the Active Directory domain.
Run the DataSync task to start the Amazon FSx file migration
- Open the AWS DataSync In the navigation pane, choose Tasks, and find the task referred to by the previously copied value of DataSyncTask output of the CloudFormation template.

Figure 2: AWS DataSync Task
- Select the task, open the Actions menu, and choose edit. On the Data transfer configuration page, edit the task bandwidth limit or schedule the data transfer to avoid impact to the filesystem performance during peak working hours. If you are using file access auditing, edit the task ownership and permission setting to enable SACL and then choose Save Changes.
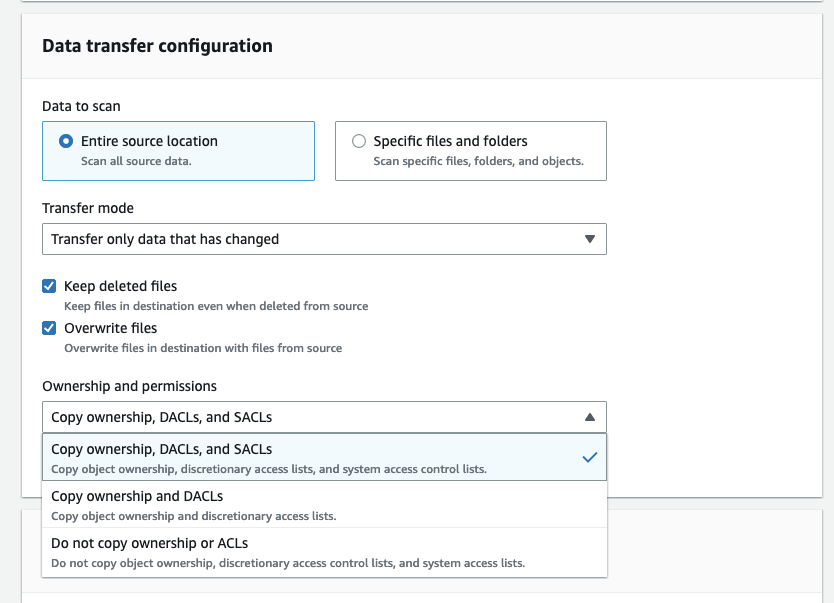
Figure 3: AWS DataSync Task Options
- To start the file transfer from source to destination Amazon FSx filesystem:
Option1: If you have not made any changes to the AWS DataSync task, choose Start with defaults.
Option2: If you have a modified configuration for the AWS DataSync task, choose Start with overriding options.
Run the Automation Document to start the Amazon FSx share and configuration migration
When you are ready to perform the migration to your Multi-AZ Amazon FSx file system, prepare by temporarily disconnecting any SMB clients from the source Single-AZ file system. Perform a final file sync using the AWS DataSync task, in case data has changed on the source file system since the last sync.
- Open the AWS Systems Manager In the navigation pane, choose Automation, choose Execute Automation, and then choose Owned by me. Choose search by keyword or filter and enter the name of the CloudFormation stack you created previously, which will configure service principal names (SPNs) for your Amazon FSx Multi-AZ file system and update the DNS CNAME records to point to the Multi-AZ filesystem. Choose Next.
- Input parameters automatically populate in the automation document. You can leave them as their default values.
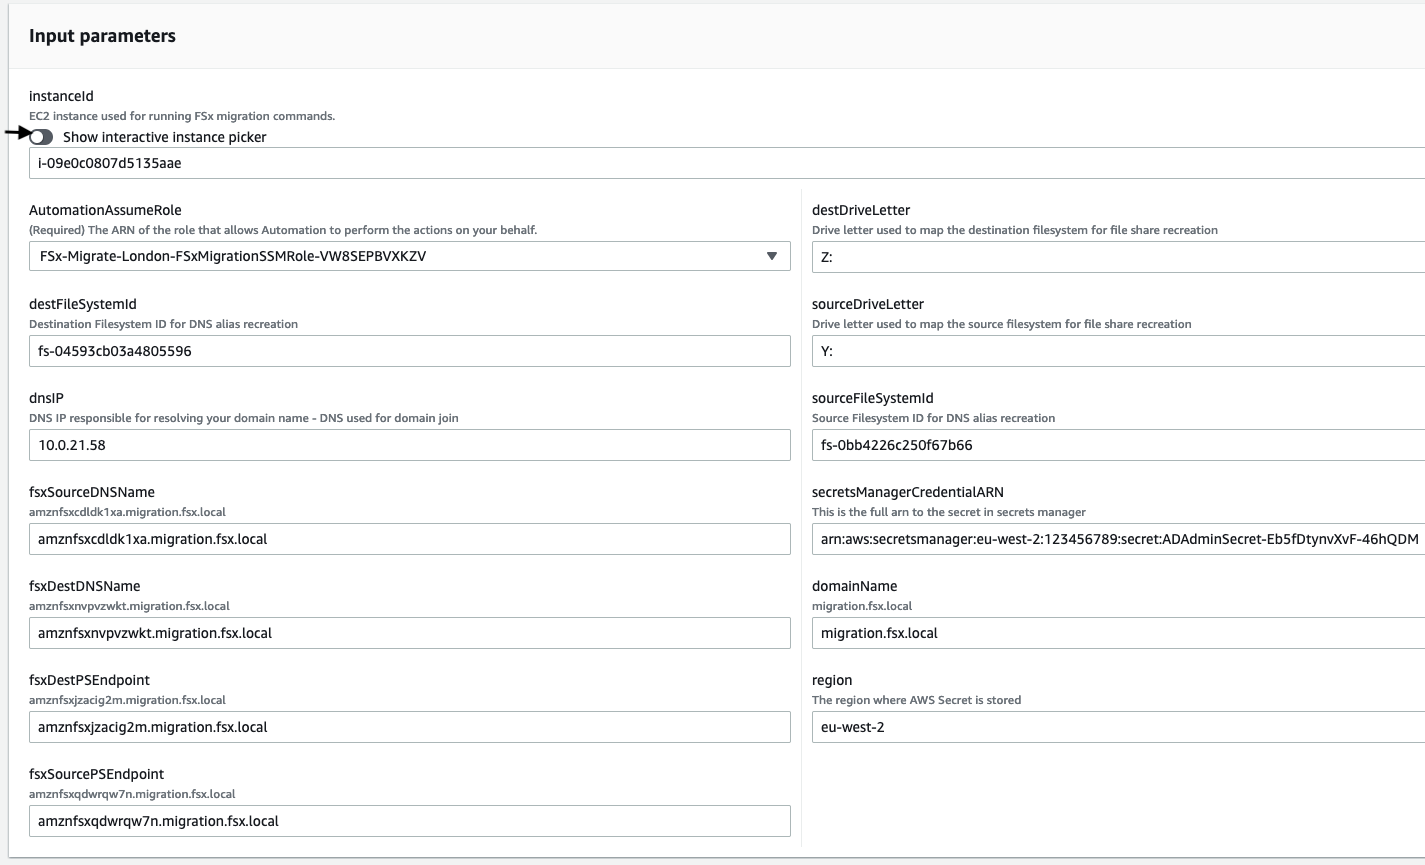
Figure 4: AWS Systems Manager Automation Input Parameters
- Choose Execute when ready to begin migration of the file share, SMB encryption, and DNS alias configuration.
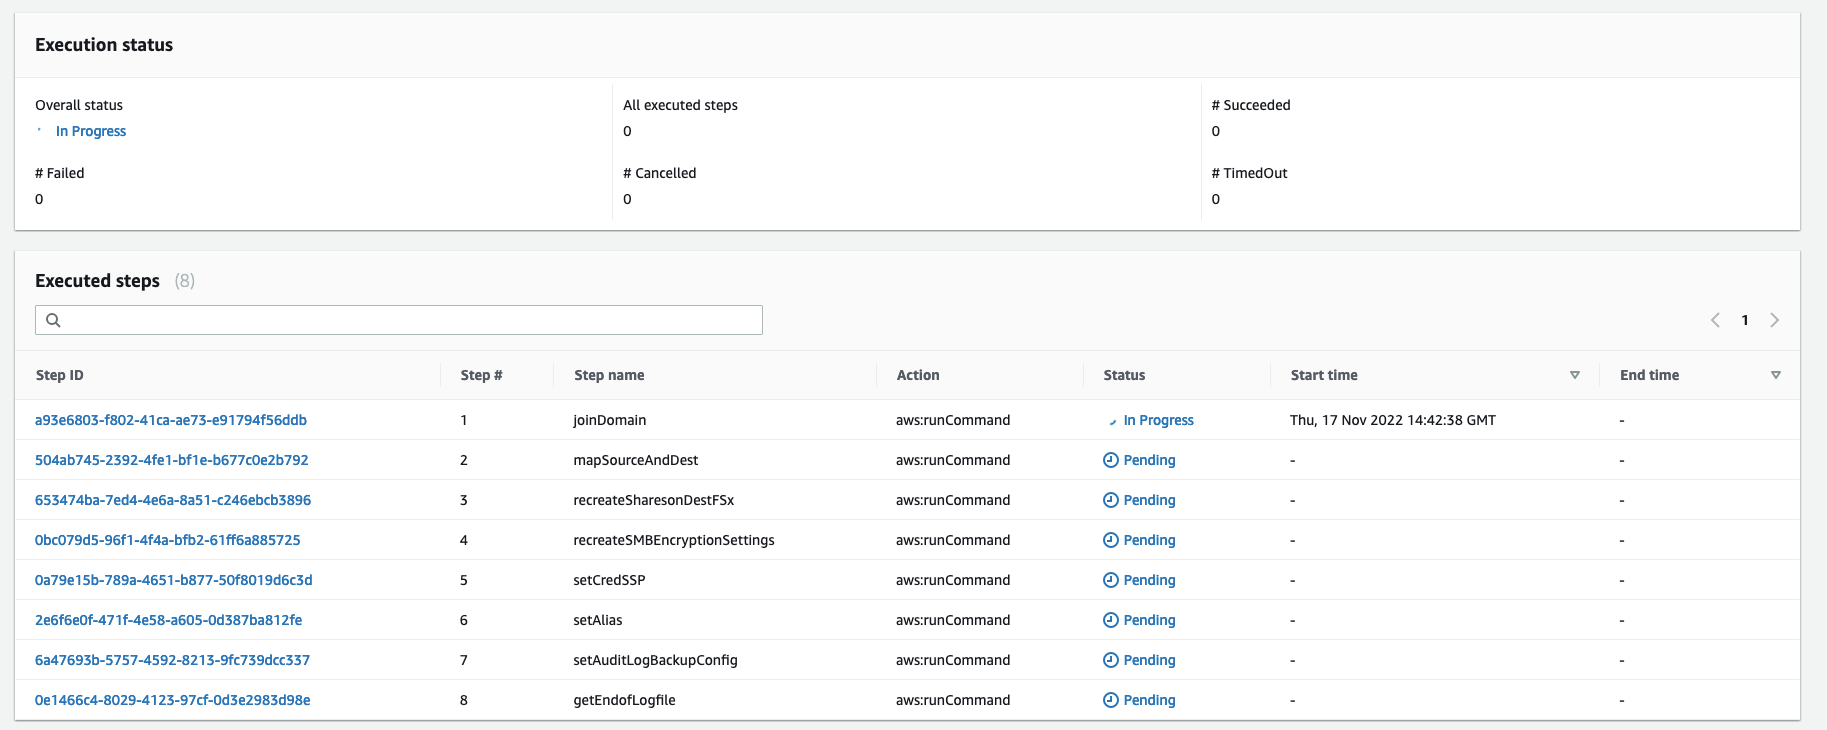
Figure 5: AWS Systems Manager Automation Execution Steps
Once the automation has completed, log onto a server that has access to both the source and destination Amazon FSx file systems. For instance, you can connect to the migration EC2 Windows server.
Map a file share to the Amazon FSx source and destination file systems. If you need help with mapping a file share to the Amazon FSx file system, please refer to our documentation.
You can confirm the source and destination file systems are identical, and verify the migration has completed successfully.
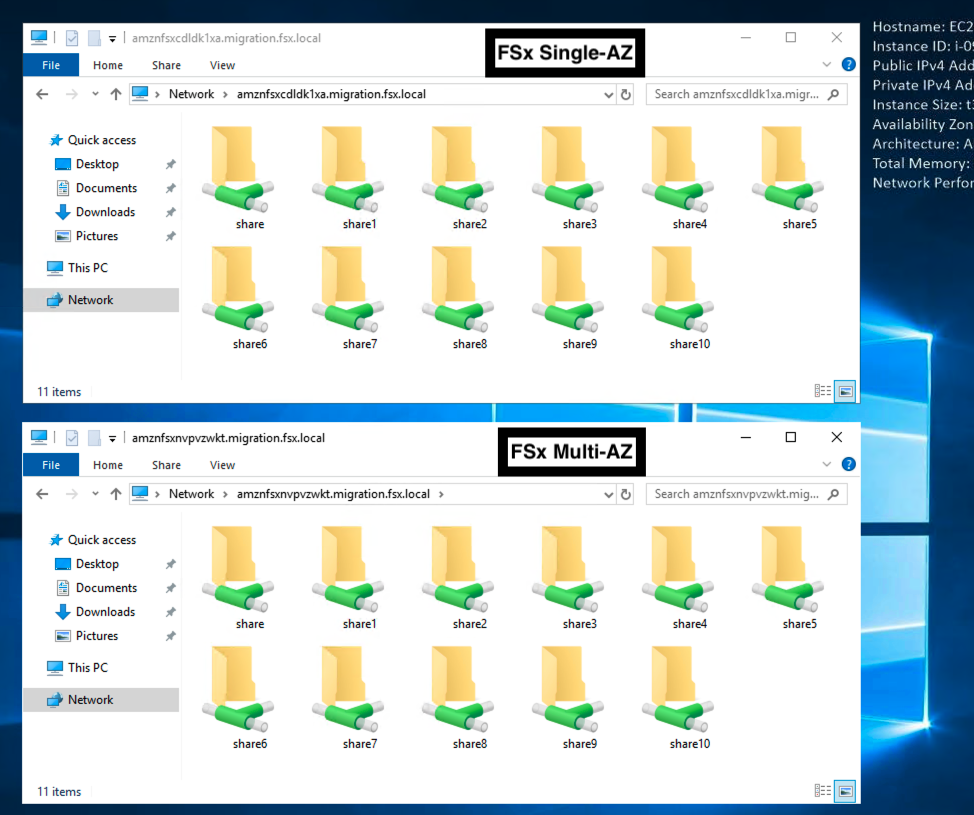
Figure 6: EC2 Windows File Explorer Connected to FSx source and destination
Clean Up
After completing this process, you may have resources running that you no longer need. Consider deleting these resources to avoid unnecessary charges.
- Run the CleanupMigrateFSx Systems Manager Automation Document to remove the Amazon EC2 migration instance from Active Directory domain and delete the parameters that were created in Parameter Store, a capability of AWS Systems Manager.
- Open the AWS CloudFormation console. On the Stacks page, choose the stack name you created. In the stack details pane, choose Delete. Select Delete stack when prompted.
Conclusion
In this blog post, I showed you how you can use AWS DataSync and AWS Systems Manager Automation to automate the steps involved in migrating your FSx file system from a Single-AZ to a Multi-AZ deployment. This helps reduce human error in the process and provides a repeatable method when performing these tasks for multiple file systems. You could additionally extend this technique to migrate an EC2-based file server to FSx.
If you would like to enhance the solution above, you could create an AWS Lambda function to run the data transfer task automatically. Navigate to starting an AWS DataSync task with the AWS CLI and deploying AWS Lambda functions using AWS CloudFormation for details. To learn more about the options of AWS DataSync or Amazon FSx For Windows File Server, check out How to replicate Amazon FSx for Windows File Server data across AWS Regions.
AWS can help you assess how your company can get the most out of cloud. Join the millions of AWS customers that trust us to migrate and modernize their most important applications in the cloud. To learn more on modernizing Windows Server or SQL Server, visit Windows on AWS. Contact us to start your modernization journey today.