AWS Cloud Operations Blog
Automating Service Limit Increases and Enterprise Support with AWS Control Tower
In this post, we show how you can use Account Factory in AWS Control Tower to provision new accounts that are ready for your teams to use. We demonstrate how you can use AWS Control Tower lifecycle events to automatically request regional service quota limit increases and enrollment in AWS Enterprise Support using the respective service API operations.
Use cases
This approach enables you to pre-configure their accounts with AWS Control Tower lifecycle events. You can provision new accounts and have Enterprise Support enrollment requests automatically generated, in addition to having the appropriate service limit requests created in each specified AWS Region. These requests are initiated through the use of AWS Control Tower lifecycle events that trigger automation.
Enterprise Support provides access to the AWS Support API, as well as business-critical system down response times. Service Quotas allows you to increase quotas like networking limits (such as VPN connections, elastic IPs), EC2 instance limits, and security group rule limits.
This solution uses the following AWS services:
- AWS Control Tower
- AWS Lambda
- AWS CloudFormation
- Amazon Simple Notification Service (Amazon SNS)
- Amazon CloudWatch
- AWS Support
- Service Quotas
Background
This post references the following concepts:
- AWS Control Tower offers you a mechanism to easily provision new accounts in a secure and compliant environment, built according to AWS best practices.
- You can create new accounts using AWS Service Catalog through its UI interface or the command line interface (AWS CLI).
- AWS Control Tower lifecycle events are events that are generated on completion of certain AWS Control Tower actions that create or change the state of resources. Each event is delivered to EventBridge and Amazon CloudWatch Events services.
- AWS Enterprise Support provides 24/7 access to cloud support engineers via phone, chat, and email. AWS Enterprise Support also provides access to a full set of AWS Trusted Advisor checks, AWS Personal Health Dashboard, and the AWS Support API.
- Service Quotas is a service that enables you to view and manage your quotas for AWS services from a central location. Depending on your business needs, you might need to increase your service quota values. Service Quotas makes it easy to quickly look up your current quota configuration and to request increases.
- AWS Lambda provides serverless compute that runs your code in response to events.
- Amazon Simple Notification Service (Amazon SNS) is a highly available, durable, and fully managed pub/sub messaging service.
Solution overview
The following diagram maps out the solution architecture.
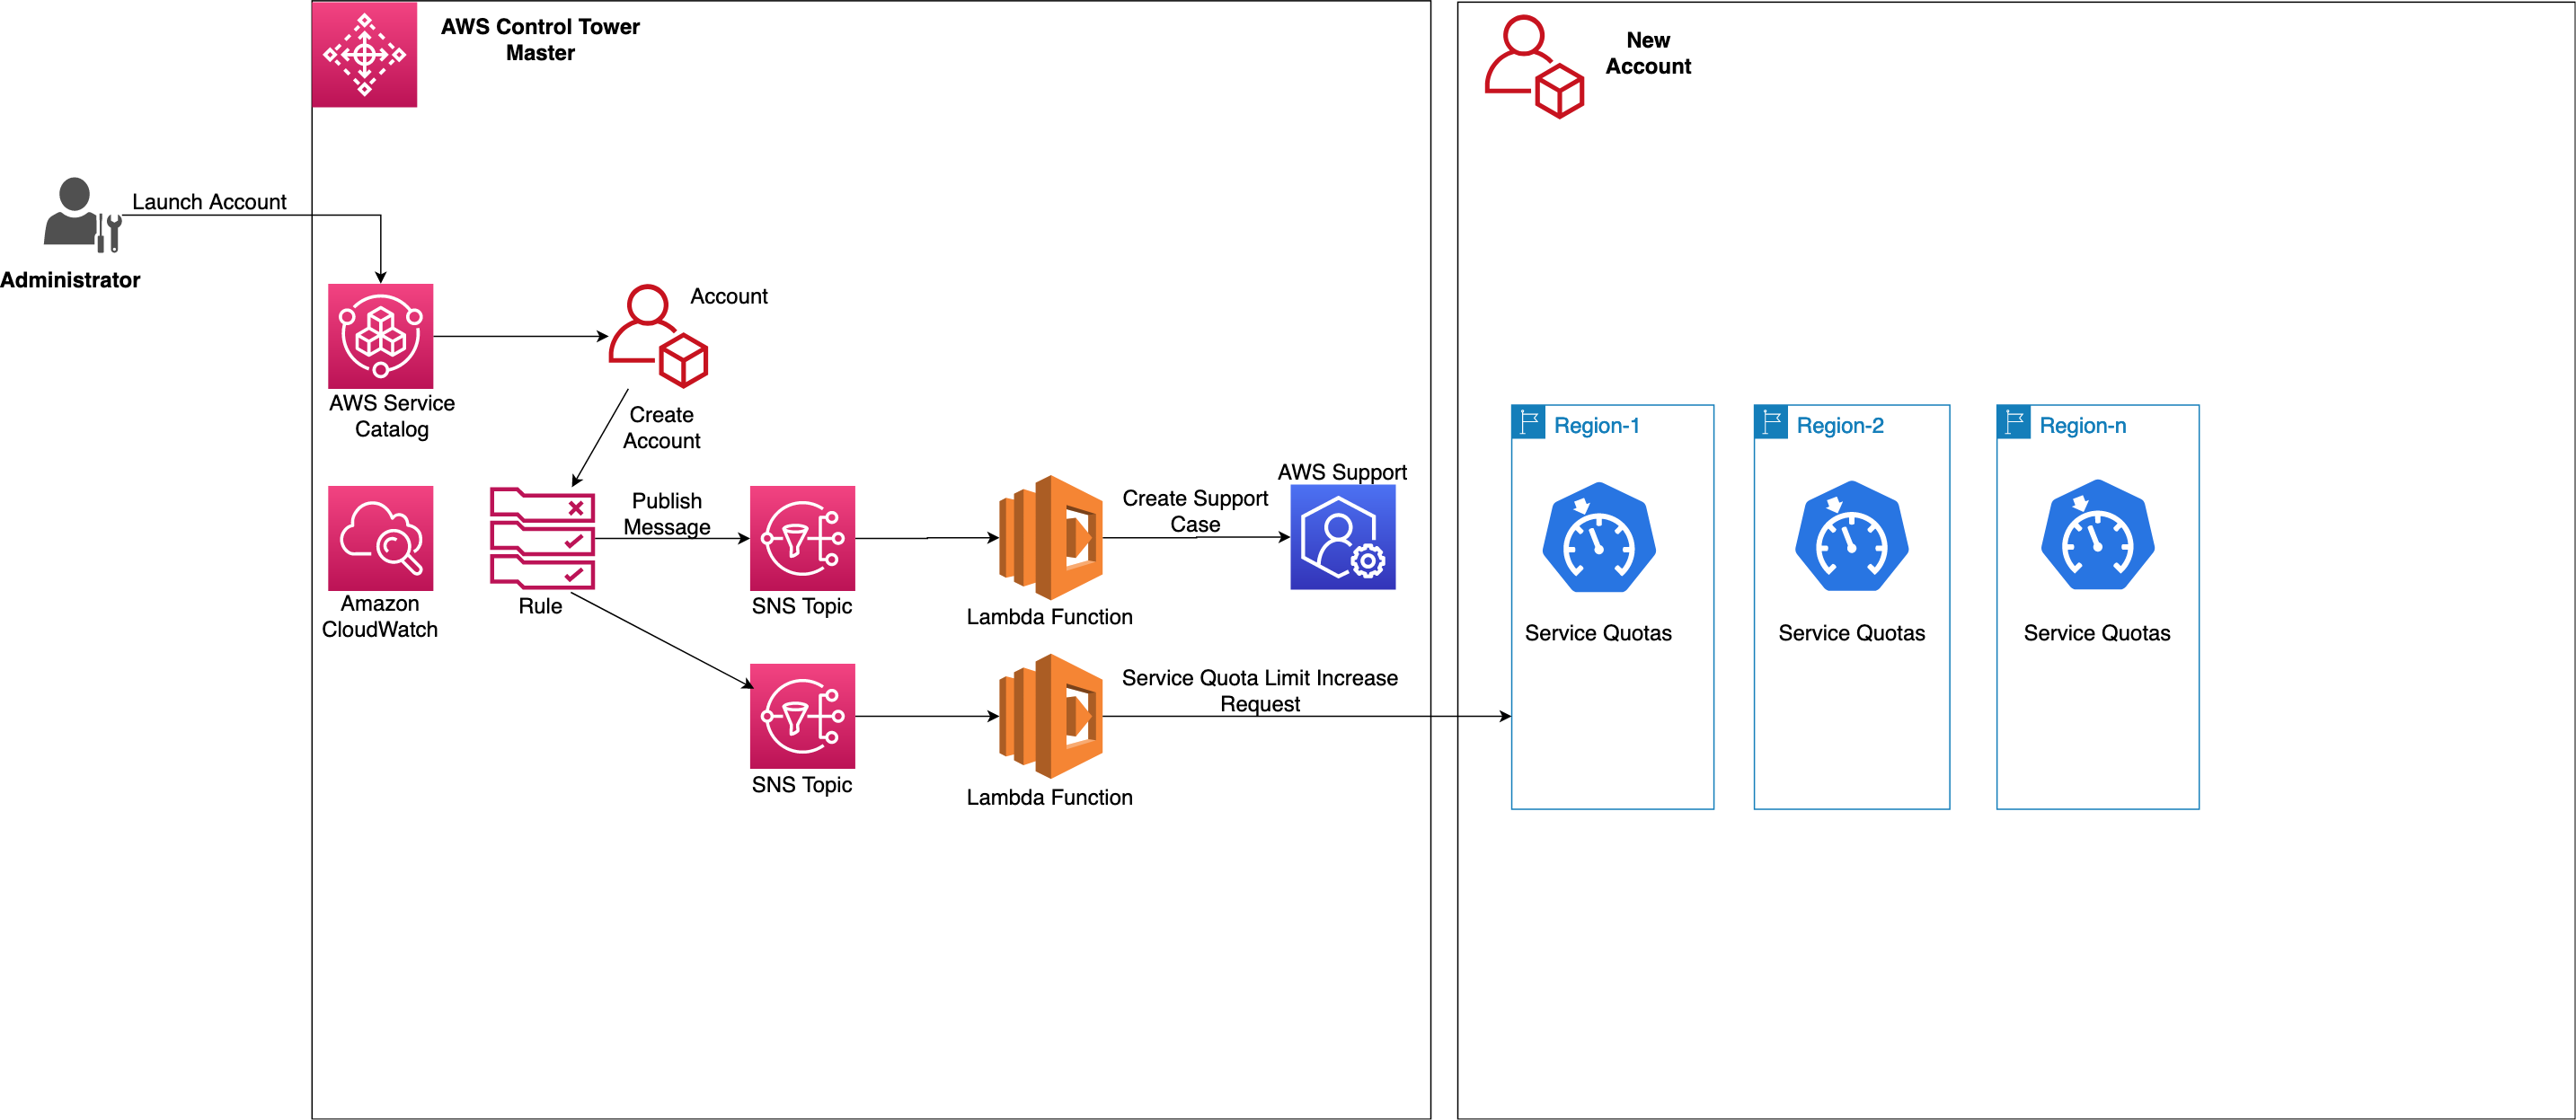
Enterprise Support and Quotas Architecture Diagram
Walkthrough
This post will walk you through all the following steps, in detail:
Set up the AWS Support automation:
Step 1: Deploy the AWS CloudFormation stack.
Set up the Service Quotas automation:
Step 1: Look up the service code, quota code, and desired limit for your quota increase request.
Step 2: Deploy the AWS CloudFormation stack.
Provisioning accounts with AWS Control Tower Account Factory
Step 1: Provision a new account using AWS Control Tower Account Factory.
Step 2: Validate the account has been provisioned successfully.
Step 3: Validate the AWS Support case has been created for the new account.
Step 4: Validate the Service Quotas increase request has been created for the new account.
Prerequisites
This post assumes that you have already set up an AWS Control Tower environment. It also assumes that the AWS Control Tower master account is enrolled in Enterprise Support, and that the service quota limit you want to increase is listed as an adjustable quota limit on the Service Quotas page.
Set up the AWS Support automation
The template to deploy the automation used in this post is enterprise_support_control_tower.cf.yml.
This AWS CloudFormation template creates an Amazon CloudWatch event for a successful account provisioning event in AWS Control Tower. It also deploys an Amazon SNS topic for the events to be delivered to, and an AWS Lambda function that processes events from the topic.
Note: The AWS Support API endpoint is only available in us-east-1.
To deploy the template:
- Use the Launch Stack button to launch the AWS CloudFormation stack in the AWS Control Tower master account.

- Choose Next.
- Enter a stack name (example: enterprise-support-case-automation).
- Choose Next.
- Enter any tags you wish to assign to the stack. Choose Next.
- Verify that the stack has been created successfully before moving to the next step.
Set up the Service Quotas automation
Step 1: Look up the service code, quota code, and desired limit for your quota increase request.
To submit a service quota increase request, you will need three pieces of information:
- The appropriate service code.
- The quota code for the particular limit you want to change.
- The desired quota value that you want to request the limit be set to.
Follow these steps to look up the required information:
- Navigate to the Service Quotas console page.
- On the left-hand panel, choose AWS Services.
- Search for the service for which you want to submit an increase request and click on it to see the list of service quotas.
- Note: The limit must be listed as adjustable in order for you to submit a request.
- Choose the quota you want to update for all newly provisioned accounts.
- The Details page displays the necessary information:
- The service code is displayed within the Quota ARN – it is the value in between the account number and the quota code.

Lambda Service Quotas Service Code
- The service code is displayed within the Quota ARN – it is the value in between the account number and the quota code.
-
- The quota code is listed at the end of the Quota ARN.

Lambda Service Quotas Code ARN
- The applied quota value is listed here – your requested value must be higher than this.
- The quota code is listed at the end of the Quota ARN.
Step 2: Deploy the AWS CloudFormation stack.
The template to deploy the automation used in this post is service_quotas_control_tower.cf.yml.
The Lambda package used in this post is service_quota_request.py.zip.
This CloudFormation template creates an Amazon CloudWatch event for a successful account provisioning event in AWS Control Tower. It also deploys an Amazon SNS topic for the events to be delivered to, in addition to a Lambda function that processes events from the topic.
To deploy the template:
- Use the Launch Stack button to launch the AWS CloudFormation stack in the AWS Control Tower master account.
- Choose Next.
- Enter a stack name (example: service-quota-automation).
- Enter the parameters:
- SNS Topic Name: Accept the default or enter a custom name.
- S3 Bucket: Accept the default.
- Lambda Package S3 Key: Accept the default.
- IAM Role to Assume in Child Account: Accept the default of AWSControlTowerExecution or enter another role that can be assumed in the child account.
- Region List to Deploy to: Enter a list of comma-delimited AWS Region names. These must be valid AWS Regions that Control Tower can be deployed into. Check the AWS Regional Table for a list of supported regions.
- Service Quotas Service Code: Enter the Service Code from Step 1.
- Service Quotas Code: Enter the Service Quotas Code from Step 1.
- Service Quotas Desired Limit: Enter the desired capacity limit. This must be larger than the current capacity limit.
- Choose Next.
- On the Configure Stack Options page enter any tags to assign to the stack. Choose Next.
- Check the IAM acknowledgement box and choose Create Stack.
- Before moving to the next step, verify that the stack was created successfully.
Provisioning accounts with AWS Control Tower Account Factory
For this post, we create a new account using Account Factory in the AWS Control Tower master account.
Step 1: Provision a new account using AWS Control Tower Account Factory.
- Sign in from your user portal URL.
- From Your applications, choose AWS Account.
- From the list of accounts, choose the account ID for your master account. This ID may also have a label, for example (Master).
- Ensure that you’ve chosen the correct AWS Region for provisioning accounts, which should be your AWS Control Tower home region.
- From AWSServiceCatalogEndUserAccess, choose Management console. This opens the AWS Management Console for this user in this account.
- Search for and choose Control Tower to open the AWS Control Tower console.
- From the navigation pane, choose Account factory.
- Choose Enroll account. This selection opens the Account details.
- Fill in the information, keeping the following in mind:
- The SSOUserEmail can be a new email address, or the email address associated with an existing AWS SSO user. Whichever option you select, this user will have administrative access to the account you’re provisioning.
- The AccountEmail must be an email address that isn’t already associated with an AWS account. If you used a new email address in SSOUserEmail, you can use that email address here.
- Review your account settings, and then choose Enroll account.
- Your account is now being provisioned. It can take a few minutes to complete. You can refresh the page to update the displayed status information. Only one account can be provisioned at a time.
Step 2: Verify that the account was created successfully.
Navigate to the AWS Service Catalog console page. Choose Provisioned Products List and in the filter by dropdown choose Account. Verify that the previously created account shows as Available under status.
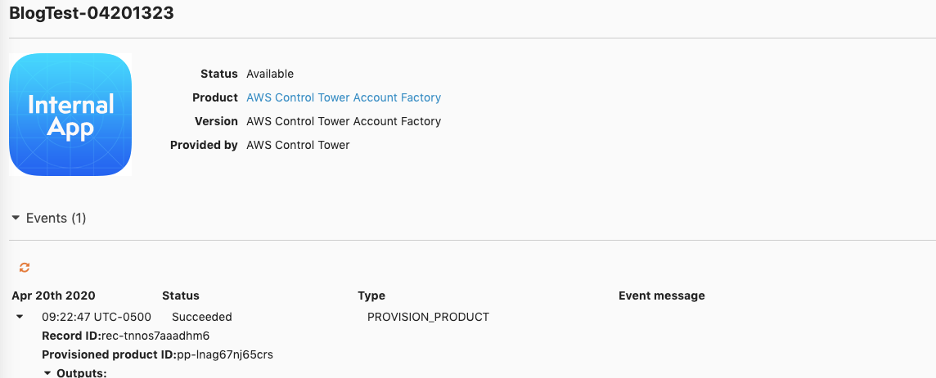
AWS Service Catalog provisioned product status
Step 3: Validate AWS Support case creation.
Navigate to the AWS Support console page. On the main page, you will see a section for Open support cases. Verify that there is a case for the newly provisioned account.
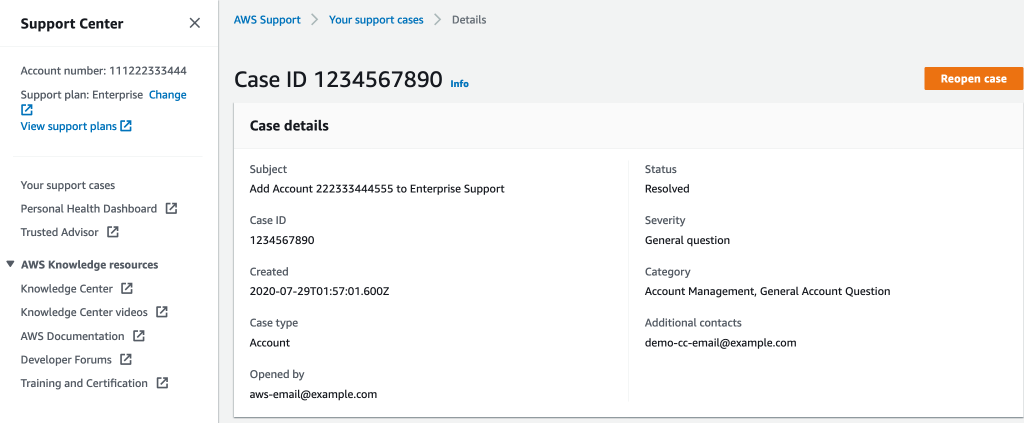
Enterprise Support case for the new account
Step 4: Validate that the service quota increase request has been created for the new account.
Return to the main SSO page for your AWS Control Tower environment and sign in to your newly provisioned account. Navigate to the Service Quotas console page. On the main page you will see a section for Pending Service Quota Requests. You will see your new request listed here.
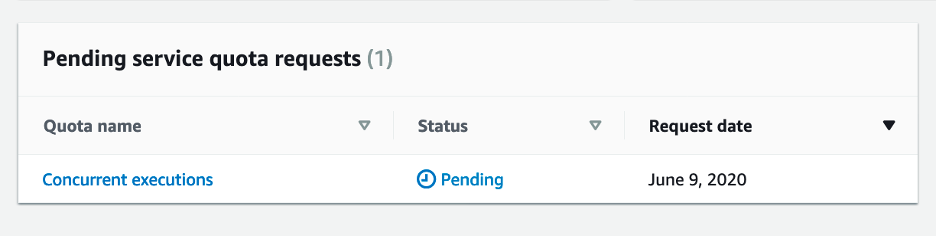
Summary view of the support case for the pending service quota increase request
Click on the Pending status to view the full details of your request. Repeat this step for each Region you requested an increased service quota limit for.

Detail view of the support case for the pending service quota increase request
Conclusion
This post guided you through the process of creating a new account. We walked you through setting up automation to create an Enterprise Support case using AWS Control Tower lifecycle events, in addition to increasing service quota limits in multiple Regions. To learn more, please watch the following video.
We welcome your feedback. Please let us know if you have any comments or questions.
Further reading
About the authors

Nick Sack is a DevOps Consultant for AWS Professional Services. He is passionate about working with customers, and building automated solutions to help customers on their cloud journeys. When not working, Nick enjoys hiking, playing soccer, reading, and learning about technology.

Gandhi Raketla is a Senior Solutions Architect for AWS. He works with AWS customers and partners on cloud adoption, as well as architecting solutions that help customers foster agility and innovation.