AWS Cloud Operations Blog
How to manage multi-account applications with AppRegistry and Resource Access Manager
In previous posts we discussed how AWS Service Catalog AppRegistry helps you group applications and application resources within a single context. You can define applications within AppRegistry by providing a name, description, associations to AWS CloudFormation stacks, and associations to application metadata.
It is common for customers to deploy applications with CloudFormation across multiple AWS accounts. The use of multiple accounts in your AWS environment is a well-documented best practice. This provides security, access, and billing boundaries for your AWS resources to help you achieve resource independence and isolation. Account level isolation of resources limits the risks of misconfiguration impacting resources in other accounts. However, it can also make viewing and managing applications within a singular context more difficult.
On June 16, 2022 we announced support for cross-account AppRegistry applications and attribute groups. This enables AppRegistry applications to be shared to multiple accounts within your AWS organization enabling recipient accounts to associate local resources to a shared application.
In this post, we show you how to view and manage an application deployed across multiple accounts as a single entity. This is done using AWS Service Catalog AppRegistry and AWS Resource Access Manager (AWS RAM).
Prerequisites
The following are prerequisite steps for following along with this solution:
- Git client installed on your local workstation
- AWS CLI installed on your local workstation
- Access to two AWS accounts that we will call “test” and “prod” within the same AWS organization
- AWS RAM enabled in the AWS organization management account
Solution overview
Using CloudFormation, we deploy test and prod versions of a basic web application to two separate AWS accounts. The web application will utilize Amazon API Gateway and AWS Lambda to display a webpage that returns the client’s IP address. The CloudFormation template will also create a single AppRegistry application in the test account, and share that application to the prod account using AWS RAM. Finally, AppRegistry attribute groups will be created in each AWS account. These will contain helpful information specific to each web application. Once the solution is deployed to both accounts, we’ll have a single AppRegistry application that groups together the resources and metadata of a multi-account web application.
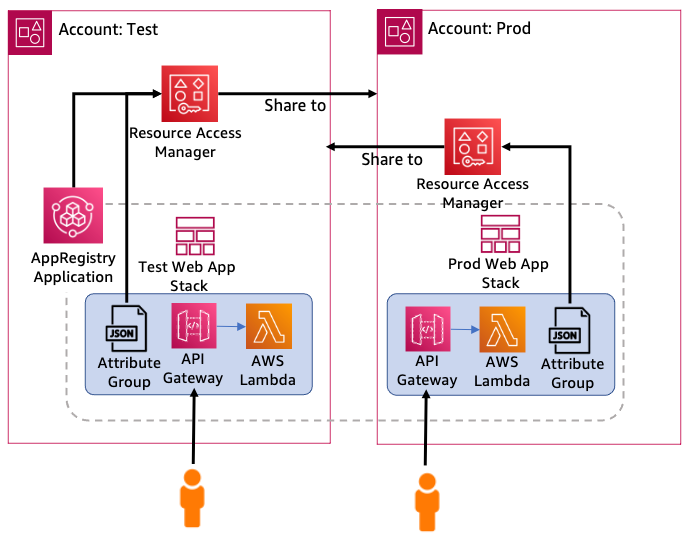
Figure 1 – Solution design
Deployment steps
1. Clone the GitHub repository to your local workstation.
2. Change your working directory folder to the repository you cloned.
cd aws-appregistry-ram3. Using your favorite editor, edit the file named test-acct-params.json and update the ParameterValue for TestAccountID and ProdAccountID. The other parameters should remain as is.
4. Next, issue the AWS CLI command with credentials authenticated to your test AWS account to deploy the test web stack:
aws cloudformation create-stack \
--stack-name appreg-app-test \
--template-body file://template.yaml \
--capabilities CAPABILITY_IAM \
--parameters file://test-acct-params.json
The output should look like the following:
5. Using your favorite editor, edit the file named prod-acct-params.json and update the ParameterValue for TestAccountID and ProdAccountID. The other parameters should remain as is.
6. Next, issue the AWS CLI command below with credentials authenticated to your prod AWS account to deploy the prod web stack:
aws cloudformation create-stack \
--stack-name appreg-app-prod \
--template-body file://template.yaml \
--capabilities CAPABILITY_IAM \
--parameters file://prod-acct-params.json
The output should look like the following:
Now let’s examine how AppRegistry gives us a singular view of this multi-account application configuration.
To view the AppRegistry application created by this post
1. Open the AWS Service Catalog console in the test account.
2. In the navigation pane, under AppRegistry, choose Applications.
3. In the applications panel, choose the application named “AppRegistrySampleApp”.
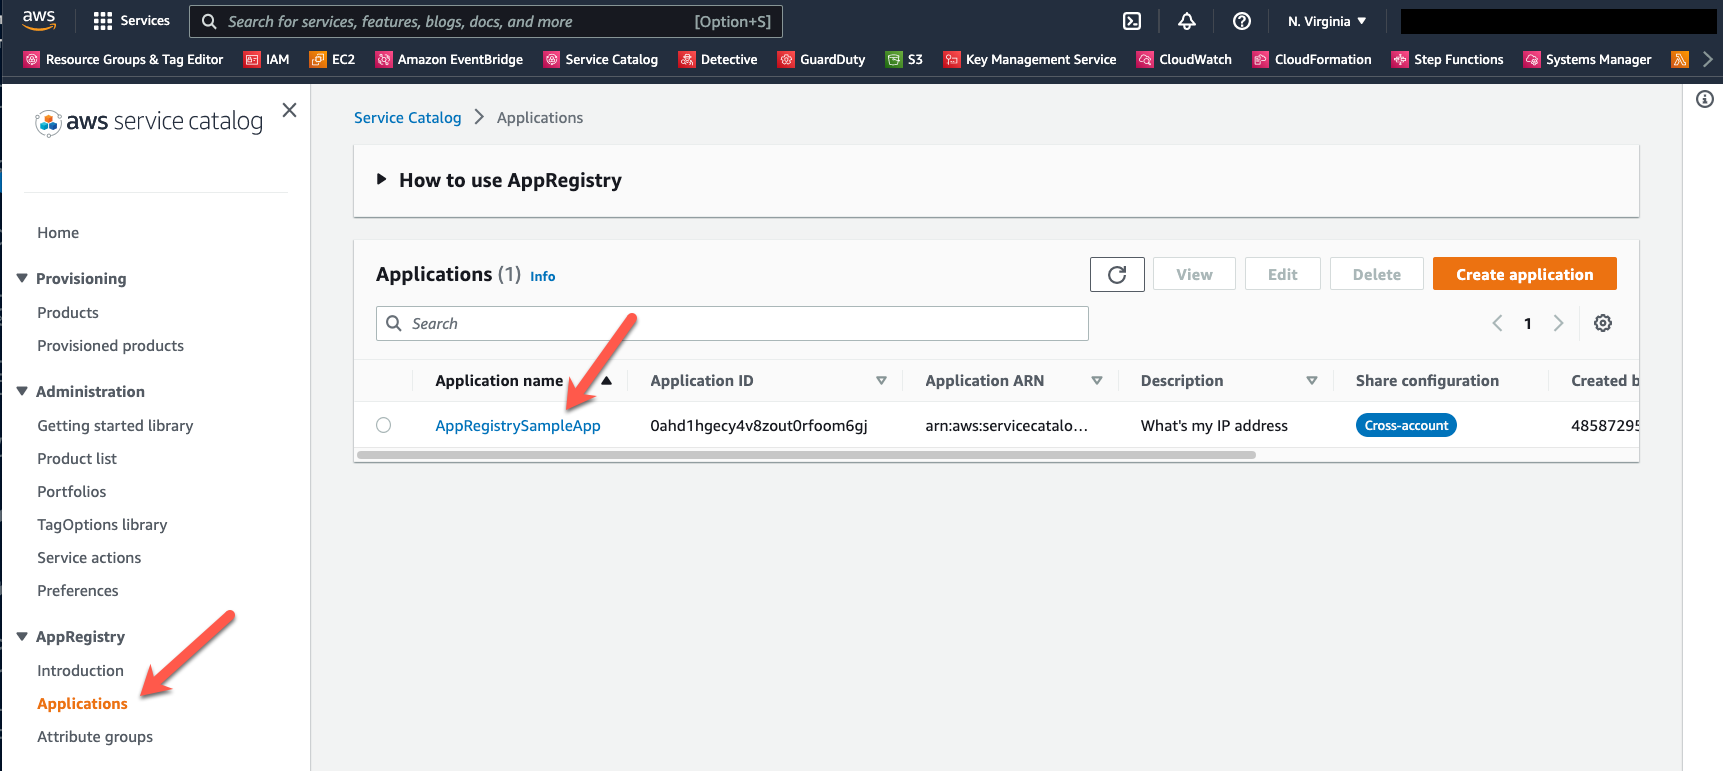
Figure 2 – AppRegistry applications
4. You will see the details for the AppRegistry application, including two tabs titled “Resource collections” and “Attribute groups.” Let’s explore each of them in turn. To examine the resource collection information across both AWS accounts, choose the Resource collections tab. The Resource collections tab displays the two CloudFormation stacks that were deployed to two different AWS accounts.
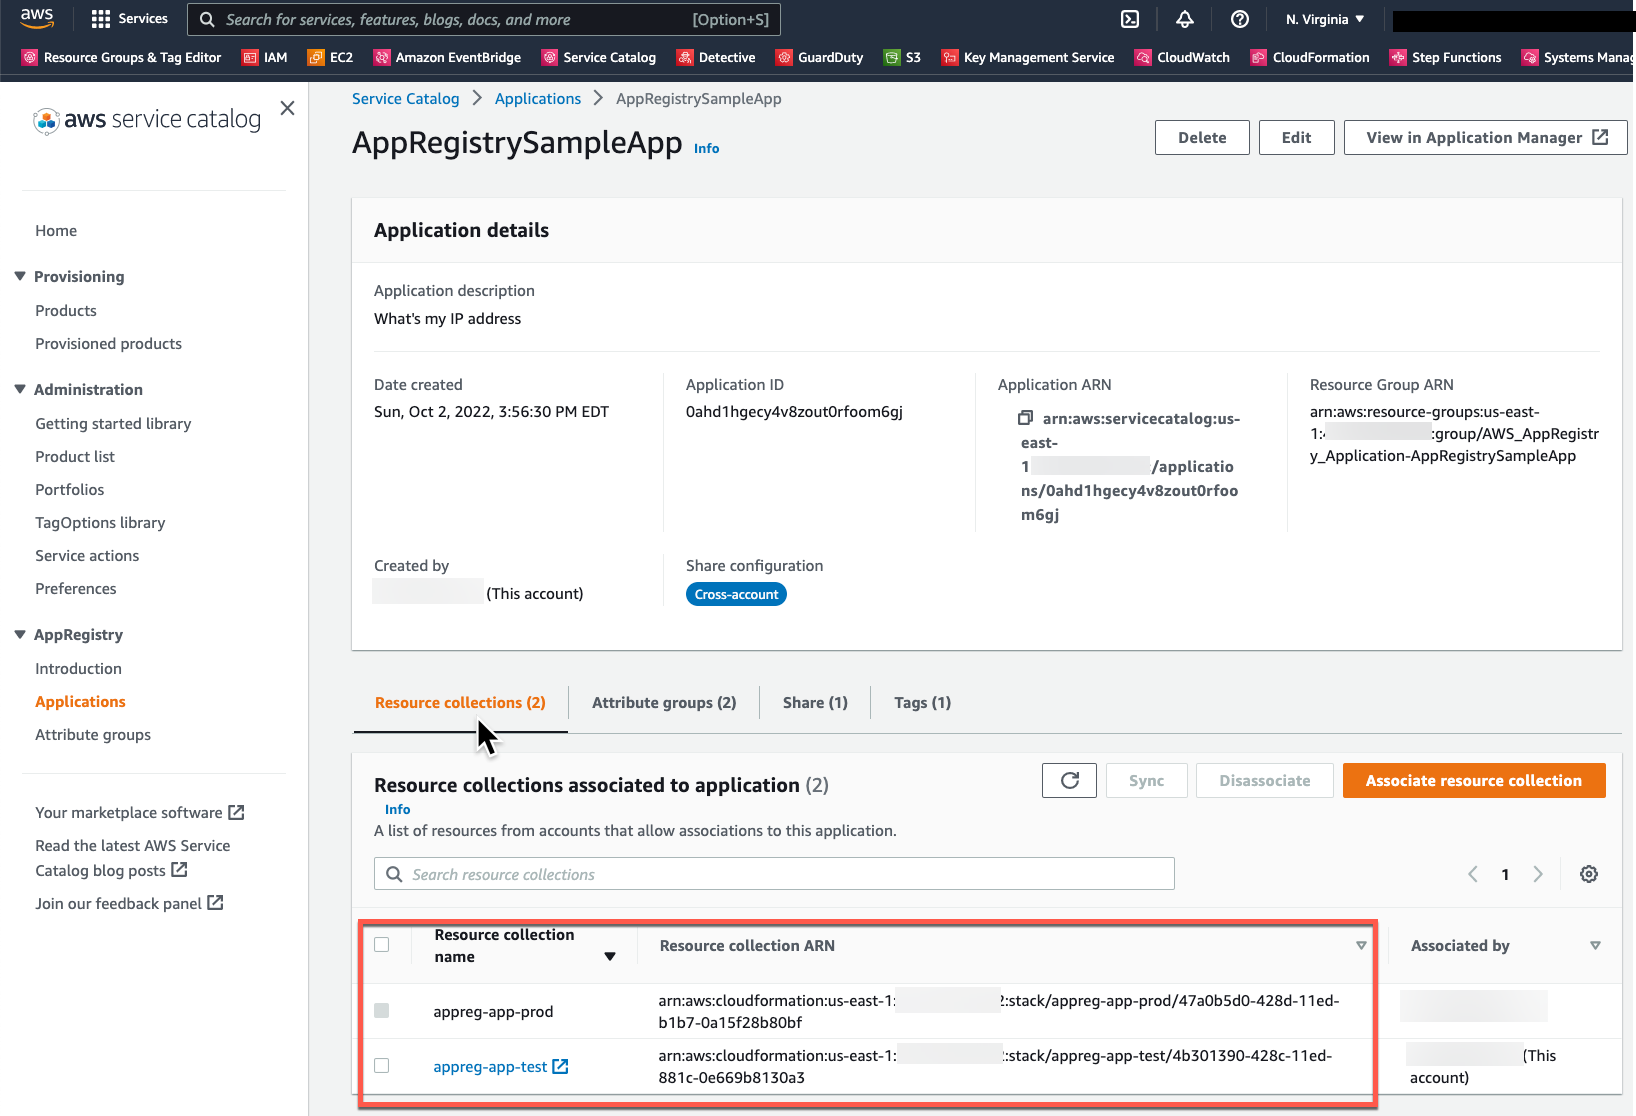
Figure 3 – AppRegistry Resource collections
5. To examine the attribute group information across both AWS accounts, choose the Attribute groups tab. You’ll be able to view the attribute groups associated with each stack.
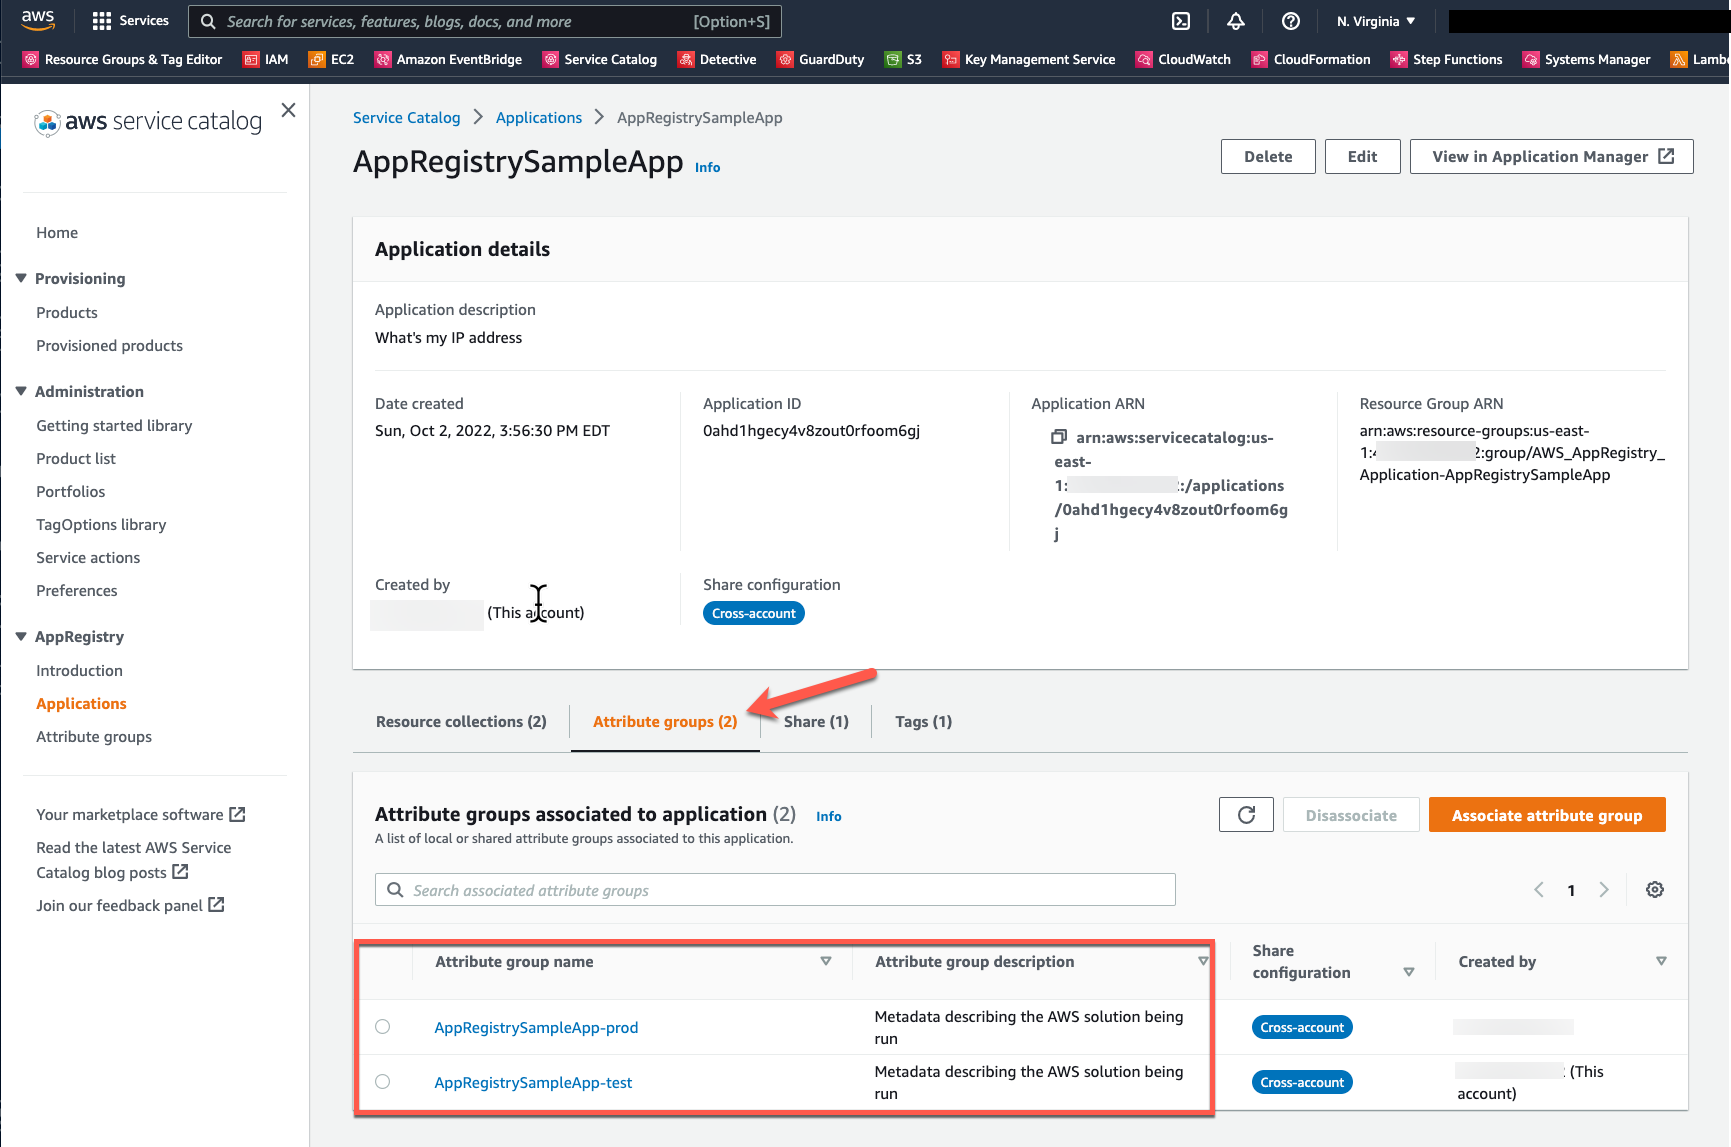
Figure 4 – AppRegistry Attribute groups
6. Now choose one of the attribute groups to examine the associated JSON document. It provides helpful metadata about the web stack, including the URL for our sample web application. Copy and paste the URL into your browser to retrieve your client IP address.
Cleanup
The solution deployed as part of this post was for demonstration purposes and will incur costs. You can delete the CloudFormation stacks in the test and prod AWS accounts that you created in the deployment steps section.
1. Issue the AWS CLI command below with credentials authenticated to your prod AWS account to delete the prod version of the sample web app.
aws cloudformation delete-stack --stack-name appreg-app-prod2. Next issue the AWS CLI command below with credentials authenticated to your test AWS account to delete the test version of the sample web app.
aws cloudformation delete-stack --stack-name appreg-app-testConclusion
This post showed you how to create an AppRegistry application that included CloudFormation created web applications spanning two different AWS accounts. It also showed how to associate useful metadata as attribute groups. Customers can easily extend this solution to encompass additional accounts and design the structure of the attribute groups’ metadata to meet their business needs.
About the authors: