AWS Cloud Operations Blog
Integrate administrator approval for EC2 Image Builder AMIs using AWS Systems Manager
Building Amazon Machine Images (AMIs) for your Amazon Elastic Compute Cloud (Amazon EC2) instances or Docker containers is a crucial step that will define the baseline for many of your workloads. AWS released a service called EC2 Image Builder (Image Builder) to help you build your pipelines more simply. Customers have different requirements depending on the workloads, the environment, and the data handled by the applications. When building your image, we recommend integrating automated security scans in the process. This enables you to detect potential issues quickly, and give the appropriate response. Then, this further lets you create a golden AMI that contains the latest security patches, software, configuration, and software agents that you need to install for logging, security maintenance, and performance monitoring. Moreover, you might find yourself in a slightly different situation, where you want an automated process to build your AMIs, but you still need a human supervisor to step in during the process. For example, if you must use an assessment tool that produces a report, or use additional controls that aren’t easily automated. Then, an administrator should then be able to run the controls and decide if the AMI is compliant with all of the relevant requirements.
In this post, we will show you how to automate your golden AMI building process while including an administrator approval. This capability is enabled by AWS System Manager. First, we will build an image that will be available for only one account during the building process. In our example, the test phase of the golden AMI pipeline will include an automated scan with Amazon Inspector. A report will be generated, and one or several administrators’ approval will be required to share the golden AMI within the AWS Organizations, or with other AWS accounts. We will utilize AWS Resource Access Manager (AWS RAM) and Amazon EC2 sharing capabilities.
What do you need to know for this process?
This post mostly uses the following AWS services:
- AWS Organizations is an account management service that lets you consolidate multiple AWS accounts into an organization that you create and centrally manage. This post assumes that you’re using an account that is a member of an AWS Organizations organization. In a production environment, consider that the account will own shared images in the organization. Therefore, this account should be set up with strong access controls and monitoring.
- Amazon Inspector assesses applications for exposure, vulnerabilities, and deviations from best practices. After performing an assessment, Amazon Inspector produces a detailed list of security findings that is organized by severity level. Image Builder uses Amazon Inspector as the default vulnerability scanning agent to establish security baselines for compatible Linux or Windows Operating Systems.
- AWS RAM will let you share your newly built image with an organization or organizational units (OUs) in AWS Organizations and AWS accounts.
- AWS Systems Manager is an AWS service that lets you view and control your infrastructure on AWS. This post uses a Systems Manager Automation runbook, which can be used to simplify the common maintenance and deployment tasks of AWS resources. It will let you customize and orchestrate your building process.
- Amazon Simple Notification Service (Amazon SNS) is a managed service that provides message delivery from publishers to subscribers (also known as producers and consumers). Publishers communicate asynchronously with subscribers by sending messages to a topic, which is a logical access point and communication channel. The client who subscribed to the topic will receive the messages. We will need an SNS topic to request approval from administrators.
- Image Builder is a fully-managed AWS service that makes it easier to automate the creation, management, and deployment of server images.
The following design describes the workflow of our process:

The Automation runbook will orchestrate the image building process and achieve the following outcomes:
Create an Image Builder pipeline that will generate your base AMI. Amazon Inspector will be used to scan the built image, and one or many administrators will have to approve the Image.
Image Builder will automatically make the image available for Amazon EC2 instances in the account.
A message will be sent to notify administrators for request for approval.
The Image Builder Image will be shared with a list of accounts, an Organization Unit, or an Organization. This Image will let account owners create Image Builder Pipelines based on the shared AMI. This step is optional, and you can remove it from the template if you wish.
The AMI will be shared with a list of accounts. The selected accounts owners will be able to directly launch Amazon EC2 instances based on the shared image. This step is optional, and you can remove it from the template if it isn’t needed.
Now, let’s consider the last two actions. Both steps imply sharing resources with other AWS accounts. This can lead to the exposure of internal resources to unauthorized principals. For that reason, you must be careful and make sure that:
- The list of principals that will get access to the AMI are authorized principals.
- The RAM resource share is properly configured. Learn how to create a resource share. We recommend enabling the following option: “Allow sharing with principals in your organization only.
Finally, you can find the templates used in this post by following this link.
How do you build the Automation?
Stage 1: Create the AMI pipeline
First, you must create an Image Builder pipeline. You could create a new one, use an existing one, or use the template simple web_server_pipeline.yml that we created as an example. This template is given as a nonfunctional example that could be an image for a Tomcat server. It requires further customization for a fully functional and secure server.
If you wish to create a new pipeline or are starting with Image builder, then refer to Create immutable servers using EC2 Image Builder and AWS CodePipeline to learn how to build a pipeline with Image Builder. Since we intend to use Systems Manager Automation to orchestrate the building process, the Image Builder parameter “Build schedule” should be set to “manual”. This lets you avoid launching the pipeline outside of the Automation runbook workflow. However, you can still periodically run pipeline using Amazon EventBridge to schedule the automation runbook execution.
When building images with Image Builder, you can run tests on your images as a part of the building process. Amazon Inspector assesses applications for exposure, vulnerabilities, and deviations from best practices. In our example template, we use Amazon Inspector in the testing phase of our Image Builder pipeline. It is best practice to build images that are automatically assessed for security vulnerabilities. At the end of the assessment, Amazon Inspector will generate a report that will be available in the account.
Stage 2: Create an Amazon SNS topic
Notifications, such as administrator approval requests, will be sent to an SNS Topic. You can create a new Amazon SNS Topic or reference an existing one. Furthermore, make sure to include the prefix “Automation” in the name of the SNS Topic to use it in our scenario. Because we used tags to control access given to the automation document, make sure to add the tag “owner/golden-ami-automation” to give the automation document permission to access the SNS Topic.
Stage 3: Create a Resource Share or use an existing one
AWS RAM lets you securely share resources that you create in an account with other AWS accounts. When the account is part of AWS Organizations, it is easier to share resources with all of the other accounts in the organization, or only those contained by one or more specified OUs. Learn how to share resources in your AWS Organizations with AWS RAM. This will let you share Image Builder images with your AWS Organization.
You can create and configure a resource share that will be used in the automation document, or use an existing one. Furthermore, make sure to add the tag owner/golden-ami-automation to give the automation document permission to access the resource share. If you don’t need this action, then you must remove Step 7 (see Stage 4) and the parameter “ResourceShareArn” from the template. Make sure to add the tag “owner/golden-ami-automation” so that the automation document permission can add resources to the resource share.
Stage 4: Create the AWS System Manager Automation runbook
A Systems Manager Automation runbook defines the actions that Systems Manager performs on your AWS environment. We will use an Automation runbook to orchestrate the steps required to build our image and share it following administrator approval. To limit the permissions of our runbook, the AWS CloudFormation template also creates a role that our automation runbook will assume to execute the defined tasks.
An Automation runbook lets you define input parameters that can be referenced within the definition of the runbook. Our template contains the following parameters:
If you want to know more about the structure of an automation document, then look into the System Manager Automation actions reference. Parameters, such as maxAttempts, timeoutSeconds, should be adapted to better fit your needs. Our Automation runbook performs the following steps:
Step 1 – We start by initiating a call to the Image Builder API to start the pipeline that was provided as input to the Automation runbook. This step will produce an output which is the Arn of the built image. This will be helpful in the subsequent steps.
Step 2 – The building process will take a while. Image Builder must build the image on an instance, and then validate it before taking a snapshot. To achieve that, we use the aws:waitForAwsResourceProperty action to wait for the pipeline to move to a success (“AVAILABLE”) or error status (“FAILED”). Notice how we reference the output from Step 1.
At this point, multiple outcomes are possible for the previous step. The state of the image being built can either be ‘AVAILABLE’ or ‘FAILED’.
It is also possible to reach the timeout value. This will cause the automation document execution to fail. Make sure to configure a value that fits with your requirements. Follow this link to see how to handle timeouts in automation runbooks.
Step 3 – To decide on the next steps, the automation document will capture the status of the building process.
Step 4 – Here the process must select the next step depending on the output of the previous step. If the image is “AVAILABLE”, then we continue the execution. Otherwise, there might be something wrong. That situation will lead to the post-processing step that we will see later.
Step 5 – Reaching this step means that the image has been successfully built. Beyond the different components installed, remember that we configured an Amazon Inspector test component to assess our newly built image. The next step aims to wait for the approval from the selected administrators. This lets us make sure that one or more human can review the Amazon Inspector report. Moreover, the output records the approval status. However, If the result is “Denied”, then the Automation runbook automatically fails here.
Step 6 – The image is approved by the administrators. Now you should make it available to the appropriate principals. First, we get the ID of the image.
Step 7 – Second, we share the AMI with the defined list of principals, using AWS RAM. Note that this will enable the targets to use the Image as the source AMI in Image Builder to build other images. If you don’t need this step, then you can remove it from the template, along with the parameter “ResourceShareArn”.
Step 8 – Finally, we can share the AMI with the defined list of principals. This step is slightly different from the previous one. It lets you directly launch Amazon EC2 instances from the AMI, without having to run an Amazon EC2 builder pipeline first. If you don’t need this step, then you can remove it from the template, along with the parameter “AMIPrincipals”.
Step 9 – This is the last step of the automation runbook. We will use it to send a summary of the process to the provided SNS Topic. Here you can add the relevant details that can offer a quick insight into the automation status, along with the next steps to take.
At this point, your Systems Manager Automation runbook is complete. The example CloudFormation template, system_manager_automation_document.yml, is available on GitHub
Stage 5: Execute the Automation runbook
Now that everything is set up, you can execute the Automation runbook. Do this using AWS Command Line Interface (AWS CLI), AWS SDK, or AWS Console. You can also create an Amazon EventBridge rule to execute the Automation runbook periodically. These are the steps when using the console:
- Open the AWS Systems Manager console
- Select Document under Shared Resources in the left panel
- Select your Automation runbook (you might want to look into the “owned by me” tab)
- Select “Execute automation”
- Select Simple Execution
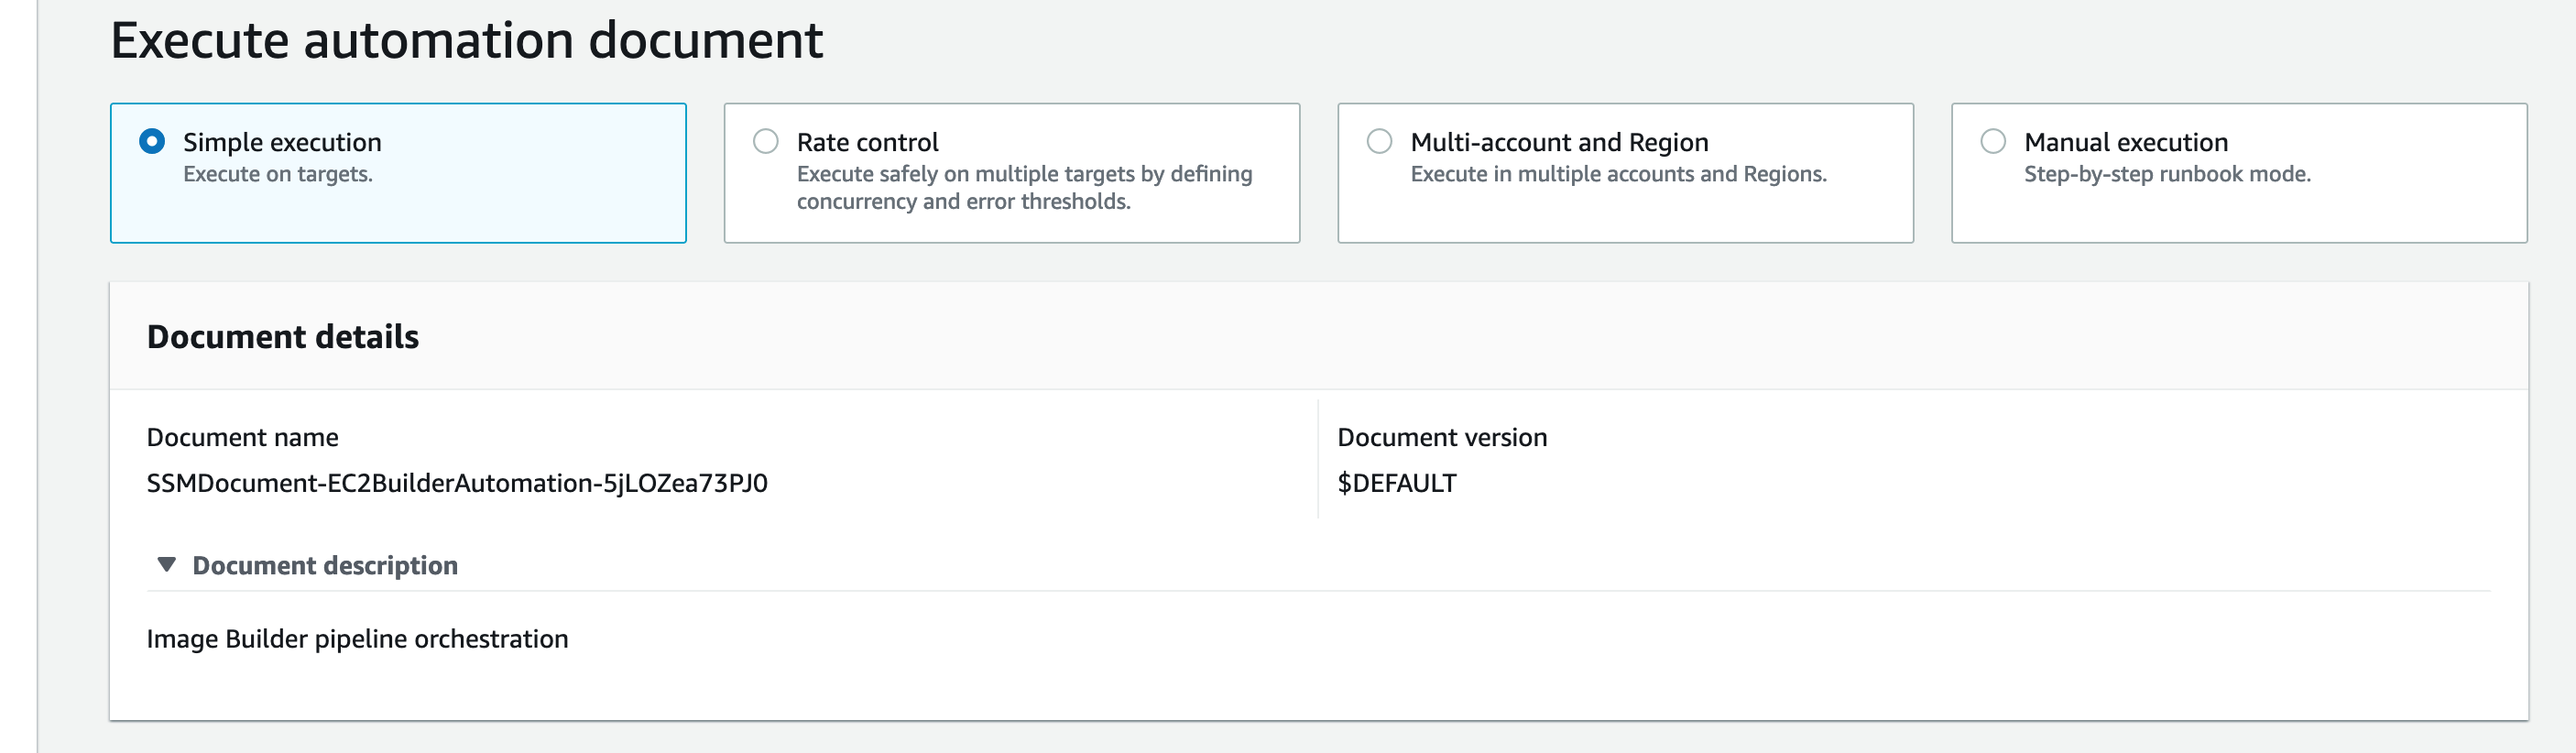
Select “Simple execution” on the console.
Fill the parameters in the following sections. Remember that if they aren’t used, then optional parameters must be removed from the template, along with the corresponding steps.
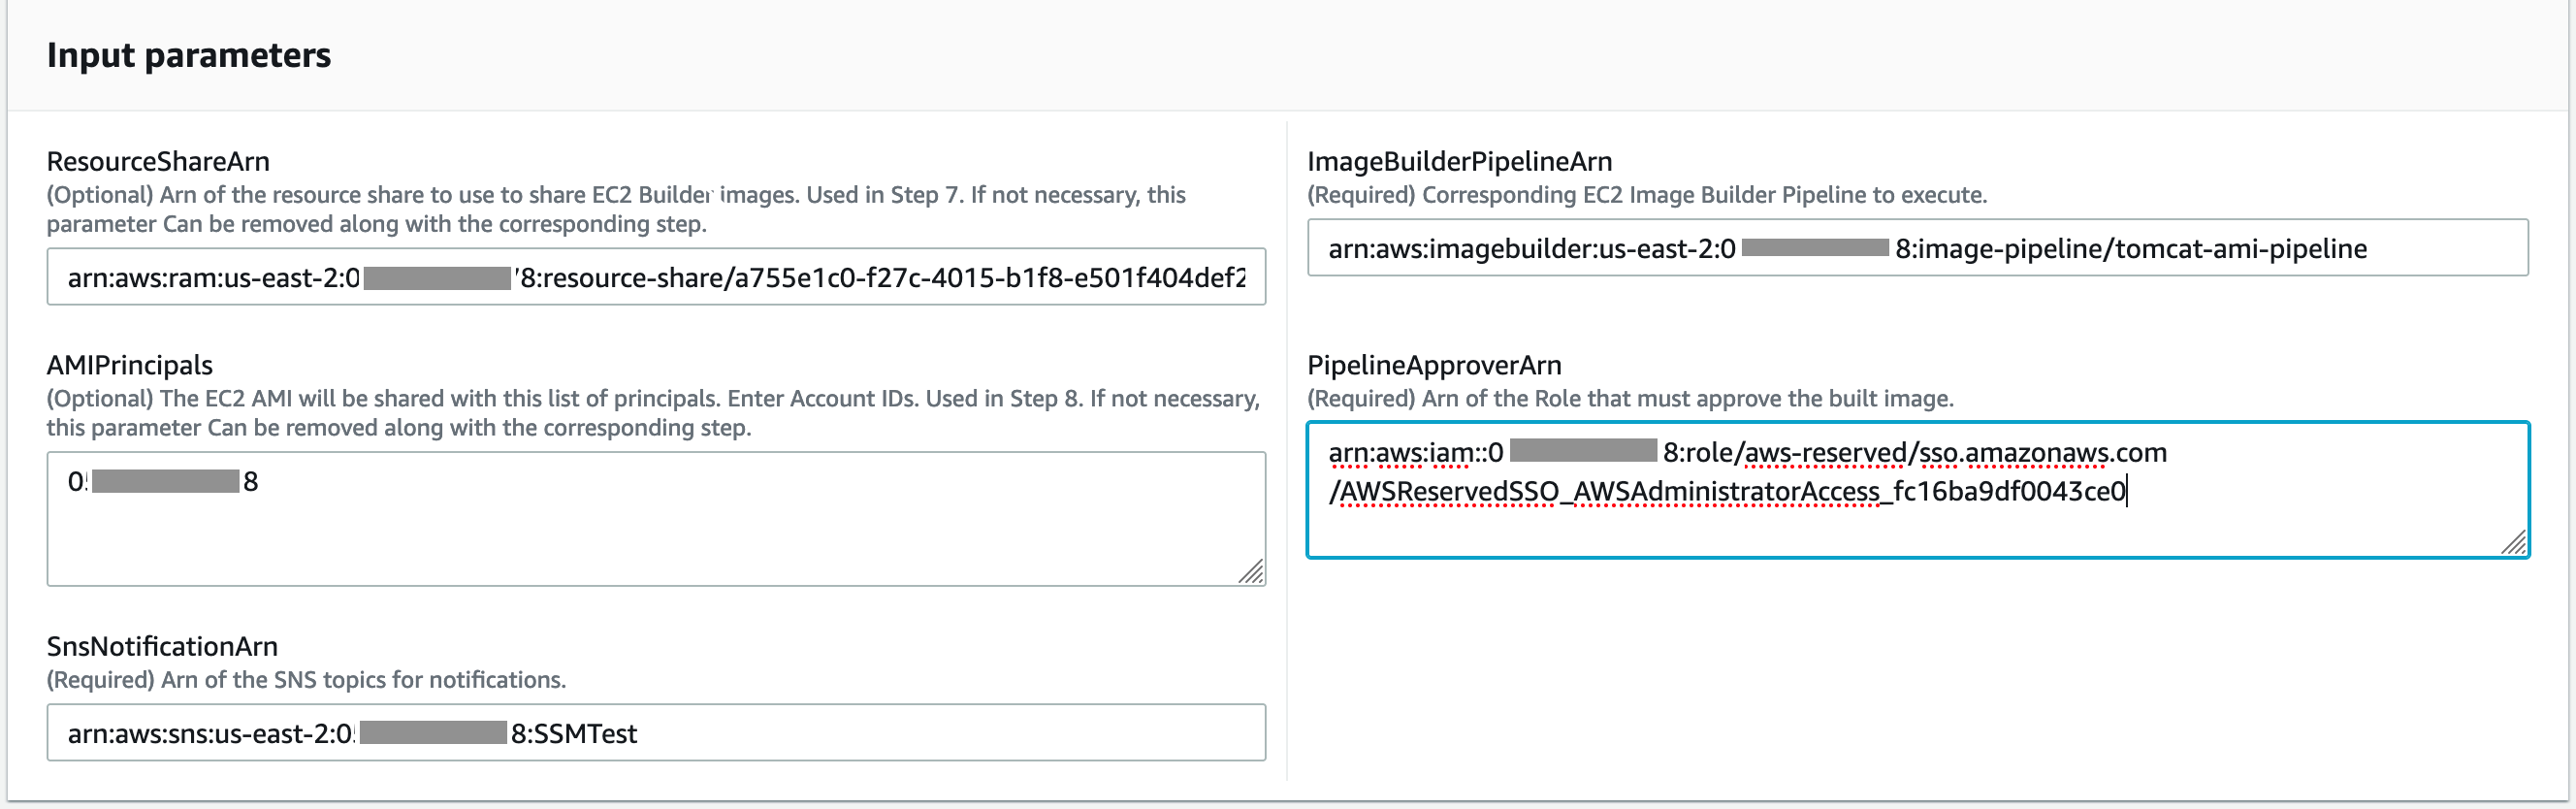
Enter the required parameters: ResourceShareArn, AMIPrincipals, SnsNotificationArn, ImageBuilderPipelineArn, and PipelineApproverArn.
Once you launch the runbook, it will trigger your pipeline. You will receive notifications on the endpoints that subscribed to the SNS topic.
Cleanup
Now that you understand the described principle, it is time to cleanup your environment.
- Terminate any Amazon EC2 instances.
- Deregister the created AMI.
- Enter EC2 in the top search box, and go to the Amazon EC2 console
- Go to AMI on the left panel
- Select the AMI
- Select Action → deregister, and Continue
- Delete the resource share association.
- Enter RAM in the search box and go the AWS RAM console
- Select resource share, under “Shared by me” in the left panel
- Select the appropriate resource share
- Select the resource to delete in the “Shared resource” section
- Select Disassociate
- Confirm by selecting “OK” in the confirmation windows
- Go to the CloudFormation console
-
- Select the Systems Manager Automation runbook template, and selectthe delete button
- Select the Image Builder template, and select the delete button
-
Conclusion
In this post, we demonstrated how to use a Systems Manager Automation runbook to integrate an Image Builder pipeline in a customized golden AMI creation workflow. We started with a pipeline that contains an automated Amazon Inspector scan to assess for security vulnerabilities to let us build secure images. We defined a Systems Manager Automation runbook that uses our Image Builder pipeline, and we added human administrator approval. The Amazon Inspector report can be read by the administrator, and the image can be accepted or denied.
To go further with this scenario, you could use the newly created image to update an autoscaling group. This would make sure that you use the most up-to-date images as soon as they are available.