AWS Cloud Operations Blog
Using AWS Config custom resources to track any resource on AWS
AWS Config is a powerful service you can use to track infrastructure resources and simplify compliance. AWS Config continuously monitors and records your resource configurations. It also allows you to use AWS Config rules to automate the evaluation of recorded configurations against desired state. You can use its remediation actions to address noncompliant resources and its conformance packs to build a powerful enterprise-wide compliance monitoring solution.
Given the speed of innovation at AWS, it can be challenging to add native support in AWS Config for all the new services. Although the AWS Config team works furiously to add more services to the list of supported resources for AWS Config, what if there’s a service not covered that you really need to track?
In this blog post, I share a solution that will allow you to create your own configuration item records for services not currently supported by AWS Config. The solution can be fully automated.
The AWS Config team recently released a feature that allows you to track resources outside of AWS like an on-premises server or a GitHub repository. When you combine this feature with Amazon CloudWatch Events, AWS Lambda, and AWS Config rules, you can track, monitor, and ensure compliance even for resources not currently supported in AWS.
In this post, I show you how to implement a custom resource that records the configuration of Amazon EBS Snapshots, which are not natively supported in AWS Config. I show you how to create a rule to evaluate if the snapshots are encrypted. You can use the elements of the solution for any other AWS resource (for example, Amazon Route 53 zones and records, workspaces in Amazon WorkSpaces, a directory in AWS Directory Service). Anything that can be described with the API can be tracked using the same approach.
Prerequisites
To complete the steps in this walkthrough, you need the following:
- An AWS account with administrator permissions.
- A workstation with the AWS CLI and AWS CloudFormation CLI installed. There are instructions in this post for setting up an AWS Cloud9 environment to simplify this requirement. You need the CloudFormation CLI to define the schema of the resources. For installation instructions, see What is the CloudFormation Command Line Interface? in the CloudFormation Command Line Interface User Guide.
Overview of the proposed solution
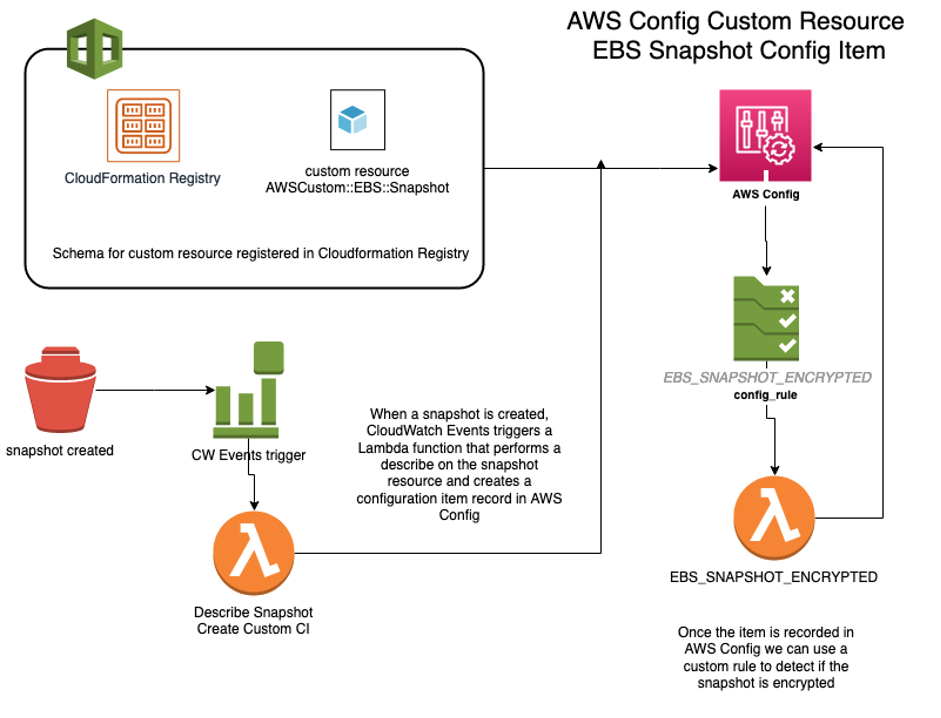
This diagram explains how the solution design works. A new custom resource type is registered in CloudFormation registry. We then use CloudWatch events to trigger a Lambda function every time a new EBS snapshot is created. The Lambda function does a describe call on the EBS snapshot then uses that information to register a new configuration item using the defined custom resource. That in turn triggers a rule that evaluates if the EBS snapshot is encrypted.
Figure 1: Solution diagram
First, to define an AWS Config custom resource, you must define the schema of the resource and register it in the CloudFormation registry. Then, create a trigger in CloudWatch Events to detect the creation of a new EBS snapshot. When that trigger fires, a Lambda function performs a describe API call on the snapshot that collects the properties from the resource. These properties are used to create a configuration item in AWS Config. With these steps, you can track all your snapshots in AWS Config, but you’ll also create a custom rule that evaluates if the snapshot is encrypted.
Register the schema in the CloudFormation registry
A configuration item represents a point-in-time view of the various attributes of a supported AWS resource that exists in your account. Custom resources create a special configuration item with properties you define.
Set up the CloudFormation CLI on Cloud9
For consistency with the instructions in this blog post, use an AWS Cloud9 environment to install the CloudFormation CLI and register the schema. AWS Cloud9 is a cloud-based integrated development environment (IDE) that lets you write, run, and debug your code with just a browser. It includes a code editor, debugger, and terminal. Because the process of registering the schema requires specific versions of programming languages and some other dependencies, using a Cloud9 environment simplifies things considerably.
Note: Before you begin, review the information in Setting up AWS Cloud9.
You will incur charges in your AWS account when you use a Cloud9 environment. For more information, see AWS Cloud9 Pricing.
To create a Cloud9 environment
- Sign in to the AWS Management Console, and then open the AWS Cloud9 console.
- Choose Create environment.
- On the Name environment page, for Name, enter a name for your environment (for example, CloudFormation Registry Setup).
- For Description, enter something about your environment and then choose Next step.
- On the Configure settings page, for Environment type, choose Create a new EC2 instance for environment (direct access).
- For Instance type, choose an instance (for example, t2.micro). Keep in mind that charges for the specified EC2 instances apply. Cloud9 will automatically stop the instance if you are not using the IDE.
- For Platform, choose Amazon Linux.
- Under Cost-saving setting, leave the default to hibernate after 30 minutes.
- Expand Network settings (advanced) and make sure the default VPC and subnet allow access to the CloudFormation endpoint for the registry. You can optionally set up a CloudFormation VPC endpoint for your VPC.
- Review your network settings and then choose Next step.
- On the Review page, verify the options you selected and then choose Create environment. It takes a few minutes to create the environment.
To accommodate the Docker images used by the CloudFormation registration process, increase the disk size for the EC2 instance used by Cloud9. You can do this 30 minutes after your environment has been created.
I summarize the steps here, but you’ll find detailed instructions in Resize an Amazon EBS volume used by an environment in the AWS Cloud9 User Guide.
In the Cloud9 IDE environment, create a file with the following content and name it resize.sh.
#!/bin/bash

# Specify the desired volume size in GiB as a command-line argument. If not specified, default to 20 GiB.
SIZE=${1:-20}

# Get the ID of the environment host Amazon EC2 instance.
INSTANCEID=$(curl http://169.254.169.254/latest/meta-data//instance-id)

# Get the ID of the Amazon EBS volume associated with the instance.
VOLUMEID=$(aws ec2 describe-instances \
  --instance-id $INSTANCEID \
  --query "Reservations[0].Instances[0].BlockDeviceMappings[0].Ebs.VolumeId" \
  --output text)

# Resize the EBS volume.
aws ec2 modify-volume --volume-id $VOLUMEID --size $SIZE

# Wait for the resize to finish.
while [ \
  "$(aws ec2 describe-volumes-modifications \
    --volume-id $VOLUMEID \
    --filters Name=modification-state,Values="optimizing","completed" \
    --query "length(VolumesModifications)"\
    --output text)" != "1" ]; do
sleep 1
done

if [ $(readlink -f /dev/xvda) = "/dev/xvda" ]
then
  # Rewrite the partition table so that the partition takes up all the space that it can.
  sudo growpart /dev/xvda 1

  # Expand the size of the file system.
  sudo resize2fs /dev/xvda1

else
  # Rewrite the partition table so that the partition takes up all the space that it can.
  sudo growpart /dev/nvme0n1 1

  # Expand the size of the file system.
  sudo resize2fs /dev/nvme0n1p1
fi
Save the file. In the IDE environment, in the terminal window, enter the following command to resize the disk to 50 GB.
sh resize.sh 50
Now you’re ready to install the dependencies. The CloudFormation CLI is available for multiple programming languages. In this example, I use the Python version.
To install the Python version of the CloudFormation CLI
In the Cloud9 environment IDE, in the terminal window, enter the following command to install the tools.
python -m pip install cloudformation-cli-python-plugin
You now have the CloudFormation CLI and its dependencies installed in your Cloud9 environment and are ready to register the custom resource.
Register the custom resource
Now use the CloudFormation CLI to do the following:
- Create the boilerplate resources.
- Define the schema.
- Validate the schema.
- Generate the registration files.
- Submit the registration.
The schema represents the structure of the configuration item. You can determine the schema for EBS snapshots by describing the resource as it’s currently defined in the API. Use the following command. Replace Account-ID with your account number.
aws ec2 describe-snapshots --owner-ids ##Account-ID##
The command returns a JSON-formatted list that describes the EBS snapshots in your account. You can use the information in one of those snapshots to determine the schema you need to create.
{
    "Description": "This is a test snapshot",
    "Encrypted": true,
    "KmsKeyId": "arn:aws:kms:us-east-1:123456789012:key/0456c968-9110-45ac-ba25-5808564a904e",
    "OwnerId": "123456789012",
    "Progress": "100%",
    "SnapshotId": "snap-03469d9007bf7942c",
    "StartTime": "2020-06-15T16:38:56.310Z",
    "State": "completed",
    "VolumeId": "vol-0f4349b571ea9cd01",
    "VolumeSize": 100
}
From these results, you can derive the following schema for your custom resource.
| Field name | Field type | Sample |
| Description | String | This is a test snapshot |
| Encrypted | Boolean | TRUE |
| KmsKeyId | String | arn:aws:kms:us-east-1:123456789012:key/0456c968-9110-45ac-ba25-5808564a904e |
| OwnerId | String | 123456789012 |
| Progress | String | 100% |
| SnapshotId | String | snap-03469d9007bf7942c |
| StartTime | String | 2020-06-15T16:38:56.310Z |
| State | String | completed |
| VolumeId | String | vol-0f4349b571ea9cd01 |
| VolumeSize | String | 100 |
Now you’re ready to define the schema. Create a directory where you’ll store the schema definition files.
mkdir ebs-snapshot

cd ebs-snapshot
Enter the following command to generate the boilerplate code.
cfn init
You’ll be prompted to enter details for the new resource. Enter r to indicate you want to develop a new resource.
Initializing new project
Do you want to develop a new resource(r) or a module(m)?.
>> r
When you’re prompted for the name of the resource type, enter AWSCustom::EBS::Snapshot.
Initializing new project

What's the name of your resource type?

(Organization::Service::Resource)

>> AWSCustom::EBS::Snapshot
Select the Python version you’re using. If you’re using a Cloud9 environment, select option 2 for Python 3.7.
Select a language for code generation:

[1] python36

[2] python37

(enter an integer):

>> 2
When you’re prompted to use Docker for platform-independent packaging, enter Y.
Use docker for platform-independent packaging (Y/n)?

This is highly recommended unless you are experienced

with cross-platform Python packaging.

>> Y
This will create all the required files. You should see the following message to confirm a new project has been initialized.
Initialized a new project in /home/ec2-user/environment/ebs-snapshot
The init process created a file that defines the schema of the resource you want to register. This file follows the format of the name of the resource (in this case, awscustom-ebs-snapshot.json). Replace the content of that file with the following schema. This sample schema is based on the information returned from the describe command.
{
    "typeName": "AWSCustom::EBS::Snapshot",
    "description": "Custom resource to store in AWS Config EBS Snapshot information",
    "sourceUrl": "https://github.com/aws-cloudformation/aws-cloudformation-rpdk.git",
    "properties": {
        "Description": {
            "description": "Description of the snapshot",
            "type": "string"
        },
        "OwnerId": {
            "description": "Account ID of the owner of the snapshot",
            "type": "string"
        },
        "Encrypted": {
            "description": "Weather the snapshot is encrypted or not",
            "type": "boolean"
        },
        "Progress": {
            "description": "Progress of the snapshot",
            "type": "string"
        },
        "KmsKeyId": {
            "description": "ID of the KMS Key Used to encrypt",
            "type": "string"
        },
        "SnapshotId": {
            "description": "ID of The Snapshot",
            "type": "string"
        },
        "StartTime": {
            "description": "ID of The Snapshot",
            "type": "string"
        },
        "State": {
            "description": "State of the snapshot",
            "type": "string"
        },
        "VolumeId": {
            "description": "ID of The Volume",
            "type": "string"
        },
        "VolumeSize": {
            "description": "ID of The Volume",
            "type": "string"
        }
    },
    "additionalProperties": false,
    "required": [
        "SnapshotId"
    ],
    "readOnlyProperties": [
        "/properties/SnapshotId"
    ],
    "primaryIdentifier": [
        "/properties/SnapshotId"
    ]
}
Save the file. Use the following command to validate its content is correct.
cfn validate
You should see the following message:
Resource Schema is valid
Now enter the following command to generate the files required for the registration.
cfn generate
You should see the following message:
Generated files for AWSCustom::EBS::Snapshot
Submit your new custom resource to be created in the CloudFormation registry. Enter the following command to register the resource.
cfn submit
This command packages the required files, including your newly defined schema, and submits the request to CloudFormation to create this resource in your account. It will take a few minutes because the Docker image must be pulled. You should see a message like this:
Starting Docker build. This may take several minutes if the image 'lambci/lambda:build-python3.6' needs to be pulled first.

Successfully submitted type. Waiting for registration with token 'f0a469de-5b14-40ce-9f99-f6e30df1161a' to complete.

Registration complete.

{'ProgressStatus': 'COMPLETE', 'Description': 'Deployment is currently in DEPLOY_STAGE of status COMPLETED; ', 'TypeArn': 'arn:aws:cloudformation:us-east-1: 123456789012:type/resource/AWSCustom-EBS-Snapshot', 'TypeVersionArn': 'arn:aws:cloudformation:us-east-1:123456789012:type/resource/AWSCustom-EBS-Snapshot/00000003', 'ResponseMetadata': {'RequestId': 'a4327ae3-5f98-4cf7-9ca2-50808891b097', 'HTTPStatusCode': 200, 'HTTPHeaders': {'x-amzn-requestid': 'a4467ae3-5f98-4cf7-9ca2-5080345891b097', 'content-type': 'text/xml', 'content-length': '683', 'date': 'Tue, 23 Jun 2020 14:02:42 GMT'}, 'RetryAttempts': 0}}
Now you’re ready to start recording EBS snapshots with AWS Config. Although you can use the put-resources-config action to manually track snapshots, it’s more efficient to automate this process.
Record a configuration item when snapshots are created
To automate the process of recording new snapshots in AWS Config, this solution uses a Lambda function that is invoked by a CloudWatch event. The event is triggered every time a new EBS snapshot is created.
To create the Lambda function
- Sign in to the AWS Management Console and then open the AWS Lambda console.
- Choose Create function.
- Choose Author from scratch.
- For the name of the Lambda function, enter ConfigEBSSnapshot.
- For Runtime, use Python 3.7.
- Under Permissions, expand Change default execution role, and then create or use an IAM role that has permissions to execute a Lambda function and the put-resource-config API in AWS Config.
- Choose Create function.
- In the Function code section, replace the existing code with this code that records the EBS snapshots:
import json
import sys
import datetime
import boto3
import botocore
from pprint import pprint

def lambda_handler(event, context):

    # this creates the objects to interact with ec2 and config
    clientec2 = boto3.client('ec2')
    clientconfig = boto3.client('config')

    # this will do a described on the snapshot id passed by the event
    response = clientec2.describe_snapshots(
    OwnerIds=[
        event["account"],
    ],
    SnapshotIds=[
        event["resources"][0].split("/")[1],
    ]
    )


    # the start time comes in as a datetime. We need to convert it to a string
    response['Snapshots'][0]["StartTime"] = response['Snapshots'][0]["StartTime"].strftime("%m/%d/%Y, %H:%M:%S")

    # we need to change the volume size to a string
    response['Snapshots'][0]["VolumeSize"] = str(response['Snapshots'][0]["VolumeSize"])

    responseconfig = clientconfig.put_resource_config(
        ResourceType='AWSCustom::EBS::Snapshot',
        SchemaVersionId='00000001',
        ResourceId=response["Snapshots"][0]["SnapshotId"],
        Configuration = json.dumps(response['Snapshots'][0])

    )
    # This will return the properties of the EBS Snapshot
    return {
        'statusCode': 200,
        'body': json.dumps(response['Snapshots'][0])
    }
Choose Deploy to save the code.
Now add the trigger so that every time a snapshot is created, the function is invoked.
- In the Designer section, choose Add trigger.
- In the trigger configuration, choose EventBridge CloudWatch Events.
- Choose Create a new rule.
- For the rule name, enter ConfigEBSSnapshotRule.
- Enter a description for the rule.
- In Rule type, choose Event pattern.
- From the Services dropdown, choose EC2.
- From the Event dropdown, choose EBS snapshot notification.
- Select Enable trigger and then choose Add. This will save the trigger and the Lambda function.
You now have all the components required to track EBS snapshots using AWS Config custom resources. If you would like to test the solution, create a snapshot of an EBS volume. If you create a snapshot, the new custom resource is displayed in the AWS Config console.
Note: Custom resources are only available in the new (redesigned) AWS Config console. There is a banner at the top of the console page that prompts you to use the new console.
Create a rule that detects if a snapshot is not encrypted
To extend the functionality of this new resource, you can use an AWS Config rule to detect snapshots that are not encrypted. For information about how to create a custom rule, see AWS Config Custom Rules in the AWS Config Developer Guide.
Follow the steps in Developing a Custom Rule for AWS Config to create the Lambda function that will be used by the rule. In the section of code where the evaluation is performed, use the following:
function evaluateChangeNotificationCompliance(configurationItem, ruleParameters) {
    checkDefined(configurationItem, 'configurationItem');
    checkDefined(configurationItem.configuration, 'configurationItem.configuration');
    checkDefined(ruleParameters, 'ruleParameters');

    if (configurationItem.resourceType !== 'AWSCustom::EBS::Snapshot') {
        return 'NOT_APPLICABLE';
    } else if (configurationItem.Encrypted) {
        return 'COMPLIANT';
    }
    return 'NON_COMPLIANT';
}
This portion of code evaluates the configuration item and returns NON_COMPLIANT if the snapshot is not encrypted.
Follow the steps in Creating a Custom Rule in AWS Config to create the custom rule that will trigger the Lambda function. For Trigger type, choose Configuration changes. For Scope of changes, choose Resources and the newly created AWSCustom EBS Snapshots. Be sure to enter the ARN of the Lambda function you just created to execute the rule, and then save the rule. The next time a new custom configuration item for an EBS snapshot is recorded, the rule will be executed and will evaluate if the snapshot is encrypted.
Conclusion
In this blog post, I showed you the process for registering a new custom resource for AWS Config using the CloudFormation CLI. I showed you how to define the schema for the resource, create a trigger using CloudWatch Events, and create an AWS Config rule to evaluate if the snapshot is encrypted. You can use this process to evaluate other resources that are not supported by AWS Config so that you can take advantage of the resource management and compliance evaluation that AWS Config provides.
About the author
 Andres (andress@amazon.com) is a Principal Specialist Solutions Architect with the Cloud Management Services team at AWS. He has been working with AWS technology for more than 10 years. Andres works closely with the AWS Service teams to design solutions at scale that help customers implement and support complex cloud infrastructures. When he is not building cloud automation, he enjoys skateboarding with his 2 kids