Networking & Content Delivery
Restricting access on HTTP API Gateway Endpoint with Lambda Authorizer
Customers use Amazon API Gateway APIs for critical production applications ranging from simple HTTP proxies to full-blown API management with request transformation, authentication, and validation. Starting in 2019, HTTP APIs have provided an enhanced alternative to the traditional API Gateway REST APIs, with HTTP APIs offering up to 60% latency reduction, 71% cost reduction, and a more intuitive and easier user experience over API Gateway REST APIs. If your API clients are geographically dispersed, or you would like to utilize edge caching, then you could utilize Amazon CloudFront and integrate your distribution with your HTTP API. Support for AWS Web Application Firewall (WAF) is currently limited to REST API Gateway. Therefore, restricting access to your API only via your CloudFront Distribution becomes a challenge. In this post, we demonstrate how to utilize HTTP APIs in API Gateway while restricting access to only CloudFront using AWS Lambda Authorizer function.
Solution Architecture
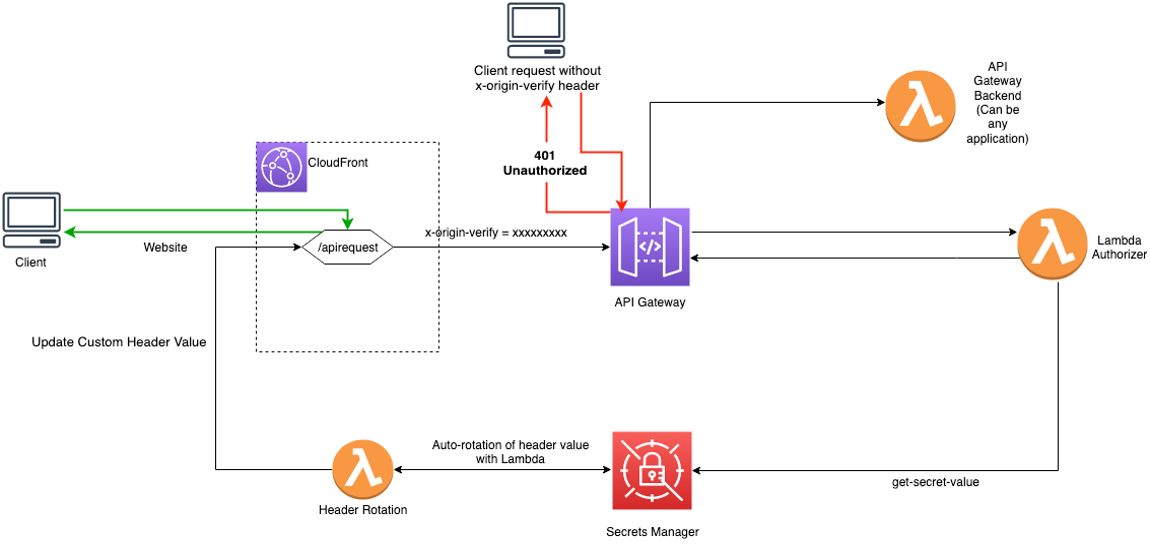
Figure 1 – Architecture Diagram
Solution Overview
Private APIs aren’t supported for HTTP API Gateway endpoint. Therefore, you need a solution that would authorize the clients (CloudFront in this case) accessing API Gateway over the Internet.
A similar solution is provided in this post, which uses AWS WAF to restrict access on REST APIs in API Gateway. However, at the time of writing this post, WAF isn’t supported for HTTP APIs. Therefore, you need an alternative solution to restrict access to only legitimate clients for your public HTTP API Gateway Endpoint.
The solution requires CloudFront to pass a custom header (x-origin-verify in this case) to the requests sent to the API Gateway. Lambda Authorizer, which is associated with the API Gateway, checks the value of the header passed by CloudFront and compares it against the value stored in AWS Secrets Manager. It authorizes the requests if the header values match. The Secrets Manager has rotation enabled and uses the “Header Rotation” AWS Lambda function to periodically rotate the custom header value. The Lambda function also updates the value in CloudFront after each rotation.
The solution is using CloudFront as the client. However, it can be used for any client that needs to send a request to the API Gateway. For the clients to be authorized by the Lambda Authorizer, they should send the custom header (x-origin-verify) in their request to the API Gateway. The clients should also be accessible from the Header Rotation Lambda function so that the custom header value can be rotated.
The following are the steps that occur when the client sends request to HTTP API Endpoint via CloudFront:
- CloudFront has an origin configured for the API Gateway endpoint with the custom header x-origin-verify set.
- The request, upon hitting the API Gateway, triggers the Lambda Authorizer function. If a client tries to access the API Endpoint without sending the x-origin-verify header, then it receives the HTTP 401 Unauthorized message. If the client sends the incorrect value for the header, then it receives the HTTP 403 Forbidden message.
- Upon receiving a request with the correct x-origin-verify header value, Lambda Authorizer authorizes the request, which is then sent to the API Gateway backend.
- The secret in the Secrets Manager has rotation enabled, and the rotation interval is configurable while you’re launching the AWS CloudFormation template. At the rotation interval, the Header Rotation Lambda function is triggered, which creates a new random value for the x-origin-verify header and uses it as the AWSCURRENT version. It also updates the header value stored in CloudFront Origin for the API Gateway.
Solution Deployment
This sample solution includes seven main steps:
- Deploy the CloudFormation template.
- Confirm successful viewer access to the CloudFront URL.
- Confirm that direct viewer access to the API Gateway HTTP API URL is blocked by the Lambda authorizer.
- Review the CloudFront origin custom header configuration.
- Review the API Gateway AWS Lambda Authorizer.
- Review the Secrets Manager configuration.
- Review the Secrets Manager Lambda Header Rotation
Step 1: Deploy the CloudFormation template
You can download the CloudFormation template from our Github repository. It takes approximately 10 minutes for the CloudFormation stack to complete.
To launch the CloudFormation stack
- Choose the following Launch Stack icon to launch a CloudFormation stack in your account in the N. Virginia Region.

- In the CloudFormation console, leave the configured values, and then choose Next.
- On the Specify Details page, the default parameter value for ‘RotateInterval’ is seven, which you can customize as per your needs, and then choose Next. Note that you would want to customize the value of the token rotation interval based on your organization security policies.
- On the Options page, keep the defaults, and then choose Next.
- On the Review page, confirm the details, acknowledge the statements under Capabilities and transforms as shown in Figure 2, and then choose Create stack.
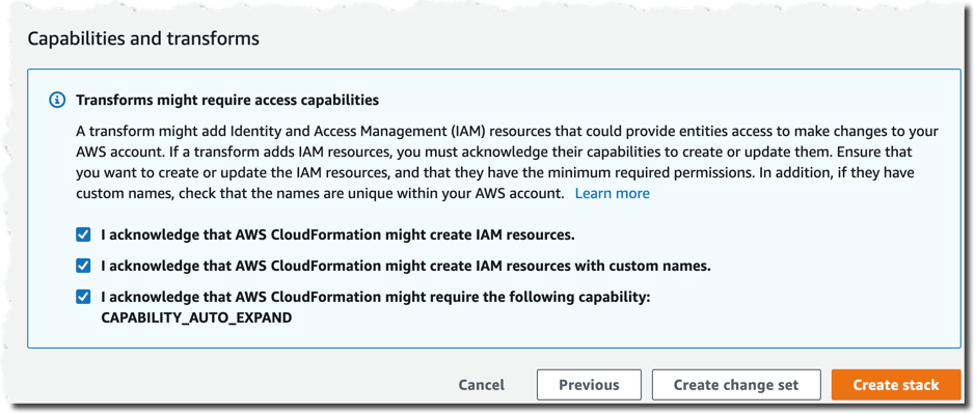
Figure 2 – CloudFormation Capabilities and Transforms acknowledgments
Step 2: Confirm access to the website through CloudFront
Next, we’ll confirm that API access through CloudFront is functioning as intended. After the CloudFormation stack is deployed, you can access the API using the distribution domain name.
To confirm viewer access to the website through CloudFront
- In the CloudFormation console, choose Services > CloudFormation > APIAccessControl stack. On the stack Outputs tab, look for the cfEndpoint entry, as shown in Figure 3:
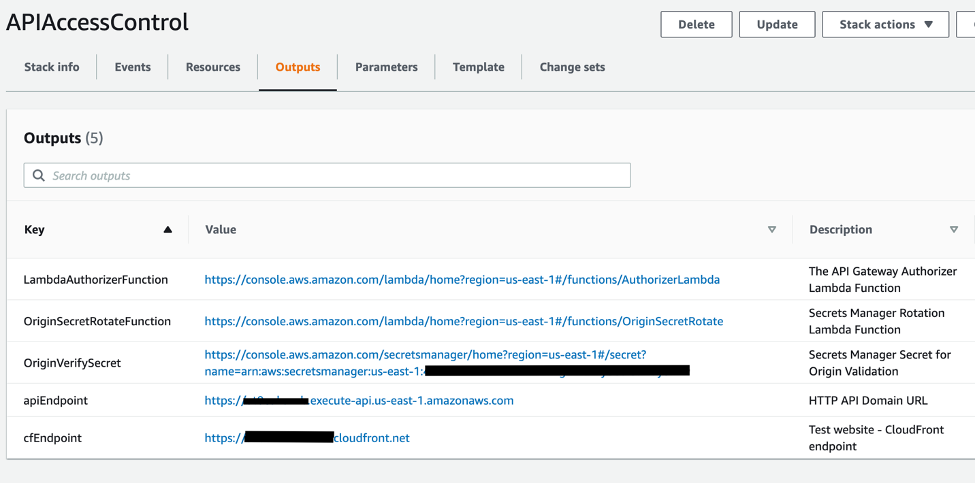
Figure 3 – CloudFormation cfEndpoint stack output
- The cfEndpoint is the URL for the distribution, and it’s automatically assigned by CloudFront. Choose the cfEndpoint link to open the test page, as shown in Figure 4.
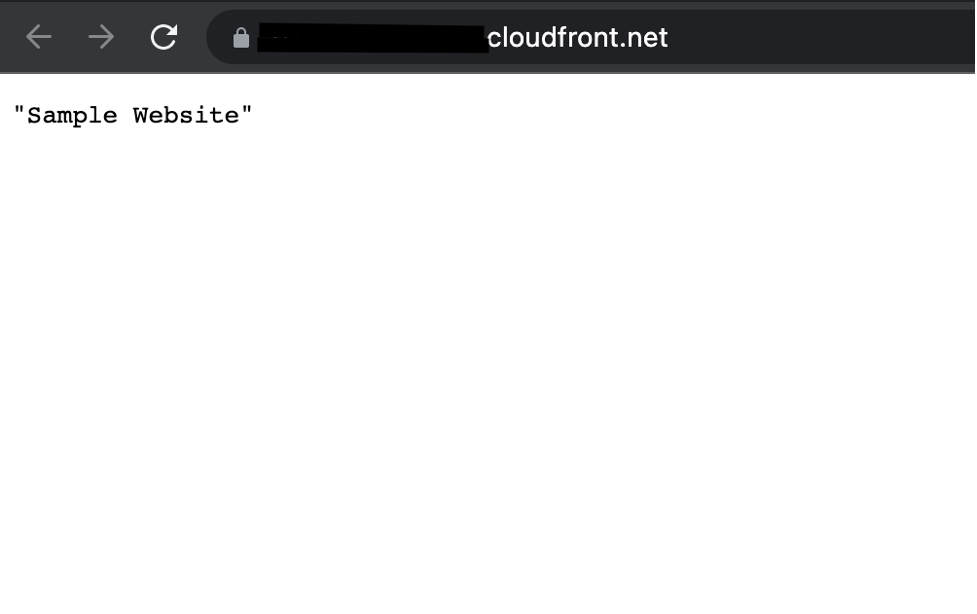
Figure 4 – CloudFormation cfEndpoint test page
In this step, you’ve confirmed that website accessibility through CloudFront is functioning as intended.
Step 3: Confirm that direct viewer access to the API Gateway HTTP API URL is blocked by Lambda Authorizer
In this step, you confirm that direct access to the HTTP API is blocked by the Lambda Authorizer.
To test direct access to the origin URL
- In the CloudFormation console, choose the APIAccessControl stack. On the stack Outputs tab, look for the apiEndpoint entry.
- Choose the apiEndpoint link to go to the test site URL that was automatically assigned to the HTTP API. Choosing this link will result in a 401 Unauthorized response, since the request doesn’t contain the Authorization header with the secret token.
In this step, you’ve confirmed that website accessibility directly to the origin HTTP API (without the x-origin-verify header) is blocked by the Lambda Authorizer for API Gateway.
Step 4: Review the CloudFront origin custom header configuration
Now that you’ve confirmed that the test website can only be accessed through CloudFront, you can review the configurations for CloudFront, Lambda Authorizer, and Secrets Manager that enable this restriction.
To review the custom header configuration
- In the CloudFormation console, choose the APIAccessControl stack. On the stack Outputs tab, look for the cfDistro entry.
- Choose the cfDistro link to go to this distribution’s configuration in the CloudFront console. On the Origins tab, under Origins, select the origin as shown in Figure 5.
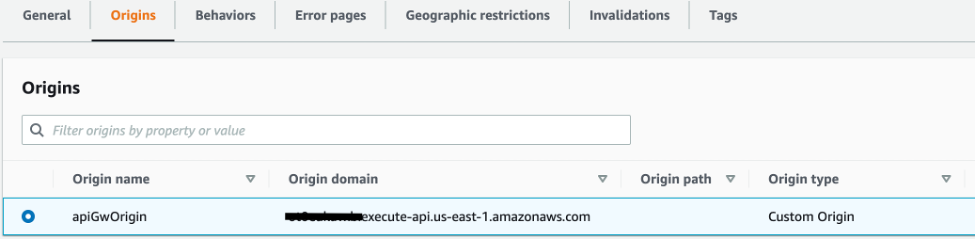
Figure 5 – CloudFront Origins and Origins settings
- Choose Edit to go to the Origin Settings section, scroll to the bottom, and review the Origin Custom Headers as shown in Figure 6.

Figure 6 – CloudFront Origin Custom Headers settings
You can see that the custom header, x-origin-verify, has been configured using Secrets Manager with a random 32-character alpha-numeric value. This custom header will be added to web requests that are forwarded from CloudFront to your origin. As you learned in Steps 2 and 3, requests without this header are blocked by the Lambda authorizer at the origin HTTP API. In the next two steps, you’ll dive deeper into how this works.
Step 5: Review the API Gateway Lambda Authorizer
In this step, you review the API Gateway Lambda Authorizer configuration that validates the CloudFront custom header x-origin-verify.
To review the header validation rule
- In the CloudFormation console, select APIAccessControl stack. On the stack Outputs tab, look for the HTTPApi entry.
- Choose the HTTPApi link to go to the HTTP API configuration in the API Gateway console. On the left panel, select the Authorization section and switch to the Manage Authorizers tab, then select the LambdaAuthorizer, as shown in Figure 7.
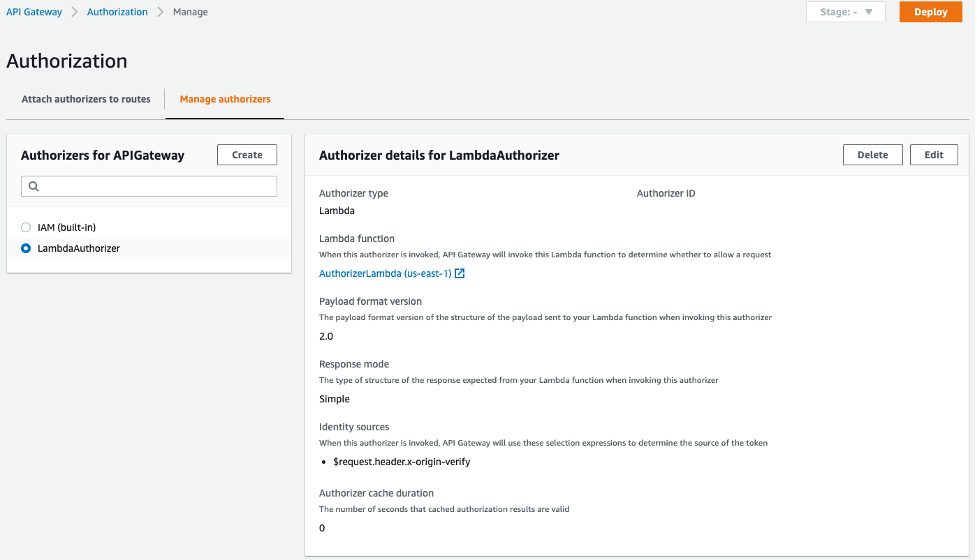
Figure 7 – Amazon API Gateway HTTP API Lambda Authorizer
Here you can see that the request header x-origin-verify is configured as the identity source for the authorizer. This implies that if the client’s request doesn’t include this header, then API Gateway doesn’t invoke the Lambda authorizer, and the client receives a 401 Unauthorized error. On the other hand, if the header is included, then the Lambda authorizer will be invoked and the authorization will be handled within the authorizer Lambda function logic.
Select the link under the Lambda Function to view the Authorizer Lambda function. The code utilizes the AWS SDK API call to get the secret value and compare it with the incoming x-origin-verify header value to make the authorization decision. Choose the Monitoring tab and review the Invocations graph as shown in Figure 8.
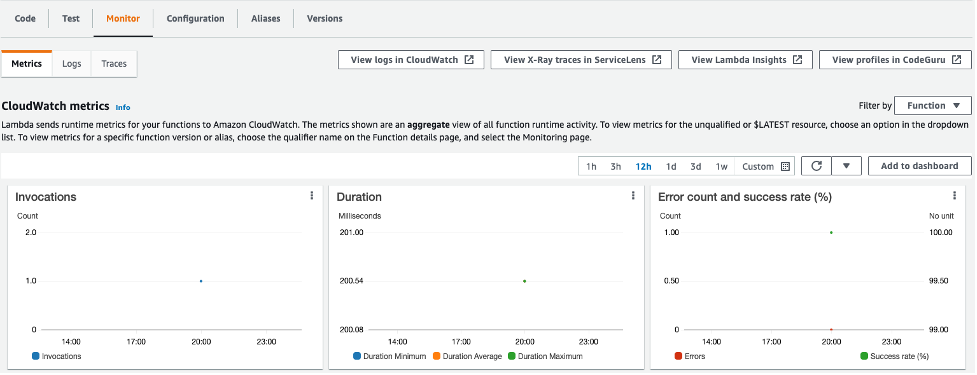
Figure 8 – Monitoring tab for the Lambda authorizer function
In case you observe any positive data points for the error metrics, you can select the ‘View logs in CloudWatch’ link on the same page to review the function execution logs.
Note that we use the GetSecretValue API call in this example for simplicity, we recommend that you cache your secret values by using client-side caching. Caching secrets improves speed and reduces your costs.
This step demonstrated how your request was allowed to access the test website in Step 2 and why your request was blocked in Step 3.
Step 6: Review Secrets Manager configuration
Now that you’re familiar with the CloudFront and API Gateway configuration, you’ll learn how Secrets Manager creates and rotates the secret used for the x-origin-verify header field value. Secrets Manager uses a Lambda function to perform the rotation of the secret used for the value and update the associated CloudFront distribution.
To review the Secrets Manager configuration
- In the CloudFormation console, choose the APIAccessControl stack. On the stack Outputs tab, look for the OriginVerifySecret entry.
- Choose the OriginVerifySecret link to go to the configuration for the secret in the Secrets Manager console. Scroll down to the section titled Secret value, and then choose Retrieve secret value to display the Secret key/value as shown in Figure 9.
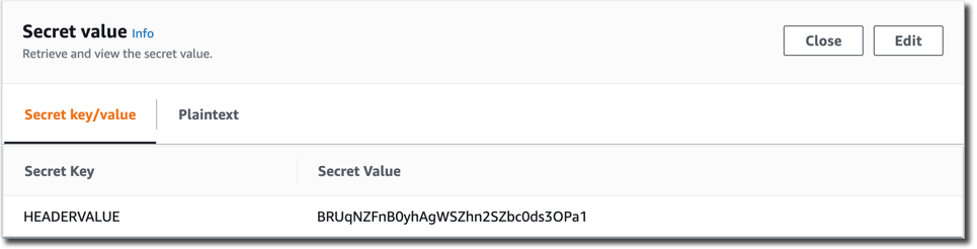
Figure 9 – Secrets Manager retrieve value
When you retrieve the secret, Secrets Manager programmatically decrypts the secret and displays it in the console. You can see that the secret is stored as a key-value pair, where the secret key is HEADERVALUE, and the secret value is the string used in the CloudFront and WAF configurations that you reviewed in Steps 3 and 4.
While you’re in the Secrets Manager console, review the Rotation configuration section, as shown in Figure 10.
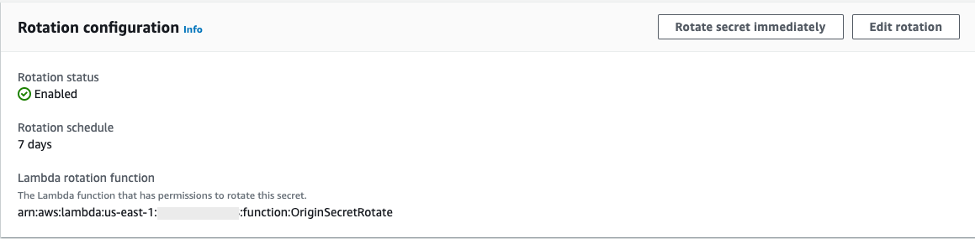
Figure 10 – Secrets Manager rotation configuration
You can see that rotation was enabled for this secret at an interval of seven days. This configuration also includes a Lambda rotation function. Secrets Manager uses a Lambda function to perform the actual rotation of a secret. If you use your secret for one of the supported Amazon Relational Database Service (Amazon RDS) databases, then Secrets Manager provides the Lambda function for you. If you use your secret for another service, then you must provide the code for the Lambda function, as we’ve done in this solution.
Step 7: Review the Secrets Manager Lambda rotation function
In this step, you review the Secrets Manager Lambda rotation function.
To review the Secrets Manager Lambda rotation function
- In the CloudFormation console, choose APIAccessControl stack. In the stack Outputs tab, look for the OriginSecretRotateFunction entry.
- Choose the OriginSecretRotateFunction link to go to the Lambda function that is configured for this secret. The code used for this secrets rotation function is based on the AWS Secrets Manager Rotation Template. Choose the Monitoring tab and review the Invocations graph as shown in Figure 11.
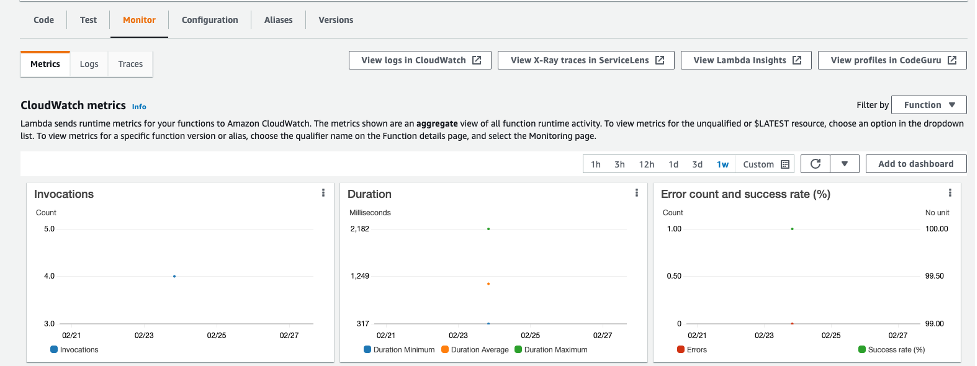
Figure 11 – Monitoring tab for the Lambda rotation function
Shortly after the CloudFormation stack creation completes, you should see several invocations in the Invocations graph. When a configured rotation schedule or a manual process triggers rotation, Secrets Manager calls the Lambda function several times, each time with different parameters. The Lambda function performs several tasks throughout the process of rotating a secret. This includes the following steps: createSecret, setSecret, testSecret, and finishSecret. Secrets Manager uses staging labels, a simple text string, to enable you to identify different versions of a secret during rotation. This includes the following staging labels: AWSPENDING, AWSCURRENT, and AWSPREVIOUS, which are covered in the following step.
To learn more about the rotation steps configured for this solution, choose View logs in CloudWatch on the Monitoring tab.
- On the Log streams tab, select the top entry in the list.
- Enter Event in the Filter events field, and then choose the arrows to expand the details for each event as shown in Figure 12.
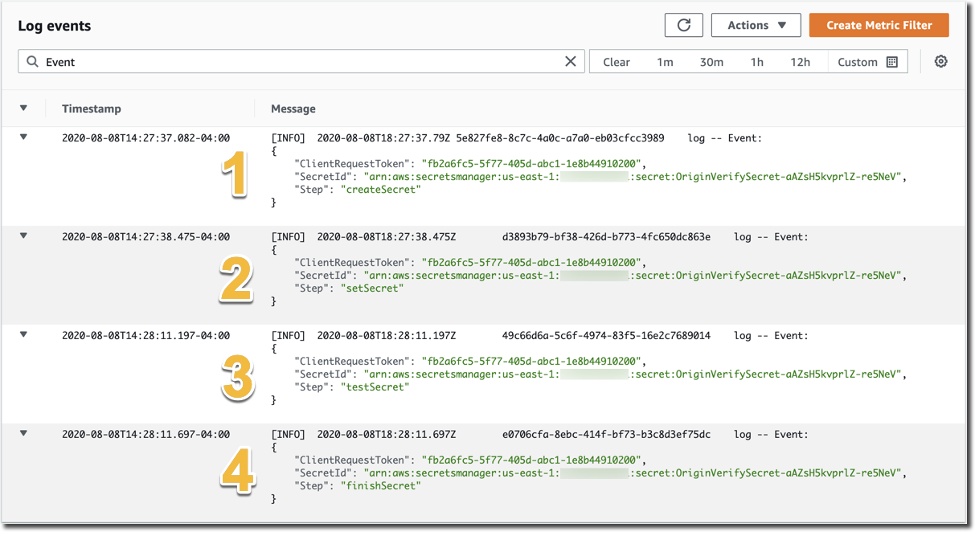
Figure 12 – CloudWatch event logs for the Lambda rotation function
The four rotation steps annotated in Figure 12 work as follows. Note that this section provides an overview of the rotation process for this solution. For more detailed information about the Lambda rotation function, see the Secrets Manager User Guide.
- The createSecret step: In this step, the Lambda function generates a new version of the secret. The rotation Lambda function calls the GetRandomPassword method to generate a new random string, and then labels the new version of the secret with the staging label AWSPENDING to mark it as the in-process version of the secret.
- The SetSecret step: In this step, the two rule statements you reviewed in Step 5 of this post are updated with the AWSPENDING and AWSCURRENT values. The rotation function also updates the value for the Origin Custom Header X-Origin-Verify. When the rotation function updates your distribution configuration, CloudFront starts to propagate the changes to all edge locations. Maintaining both the AWSPENDING and AWSCURRENT secret values helps to make sure that web requests forwarded to your origin by CloudFront aren’t blocked. Therefore, once a secret value is created, two rotation intervals are required for it to be removed from the configuration.
- The testSecret step: This step of the Lambda function verifies the AWSPENDING version of the secret by using it to access the Origin HTTP API endpoint with the X-Origin-Verify header. Both AWSPENDING and AWSCURRENT X-Origin-Verify header values are tested to confirm a “200 OK” response from the origin API endpoint.
- The finishSecret step: In the last step, the Lambda function moves the label AWSCURRENT from the current version to this new version of the secret. The old version receives the AWSPREVIOUS staging label, and it’s available for recovery as the last known good version of the secret, if needed. The old version with the AWSPREVIOUS staging label no longer has any staging labels attached, so Secrets Manager considers the old version deprecated and subject to deletion.
When the finishSecret step has successfully completed, Secrets Manager schedules the next rotation by adding the rotation interval (number of days) to the completion date. This automated process causes the values used for the validation headers to be updated at the configured interval. Although out of the scope of this post, you should monitor your secrets to make sure of the usage of your secrets and log any changes to them. This helps you to make sure that any unexpected usage or change can be investigated, and unwanted changes can be rolled back.
Cleanup
All of the resources deployed through CloudFormation templates should be deleted after successful testing and validation to avoid any unwanted costs. To do so, you can navigate to the AWS Cloudformation console, search for and select the corresponding stack, select the Actions menu, and then select Delete Stack.
Summary
You’ve learned how to use a Lambda backed Authorizer and Secrets Manager to restrict access to your API Gateway HTTP API to authorize requests that route only via the defined CloudFront domain. You might also want to learn more about Secrets Manager best practices. The code for this solution is available on GitHub.
About the authors

Shirin Bano
Shirin Bano is a Senior Cloud Infrastructure Architect with AWS Professional Services, with 5 years of experience working on AWS services. Over the past years, she has worked with many enterprise customers to migrate them to AWS, design solutions following best practices, and optimize their AWS infrastructure. She holds a Masters in Telecommunication from the University of Colorado at Boulder.

Pratik Jain
Pratik is a Cloud Infrastructure Architect at AWS. He has expertise in Serverless and Automation, and is passionate about making the cloud journey seamless for AWS customers. Outside of work, he enjoys traveling and exploring cafes in various cities.