Networking & Content Delivery
Starting Small with AWS Global Accelerator
In this blog post, we will present an approach to starting small and testing the benefits of AWS Global Accelerator before determining if you would like to transition to a full Global Accelerator enhanced application. Similarly, if you are interested in performing A/B testing or looking for a rolling deployment method for the Global Accelerator, this blog post will be useful.
Traffic performance, in terms of latency, network jitters and packet loss, has a significant impact on the quality of experience of your customers. As formulated by the Apdex score [1], an increase in response time of web applications negatively impact your customer’s satisfaction. Your customers would be more sensitive to traffic performance if you are hosting latency driven applications such as an online multiplayer game. Increasing the latency by 100 ms may cause 20% of players to leave the game or as small as 10ms variation in the network latency may cause another 10% of players to leave [2]. The same research pointed out players are even more sensitive to packet loss. If the packet loss increases from 0.1% to 0.2%, you may cause around 5% of your players leaving the game [2].
One of the leading factors hindering a fast, smooth and seamless online experience for your users is that they are exposed to congestion and unpredictable traffic on the public Internet. It is particularly important if your application has a global user base. No matter where your application is hosted, your users world-wide expect performant, low-latency applications. However, the longer the distance between your users and servers is, the more congestion and unpredictability that your users will experience.
To address this issue, you can utilize AWS’s globally distributed points of presence via AWS Global Accelerator. As of March 2021, Global Accelerator has 95+ Points of Presence in 80+ cities across 45+ countries. A listener located in these points of presence processes inbound connections from your users to Global Accelerator, based on the port (or port range) and protocol (or protocols). Global Accelerator then directs user connections to your endpoint located in an AWS Region. Your endpoint can be an EC2 instance, Application Load Balancer, Network Load Balancer, or Elastic IPs. Global Accelerator utilizes AWS’s global network infrastructure, improving your internet user performance by up to 60%. If your application is multi-region, Global Accelerator can direct traffic based on weights or dialing up and down the traffic coming to an AWS Region, giving you granular control over your global traffic. Global Accelerator provides you with two IP addresses that are anycast from the AWS edge network. You can set up failover to redirect traffic in seconds without impacting the customer-facing IP address or requiring a change in your customers’ DNS cache. Your customers using devices relying on DNS caching would especially welcome this feature since the cached IPs do not change with the failover.
Global Accelerator Speed Comparison Tool gives you a good starting point to test the accelerator. This speed comparison tool will use sample files in different sizes, downloaded from various AWS Regions. However, if you would like to perform a more detailed test with the Global Accelerator on your own, you can follow the steps explained in this blog post.
The rest of this blog outlines the steps you can take to quickly set up AWS Global accelerator and improve performance of your web applications. You can set up this test without impacting your existing workloads. Click here to learn more about edge networking with AWS.
Gradually Deploying AWS Global Accelerator
Solution
Step – 1: Hosting a Simple Single Region Application on EC2
To have a cost-effective but a realistic example, you will use a simple one-tier, single region, multi-AZ application hosted on an Amazon EC2 Auto-Scaling group (Figure 1) in this blog post. Your architecture has an Application Load Balancer (ALB) distributing the traffic between two AZs using cross-zone balancing. You will use HTTP for the sake of not requiring a certificate to do this simple test. In real life, you should follow the security best practices recommending HTTPS. Apache HTTP will host the application (www.example.com) which will display the AWS Region and the Public IP address of the EC2 responded your request. As the security group only accepts traffic from the ALB, you should use the ALB alias.
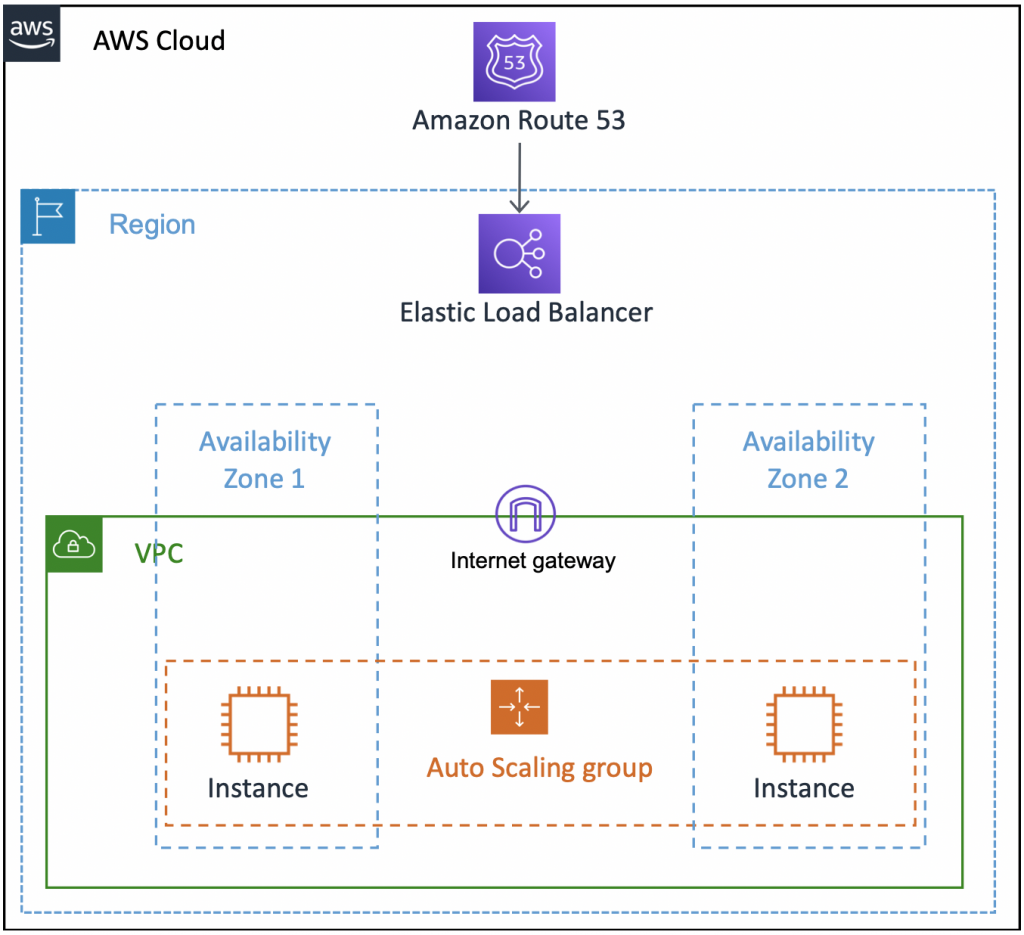
Figure 1. Example architecture – a simple single region application on EC2 (original condition)
You can use the below AWS CloudFormation template to deploy the architecture in Figure 1, except the Amazon Route53. You will see a separate discussion on Route53 near the end of the blog post. To proceed with the deployment, you can copy-paste the below code, and save as my-template.yaml. Then, you can go to Create Stack option in the AWS CloudFormation page and then choose Upload a template file option in CloudFormation console as explained here. Or you can use the AWS CLI to deploy your cloudformation template.
AWSTemplateFormatVersion: "2010-09-09"

Description:  This template deploys the prior (initial) architecture with an AutoScaling group hosting two instances in two GetAZs
  behind a Application Load Balancer. A private VPC is created for hosting these services. The
  template also deploys IGW, Route Tables, Security Groups to complement the solution.
Parameters:
  EnvironmentName:
    Description: An environment name that is prefixed to resource names
    Type: String
  KeyName:
    Description: The EC2 Key Pair to allow SSH access to the instances
    Type: AWS::EC2::KeyPair::KeyName
    ConstraintDescription: must be the name of an existing EC2 KeyPair.
  LatestAmiId:
    Type: 'AWS::SSM::Parameter::Value<AWS::EC2::Image::Id>'
    Default: '/aws/service/ami-amazon-linux-latest/amzn2-ami-hvm-x86_64-gp2'
Resources:
  VPC:
    Type: AWS::EC2::VPC
    Properties:
      CidrBlock: 10.192.0.0/16
      EnableDnsSupport: true
      EnableDnsHostnames: true
      Tags:
        - Key: Name
          Value: !Ref EnvironmentName
  InternetGateway:
    Type: AWS::EC2::InternetGateway
    Properties:
      Tags:
        - Key: Name
          Value: !Ref EnvironmentName
  InternetGatewayAttachment:
    Type: AWS::EC2::VPCGatewayAttachment
    Properties:
      InternetGatewayId: !Ref InternetGateway
      VpcId: !Ref VPC
  PublicSubnet1:
    Type: AWS::EC2::Subnet
    Properties:
      VpcId: !Ref VPC
      AvailabilityZone: !Select [ 0, !GetAZs '' ]
      CidrBlock: 10.192.10.0/24
      MapPublicIpOnLaunch: true
      Tags:
        - Key: Name
          Value: !Sub ${EnvironmentName} Public Subnet (AZ1)
  PublicSubnet2:
    Type: AWS::EC2::Subnet
    Properties:
      VpcId: !Ref VPC
      AvailabilityZone: !Select [ 1, !GetAZs  '' ]
      CidrBlock: 10.192.11.0/24
      MapPublicIpOnLaunch: true
      Tags:
        - Key: Name
          Value: !Sub ${EnvironmentName} Public Subnet (AZ2)
  PublicRouteTable:
    Type: AWS::EC2::RouteTable
    Properties:
      VpcId: !Ref VPC
      Tags:
        - Key: Name
          Value: !Sub ${EnvironmentName} Public Routes
  DefaultPublicRoute:
    Type: AWS::EC2::Route
    DependsOn: InternetGatewayAttachment
    Properties:
      RouteTableId: !Ref PublicRouteTable
      DestinationCidrBlock: 0.0.0.0/0
      GatewayId: !Ref InternetGateway
  PublicSubnet1RouteTableAssociation:
    Type: AWS::EC2::SubnetRouteTableAssociation
    Properties:
      RouteTableId: !Ref PublicRouteTable
      SubnetId: !Ref PublicSubnet1
  PublicSubnet2RouteTableAssociation:
    Type: AWS::EC2::SubnetRouteTableAssociation
    Properties:
      RouteTableId: !Ref PublicRouteTable
      SubnetId: !Ref PublicSubnet2
  InstanceSecurityGroup:
    Type: AWS::EC2::SecurityGroup
    Properties:
      GroupDescription: Allow http to client host
      VpcId: !Ref VPC
      SecurityGroupIngress:
      - IpProtocol: tcp
        FromPort: 80
        ToPort: 80
        CidrIp: 0.0.0.0/0
      - IpProtocol: icmp
        FromPort: -1
        ToPort: -1
        CidrIp: 0.0.0.0/0
      Tags:
      - Key: Name
        Value: !Sub ${EnvironmentName}-SG
  DefaultTargetGroup:
    Type: AWS::ElasticLoadBalancingV2::TargetGroup
    Properties:
      Name: !Sub ${EnvironmentName}-defaultTG
      VpcId: !Ref VPC
      Port: 80
      Protocol: HTTP
  ElasticLoadBalancerPrimary:
    Type: AWS::ElasticLoadBalancingV2::LoadBalancer
    Properties:
      Name: !Sub ${EnvironmentName}-primary
      Subnets:
      - Ref: PublicSubnet1
      - Ref: PublicSubnet2
      Scheme: 'internet-facing'
      SecurityGroups:
      - Ref: InstanceSecurityGroup
  LoadBalancerListenerPrimary:
    Type: AWS::ElasticLoadBalancingV2::Listener
    Properties:
      LoadBalancerArn: !Ref ElasticLoadBalancerPrimary
      Port: 80
      Protocol: HTTP
      DefaultActions:
        - Type: forward
          TargetGroupArn: !Ref DefaultTargetGroup
  WebServerGroup:
    Type: AWS::AutoScaling::AutoScalingGroup
    Properties:
      LaunchConfigurationName: !Ref LaunchConfig
      MinSize: '2'
      MaxSize: '4'
      TargetGroupARNs:
          - !Ref DefaultTargetGroup
      VPCZoneIdentifier:
      - Ref: PublicSubnet1
      - Ref: PublicSubnet2
  LaunchConfig:
    Type: AWS::AutoScaling::LaunchConfiguration
    Properties:
      KeyName:
        Ref: KeyName
      ImageId: !Ref LatestAmiId
      InstanceType: t2.micro
      SecurityGroups:
      - Ref: InstanceSecurityGroup
      AssociatePublicIpAddress: 'true'
      UserData:
          Fn::Base64:
            !Sub |
              #!/bin/bash
              sudo -s
              yum update -y
              yum install httpd -y
              EC2_AVAIL_ZONE=`curl -s http://169.254.169.254/latest/meta-data/placement/availability-zone`
              EC2_PUBLIC_IP=`curl -s http://169.254.169.254/latest/meta-data/public-ipv4`
              echo "This is a test web server (" $EC2_PUBLIC_IP ") from " $EC2_AVAIL_ZONE>/var/www/html/index.html
              service httpd start
Outputs:
  URL:
    Description: The URL of the primary load balancer
    Value:
      Fn::Join:
      - ''
      - - http://
        - Fn::GetAtt:
          - ElasticLoadBalancerPrimary
          - DNSName
Once the deployment is done, you can use the URL (http://mytestapplication-primary-XXXXXXXXX.<region>.elb.amazonaws.com/) shown in Figure 4) provided in the Outputs section of the CloudFormation. You should see a message on your browser like below;
This is a test web server ( 1.11.111.11 ) from region <region>
In this step, your connection is directed via the public Internet to the region where your application is hosted.
Step – 2: Adding our test Global Accelerator
The important piece in this step is to deploy a parallel ELB pointing to the same autoscaling group to define the new ELB as the origin to Global Accelerator. As a result, you will have two overlapping ELBs where the original ELB deployed is labeled as primary and the new one is called testing (Figure 2). The newly deployed load balancer will take some of the Load Balancer Capacity Units (LCUs) from the primary ELB. As a result, the cost attributed to the capacity units will be the same. However, the new ELB will add extra hourly costs. The hourly rate of running an ELB is significantly smaller than the cost associated with the capacity units (please see this link for the ELB pricing). Therefore, the cost impact of adding the parallel ELB is expected to be minor.
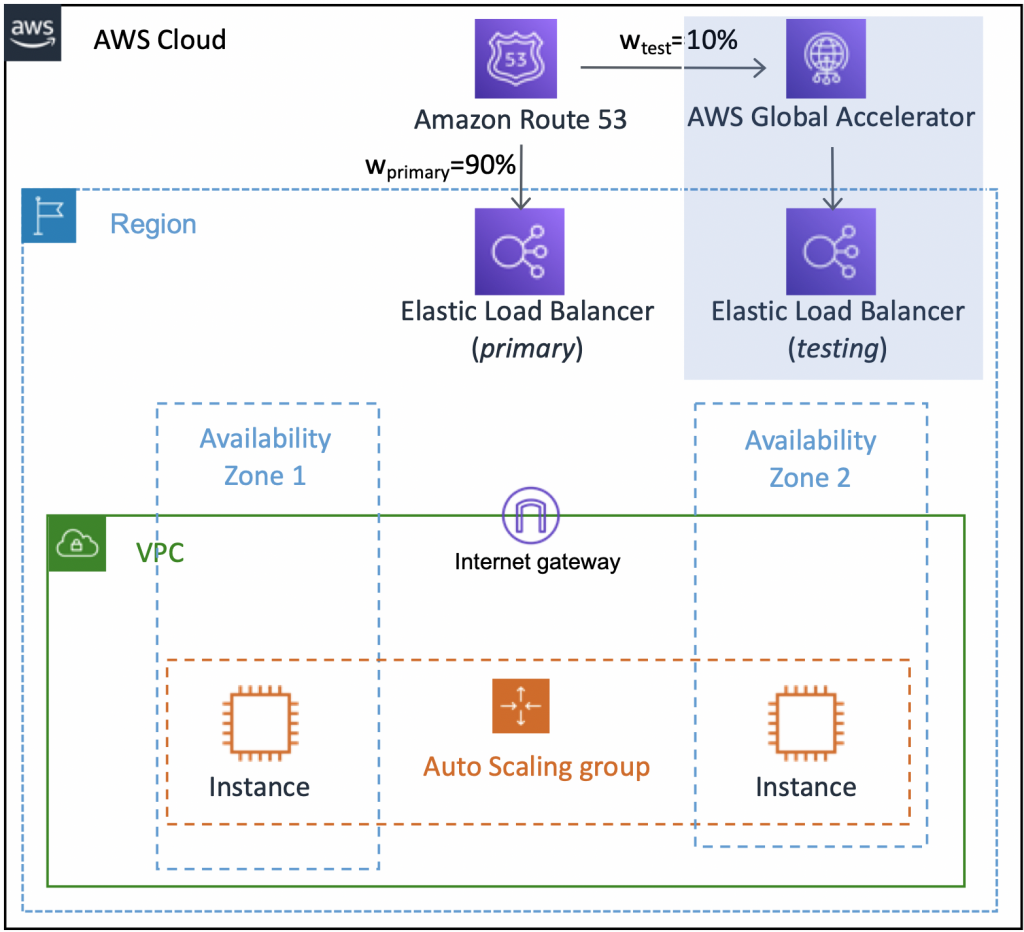
Figure 2. A/B testing or Canary/Blue-Green deployment of Global Accelerator. (Purple shading highlight the add-on)
You can use the below CloudFormation Change Set to deploy the changes to the previously deployed architecture. You can now copy-paste the below template and save the file with a different name, such as my-template-2.yaml . You can follow the steps described here with this new template file to deploy the below CloudFormation template but please choose Replace current template option while proceeding.
AWSTemplateFormatVersion: "2010-09-09"

Description:  This template includes the template for the prior deployment. However, now it also includes the changes such as AWS Global Accelerator, a secondary Elastic Load Balancer, etc.
Parameters:
  EnvironmentName:
    Description: An environment name that is prefixed to resource names
    Type: String
  KeyName:
    Description: The EC2 Key Pair to allow SSH access to the instances
    Type: AWS::EC2::KeyPair::KeyName
    ConstraintDescription: must be the name of an existing EC2 KeyPair.
  LatestAmiId:
    Type: 'AWS::SSM::Parameter::Value<AWS::EC2::Image::Id>'
    Default: '/aws/service/ami-amazon-linux-latest/amzn2-ami-hvm-x86_64-gp2'
Resources:
  VPC:
    Type: AWS::EC2::VPC
    Properties:
      CidrBlock: 10.192.0.0/16
      EnableDnsSupport: true
      EnableDnsHostnames: true
      Tags:
        - Key: Name
          Value: !Ref EnvironmentName
  InternetGateway:
    Type: AWS::EC2::InternetGateway
    Properties:
      Tags:
        - Key: Name
          Value: !Ref EnvironmentName
  InternetGatewayAttachment:
    Type: AWS::EC2::VPCGatewayAttachment
    Properties:
      InternetGatewayId: !Ref InternetGateway
      VpcId: !Ref VPC
  PublicSubnet1:
    Type: AWS::EC2::Subnet
    Properties:
      VpcId: !Ref VPC
      AvailabilityZone: !Select [ 0, !GetAZs '' ]
      CidrBlock: 10.192.10.0/24
      MapPublicIpOnLaunch: true
      Tags:
        - Key: Name
          Value: !Sub ${EnvironmentName} Public Subnet (AZ1)
  PublicSubnet2:
    Type: AWS::EC2::Subnet
    Properties:
      VpcId: !Ref VPC
      AvailabilityZone: !Select [ 1, !GetAZs  '' ]
      CidrBlock: 10.192.11.0/24
      MapPublicIpOnLaunch: true
      Tags:
        - Key: Name
          Value: !Sub ${EnvironmentName} Public Subnet (AZ2)
  PublicRouteTable:
    Type: AWS::EC2::RouteTable
    Properties:
      VpcId: !Ref VPC
      Tags:
        - Key: Name
          Value: !Sub ${EnvironmentName} Public Routes
  DefaultPublicRoute:
    Type: AWS::EC2::Route
    DependsOn: InternetGatewayAttachment
    Properties:
      RouteTableId: !Ref PublicRouteTable
      DestinationCidrBlock: 0.0.0.0/0
      GatewayId: !Ref InternetGateway
  PublicSubnet1RouteTableAssociation:
    Type: AWS::EC2::SubnetRouteTableAssociation
    Properties:
      RouteTableId: !Ref PublicRouteTable
      SubnetId: !Ref PublicSubnet1
  PublicSubnet2RouteTableAssociation:
    Type: AWS::EC2::SubnetRouteTableAssociation
    Properties:
      RouteTableId: !Ref PublicRouteTable
      SubnetId: !Ref PublicSubnet2
  InstanceSecurityGroup:
    Type: AWS::EC2::SecurityGroup
    Properties:
      GroupDescription: Allow http to client host
      VpcId: !Ref VPC
      SecurityGroupIngress:
      - IpProtocol: tcp
        FromPort: 80
        ToPort: 80
        CidrIp: 0.0.0.0/0
      - IpProtocol: icmp
        FromPort: -1
        ToPort: -1
        CidrIp: 0.0.0.0/0
      Tags:
      - Key: Name
        Value: !Sub ${EnvironmentName}-SG
  DefaultTargetGroup:
    Type: AWS::ElasticLoadBalancingV2::TargetGroup
    Properties:
      Name: !Sub ${EnvironmentName}-defaultTG
      VpcId: !Ref VPC
      Port: 80
      Protocol: HTTP
  CopyDefaultTargetGroup:
    Type: AWS::ElasticLoadBalancingV2::TargetGroup
    Properties:
      Name: !Sub ${EnvironmentName}-CopiedTG
      VpcId: !Ref VPC
      Port: 80
      Protocol: HTTP
  ElasticLoadBalancerPrimary:
    Type: AWS::ElasticLoadBalancingV2::LoadBalancer
    Properties:
      Name: !Sub ${EnvironmentName}-primary
      Subnets:
      - Ref: PublicSubnet1
      - Ref: PublicSubnet2
      Scheme: 'internet-facing'
      SecurityGroups:
      - Ref: InstanceSecurityGroup
  LoadBalancerListenerPrimary:
    Type: AWS::ElasticLoadBalancingV2::Listener
    Properties:
      LoadBalancerArn: !Ref ElasticLoadBalancerPrimary
      Port: 80
      Protocol: HTTP
      DefaultActions:
        - Type: forward
          TargetGroupArn: !Ref DefaultTargetGroup
  LoadBalancerListenerSecondary:
    Type: AWS::ElasticLoadBalancingV2::Listener
    Properties:
      LoadBalancerArn: !Ref ElasticLoadBalancerSecondary
      Port: 80
      Protocol: HTTP
      DefaultActions:
        - Type: forward
          TargetGroupArn: !Ref CopyDefaultTargetGroup

  ElasticLoadBalancerSecondary:
    Type: AWS::ElasticLoadBalancingV2::LoadBalancer
    Properties:
      Name: !Sub ${EnvironmentName}-secondary
      Subnets:
      - Ref: PublicSubnet1
      - Ref: PublicSubnet2
      Scheme: 'internet-facing'
      SecurityGroups:
      - Ref: InstanceSecurityGroup
  GlobalAccelerator:
    Type: AWS::GlobalAccelerator::Accelerator
    Properties:
      Name: !Sub ${EnvironmentName}-GlobalAccelerator
      IpAddressType: "IPV4"
      Enabled: true
  AcceleratorListener:
    Type: 'AWS::GlobalAccelerator::Listener'
    Properties:
      AcceleratorArn: !Ref GlobalAccelerator
      Protocol: TCP
      PortRanges:
        - FromPort: '80'
          ToPort: '80'
  EndpointGroup:
    Type: AWS::GlobalAccelerator::EndpointGroup
    Properties:
      ListenerArn: !Ref AcceleratorListener
      EndpointGroupRegion: !Ref AWS::Region
      EndpointConfigurations:
        - EndpointId: !Ref ElasticLoadBalancerSecondary
          ClientIPPreservationEnabled: true
  WebServerGroup:
    Type: AWS::AutoScaling::AutoScalingGroup
    Properties:
      LaunchConfigurationName: !Ref LaunchConfig
      MinSize: '2'
      MaxSize: '4'
      TargetGroupARNs:
          - !Ref DefaultTargetGroup
          - !Ref CopyDefaultTargetGroup
      VPCZoneIdentifier:
      - Ref: PublicSubnet1
      - Ref: PublicSubnet2
  LaunchConfig:
    Type: AWS::AutoScaling::LaunchConfiguration
    Properties:
      KeyName:
        Ref: KeyName
      ImageId: !Ref LatestAmiId
      InstanceType: t2.micro
      SecurityGroups:
      - Ref: InstanceSecurityGroup
      AssociatePublicIpAddress: 'true'
      UserData:
          Fn::Base64:
            !Sub |
              #!/bin/bash
              sudo -s
              yum update -y
              yum install httpd -y
              EC2_AVAIL_ZONE=`curl -s http://169.254.169.254/latest/meta-data/placement/availability-zone`
              EC2_PUBLIC_IP=`curl -s http://169.254.169.254/latest/meta-data/public-ipv4`
              echo "This is a test web server (" $EC2_PUBLIC_IP ") from " $EC2_AVAIL_ZONE>/var/www/html/index.html
              service httpd start
Outputs:
  URL:
    Description: The URL of the primary load balancer (primary)
    Value:
      Fn::Join:
      - ''
      - - http://
        - Fn::GetAtt:
          - ElasticLoadBalancerPrimary
          - DNSName
  URL2:
    Description: The URL of the global accelerator (testing url)
    Value:
      Fn::Join:
      - ''
      - - http://
        - !GetAtt GlobalAccelerator.DnsName
You may notice that a Modify action is added next to WebServerGroup before choosing the execution in the CloudFormation console. This modification is nothing but the association of a new target group (CopyDefaultTargetGroup) with the WebServerGroup. You will not experience any downtime or performance impact due to this association. Finally, you can choose Execute to proceed the deployment.

Figure 3. Outputs section of CloudFormation; showing two URLs, one for the original one and one for the testing.
Once your deployment is finished, you can use the new URL (URL2 in Outputs), together with the original URL provided in the Outputs in CloudFormation console (Figure 3). You may notice that the original URL has not been changed. You can start using the URL2 provided by the Global Accelerator.
URL: http://mytestapplication-primary-111122223333.us-east-2.elb.amazonaws.com/
URL2: http://ABC1234ABC1234.awsglobalaccelerator.com/
You can also work with the two static IPs provided by the Global Accelerator as discussed in the introduction section. This time, let’s use describe-accelerator API to get both DNS name and static IPs as shown below;
aws globalaccelerator describe-accelerator \
    --accelerator-arn arn:aws:globalaccelerator::111122223333:accelerator/1234abcd-abcd-1234-abcd-1234abcdefgh \
    --region us-west-2
An example output JSON would look like as follows;
{
    "Accelerator": {
        "AcceleratorArn": "arn:aws:globalaccelerator::123456789012:accelerator/1234abcd-abcd-1234-abcd-1234abcdefgh",
        "IpAddressType": "IPV4",
        "Name": "ExampleAccelerator",
        "Enabled": true,
        "Status": "IN_PROGRESS",
        "IpSets": [
            {
                "IpAddresses": [
                    "192.0.2.250",
                    "198.51.100.52"
                ],
                "IpFamily": "IPv4"
            }
        ],
        "DnsName":"a1234567890abcdef.awsglobalaccelerator.com",
        "CreatedTime": 1542394847,
        "LastModifiedTime": 1542395013
    }
}
Step – 3: Utilizing Amazon Route53 to gradually deploy AWS Global Accelerator
Now it is time to attach Route53 to our architecture. To do that, you first need to create a hosted zone with Amazon Route53 to employ your domain (Figure 4). Noting that, the example.com is a domain name reserved by AWS. However, you can create a new domain name or bring your domain as explained here. If you will, you can use the URL and URL2 (or two static IPs) in your DNS service. The weighted routing policy in Amazon Route53 is the key to perform an A/B testing, or a gradual deployment of Global Accelerator.
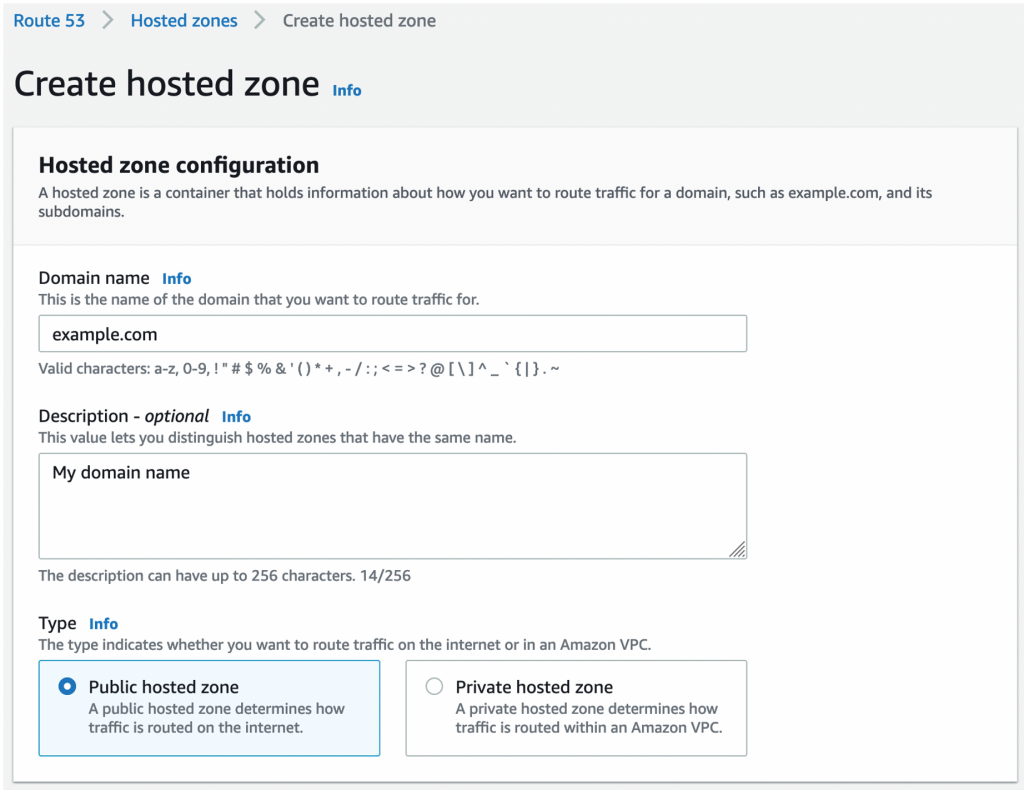
Figure 4. Outputs section of CloudFormation; showing two URLs, one for the original one and one for the testing.
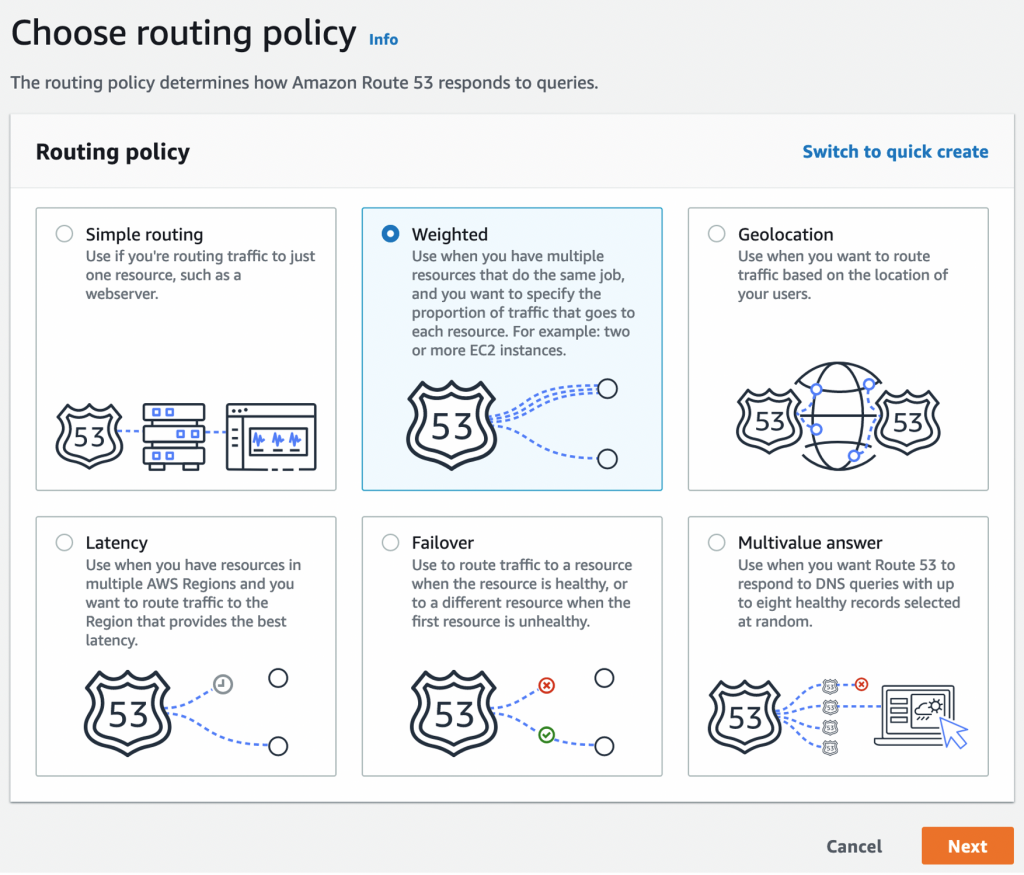
Figure 5. Weighted Routing for using primary and testing URLs.
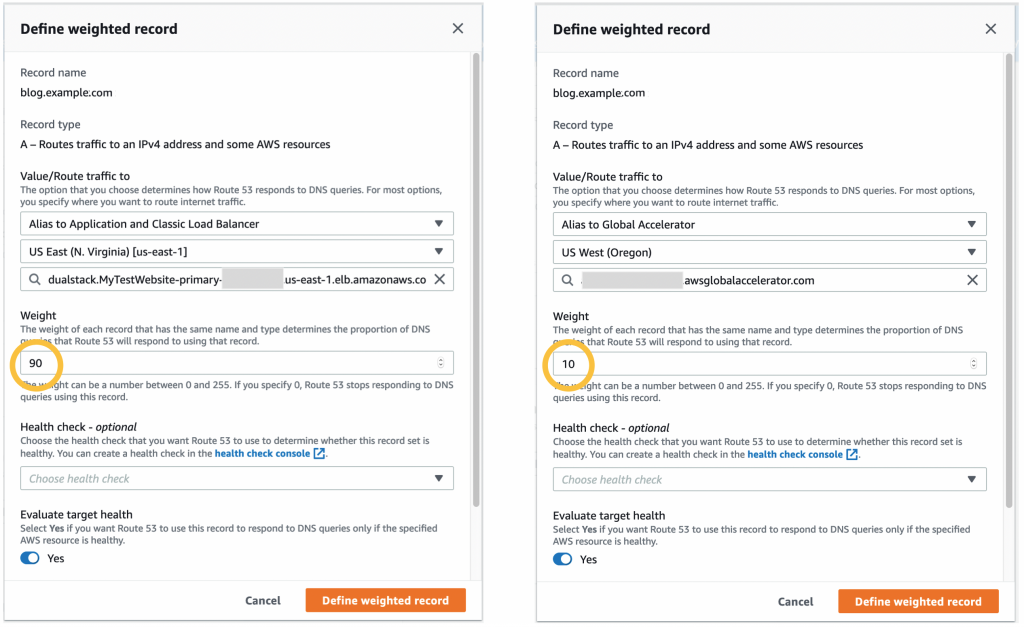
Figure 6. Weighted routing to original elastic load balancer with 90% weight (left), and to AWS Global Accelerator with 10% weight (right).
Figure 6 shows a weighted routing policy that directs 90% of the traffic to the old ELB and 10% to the Global Accelerator. You can use your own weights to get the desired sharing. Finally, you can gradually increase the weight to 100% for a full-scale Global Accelerator deployment and remove the old ELB as shown in Figure 7.
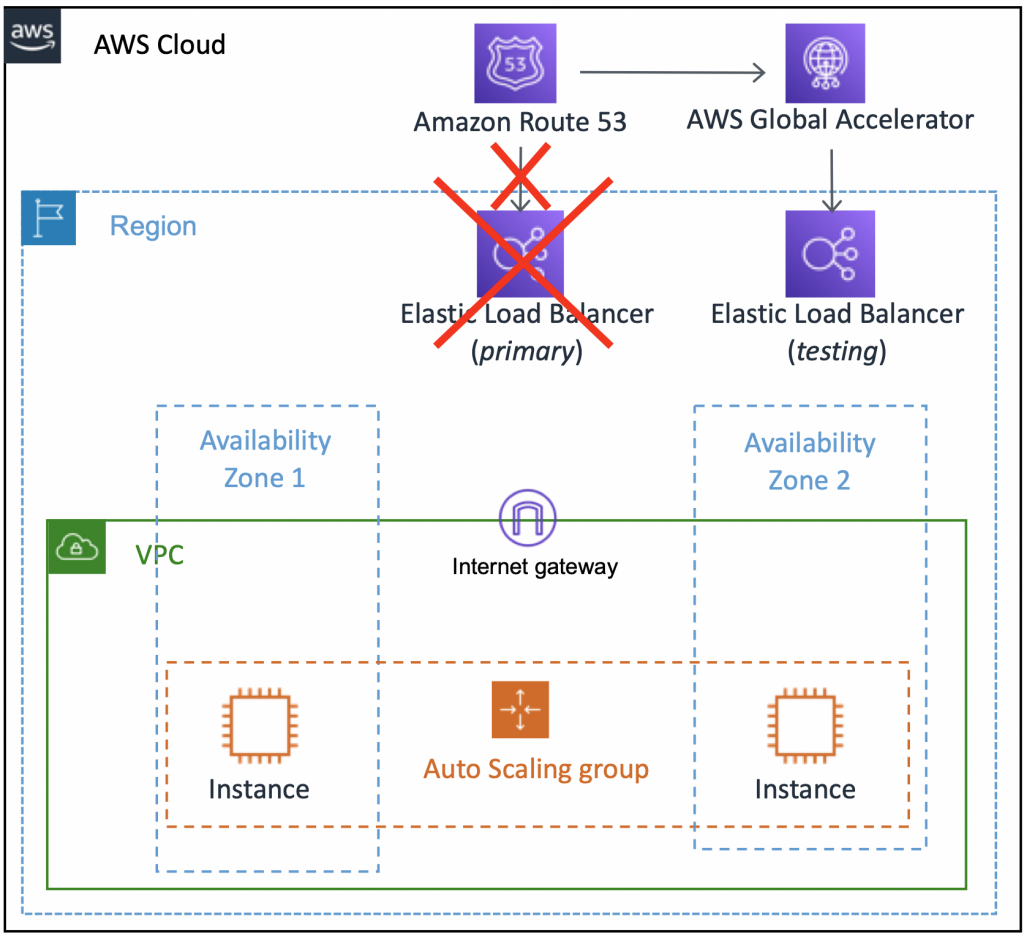
Figure 7. Final view of architecture going full with Global Accelerator.
Cleaning Up
You can delete the resources by simply going to the CloudFormation section in AWS Management Console, select your deployed Stack name and then choose Delete. Since you had two successive deployments, please start with the second (latest) deployment and then move to the first one.
Conclusions
Global Accelerator is a cost effective and easy solution to decrease the latency, increase reliability, and speed up the recovery from failovers. Global accelerator will help you to provide a better service to your users located all around the globe. In this blog, you saw an approach to quickly and efficiently utilize the Global Accelerator under real-life conditions without impacting your existing workload.
References:
- The Apdex Users Group, www.apdex.org/
- An, D., & Meenan, P. (2016). Why marketers should care about mobile page speed. https://www.thinkwithgoogle.com/_qs/documents/2698/53dff_Why-Marketers-Should-Care-About-Mobile-Page-Speed-EN.pdf
About the Author

Burak Gozluklu, PhD is a Solutions Architect located in Boston, MA. Before joining AWS in 2019, Burak was a post-doctoral fellow at MIT in Cambridge, MA. Burak holds a PhD in Aerospace engineering from METU and MSc in Systems Engineering from MIT.