AWS Open Source Blog
Continuous delivery with server-side Swift on AWS
Swift is a general-purpose programming language released by Apple in 2014. It aimed to provide many of the features of Objective-C, such as type safety, late binding, and dynamic dispatch, in a package that would improve developer productivity and code safety. Although Swift has been a popular replacement for Objective-C for iOS development, it is gaining interest for server-side development as well. The combination of type safety and developer productivity makes Swift an interesting alternative to other popular server-side programming languages, and especially interesting for development teams that are already using Swift for iOS development.
A fast and flexible continuous integration and delivery pipeline is critical to ensure that developers get fast feedback on potential issues in their code, and to keep delivery lead times as quick as possible. A good CI/CD pipeline is a great complement to the productivity and safety that Swift provides; the programming language ensures those benefits at the code level, and the pipeline enforces quality and speed during the integration and deployment process.
This post explains how to use Amazon Web Services (AWS) to create a continuous delivery pipeline for server-side Swift code. We will be creating a pipeline using managed AWS services, such as AWS CodePipeline, AWS CodeBuild, and AWS CodeDeploy. This pipeline will compile, build, test, and deploy a simple Swift web service onto two compute platforms: directly on EC2 virtual machines running Ubuntu, and on AWS Fargate, a managed container platform.
Overview of the pipeline architecture

The pipeline is designed to test, build, and deploy our Swift web service. Before starting, let’s step back and think about what properties we want this pipeline to have.
- Fast: The pipeline should pick up changes without developer input, and execute the build, test, and deployment process as quickly as possible.
- Flexible: Technical and business needs change. Our architecture should make creating additional pipeline steps or modify existing ones simple, quick, and without disruption.
- Elastic: We want to make sure that we’re achieving our goal of a fast pipeline without paying for idle capacity. We want power when we need it, but don’t want to pay for that power on nights and weekends.
We’ve taken an opinionated view of how to build this pipeline with AWS services to achieve these goals, using CodePipeline, CodeBuild, CodeDeploy, and other AWS services; however, this is not all-or-nothing. CodePipeline supports a variety of services to build, test, and deploy code, and CodePipeline itself can be swapped with other services, such as Jenkins, Concourse CI, and others. If you’re curious about the Jenkins integrations with CodePipeline, see the Create a Four-Stage Pipeline tutorial.
We encourage you to take this setup as a foundation for your own pipeline, to give you ideas of how components can fit together. Don’t hesitate to modify it and make it your own.
Let’s learn about each of the components in our setup.
CodePipeline – CI/CD pipeline
First let’s examine the pipeline itself. AWS CodePipeline is a fully managed continuous delivery service that will let us tie together the source, test, build, and deployment steps of our pipeline, while integrating with other AWS services and respecting least-privileges access.
CodePipeline organizes actions that should be performed within stages. Our pipeline will have four stages:
- Source
- Test
- Build
- Deploy
The Source stage will respond to changes in the associated Swift Git repository. The Test stage will run unit tests on the code. The Build stage will run two actions in parallel: one to build a Swift binary and one to build a Docker container. Finally, the Deploy stage will also run two actions in parallel, deploying the Swift binary to EC2 and the Docker container to ECS.
CodeCommit – source code
The first stage of our pipeline is the Source stage, which is responsible for managing the connection with the source code repository and pulling the latest code revision when there is an update. In our pipeline, we have used CodeCommit, an AWS-managed Git source code repository. CodePipeline supports other source code repositories, such as GitHub, GitHub Enterprise, or even an S3 bucket.
S3 – artifact repository
Our pipeline will need to create and use artifacts in the pipeline, such as the source code from the Git repository, the Swift binaries compiled in the CodePipeline build stage, and so on. With the exception of the Docker image, which will be stored in an ECR container registry, CodePipeline will use a special artifact bucket to store these artifacts.
ECR – container repositories
Amazon Elastic Container Registry (ECR) is a fully managed Docker registry that we are using in two ways: to hold the generated Swift Docker images, and to hold the custom CodeBuild image used to compile the Swift binaries.
Our first use case for ECR is to enable CodeBuild to create the compiled Swift binaries. Later we’ll examine how our pipeline uses AWS CodeBuild to create binaries for our Swift application, but for now the important thing to know is that CodeBuild allows us to run a set of build commands on top of a base environment, which uses a Docker image pre-installed with the required build setup. In our case, we created a custom Docker image with the Swift toolchain and libraries so that CodeBuild can compile the Swift binaries.
The second use case for ECR is to act as an artifact repository for the Swift application container images created by our pipeline. The pipeline will use this repository as a place to put the image, and ECS will use this repository to pull images when a new application version is deployed.
ECS and Fargate – container orchestration and hosting
We have set up two targets for our code, showing how we can host the Swift application directly on EC2 instances and via Docker containers. In a real-world application you would most likely want to deploy your service to one platform or another, but this pipeline demonstrates both approaches.
We have a variety of options to host the Docker containers: we could deploy to a self-hosted Kubernetes cluster running on EC2 instances, or we could use Amazon Elastic Kubernetes Service (EKS) to take advantage of the AWS managed Kubernetes service. For the purposes of this pipeline, however, we’ll be using AWS Elastic Container Service (ECS). ECS has strong integration with AWS CodePipeline and other AWS services, making the setup and deployment process simple and easy. We’ll be coupling ECS with AWS Fargate, a serverless compute engine that works with ECS and removes the need to provision and manage servers.
Our ECS platform is integrated with an AWS Application Load Balancer (ALB), which acts as the point of entry for incoming requests and distributes those requests among our containers running on Fargate.
EC2 – virtual machine hosting
The second hosting platform that we are setting up in this pipeline will host the Swift application directly on AWS EC2 instances. The EC2 instances are running in an autoscaling group, which ensures that we provision or remove EC2 instances based on incoming demand, and removes any EC2 instance marked as unhealthy.
Similarly to the ECS platform, we are running these instances attached to an Application Load Balancer (ALB) to distribute traffic to all healthy EC2 instances.
CodeBuild – test and build
We will be using CodeBuild to test and build our Swift code. CodeBuild provides prepackaged build environments in the form of optimized Docker images that have been set up to provide the toolchain you need to build and test code in a variety of programming languages. In our case, we also will take advantage of the ability to create custom build environments in CodeBuild to test and compile our Swift application.
We also provide a buildspec file to tell CodeBuild which steps to perform for each build process. This is a yaml file that describes the commands needed to run during each phase of the build process (e.g., an install phase to install any prerequisite tools or libraries, the build phase, a post-build phase to package artifacts), and a section describing which artifacts of the build process should be stored for use by subsequent steps. The buildspec file can either be specified as part of the CodeBuild project definition, or can be included as part of the project source code. In our case we will take the latter approach, with the buildspec.*.yml files in the sample application
CodeBuild will be used in three different ways in our pipeline:
- A build environment that compiles the Swift code and pushes the resulting binaries to the S3 artifact bucket. The buildspec file used is
buildspec.ec2.ymlin the project source directory. - A build environment that compiles the Swift code within a Docker image, then creates a deployable image using a multi-stage build. The deployable image is deployed to an ECR repository. The buildspec file used is
buildspec.docker.ymlin the project source directory. - A test environment that runs the Swift application’s unit tests. The buildspec file used is
buildspec.test.ymlin the project source directory.
CodeDeploy – deploy to live systems
Our pipeline needs to deploy to two different systems: ECS for the Docker deployable image, and EC2 for the Swift binaries.
CodePipeline has a built-in integration with ECS to support either rolling or blue/green deployments. Deploying on EC2 requires additional rules and guidance; we need to provide instructions on how to take a new binary from our S3 artifact repository and either deploy or roll back on an EC2 instance.
CodeDeploy helps us out here. With CodeDeploy, we can provide instructions on what steps should be taken for each stage in a deployment on an EC2 instance, specifically:
- BeforeInstall
- AfterInstall
- ApplicationStart
- ApplicationStop
- ValidateService
- BeforeBlockTraffic
- AfterBlockTraffic
- BeforeAllowTraffic
- AfterAllowTraffic
For details on how each stage is used, see the AppSpec ‘hooks’ Section for an EC2/On-Premises Deployment in the AWS CodeDeploy documentation.
Although we don’t need to provide scripts for each deployment stage, we have the ability to do so via an AppSpec file provided with the deployment. In this example, we take advantage of the ApplicationStop and ApplicationStart to stop and start a systemd service, and BeforeInstall and AfterInstall to ensure that we have the right directory structure and permissions.
CodeDeploy also allows us to specify a variety of deployment configurations, such as deploying in place to one instance at a time, half of the instances in place at a time, blue/green style deployments, or your own custom configurations. CodeDeploy will monitor the deployments, provide notifications for success or failure, and roll back in case of a failed deployment.
CloudFormation – update and maintain the pipeline
As we’ll learn in the following section, we are using CloudFormation to set up and configure all the AWS resources in the pipeline, the EC2 and ECS components, and all the networking and security components. CloudFormation allows us to automate the setup and configuration in a repeatable way, and to track infrastructure updates as code changes.
Getting started
Let’s get started building the pipeline. The AWS resources described in the previous section and the required configuration will be provisioned through a CloudFormation script.
Setting up an AWS account, CloudFormation, and Docker
The first step is to decide on the AWS account where the resources will be provisioned. If you already have an account provisioned that you want to use, then you can skip this step. Otherwise go to https://portal.aws.amazon.com/billing/signup and create a new account.

Note that the CloudFormation script will provision resources that will result in a monthly bill. Be sure to destroy the CloudFormation stack to remove those resources once you are done using them. See the Cleanup section at the end of this article for instructions on how to tear down the resources.
To run the CloudFormation creation scripts from the CLI, you’ll need a user with CLI access. From the AWS console, navigate to the IAM service, then click on Add User. Pick a user name and make sure that Programmatic access is selected. Next, Add existing policies directly and select Administrator access. Make sure you copy or download the Access Key ID and Secret Access Key.
If you don’t have the AWS CLI installed already, let’s do that now. The download link and instructions are available at AWS Command Line Interface. Make sure you’ve configured the CLI with the Access Key ID and Secret Access Key you wrote down in the previous step.
Create a new S3 bucket that will store your packaged CloudFormation templates. If you have a preexisting account with a bucket that you want to use for this purpose, you can use it. The user running the scripts should have read/write access to this bucket, and it should be in the same account as where you want the resources to be provisioned.
We will be creating and uploading a custom Docker image in a later step, containing the Swift toolchain for CodeBuild to use. Make sure you have Docker installed and configured on your workstation.
To push code from your workstation to Git, we will be using the Git CLI. Make sure you have a working installation on your workstation. If you don’t have Git installed already, it is available for multiple operating systems from Git downloads.
Download and configure the CloudFormation setup package
The CloudFormation template, helper scripts, sample application, and the CodeBuild Swift build image are bundled together in a file located on GitHub. (You can also browse the GitHub page and clone it from here: https://github.com/aws-samples/aws-pipeline-server-side-swift-blog.) Download that file and extract the contents. Update package.json so that both lines with CF_BUCKET= is followed by the name of the CloudFormation S3 bucket you configured in the previous step.
In create-stack.json you can optionally update the name of the CloudFormation stack that will be create; it defaults to swift-build. You can also change the tags that will be applied to all created resources.
Deploying the CloudFormation template
We can now deploy the CloudFormation template. There’s a helper script located in ./scripts/create-stack.sh that will package up and run the CloudFormation script. You can run that yourself:
CF_BUCKET=<your CloudFormation S3 bucket name here> ./scripts/create-stack.sh
If you happen to have npm installed, there’s also a handy shortcut: npm run-script create will run the same commands for you.
We now need to wait for the script to finish, which will take approximately 15-20 minutes. You can view the status either by looking at the AWS console in the CloudFormation section or by running aws cloudformation wait stack-create-complete.
Note: The CloudFormation script creates ECR repositories named swift-app and codebuild/swift. If you get CloudFormation errors while trying to create those repositories, check that you don’t have existing repositories with those names.
Creating the CodeBuild custom build runtime
In this step we’ll create the custom CodeBuild runtime image that will be used when CodeBuild compiles the Swift binary.
First, let’s create the Docker image. Navigate to ECR within the AWS console, click on codebuild/swift and follow the instructions in View push commands from within the codebuild-image folder. You’ll be asked to log in to ECR, then build the image, then tag it so that it’s associated with the ECR repository, and finally push the newly created image to AWS. The steps will look something like this (the repository name will be different based on your region and account):
cd codebuild-image
$(aws ecr get-login --no-include-email --region us-west-2)
docker build -t codebuild/swift .
docker tag codebuild/swift:latest 123456789123.dkr.ecr.us-west-2.amazonaws.com/codebuild/swift:latest
docker push 123456789123.dkr.ecr.us-west-2.amazonaws.com/codebuild/swift:latest
Pushing the Swift application code
Now that the pipeline is in place with the correct CodeBuild custom runtime, everything is ready and we can push the application code.
We have a sample Swift web application in the app folder that we’ll be using to test the pipeline. From the project root navigate to the ./app directory and initialize a Git repository: cd app && git init.
Prior to using the Git CLI to push the web application code to CodeCommit, you may have to configure AWS and Git to enable access. There are two methods described in Setting Up for AWS CodeCommit in the AWS documentation, which involves either HTTP access or SSH access. Either access method will work fine; although I used SSH access in the following examples, the steps once setup is complete will be the same in either case.
Navigate to the CodeCommit service in the AWS console, then locate the repository created by the CloudFormation script (it should start with the stack name that you used, e.g. swift-build-...). Click on that repository and follow the instructions to initialize CodeCommit with the contents of the app git repository.

git remote add origin ssh://git-codecommit.us-west-2.amazonaws.com/v1/repos/swift-build-Pipeline-1234567890ABC-Repo
git add .
git commit -m "Initial commit"
git push --set-upstream origin master
Confirming the pipeline execution
CodePipeline should now pick up on the change in the CodeCommit repository and start the pipeline. Let’s confirm that.
Navigate to CodePipeline. Click on the pipeline whose name starts with the CloudFormation stack name. A few seconds after the git push it should pick up the change in the CodeCommit repository and launch. After 10-15 minutes it should complete all four stages: Source, Test, Build, and Release.

Once that is complete, we need to make a slight adjustment to our CloudFormation stack. Initially when we deployed the stack we set the number of desired ECS tasks to zero. This was to prevent CloudFormation from failing to stabilize as it tried to use the Swift docker image that didn’t yet exist. Now that the pipeline has executed and created that Docker image, we can modify the CloudFormation parameters to include one or more ECS tasks.
From within create-stack.json find the ECSDesiredCount parameter, which should currently be set to 0. Modify that to 2 and run npm run-script update or:
CF_BUCKET=<your CloudFormation S3 bucket name here> ./scripts/update-stack.shOnce the CloudFormation stack has updated successfully, let’s make sure that the application was correctly deployed to the EC2 servers. Navigate to the EC2 AWS console, then click on the sidebar to find the Load Balancer section. First click on the load balancer whose name starts with swift-EC2. Copy the DNS name and paste it into a browser window. Confirm that it responds with “It works!”
Optionally, you can also verify the EC2 service is working from the command line:
curl $(aws cloudformation describe-stacks --stack-name swift-build --query "Stacks[0].Outputs[?OutputKey=='Ec2LbUrl'].OutputValue" --output text)
Finally, let’s make sure that the application loaded on the Docker image was also correctly deployed to the ECS service. Navigate to the EC2 AWS console, then click on the sidebar to find the Load Balancer section. First click on the load balancer whose name starts with swift-ECS. Copy the DNS name and paste it into a browser window. Confirm that it responds with “It works!”
Just as with EC2, you can also verify that the ECS service is working from the command line:
curl $(aws cloudformation describe-stacks --stack-name swift-build --query "Stacks[0].Outputs[?OutputKey=='EcsLbUrl'].OutputValue" --output text)Pushing a code change
As a final check, let’s make a quick change to the application source code and make sure that it updates the services correctly.
Update the swift-codebuild-app repository. Edit Sources/App/routes.swift and modify return "It works!" to read return "It works! With an update!" or whichever updated message you prefer. Commit those changes and push them to the CodeCommit repository:
git add .
git commit -m "Changed application message"
git push
Now wait for the pipeline to update and confirm that the two load balancers update with the correct message. Use the DNS addresses as we did in the previous step to check that the update was deployed to the EC2 server and to the ECS service.
Cleanup
Once you are done trying out the pipeline and are no longer using it, be sure to destroy the CloudFormation stack to save on the monthly cost of unused resources.
Before destroying the CloudFormation stack, we need to make sure that the S3 bucket and the ECR repositories are empty. You can do that manually via the AWS management console, or via the command line:
aws s3 rm s3://$(aws cloudformation describe-stacks --stack-name swift-build --query "Stacks[0].Outputs[?OutputKey=='S3ArtifactBucket'].OutputValue" --output text)/ --recursive
IMAGES_TO_DELETE=$(aws ecr list-images --repository-name codebuild/swift --query 'imageIds[*]' --output json)
aws ecr batch-delete-image --repository-name codebuild/swift --image-ids "$IMAGES_TO_DELETE"
IMAGES_TO_DELETE=$(aws ecr list-images --repository-name swift-app --query 'imageIds[*]' --output json)
aws ecr batch-delete-image --repository-name swift-app --image-ids "$IMAGES_TO_DELETE"
Once the repositories and the bucket are empty, destroy the CloudFormation stack from the AWS management console or from the command line: aws cloudformation delete-stack --stack-name swift-build
Troubleshooting tips
Hopefully you were able to deploy the pipeline successfully. If you did run into trouble, here are a couple of potential issues that you may have faced and tips on how to fix them.
Name collisions
The CloudFormation script uses dynamic names for most AWS resources, but there are a couple of examples where the pipeline makes an assumption that no other resources are using a given name. Specifically, the CloudFormation script creates a repository name called codebuild/swift for the Docker image used to provide the Swift toolchain. If you get an error from CloudFormation saying that it can’t create the ECR repository of that name, check that you don’t already have a name collision.
ECS ARN format
Depending on when you created your AWS account, and depending on the account settings, you may need to enable long ARN formats for the ECS service. If you get an error similar to Not able to add tag on resource AWS::ECS::Service. The new ARN and resource ID format must be enabled to add tags to the service CloudFormation you can enable long ARN formats for your CLI user by running:
aws ecs put-account-setting --name containerInstanceLongArnFormat --value enabled
aws ecs put-account-setting --name taskLongArnFormat --value enabled
aws ecs put-account-setting --name serviceLongArnFormat --value enabled
Further optimizations and next steps
There are a few ways that we can make our pipeline even better.
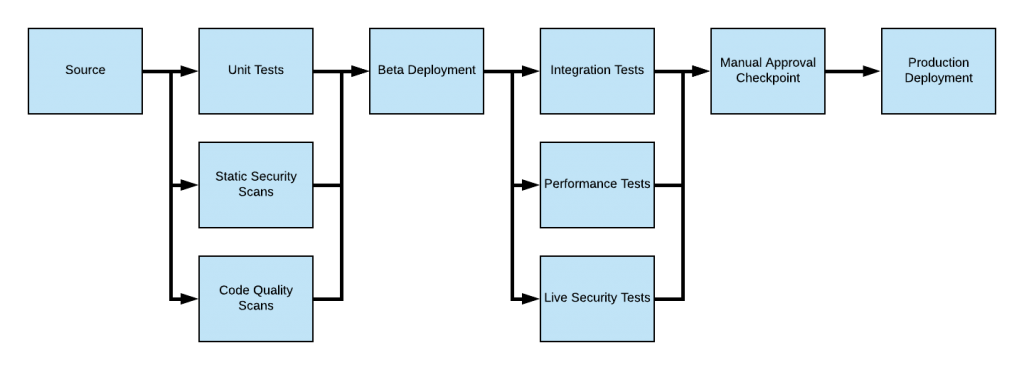
A more sophisticated pipeline will probably need a staging environment. We could easily add to our pipeline so that it deploys first to an environment with limited access, so that we can perform either a manual review or a set of automated tests before deploying to the production site. That pipeline might look something like this:

Another improvement would be to generate more useful reports. Currently, the second stage of the pipeline runs unit tests, but the only way for developers to get feedback on their code is by viewing the CodeBuild logged output. Fortunately, CodeBuild supports the ability to gather information from test reports and associates that report with the CodeBuild execution. See Working with Test Reporting in CodeBuild for more information.
Finally, a good pipeline will check a variety of quality metrics, not just the functionality as tested by unit tests and integration tests. CodePipeline allows you to integrate performance, security, load testing, and so on into your pipeline. One approach is to do something similar to what we did in this article and leverage CodeBuild to host your test scripts, but CodePipeline also allows you to integrate with tools such as BlazeMeter, Ghost Inspector, Micro Focus StormRunner, Runscope API, or your existing Jenkins jobs. Once the pipeline is this mature, manual approvals can either be eliminated or used only for highly sensitive modules. A full pipeline with these additional checks may look something like this:
Best of luck developing with server-side Swift! I hope this post helps you get off the ground in your effort to build, test, and deploy your Swift code on AWS, and I encourage you to experiment with the provided CloudFormation code.