AWS Open Source Blog
How to deploy a live events solution built with the Amazon Chime SDK
In this tutorial, I will explain how to deploy an interactive live events solution with which speakers can present to a large pre-selected audience, and moderators can screen attendees to participate in the broadcast. This interactive live events solution, built with the Amazon Chime SDK, addresses many of the shortcomings of traditional online meeting platforms as applied to live-broadcast events, including attendance limits, access control, and participant screening.
Not only is this a working solution for running live events, and a starting point from which to build your own event applications, it is also an example of a sophisticated use case for the Amazon Chime SDK, involving multiple meetings and integration with other AWS services. The code and detailed technical documentation for this solution are available in the GitHub repository amazon-chime-live-events. The code is licensed under the Apache License 2.0.
Companies, politicians, and other public figures host large gatherings that allow audience members to raise their hands and be called on to ask their questions. Organizations host events in which multiple speakers take turns addressing thousands of people. This solution enables you to take these types of events online.
Other scenarios in which this solution can be applied:
- A Q&A-style meeting, such as a town hall.
- Running a privately broadcast meeting without requiring attendees to create accounts.
- A VIP experience for meeting celebrities after a live show.
- A remote ceremony with a large audience and several active participants, such as musicians and guest speakers.

Solution features
This solution comprises three different user experiences: the attendee app, the moderator app, and the talent app.
- An attendee is a person who will view the live event. When you create your live event, you can specify which attendees will be able to raise their hands to ask questions.
- A moderator sees questions from attendees, and is responsible for vetting attendees via one-on-one interviews. Moderators control which attendees are promoted into the live broadcast.
- The talent is usually the subject of the event. They are in the broadcasted
live meeting and are able to interact with others coming and going in and out of the live meeting.
A typical flow for hosting a live event would be as follows:
- Generate a live event by triggering an AWS Lambda test event that reads lists of attendees, moderators, and talent from CSV files that you have uploaded to Amazon Simple Storage Service (Amazon S3).
- The Lambda function generates unique join links to distribute to all participants using your preferred delivery mechanism (e.g., email).
- The moderators log in to the event ahead of the start time and help get the talent set up.
- The moderators start the broadcast.
- During the broadcast, attendees click the raise hand button to submit a question to the moderators.

- The moderators queue up attendees they are considering for the live broadcast, and interview those attendees one by one.

- Chosen attendees are put into a virtual holding room where they can view the live broadcast and wait to go live.
- The moderator introduces attendees as they promote them into the live broadcast to speak or interact with the talent or other live broadcast participants.

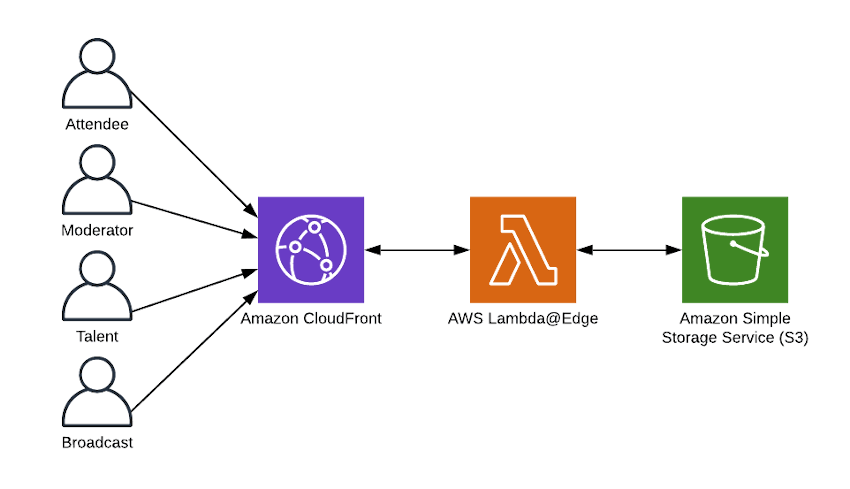
Architecture
The solution is broken up into four different web applications, each of which is built as a separate collection of HTML, JavaScript, and CSS assets. The four applications are the three user experiences mentioned above—attendee, moderator, and talent—as well as a fourth application that is used as the broadcast feed for the event.
Each application uses the Amazon Chime SDK for JavaScript and the web browser’s WebRTC stack to join video meetings. These applications are serverless single-page applications built in React and served from Amazon S3 using Amazon CloudFront and AWS Lambda@Edge. Lambda@Edge is used to determine which HTML file to return based on the request URL—/attendee will return the attendee.html file.
The backend stack that powers these apps follows a standard serverless architecture. It uses Amazon API Gateway to route to various AWS Lambda functions that access Amazon DynamoDB for persistent state management and the Amazon Chime API to manage video meetings.
The solution also uses API Gateway’s WebSocket APIs to provide bidirectional messaging to:
- Send hand raises from attendees to moderators.
- Enable moderators to remote-control attendee and talent audio and video.
- Communicate when attendees are added to or removed from the live broadcast feed.

The final piece of this solution is a stack used for broadcasting the event. This stack runs a Docker container within an Amazon Elastic Container Service (Amazon ECS) instance. That container runs the broadcast application in Firefox during the event. The screen is scraped and output to an RTMP endpoint. The RTMP feed is transcoded to HTTP Live Streaming (HLS) to be played in the attendee’s view of the event.

Authentication
The authentication/authorization model for this solution balances allowing attendees to watch the broadcast with one click against making sure that no one can get into the live broadcast meeting without sufficient authorization or vetting. It does not require users to create accounts, which means you can easily enable varying groups of users to participate in events with minimal effort.
To be able to raise their hands, each attendee must have a pre-generated unique UUID in their URL. The UUIDs are generated before the event, as described later in the post. You can choose whether or not you make the broadcast public to allow unauthorized attendees to watch; unauthorized attendees would not be able to raise their hands.
Moderators and talent also need a unique UUID in their URL, as well as an additional access key (equivalent to a one-time password) that you generate and give to them before the event. When they log in, they are issued a session token that gives them special permissions to be in the live broadcast meeting. This solution uses AWS Key Management Service (AWS KMS) to manage the keys we use for generating and validating these session tokens.

The access key is the extra level of security for moderators and talent to get into the live broadcast meeting. The extra access control for attendees is that they must be pre-screened by a moderator before they can join the live meeting. Once screened, they are issued a token that lets them into the holding room for the live meeting. From the holding room, they can be added to the live broadcast by a moderator.
Deploying the solution
Prerequisites
- Install Node.
- Install version 2 of the AWS CLI.
- Install the AWS SAM CLI.
- Install and run Docker.
- Choose names for the following resources:
- Deployment Bucket Name: This bucket will be used to facilitate the deployment.
- Stack Name: The name of the AWS CloudFormation deployment stack that will be created.
Configure access to your account
Disable Block Public Access for Amazon S3 in your account so that web assets can be configured correctly during the deployment. For instructions to configure this setting, read Amazon S3 Block Public Access – Another Layer of Protection for Your Accounts and Buckets. (You can re-enable this after the deployment.)
Configure the CLI to use your AWS account by running aws configure and supplying your Access and Secret Keys. For more detailed steps, read the Configuring the AWS CLI documentation.
If you want to restrict access to your broadcast output streams, you will need to generate a CloudFront key pair to sign the credentials used to restrict access. This will require root access to your account. Read the Creating CloudFront Key Pairs for Your Trusted Signers documentation for instructions to generate the key pair. You must then store the private key portion of the key pair into AWS Secrets Manager in Privacy Enhanced Mail (PEM) format. You will need the key ID and the ARN of the secret you installed in Secrets Manager for the deployment script below.
Accessing the repo
This solution is hosted on GitHub as amazon-chime-live-events. Clone the repository using the following command:
git clone https://github.com/aws/amazon-chime-live-events.git
Deploying the solution
Note: If you have a domain name that you’d like to use for this solution, follow the steps in the src/backend/serverless/README.md to configure your domain and ACM Certificate before deploying. You will also need to specify your domain in the deployment script as described in the GitHub README.
Navigate to the src/backend/serverless directory:
cd src/backend/serverlessDeploy the solution using the following example command, replacing the arguments with the names of your choosing:
node ./deploy.js -r us-east-1 -b live-event-deployment-bucket -s live-event-stackYou must supply the following arguments to the script:
  -r, --region                 Target region, default 'us-east-1'
  -b, --s3-bucket              S3 bucket for deployment
  -s, --stack-name             CloudFormation stack name
If you are choosing to make your broadcast private, pass the key ID and the ARN of the secret you installed in Secrets Manager into the deploy.js parameters as --signing-key-id and --signing-key-arn, respectively. You should also set the --access-duration parameter to specify how long you want viewers to be able to access the output stream. Make the duration long enough to cover the entire event, plus some buffer. It defaults to one day, but you may want to restrict that to a shorter time period.
Additional optional parameters are listed in the src/backend/serverless/README.md on GitHub.
Upon stack creation, CloudFormation will output the CloudFront distribution name. If you specified a domain name during your deployment, this distribution name will be aliased by the Domain Name passed to the deployment script:
CloudFrontDomainName
The script will also output the application URLs for the Attendee, Moderator, Talent, and Broadcast web apps under the following keys respectively:
AttendeeURLModeratorURLTalentURLBroadcastURL
The script also outputs the two MediaLive input endpoints that you can use to send your broadcast input streams towards. They accept RTMP format:
MediaLivePrimaryEndpointMediaLiveSecondaryEndpoint
These two outputs will be used in the following section to generate your first event:
GenerateEventFunctionCustomerImportS3Bucket
This output is the name of the AWS Lambda function that will be used to start and stop your broadcast:
BroadcastLambdaFunction
You can now re-enable Block Public Access for Amazon S3 in your account because it was only needed during deployment. Read Amazon S3 Block Public Access – Another Layer of Protection for Your Accounts and Buckets for instructions to configure this setting.
Setting up an event
To generate an event, create three files with Comma-Separated Value (CSV) format, one for each of the participant types: moderators, attendees, and the talent. (The talent file will only have one name because the solution only supports one talent participant at this time.) The only required field for these CSVs is full_name. Here is an example of the minimal CSV file contents:
full_name
Adam Smith Alexander Hamilton Marie Curie
Upload the three CSV files to the CustomerImportS3Bucket whose name was specified in the output of the deployment script.
The GenerateEventFunction, which was also output from the deployment script, is the name of the AWS Lambda function that you will use to generate an event. Navigate to the AWS Lambda service in the AWS console. Generate a test event for the GenerateEventFunction Lambda, specifying the three CSV files you just created:
{
  "attendeesKey": "Attendees.csv", "moderatorsKey": "Moderators.csv", "talentsKey": "Talents.csv"
}
Run the test event.
The Lambda will generate four JSON files in the same CustomerImportS3Bucket where you uploaded your CSV files. There will be three JSON files with the access information for all the participants of your event (attendees, moderators, and talent). There also will be a fourth JSON file that will have the broadcast URL that you will need to start your broadcast.
Here is an example of the generated output:
  {
 "full_name": "John Doe", "eventId": "LiveEventSample-ke40", "attendeeId": "d59f0394-9b56-48e9-9954-b2309a617220", "access_url": "http://localhost:9001/moderator.html?aId=d59f0394-9b56-48e9-9954-b2309a617220&eId=LiveEventSample-ke40&name=John%20Doe", "access_key": "jHkbdH2TJIlGfrzcWUYtUE3J"
  }
Copy the access_url into your browser to access the app. If you are accessing the moderator or talent view, you will also need to copy the access_key to log in. You can log in as different participant types in different browser tabs to play around with the interaction model. Log in as an attendee and a moderator, and send a hand raise from the attendee’s view. You will see the hand raise pop up in the moderator’s screen.
Starting your broadcast
Before starting your broadcast, you will need to start your MediaLive instance. Navigate to the AWS Elemental MediaLive service in the AWS console, select the channel prefixed with the name of stack you created for this solution, and click Start.
Your broadcast can be started and stopped at the beginning and end of your event by submitting Test Events to the BroadcastLambdaFunction whose name was output from the deploy script.
Go to AWS console and find the BroadcastLambdaFunction.
Grab your broadcast URL from the “broadcaster” JSON file that was dumped in S3 when you set up your event. Also, grab the RTMP endpoint that was output from the deploy script, MediaLivePrimaryEndpoint.
Put these two parameters into a test event with the following structure. Then click the Test button to START your broadcast:
 {
   "action": "start", "meetingURL": "<your-url-to-be-broadcast>", "rtmpEndpoint": "<your-rtmp-endpoint-url>"
 }
The output of the above command is an Amazon ECS task ID. It will be used to STOP the broadcast. To stop the broadcast, create another test event with task ID in the input below, then click the Test button:
 {
 "action": "stop", "taskId": "<your-ecs-task-id-or-arn>"
 }
After a small delay—typically 20–45 seconds—you can see the broadcast stream come through in the attendee view of the application.
After you have stopped your broadcast, you can stop your MediaLive instance. Navigate to the MediaLive service in the AWS console, and click on the channel prefixed with the name of stack you created for this solution. Click Stop.
Cleaning up
In order to fully avoid incurring future charges, please delete all resources created by the two CloudFormation stacks once you are done trying out the solution.
To prevent events you have created from running in your account and incurring costs, delete all of the rows from the AccessKeys DynamoDB table.