AWS Open Source Blog
Running your own server for Jamulus, an open source solution to jam with other musicians online
Musician activities, such as choir and band rehearsals—or jamming out—were largely grounded by the Covid-19 pandemic lockdowns. Many of these groups needed alternatives, and they often resorted to videoconferencing tools, such as Amazon Chime or open source tools, such as Jitsi. Most of these solutions are optimized for conversation, however, not for music, so they do not meet the requirement for extremely low-latency (typically <50 ms) transfer times required for a playing music together.
The need for low-latency audio connections between musicians to connect around the globe is met by an open source solution: Jamulus. After installing Jamulus on your computer, you can use it to join a public server around the globe to jam with anyone currently present on that server. Many musicians prefer to run private rehearsals, however, without unknown people dropping in or risking the server they use getting shut down midrehearsal. Such private jams or rehearsals require running a private server.
In this blog post, we explain how to set up such a server using AWS Fargate, and why Jamulus and AWS is a great combination for running it.
What is Jamulus?
Jamulus has been in development since 2006, and the Jamulus website describes the project as “… software for playing music, rehearsing, or just jamming with anyone online with low latency. You can use your Windows, macOS, or Linux machine to connect to Jamulus servers worldwide. Jamulus is free and you can just use your normal broadband connection.”
If you want to watch Jamulus in action, check out the demos.
Note that Jamulus is not a video conferencing tool; it only does audio. Running additional video connections with other solutions in parallel often affects the audio performance, so when using Jamulus, expect only to hear your music partners. Also, Jamulus is not meant for huge concerts or broadcasting. At the time of writing, the maximum number of participants for one server, according to the server documentation, is 150.
Why run your own Jamulus server?
Running your own server is not necessary if you only want to connect and don’t mind people listening in to your music; however, there are good reasons to run your own server. (Refer to the documentation for more detail about server options.) For example, run your own server if:
- You need a server of a given size. Typical public servers are limited to 10-16 participants.
- You rely on server availability at a specific rehearsal time. Public servers, although persistent, are out of your control.
- You don’t want people to be able to listen to your conversations and rehearsals or interrupt them. You can mute new joiners for yourself, but they will always be able to hear you.
Why use AWS for your Jamulus server?
Jamulus runs on many different environments and the requirements are low enough that people can run it on small infrastructure, such as a Raspberry Pi. At the same time, running your server with a cloud provider, such as AWS, makes sense for a few reasons, including:
- Performance: Because network latency is the highest priority for a good jamming experience, a good network backbone is key. Running Jamulus on AWS provides the option to use servers in a data center closer to your location, thus minimizing latency.
- Cost: Using cloud services lets you start the server quickly when you need it, and shut it down when you don’t. For instance, if you rehearse once a week for two hours, you can do so for a fraction of the price of running a server 24/7.
- Flexibility: Rent a server that suits your capacity, from jamming with a few friends to a large choir. AWS offers servers in all sizes, so you can choose according to what you need.
- Simplicity: Running a server can be tedious work. Using AWS Managed Services, such as AWS Fargate, removes the operations effort to patch and manage your server. Click a button and start jamming and click another to stop.
Running Jamulus on AWS is a great combination to get jamming quickly and affordably.
Jamulus on Amazon ECS
To run Jamulus anywhere, we must:
- Start a server.
- Install Jamulus on the server.
- Run the software.
Thankfully, the open source community facilitates the installation (step 2), which can be a lengthy process, by providing a Docker image that has Jamulus and its dependencies preinstalled. Additionally, AWS makes steps 1 and 3 simple with managed services. We will walk through how to deploy the Docker image (step 1) for a Jamulus server on Amazon Elastic Container Service (Amazon ECS), more specifically on AWS Fargate. Whereas starting and stopping it can be done flexibly either from the AWS Management Console or using an AWS Lambda function (step 3).
In the following, we will first walk through a manual step-by-step setup to illustrate the infrastructure configuration required to run the Jamulus Docker image and how to start and stop it (Method 1). Additionally, we show how to do the deployment automatically using our AWS CloudFormation template and how to use the Lambda function included in it to facilitate starting and stopping the server (Method 2).
Prerequisites
- An AWS account and access to the AWS Management Console.
- Because we will be configuring services, we need a user inside our account that can provision those services.
Architecture
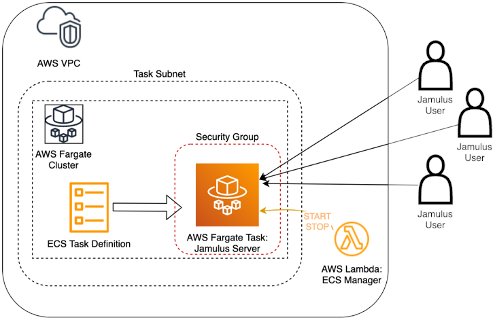
Now let’s walk through the architecture required for running our Jamulus server. The main building block is the Amazon ECS task definition that holds the configuration, such as network placement and Docker image, of the server that we want to run. When started, either manually (Method 1) or through a Lambda function (only Method 2), this definition becomes a running AWS Fargate task that users then connect to by using the server’s public IP address. The remaining architecture is there to run the task, notably a virtual private cloud (VPC) and subnet to provide the required networking infrastructure, in addition to the security group to allow users access to the server.
Method 1: Manual setup
To run our server on AWS Fargate, we must configure three things: the server itself, the networking, and the network access to the Jamulus server.
Setting up the network
To allow users to access our server, we must create a network in which to run our Jamulus server. More precisely, we must create a VPC with the corresponding subnets. Amazon ECS simplifies this by allowing us to create all of this at once, as we set up a cluster that will contain exactly one task—namely, our Jamulus server.
To set all of this up, navigate to Amazon ECS, select Create cluster, and choose to create a default VPC and subnet along with it.

After creating the cluster, we will be shown a list of resources created. Note the name of the VPC and subnets as we will need them later.

Setting up security groups
In addition to the networking, we must open the ports Jamulus requires to communicate with users over the internet. We create a security group that allows people to connect to the server we are setting up and allows the server to fetch the Docker image it needs to run.
To create the security group, navigate to the Security Groups in Amazon EC2 and select Create security group. Configure it with the VPC we created. Configure UDP protocol traffic to port 22124 from Anywhere to allow people to connect to the server, and allow outbound TCP traffic on port 443 to Anywhere to allow the server to fetch the Docker image.

Note the created security group name because we will need it later.
Note that we are opening our security group to everyone on the internet who might be trying to connect to the right server on port 22124. That anyone will connect accidentally is unlikely, but if you want more security, get the public IP addresses of the musicians and modify the inbound rule to allow only those addresses.
Creating the AWS Fargate task definition
Now that networking is ready, we can move to creating an AWS Fargate task definition. Later, we will start this task definition as an actual task, and then it becomes our server.
To create the task definition, navigate to the Amazon ECS console, select Task definition, and then create a new one. Choose the Fargate type and let Amazon ECS create a new role automatically because our server will not need any permissions beyond running the task.
The container definition stage is where we can modify the job we want to run, most notably the memory and CPU of our task. Choosing higher values means that we can allow more people to use the server, but will also increase cost. Experience shows that even conservative values (1 GB RAM, 0.5 vCPU) that cost less than $0.03 per hour will cover groups of 5-10 musicians, while a slightly bigger one (2 GB RAM, 1 vCPU), that costs less than $0.05 per hour might be suitable for most groups. We recommend going with a smaller configuration first and only increasing the size later if there are capacity issues.

Under Add container, we can configure the software, Jamulus, and its properties. Specify a name for the Docker container (for example, myJamulus) and use the following configuration:
- Image: grundic/jamulus
- Port mappings: udp port 22124
- Entrypoint: Jamulus,–server,–nogui,–numchannels,16
Note that the command-line options we provide in the entrypoint to Jamulus will start Jamulus as a server (not as a client), disable the graphical interface, and allow up to 16 participants to connect to it at the same time. Change this according to your needs).

After saving this configuration, we have a task configuration that we can use to start tasks that will run a Jamulus server.
Starting and stopping the Jamulus server
To run the task definition we just created, select it and choose Run task under the Actions. Choose Fargate as the deployment, and then select the VPC, subnet, and security group we created in the respective fields. Make sure that assigning a public IP is enabled, then select Run task. The task should transition from the provisioned to running state within a few seconds, meaning that our server is now running.
To connect to Jamulus, all participants must know the server’s public IP address—the IP address of the running task—and enter it as the server name in their client applications. To find this IP, select the running task to get its details, then find the Public IP. Note that the public IP address is different each time the task starts, so we will need to provide it to the musicians at each rehearsal. If this is inconvenient, review the following Advanced section.

Now we are ready to jam. The frontend looks slightly different for different operating systems; the one shown in this article is the Linux version. In the following image, I am connected to the server we just created, waiting for other people to join. With my copper-wire internet connection, the latency (overall delay) is in the range of 50 ms, which is barely audible.

Sadly, every rehearsal or session comes to an end. When finished, make sure to stop the task, to avoid cost for the unused container. To do so, return to the task details and select the Stop button at the top right. The task should stop within a few seconds, but we can restart it from the task definition at any time.
Method 2: Using the CloudFormation stack
To facilitate the setup, we have created an AWS CloudFormation template that does it for you. To use it, download the CloudFormation template from the Amazon Simple Storage Service (Amazon S3). Then navigate to AWS CloudFormation and create a new stack. Choose Template is ready and select the cloudformation_jamulus_ahelge.yml file from your computer. Enter a name for your stack and confirm all the defaults.

CloudFormation should now be creating the resources for us. If we navigate to Amazon ECS, we will find the task definition and can start or stop the server as with the manual setup.
Advanced
Keeping the same public IP address
If the changing IP address at each rehearsal is a problem for you, then you can provision an Elastic IP that is reserved for you at a small cost. To do so, first navigate to the Amazon EC2 service in the AWS Management Console and allocate it following the steps in the documentation.
Second, create a load balancer that forwards traffic from that IP address to the server. To do so, follow the documentation steps to create a load balancer with your Elastic IP outlined. Make sure to place the load balancer inside the same VPC and subnet as your task, so it can communicate with the server we create. This load balancer is again charged per hour, so it will be ideal to start and shut it down after each session.
Finally, to get it all to work on the network level, the load balancer must be allowed to communicate with the Jamulus task. For this, add the security group rules that allow it to communicate with the Fargate task. Specifically, add a rule to the load balancer security group that allows inbound traffic from the internet to the load balancer, which should be the default, in addition to outbound traffic from the load balancer to the server task security group. Finally, modify the inbound rules of the server to allow traffic from the load balancer rather than the internet.
Using a Lambda function to start and stop the server
If you are using the CloudFormation stack to create your Jamulus stack, then in addition to the previously mentioned resources—networking, security group, task definition, and corresponding roles—you will find that it creates a Lambda function, called <stackname>-ECSManager. This Lambda function allows you to start or stop the Fargate task by selecting a button rather than having to specify networking settings each time. Also, it makes starting or stopping the task using other services easier (for example, to run it on a schedule).
To use the Lambda function, navigate to AWS Lambda and find the Lambda function called <ProjectName>-ECSManager, where ProjectName is JamulusStack if you kept the default settings for the CloudFormation template.
To tell the function whether to start or stop the server when run, we must define the appropriate events. Running with {“ACTION”: “START”} will start the server, {“ACTION”: “STOP”} will stop it, and {“ACTION”: “CHECK”} will provide the details of the network interface, including the public IP. To allow these three options, create each of the three events as shown in the following screenshot. Then select the appropriate event as you run the function.

Using the Lambda function to start and stop tasks facilitates managing the starting and stopping of the tasks and avoids entering the networking details manually at each start of a task definition.

Using EventBridge and AWS Lambda to run the server on a schedule
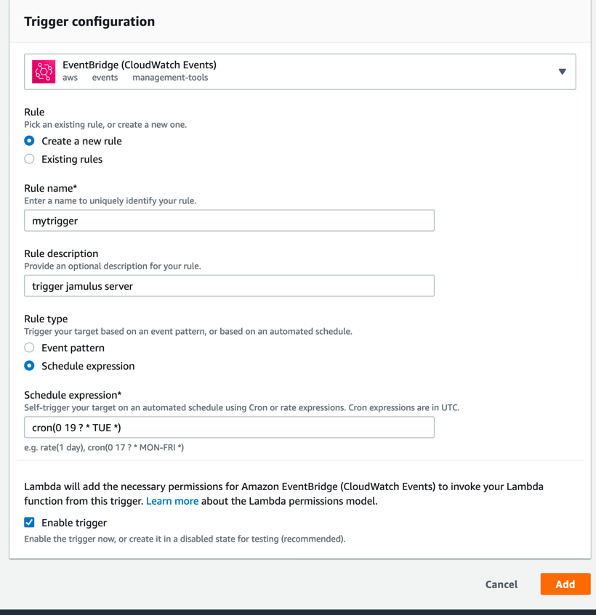
One benefit of running Jamulus on AWS is the degree of automation that we can achieve by integrating with other AWS services. For instance, if we are rehearsing on a weekly basis, we can use Amazon EventBridge to launch the Lambda function to start or stop the server on a schedule. For this, go to the Lambda function, and select Add trigger and choose EventBridge. For instance, the following trigger will launch the Lambda function every Tuesday at 19:00 UTC.
This rule will only trigger the Lambda function. To start the server, we must provide the right event (Start, in this case). For that, navigate to the EventBridge service and edit the rule, adding the event as an input.

To stop the server on a schedule—for example, at 21:00 on Tuesdays—create another trigger with the input {“ACTION”: “STOP”}.
Using Amazon Simple Email Service to provide the server IP by email
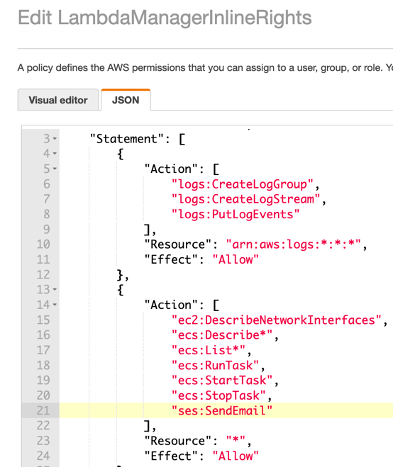
If we do not want to log in to the AWS Management Console every time to retrieve the public IP and send it to all musicians manually, then we can send it out using Amazon Simple Email Service (Amazon SES). For this, we must first add and verify the email address or addresses we want to send to in the Amazon SES. Second, we must add the ses:SendEmail permission to the Lambda function execution role. For this, go to the Lambda function configuration, find the Execution role, and follow the link to that role in AWS Identity and Access Management (IAM). In the inline policy of the role, add ses:SendEmail as a permission.
Finally, return to the Lambda function and add SES = boto3.client(“ses”) to the top of the function to create the Amazon SES service client.

In the function, the following code first retrieves the network ID of a running Amazon ECS task, then uses that to get the public IP from ECS, and finally uses SES to send the IP out to the email addresses provided. Except for the email functionality, the code shown is already included in the Lambda function deployed by AWS CloudFormation because the same calls are required to obtain the IP address when calling the CHECK event.

To automate completely, we can now run the CHECK event on a schedule right after the START event as described above, and will always be informed about the public IP.
Summary
In this blog post, we have shown the powerful combination of AWS with the open source Jamulus software, which allows musicians to connect around the globe. Running a Jamulus server on AWS makes holding private rehearsals easier, with lowest network latency and high reliability, while paying only for what you use. Also, we have shown how integration with other AWS services makes operating and maintaining the server easier, and provides convenient options, such as starting it on a weekly schedule.
This setup is possible thanks to the great open source community behind Jamulus. If you are into software development—and music—consider getting involved with the Jamulus project. Have fun with your Jamulus server, and keep jamming out!