AWS Quantum Technologies Blog
Setting up your local development environment in Amazon Braket
As a fully managed quantum computing service, Amazon Braket provides a development environment based on Jupyter notebooks for you to experiment with quantum algorithms, test them on quantum circuit simulators, and run them on different quantum hardware technologies. However, Amazon Braket does not restrict you to use only the managed notebooks and the AWS management console. You can download the Amazon Braket SDK and use other integrated development environments (IDE) to run your experiments.
This blog explains how quantum computing researchers and developers can enable Amazon Braket with the proper permissions and work with quantum resources using a local Conda development environment.
By following this procedure, you will setup your new or existing AWS account and create a user to start using the service. You will then go through all the steps required to activate Amazon Braket and execute your code in your own local environment.
Step 1: Set up your AWS account
If you or your organization already has an AWS account, you can ask your administrator to set up your access to the AWS console. AWS Identity and Access Management (IAM) is the service that enables you to manage permissions and policies from a centralized location, giving you fine grained access only to the services you need. If you don’t have an existing AWS account, you can create a new one and follow these steps to activate it.
Step 2: Create an IAM user and keys for programmatic access
- Sign into the AWS Management Console and open the IAM console at https://console.aws.amazon.com/iam/. In the navigation pane, find the Users menu on the left panel, and then click on Add users in the right window, as shown:
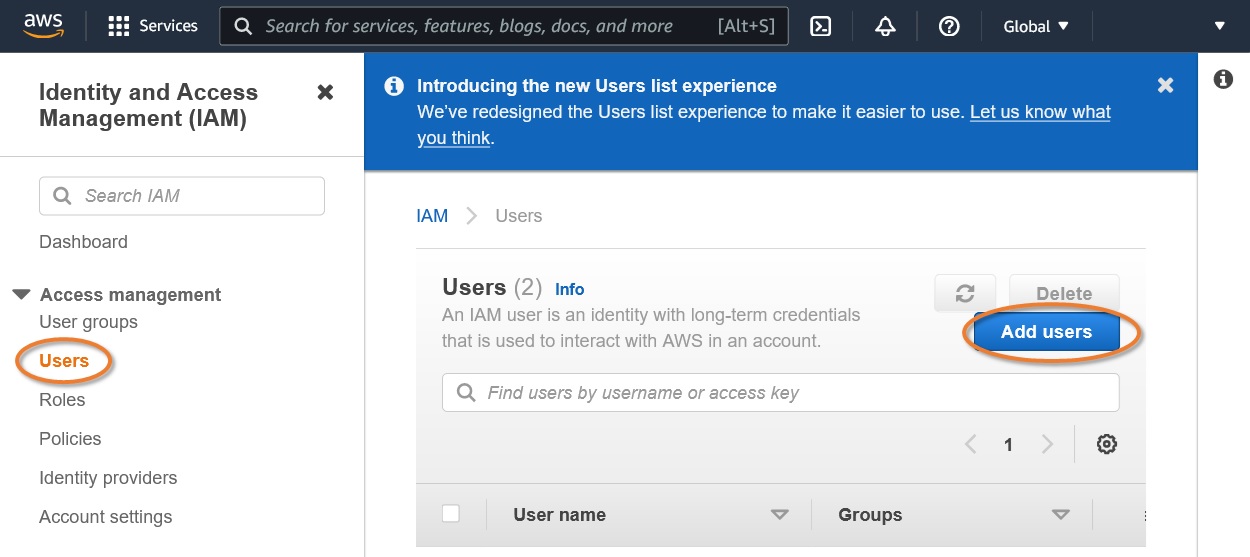
Figure 1: The AWS Identity and Access (IAM) console screen for managing users
- In the Set user details section, provide the following:
- Type the User name for the new user.
- Under Select AWS access type, select Programmatic access and AWS Management Console access.
- Under Console password, you can either leave it to Autogenerated or specify a custom password.
- Click Next: Permissions.
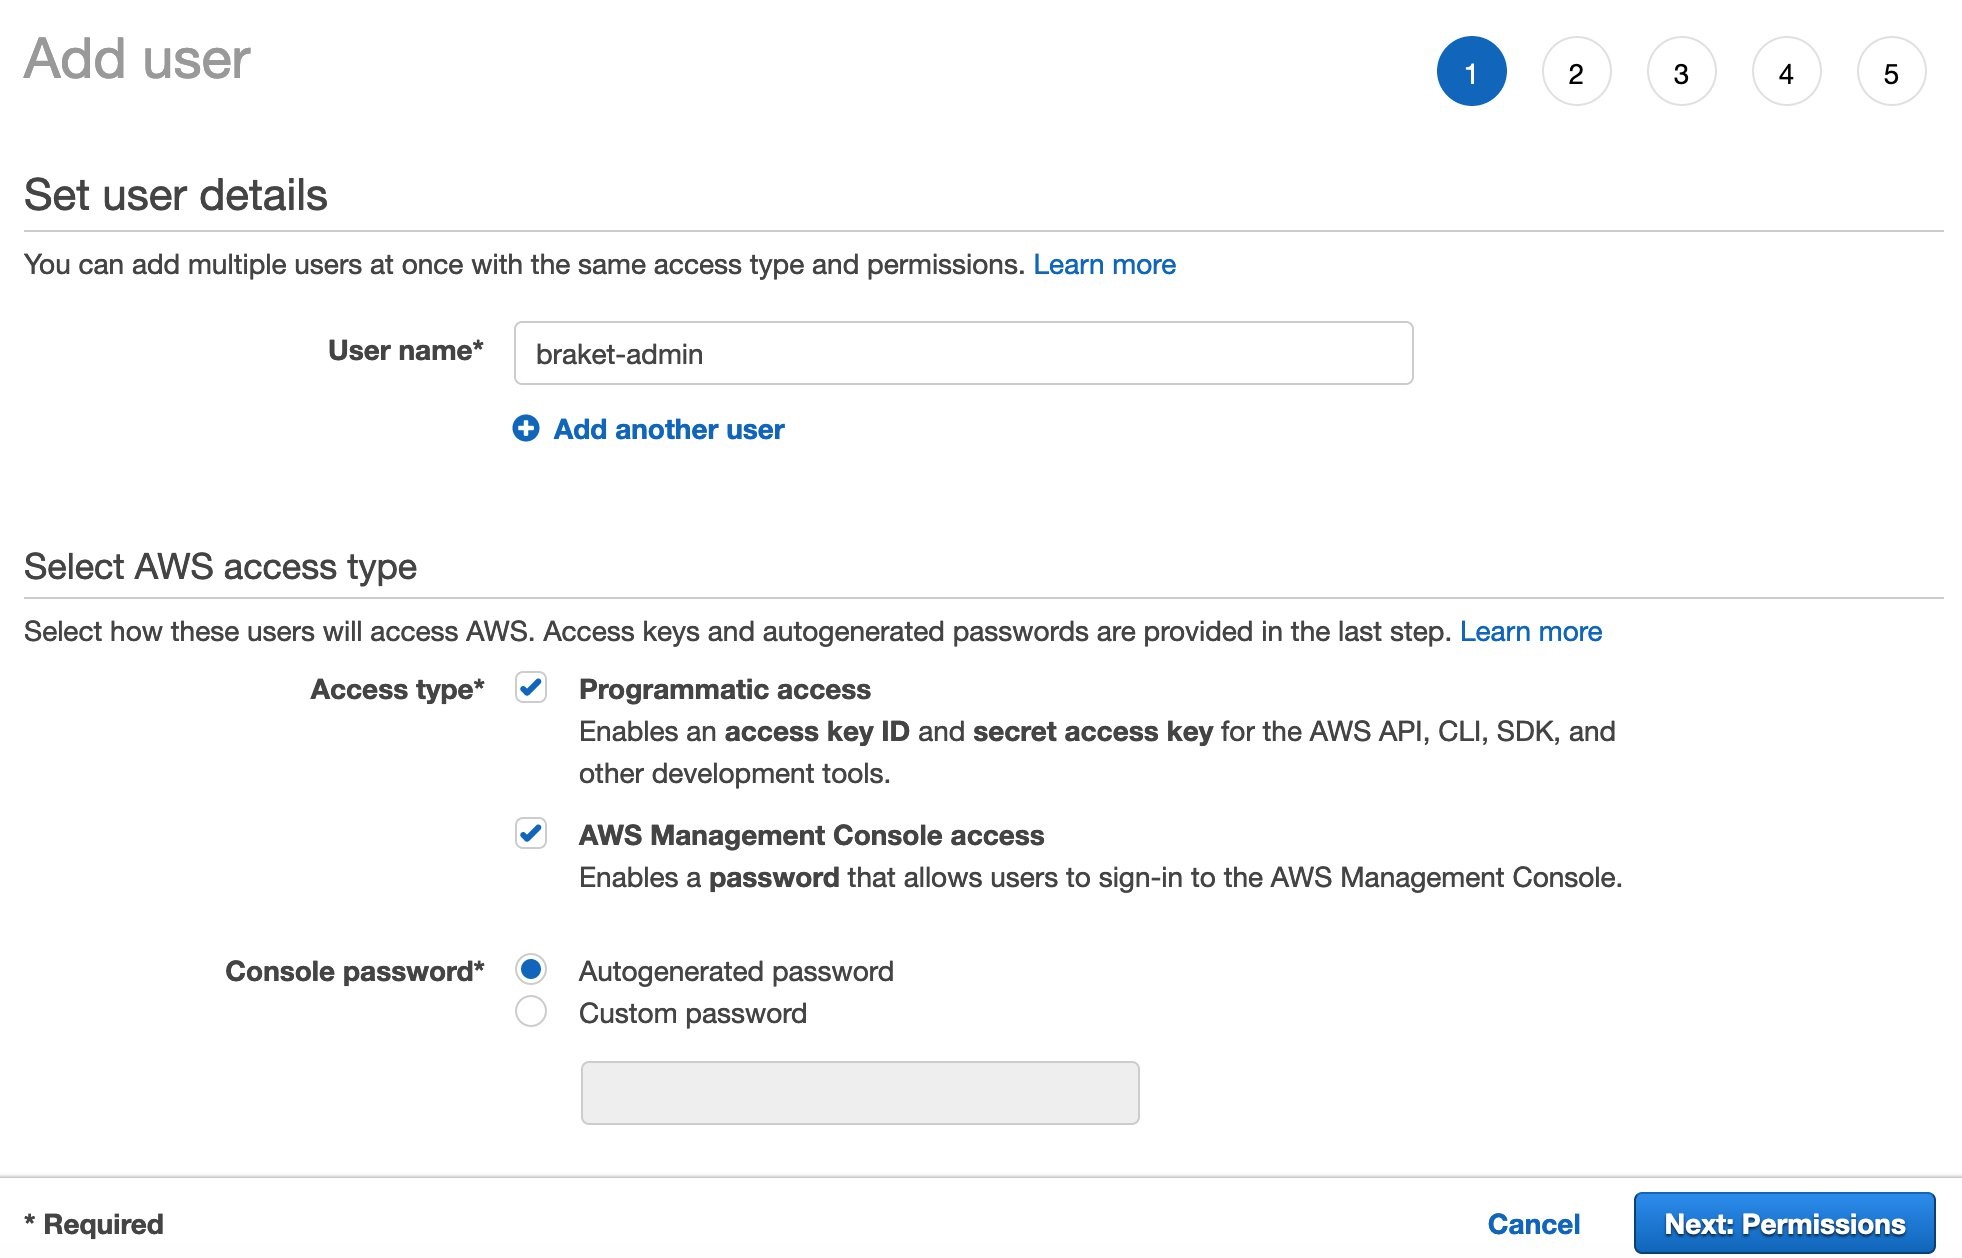
Figure 2: The AWS IAM console screen to set user details
- In the Set permissions section, provide the following:
- Select Attach existing policies directly.
- Type the word Braket in the search field.
- Tick the checkbox for managed policies AmazonBraketFullAccess and AmazonBraketJobsExecutionPolicy.
- Click Next.
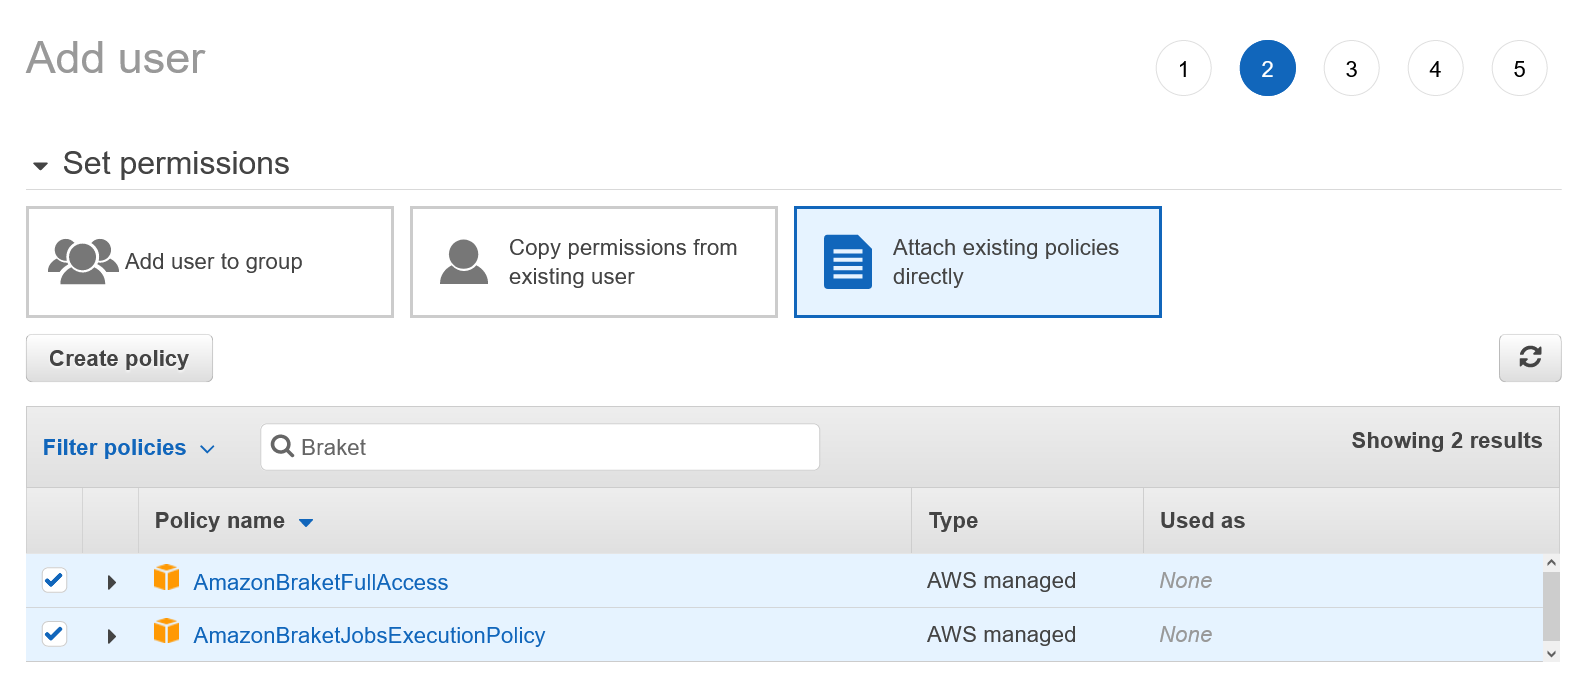
Figure 3: Set user permissions with an existing policy
- (Optional) Set descriptive tags in the Tags section and click Next.
- Verify the details in the review screen, and click Next: Review
- Confirm that the information on this screen matches with the previous steps you configured, and click Create User.
- Choose Show next to the password and access key to view the user’s access key ID and secret access key.
- Choose Download .csv and then save the file with your credentials to a safe location.

Figure 4: How to download AWS IAM user keys
Important! This is your only opportunity to view or download the secret access keys. If you are an administrator, you must provide this information to your users before they can use the AWS API. Save the user’s new access key ID and secret access key in a safe and secure place. Note that you will not be able to retrieve the secret keys again after this step.
Step 3: Enable Amazon Braket service
The actions in this step are necessary for Amazon Braket to interact with other services, and to ensure that you give your consent to the service to access quantum hardware partners outside of AWS.
Navigate to the Amazon Braket console at https://console.aws.amazon.com/braket, and click in Permissions and settings in the left bottom panel. In some cases, you might see a warning window on top of the screen along with a View permissions button. You don’t need to click that button at this point, as you will take care of that warning at a later stage.
1. Navigate to the Amazon Braket console at https://console.aws.amazon.com/braket, and click in Permissions and settings in the left bottom panel. Depending on your configuration, you will see a warning window on top of the screen along with a View permissions button, as shown below. You don’t need to click that button at this point, as you will take care of that warning at a later stage.
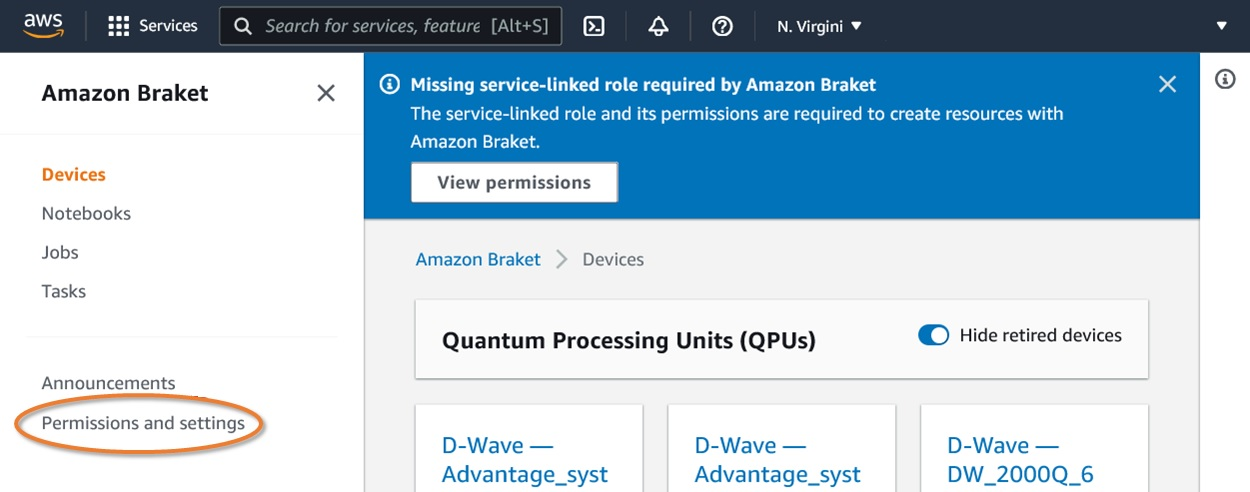
Figure 5: Open the Permissions and settings menu.
2. In the Permissions and settings for Amazon Braket window, click on the General tab and look at the button to the right of Enable third-party devices. If the button says Accept terms and enable, go ahead and click on it. With this action, you accept the terms and conditions of accessing quantum hardware partners of AWS.
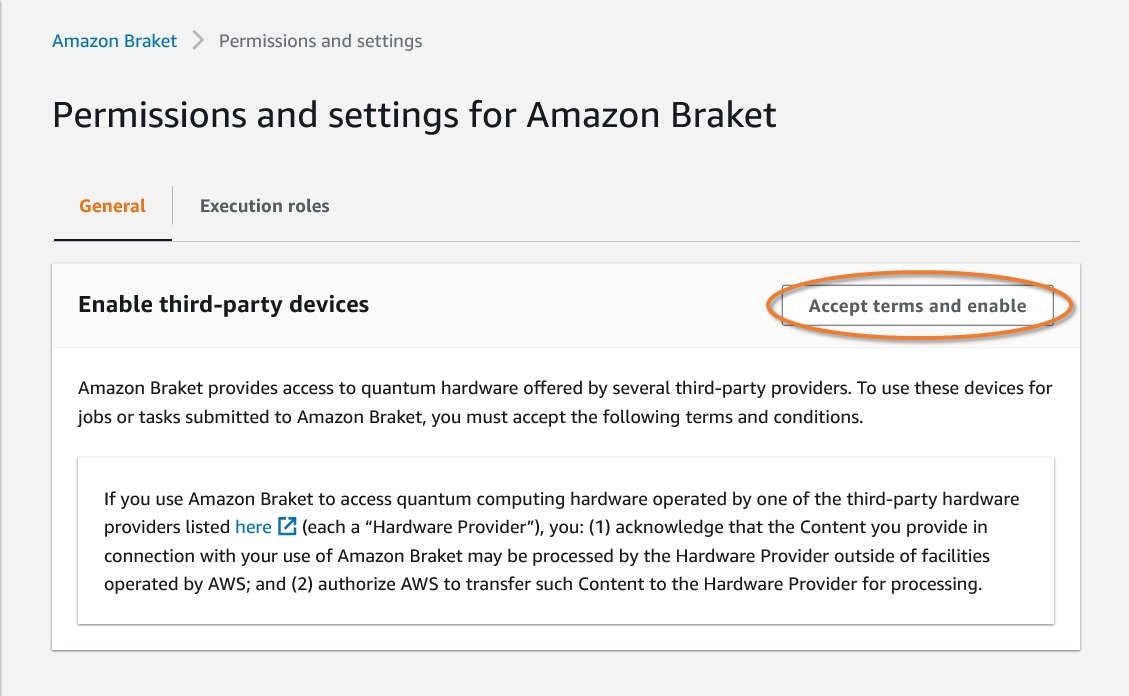
Figure 6: Accept terms and conditions to access quantum hardware partners.
3. Click on the Execution roles tab under Permissions and settings for Amazon Braket screen, and click on Create service-linked role button in the middle if that is available to you. If the button is greyed out, the role was already created before for your user and you don’t need to take any action. After a few seconds, you will get a confirmation message that the role has been created successfully, as shown in this screenshot:
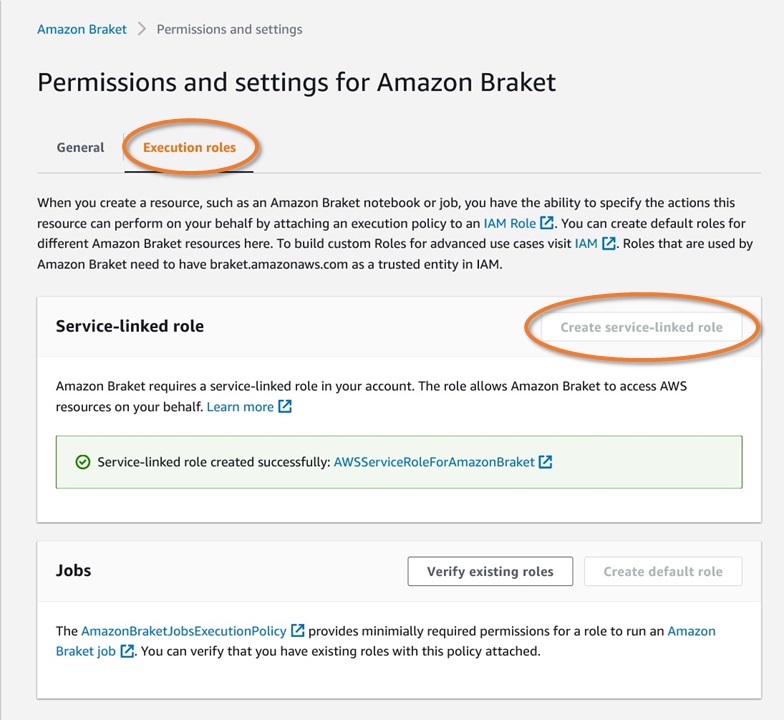
Figure 7: Create the service-linked role needed by Amazon Braket.
4. At the bottom of the same screen, click the Verify existing roles button, and if prompted after a few seconds, click the Create default role to its right.

Figure 8: Create the default role needed to run an Amazon Braket job.
This is how your Permissions and settings screen should look like after your have completed this step:
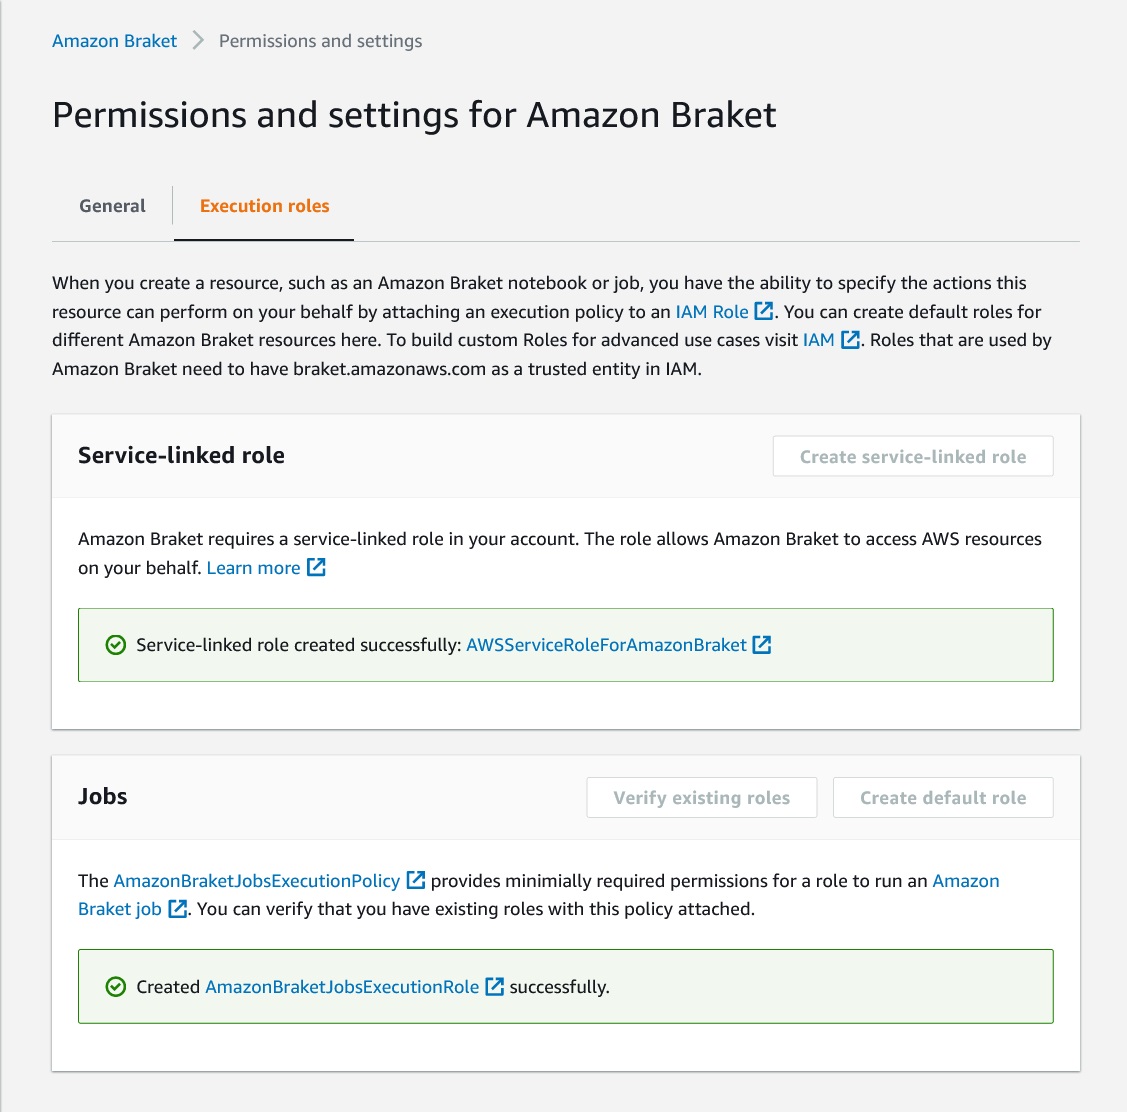
Figure 9: Summary of Permissions and settings for Amazon Braket.
Step 4: Use Amazon Braket with your local system: CLI setup
- Install the AWS CLI in your local system. The AWS Command Line Interface (AWS CLI) is an open source tool that enables interaction with AWS services via the command-line shell. With minimal configuration, the AWS CLI enables you to run commands that implement functionality equivalent to that provided by the browser-based AWS Management Console from the command prompt. This is a required initial step for any user wanting to interact with AWS in a programmatic manner.
-
- AWS CLI installation (Linux x86)
-
- AWS CLI installation (MacOS)
-
- AWS CLI installation (Windows)
- Download the AWS CLI MSI installer for Windows.
- Run the downloaded MSI installer and follow the on-screen instructions. By default, the AWS CLI installs to
C:\Program Files\Amazon\AWSCLIV2. - To confirm the successful installation, open the Start menu, search for cmd to open a command prompt window, and at the command prompt type:
aws --version
- AWS CLI installation (Windows)
- Configure AWS CLI with access keys for programmatic access. Run the CLI configuration command, replacing the Access Key ID and the Secret Access Key fields with the values on the credentials csv file you created in step 2. Here is an example:
-
- Access keys consist of an access key ID and secret access key, which are used to sign programmatic requests that you make to AWS.
- The Default region name identifies the AWS Region whose servers you want to send your requests to by default. This is typically the Region closest to you, but it is recommended that you pick one of the 3 regions in which Amazon Braket is available: us-east-1, us-west-1, us-west-2.
- The Default output format specifies how the results are formatted. The value can be any of the values in the following list. If you don’t specify an output format, json is used as the default.
With this, you have covered the minimum requirements to start creating tasks in Amazon Braket using CLI scripts. You can refer to the AWS CLI documentation for more details.
If you want to run Python code from your local computer, you need to take an additional step. Conda is a popular Python environment management system, so we use it in this blog as a reference to setup your local environment with the Amazon Braket SDK.
Step 5: Use Amazon Braket with your local system: Conda setup
- Install Anaconda or Miniconda and initialize Conda (below is a generic installation in Linux OS. Follow the instructions in the link provided for your Operating System):
- Create a new Conda python environment, give it a name, and activate it as follows. The example uses braket as the environment name:
- Install the Amazon Braket SDK. This installs all the necessary dependencies including boto3, numpy, local simulators, etc.
Step 6: Run a circuit
You are now ready to start coding your first quantum circuit using your local editor or IDE. You will copy and modify the example scripts that are provided in this section, and execute them from the Conda command prompt.
When you run Python and call an AWS service using the SDK, it uses the default credentials that were configured using AWS CLI (aws configure) in step 4. If you receive errors related AWS Authentication, please refer to the AWS Python SDK documentation.
In this step, you will be testing that the Amazon Braket SDK is properly installed and that you can import its libraries, call various methods, and use different backend resources. You will create Python scripts with a basic Bell pair circuit definition, which describes the superposition and entanglement of 2 qubits. Additional examples are available in this Amazon Braket GitHub repo.
You will run the same circuit on 3 different backends: a local simulator running on your local system, a managed simulator, and an actual Quantum Processing Unit (QPU).
Using the Local Simulator
The Amazon Braket Python SDK includes an implementation of a quantum device simulator that can run circuits on your local machine. The local simulator is well suited for rapid prototyping on small circuits up to 25 qubits.
- (Optional) Copy the example code from here: local_bell.py
- Create an empty file, insert the following lines and save it as local_bell.py:
from braket.circuits import Circuit
from braket.devices import LocalSimulator
device = LocalSimulator()
bell = Circuit().h(0).cnot(0, 1)
print(device.run(bell, shots=100).result().measurement_counts)- Run the circuit:
Using Managed Simulators
Amazon Braket offers fully managed circuit simulators that you can use to run circuits with a simple API call. Managed simulators run on AWS managed infrastructure, and are optimized for different use cases. This enables you to run larger circuits in the cloud and save time by executing multiple circuits in parallel.
Cost alert: If you do run multiple circuits in parallel, you are charged based on the run time of all of them concurrently. If you are taking advantage of the AWS Free Tier for Amazon Braket (1 hour of free simulation time per month for a year), you may be using your time up faster than clock time would indicate, because of running concurrent jobs.
For a list of available simulators and their features, consult the Amazon Braket Developer Guide. This example uses SV1, a state vector simulator for general-purpose circuits.
To run a circuit using a managed simulator, follow these steps:
- Create a new file (aws_bell.py in the example) with the following code:
from braket.aws import AwsDevice
from braket.circuits import Circuit

device = AwsDevice("arn:aws:braket:::device/quantum-simulator/amazon/sv1")

# Choose S3 bucket to store results
bucket = # <<Update with your actual bucket name>> #eg: "amazon-braket-unique-aabbcdd"
prefix = "results"
s3_folder = (bucket, prefix)

bell = Circuit().h(0).cnot(0, 1)
print(bell)

task = device.run(bell, s3_folder, shots=100)
print("Measurement Results")
print(task.result().measurement_counts)
Note that you need to replace the name of the bucket you specified when you activated the Amazon Braket service.
- Save the file and run the circuit from the Conda command prompt:
- (Optional) Check the developer guide to track your task from the Amazon Braket SDK using task.id and task.state()
Using QPUs
With Amazon Braket, you can run your quantum circuit on a physical quantum computer. The following example executes the same Bell Pair example to validate your configuration on a Rigetti superconducting quantum computer.
Important: Tasks may not run immediately on the QPU. The QPUs only execute tasks during their execution windows.
- (Optional) To find its execution window, run
get-deviceAPI call passing the Amazon Resource Number (ARN) and region of your quantum device:
You can obtain the device ARN from the developer guide, in the AWS management console, by calling the AwsDevice.get_devices() method in the SDK, or by running aws braket search-devices –filter in the CLI from the region where your device is located.
Note that time is displayed in UTC. If the device is currently OFFLINE because you are outside of the execution window, you still can run your circuit, but it will be queued and processed when the device is back online. You can also refer to the AWS management console in the “Devices” tab to find its execution window.
- Create a new file (rigetti_bell.py in the example) with the following code, replacing the bucket variable with the S3 bucket name that you chose in previous steps:
from braket.aws import AwsDevice
from braket.circuits import Circuit
device = AwsDevice("arn:aws:braket:::device/qpu/rigetti/Aspen-9")

# Choose S3 bucket to store results
bucket =  <<Update with you actual bucket name>> #eg: "amazon-braket-unique-aabbcdd"
prefix = "results"
s3_folder = (bucket, prefix)
bell = Circuit().h(0).cnot(0, 1)
print(bell)
task = device.run(bell, s3_folder, shots=100)
print("Task submitted. Task ARN is: ",task.id)- Run the code. Instead of the results, it returns a task id or task ARN:
- Create a new file (get_results.py) with the following code to retrieve the results once the execution has completed. Make sure to update the task ID with the previous output:
from braket.aws import AwsQuantumTask

rigetti_task_id = "arn:aws:braket:us-west-1:83xxxxxxx862:quantum-task/321c7904-a07b-4aa9-945e-daec329ed1cd"

# recover task
task_load = AwsQuantumTask(arn=rigetti_task_id)

# print status
status = task_load.state()
print('Status of (reconstructed) task:', status)
print('\n')
if status == 'COMPLETED':
    # get results
    rigetti_results = task_load.result()

    # get all metadata of submitted task
    metadata = task_load.metadata()
    # example for metadata
    shots = metadata['shots']
    machine = metadata['deviceArn']
    # print example metadata
    print("{} shots taken on machine {}.\n".format(shots, machine))

    # get measurement counts
    rigetti_counts = rigetti_results.measurement_counts
    print('Measurement counts:', rigetti_counts)

elif status in ['FAILED', 'CANCELLED']:
    # print terminal message
    print('Your task is in terminal status, but has not completed.')

else:
    # print current status
print('Sorry, your task is still being processed and has not been finalized yet.')- Run the get_results.py script:
- (Optional) You can configure Amazon EventBridge to send an email or text message once the task state changes. Check the developer guide for more details.
Conclusion
In this blog, you walked through the steps required to setup your AWS account, create an AWS IAM user with the right permissions to run Amazon Braket, enable the service, and execute your first circuits using a local Conda development environment. You used the Amazon Braket SDK to interact with the local simulator, the SV1 managed simulator, and Rigetti’s QPU.
As a researcher or developer who want to be able to use Amazon Braket, you have now a functional local environment without the need to use managed notebooks or the graphical Amazon Braket management console.
Now that you have the basics down, you can download and practice with the circuits used on this tutorial. Another great way to learn is to run the examples in the Amazon Braket github repository. If you are performing academic research in quantum algorithms or hardware, you can learn more about how you can work with Amazon Braket for research and an AWS research credits program.