AWS Security Blog
Best Practices to help secure your container image build pipeline by using AWS Signer
AWS Signer is a fully managed code-signing service to help ensure the trust and integrity of your code. It helps you verify that the code comes from a trusted source and that an unauthorized party has not accessed it. AWS Signer manages code signing certificates and public and private keys, which can reduce the overhead of your public key infrastructure (PKI) management. It also provides a set of features to simplify lifecycle management of your keys and certificates so that you can focus on signing and verifying your code.
In June 2023, AWS announced Container Image Signing with AWS Signer and Amazon EKS, a new capability that gives you native AWS support for signing and verifying container images stored in Amazon Elastic Container Registry (Amazon ECR).
Containers and AWS Lambda functions are popular serverless compute solutions for applications built on the cloud. By using AWS Signer, you can verify that the software running in these workloads originates from a trusted source.
In this blog post, you will learn about the benefits of code signing for software security, governance, and compliance needs. Flexible continuous integration and continuous delivery (CI/CD) integration, management of signing identities, and native integration with other AWS services can help you simplify code security through automation.
Background
Code signing is an important part of the software supply chain. It helps ensure that the code is unaltered and comes from an approved source.
To automate software development workflows, organizations often implement a CI/CD pipeline to push, test, and deploy code effectively. You can integrate code signing into the workflow to help prevent untrusted code from being deployed, as shown in Figure 1. Code signing in the pipeline can provide you with different types of information, depending on how you decide to use the functionality. For example, you can integrate code signing into the build stage to attest that the code was scanned for vulnerabilities, had its software bill of materials (SBOM) approved internally, and underwent unit and integration testing. You can also use code signing to verify who has pushed or published the code, such as a developer, team, or organization. You can verify each of these steps separately by including multiple signing stages in the pipeline. For more information on the value provided by container image signing, see Cryptographic Signing for Containers.
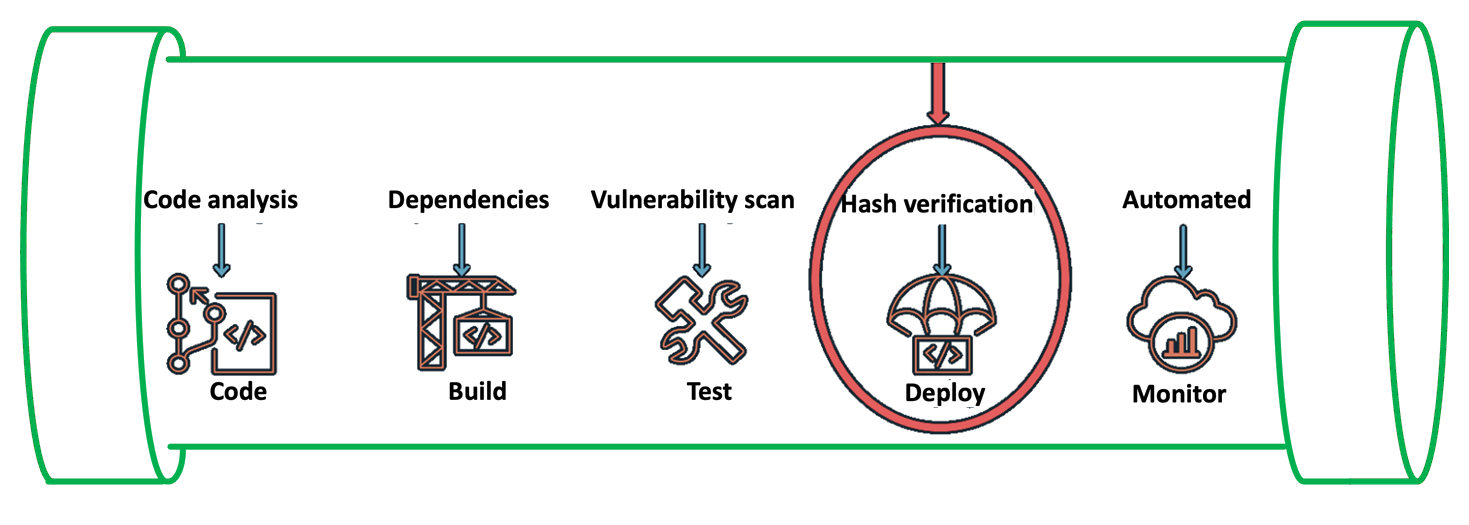
Figure 1: Security IN the pipeline
In the following section, we will walk you through a simple implementation of image signing and its verification for Amazon Elastic Kubernetes Service (Amazon EKS) deployment. The signature attests that the container image went through the pipeline and came from a trusted source. You can use this process in more complex scenarios by adding multiple AWS CodeBuild code signing stages that make use of various AWS Signer signing profiles.
Services and tools
In this section, we discuss the various AWS services and third-party tools that you need for this solution.
CI/CD services
For the CI/CD pipeline, you will use the following AWS services:
- AWS CodePipeline — a fully managed continuous delivery service that you can use to automate your release pipelines for fast and reliable application and infrastructure updates.
- AWS CodeCommit — a fully managed source control service that hosts secure Git-based repositories.
- AWS Signer — a fully managed code-signing service that you can use to help ensure the trust and integrity of your code.
- AWS CodeBuild — A fully managed continuous integration service that compiles source code, runs tests, and produces software packages that are ready to deploy.
Container services
You will use the following AWS services for containers for this walkthrough:
- Amazon EKS — a managed Kubernetes service to run Kubernetes in the AWS Cloud and on-premises data centers.
- Amazon ECR — a fully managed container registry for high-performance hosting, so that you can reliably deploy application images and artifacts anywhere.
Verification tools
The following are publicly available sign verification tools that we integrated into the pipeline for this post, but you could integrate other tools that meet your specific requirements.
- Notation — A publicly available Notary project within the Cloud Native Computing Foundation (CNCF). With contributions from AWS and others, Notary is an open standard and client implementation that allows for vendor-specific plugins for key management and other integrations. AWS Signer manages signing keys, key rotation, and PKI management for you, and is integrated with Notation through a curated plugin that provides a simple client-based workflow.
- Kyverno — A publicly available policy engine that is designed for Kubernetes.
Solution overview
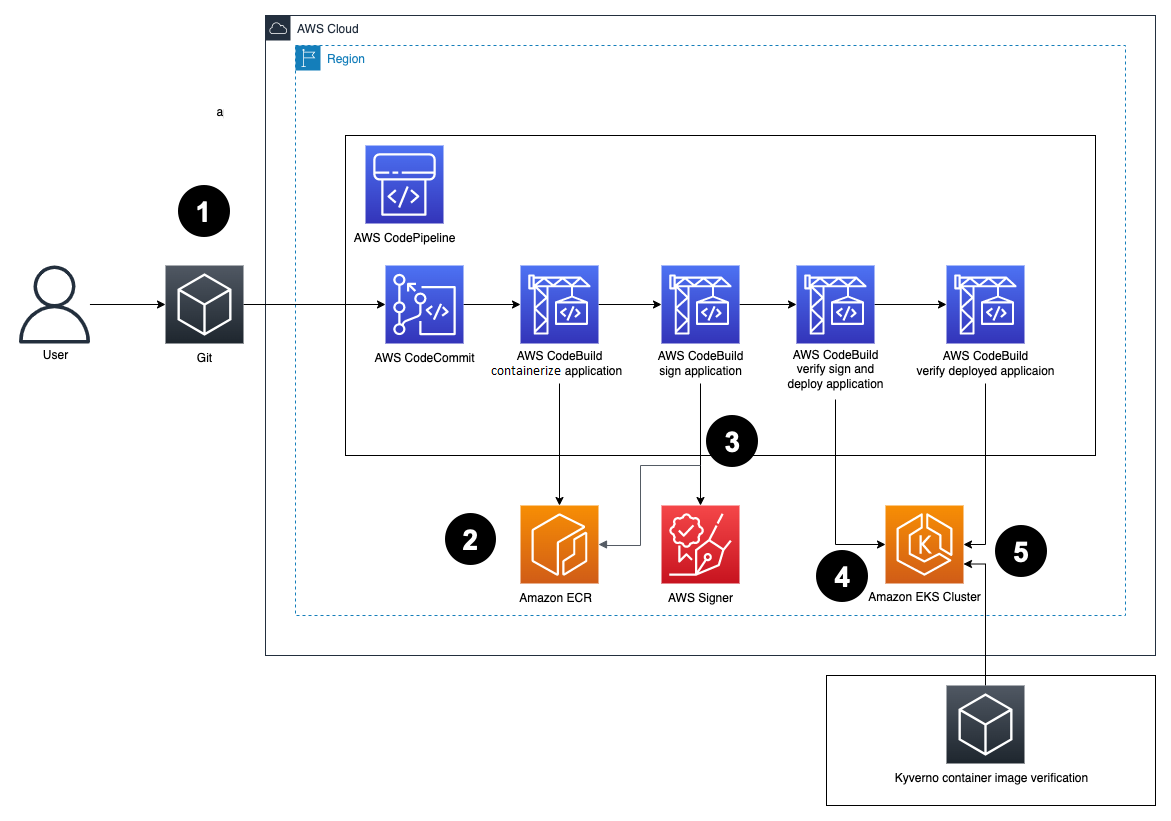
Figure 2: Solution architecture
Here’s how the solution works, as shown in Figure 2:
- Developers push Dockerfiles and application code to CodeCommit. Each push to CodeCommit starts a pipeline hosted on CodePipeline.
- CodeBuild packages the build, containerizes the application, and stores the image in the ECR registry.
- CodeBuild retrieves a specific version of the image that was previously pushed to Amazon ECR. AWS Signer and Notation sign the image by using the signing profile established previously, as shown in more detail in Figure 3.

Figure 3: Signing images described
- AWS Signer and Notation verify the signed image version and then deploy it to an Amazon EKS cluster.
If the image has not previously been signed correctly, the CodeBuild log displays an output similar to the following:
If there is a signature mismatch, the CodeBuild log displays an output similar to the following:
- Kyverno verifies the container image signature for use in the Amazon EKS cluster.
Figure 4 shows steps 4 and 5 in more detail.

Figure 4: Verification of image signature for Kubernetes
Prerequisites
Before getting started, make sure that you have the following prerequisites in place:
- An Amazon EKS cluster provisioned.
- An Amazon ECR repository for your container images.
- A CodeCommit repository with your application code. For more information, see Create an AWS CodeCommit repository.
- A CodePipeline pipeline deployed with the CodeCommit repository as the code source and four CodeBuild stages: Build, ApplicationSigning, ApplicationDeployment, and VerifyContainerSign. The CI/CD pipeline should look like that in Figure 5.

Figure 5: CI/CD pipeline with CodePipeline
Walkthrough
You can create a signing profile by using the AWS Command Line Interface (AWS CLI), AWS Management Console or the AWS Signer API. In this section, we’ll walk you through how to sign the image by using the AWS CLI.
To sign the image (AWS CLI)
- Create a signing profile for each identity.
- Sign the image from the CodeBuild build—your buildspec.yaml configuration file should look like the following:
The commands in the buildspec.yaml configuration file do the following:
- Sign you in to Amazon ECR to work with the Docker images.
- Reference the specific image that will be signed by using the commit hash (or another versioning strategy that your organization uses). This gets the digest.
- Sign the container image by using the notation sign command. This command uses the container image digest, instead of the image tag.
- Install the Notation CLI. In this example, you use the installer for Linux. For a list of installers for various operating systems, see the AWS Signer Developer Guide,
- Sign the image by using the notation sign command.
- Inspect the signed image to make sure that it was signed successfully by using the notation inspect command.
- To verify the signed image, use the notation verify command. The output should look similar to the following:
- (Optional) For troubleshooting, print the notation policy from the pipeline itself to check that it’s working as expected by running the notation policy show command:
For this, include the command in the pre_build phase after the notation version command in the buildspec.yaml configuration file.
After the notation policy show command runs, CodeBuild logs should display an output similar to the following:
- To verify the image in Kubernetes, set up both Kyverno and the Kyverno-notation-AWS Signer in your EKS cluster. To get started with Kyverno and the Kyverno-notation-AWS Signer solution, see the installation instructions.
- After you install Kyverno and Kyverno-notation-AWS Signer, verify that the controller is running—the STATUS should show Running:
- Configure the CodeBuild buildspec.yaml configuration file to verify that the images deployed in the cluster have been previously signed. You can use the following code to configure the buildspec.yaml file.
The commands in the buildspec.yaml configuration file do the following:
- Set up the environment variables, such as the ECR repository URI and the Commit hash, to build the image tag. The kubectl tool will use this later to reference the container image that will be deployed with the Kubernetes objects.
- Use kubectl to connect to the EKS cluster and insert the container image reference in the deployment.yaml file.
- After the container is deployed, you can observe the kyverno-notation-aws controller and access its logs. You can check if the deployed image is signed. If the logs contain an error, stop the pipeline run with an error code, do a rollback to a previous version, or delete the deployment if you detect that the image isn’t signed.
Decommission the AWS resources
If you no longer need the resources that you provisioned for this post, complete the following steps to delete them.
To clean up the resources
- Delete the EKS cluster and delete the ECR image.
- Delete the IAM roles and policies that you used for the configuration of IAM roles for service accounts.
- Revoke the AWS Signer signing profile that you created and used for the signing process by running the following command in the AWS CLI:
- Delete signatures from the Amazon ECR repository. Make sure to replace <AWS_ACCOUNT_ID> and <AWS_REGION> with your own information.
Note: Using the ORAS project’s oras client, you can delete signatures and other reference type artifacts. It implements deletion by first removing the reference from an index, and then deleting the manifest.
Conclusion
In this post, you learned how to implement container image signing in a CI/CD pipeline by using AWS services such as CodePipeline, CodeBuild, Amazon ECR, and AWS Signer along with publicly available tools such as Notary and Kyverno. By implementing mandatory image signing in your pipelines, you can confirm that only validated and authorized container images are deployed to production. Automating the signing process and signature verification is vital to help securely deploy containers at scale. You also learned how to verify signed images both during deployment and at runtime in Kubernetes. This post provides valuable insights for anyone looking to add image signing capabilities to their CI/CD pipelines on AWS to provide supply chain security assurances. The combination of AWS managed services and publicly available tools provides a robust implementation.
If you have feedback about this post, submit comments in the Comments section below. If you have questions about this post, contact AWS Support.
Want more AWS Security news? Follow us on Twitter.