AWS Security Blog
How to BYOK (bring your own key) to AWS KMS for less than $15.00 a year using AWS CloudHSM
February 26, 2024: We’ve updated this post to replace the key_mgmt_util with cloudhsm-cli, which is part of the newer SDK 5.
August 31, 2021:AWS KMS is replacing the term customer master key (CMK) with AWS KMS key and KMS key. The concept has not changed. To prevent breaking changes, AWS KMS is keeping some variations of this term. More info.
Note: BYOK is helpful for certain use cases, but I recommend that you familiarize yourself with KMS best practices before you adopt this approach. You can review best practices in the AWS Key Management Services Best Practices (.pdf) whitepaper.
May 14, 2019: We’ve updated a sentence to clarify that this solution does not include instructions for creating an AWS CloudHSM cluster. For information about how to do this, please refer to our documentation.
Back in 2016, AWS Key Management Service (AWS KMS) announced the ability to bring your own keys (BYOK) for use with KMS-integrated AWS services and custom applications. This feature allows you more control over the creation, lifecycle, and durability of your keys. You decide the hardware or software used to generate the customer-managed AWS KMS key, you determine when or if the keys will expire, and you get to upload your keys only when you need them and delete them when you’re done.
The documentation that walks you through how to import a key into AWS KMS provides an example that uses OpenSSL to create your KMS key. Some customers, however, don’t want to use OpenSSL. While it’s a valid method of creating the key material associated with a KMS key, security best practice is to perform key creation on a hardware security module (HSM) or a hardened key management system.
However, using an on-premises HSM to create and back up your imported keys can become expensive. You have to plan for factors like the cost of the device itself, its storage in a datacenter, electricity, maintenance of the device, and network costs, all of which can add up. An on-premises HSM device could run upwards of $10K annually even if used sparingly, in addition to the cost of purchasing the device in the first place. Even if you’re only using the HSM for key creation and backup and don’t need it on an ongoing basis, you might still need to keep it running to avoid complex re-initialization processes. This is where AWS CloudHSM comes in. CloudHSM offers HSMs that are under your control, in your virtual private cloud (VPC). You can spin up an HSM device, create your key material, export it, import it into AWS KMS for use, and then terminate the HSM (since CloudHSM saves your HSM state using secure backups). Because you’re only billed for the time your HSM instance is active, you can perform these steps for less than $15.00 a year!
Solution pricing
In this post, we’ll show you how to use an AWS CloudHSM cluster (which is a group that CloudHSM uses to keep all HSMs inside in sync with one another) with one HSM to create your key material. Only one HSM is needed, as you’ll use this HSM just for key generation and storage. Ongoing crypto operations that use the key will be performed by KMS. AWS CloudHSM comes with an hourly fee that changes based on your region of choice; be sure to check the pricing page for updates prior to use. AWS KMS has a $1.00/month charge for customer-managed KMS keys, including those that you import yourself. In the following chart, we’ve calculated annual costs for some regions. These assume that you want to rotate your imported key annually and that you perform this operation once per year by running a single CloudHSM for one hour. We’ve included 12 monthly installments of $1.00/mo for your KMS key. Additional costs may apply for AWS KMS usage based on the volume of API calls that your application makes. For details, see the AWS KMS pricing page.
| REGION | CLOUDHSM PRICING STRUCTURE | KMS PRICING STRUCTURE | ANNUAL TOTAL COST |
| US-EAST-1 | $1.60/HR | $1/MO | $13.60/YR |
| US-WEST-2 | $1.45/HR | $1/MO | $13.45/YR |
| EU-WEST-1 | $1.47/HR | $1/MO | $13.47/YR |
| US-GOV-EAST-1 | $2.08/HR | $1/MO | $14.08/YR |
| AP-SOUTHEAST-1 | $1.86/HR | $1/MO | $13.86/YR |
| EU-CENTRAL-1 | $1.92/HR | $1/MO | $13.92/YR |
| EU-NORTH-1 | $1.40/HR | $1/MO | $13.40/YR |
| AP-SOUTHEAST-2 | $1.99/HR | $1/MO | $13.99/YR |
| AP-NORTHEAST-1 | $1.81/HR | $1/MO | $13.81/YR |
Solution overview
We’ll walk you through the process of creating a KMS key in AWS KMS with no key material associated and then downloading the public key and import token that you’ll need in order to import the key material later on. We will also show you how to create, securely wrap, and export your symmetric key from AWS CloudHSM. Finally, we will show you how to import your key material into AWS KMS and then terminate your HSM to save on cost. The following diagram illustrates the steps covered in this post.
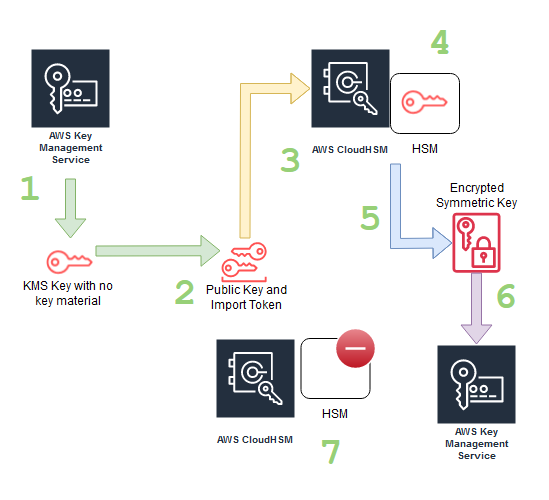
Figure 1: The process of creating a KMS key in AWS KMS
- Create a KMS key in AWS KMS that has no key material associated.
- Download the import wrapping key and import token from KMS.
- Import the wrapping key provided by KMS into the HSM.
- Create a 256 bit symmetric key on AWS CloudHSM.
- Use the imported wrapping key to wrap the symmetric key.
- Import the symmetric key into AWS KMS using the import token from step 2.
- Terminate your HSM, which triggers a backup. Delete or leave your cluster, depending on your needs.
Prerequisites
In this walkthrough, we assume that you already have an AWS CloudHSM cluster set up and initialized with at least one HSM device, and an Amazon Elastic Compute Cloud (EC2) instance running Amazon Linux OS with the AWS CloudHSM client installed. You must have a crypto user (CU) on the HSM to perform the key creation and export functions. You’ll also need an IAM user or role with permissions to both AWS KMS and AWS CloudHSM, and with credentials configured in your AWS Command Line Interface (AWS CLI). Make sure to store your CU information and IAM credentials (if a user is created for this activity) in a safe location. You can use AWS Secrets Manager for secure storage.
Deploying the solution
For our demonstration, we’ll be using the AWS CLI. However, if you prefer working with a graphical user interface, step #1 and the important portion of step #3 can be done in the AWS KMS Console. All other steps are via AWS CLI only.
Step 1: Create the KMS key with no key material associated
Begin by creating a KMS key in AWS KMS that has no key material associated. The CLI command to create the KMS key is as follows:
If successful, you’ll see an output on the CLI similar to below. The KeyState will be PendingImport and the Origin will be EXTERNAL.
Step 2: Download the public key and import token
With the KMS key ID created, you now need to download the import wrapping key and the import token. Wrapping is a method of encrypting the key so that it doesn’t pass in plaintext over the network. You need both the wrapping key and the import token in order to import a key into AWS KMS. You’ll use the public key to encrypt your key material, which protects your key as it is imported. When AWS KMS receives the encrypted key material, it will use the corresponding private component of the import wrapping key to decrypt it. The public and private key pair used for this action will be a 2048-bit RSA key that is unique to each import operation. The import token contains metadata to verify that the key material is imported to the correct KMS key ID. Both the import token and import wrapping key are on a time limit, so if you don’t import your key material within 24 hours of downloading them, the import wrapping key and import token will expire and you’ll need to download a new set from KMS.
- (OPTIONAL) In our example command, we’ll use the wrapping algorithm RSAES_OAEP_SHA_256 to encrypt and securely import our key into AWS KMS. If you’d like to choose a different wrapping algorithm, you may use any of the following: RSAES_OAEP_SHA_256, RSAES_OAEP_SHA_1, or RSAES_PKCS1_V1_5.
- In the command below, replace the example key ID (shown in red) with the key ID you received in step 1. If you’d like, you can also modify the wrapping algorithm. Then run the command.
If the command is successful, you’ll see an output similar to what’s below. Your output will contain the import token and import wrapping key. Copy this output to a safe location, as you’ll need it in the next step. Keep in mind, these items will expire after 24 hours.
- Because the output of the command is base64 encoded, you must base64 decode both components into binary data before use. To do this, use your favorite text editor to save the output into two separate files. Name one ImportToken.b64—it will have the output of the “ImportToken” section from above. Name the other PublicKey.b64—it will have the output of the “PublicKey” section from above. You will find example commands to save both below.
- On both saved files, you must then run the following commands, which will base64 decode them and save them in their binary form:
Step 3: Import the import wrapping key provided by AWS KMS into your HSM
Now that you’ve created the KMS key ID and prepared for the key material import, you’re going to move to AWS CloudHSM to create and export your symmetric encryption key. Before completing this step, be sure you’ve set up the prerequisites that we listed at the start of this post.
- Log in to your EC2 instance with the AWS CloudHSM client package installed, and launch the CloudHSM command line interface (cloudhsm-cli). You will launch the utility using the command below:
- After launching the cloudhsm-cli in interactive mode, you’ll need to log in as the crypto-user (CU) user. Do so with the command below, being sure to replace ExampleUser for your own CU user and enter your password when prompted.
You should see an output similar to the example below, letting you know that you’ve logged in correctly:
Next, you’ll import the import wrapping key provided by KMS into the HSM, so that you can use it to wrap the symmetric key you’re going to create.
- Open the file PublicKey.b64 in your favorite text editor and add the line
-----BEGIN PUBLIC KEY-----at the very top of the file and the line-----END PUBLIC KEY------at the very end. (An example of how this should look is below.) Save this new file as PublicKey.pem. - Use the import pem command from the cloudhsm-cli to import the key file and set the attributes, allowing it to be used for wrapping other keys. An example of the command is below. For the
--labelflag , we named our example wrapping-key so that we know what it’s for. You can name yours whatever you choose. Also, remember to replace PublicKey.pem with the actual filename of your public key.If successful, your output should look similar to the following example. Make note of the key reference or the key label, as this is the identifying ID for your wrapping key:
Step 4: Create a symmetric key on AWS CloudHSM
Next, you’ll create a symmetric key that you want to export from CloudHSM, so that you can import it into AWS KMS.
AWS KMS only accepts the AES key type so you will use the generate-symmetric aes command. The first parameter you will use is --key-length-bytes with a value of 32 (256 bits). The last parameter is the --label flag with the value byok-kms. This flag is simply a label to name your key, so you may alter this value however you wish.
Here’s what our example looks like:
If successful, your output should look similar to what’s below. Make note of the key reference and key label, as this will be the identifying ID of the key you wish to import into AWS KMS.
Step 5: Use the imported import wrapping key to wrap the symmetric key
Now that you’ve imported the import wrapping key into your HSM in the PublicKey.pem file, we’ll show you how to use the PublicKey.pem file and the cloudhsm-cli to wrap your symmetric key out of the HSM.
An example of the command is below. Here’s how to customize the parameters:
rsa-oaepspecifies the wrapping algorithm.--payload-filterdefines the key that you want to wrap out of the HSM. You can use the key-reference (for example, key-reference=0x00000000002e06bf) or reference key attributes, such as the key label.--wrapping-filterdefines the key that you will use to wrap out the payload key. This should be the wrapping key that you imported previously from AWS KMS.--hash-functiondefines the hash function used as part of the OAEP encryption. This should match the wrapping algorithm that you specified when you got the import parameters from AWS KMS.--mgfdefines the mask generation function used as part of the OAEP encryption. It follows the form mgf1-HashFunction where the hash function is the same one that you used in the signing process.
If successful, you should see an output similar to what’s below:
With that, you’ve completed the AWS CloudHSM steps. You now have a symmetric key, securely wrapped for transport into AWS KMS. You can log out of the cloudhsm-cli by entering the word quit.
Step 6: Import the wrapped symmetric key into AWS KMS using the key import function
You’re ready to import the wrapped symmetric key into AWS KMS using the key import function. Make the following updates to the sample command that we provide below:
- Replace the key-id value and file names with your own.
- Leave the expiration model parameter blank, or choose from
KEY_MATERIAL_EXPIRES or KEY_MATERIAL_DOES_NOT_EXPIRE. If you leave the parameter blank, it will default to KEY_MATERIAL_EXPIRES. This expiration model requires you to set the--valid-toparameter, which can be any time of your choosing as long as it follows the format in the example. If you choose KEY_MATERIAL_DOES_NOT_EXPIRE, you may leave the--valid-tooption out of the command. To enforce an expiration and rotation of your key material, best practice is to use the KEY_MATERIAL_EXPIRES option and a date of 1-2 years.
Here’s our sample command:
You can test that the import was successful by using the key ID to encrypt a small (under 4KB) file. An example command is below:
A successful call will output something similar to below:
Step 7: Terminate your HSM (which triggers a backup)
The last step in the process is to Terminate your HSM (which triggers a backup). Since you’ve imported the key material into AWS KMS, you no longer need to run the HSM. Terminating the HSM will automatically trigger a backup, which will take an exact copy of the key material and the users on your HSM and store it, encrypted, in an Amazon Simple Storage Service (Amazon S3) bucket. If you need to re-import your key into KMS or if your company’s security policy requires an annual rotation of your KMS key(s), when the time comes, you can spin up an HSM from your CloudHSM backup and be back to where you started. You can re-import your existing key material or create key materials for your new KMS key, either way, you’ll need to request a fresh import wrapping key and import token from KMS.
Deleting an HSM can be done with the command below. Replace cluster-example with your actual cluster ID and hsm-example with your HSM ID:
Following these steps, you will have successfully defined a KMS key, created your own key material on a CloudHSM device, and then imported it into AWS KMS for use. Dependent upon region, all of this can be done for less than $15.00 a year.
Summary
In this post, we walked you through creating a KMS key ID without encryption key material associated, creating and then exporting a symmetric key from AWS CloudHSM, and then importing it into AWS KMS for use with KMS-integrated AWS services. This process allows you to maintain ownership and management over your KMS keys, create them on FIPS 140-2 Level 3 validated hardware, and maintain a copy for disaster recovery scenarios. This saves not only the time and personnel required to maintain your own HSMs on-premises, but the cost of hardware, electricity, and housing of the device.
If you have feedback about this blog post, submit comments in the Comments section below. If you have questions about this blog post, start a new thread on the AWS CloudHSM or AWS KMS forums.
Want more AWS Security news? Follow us on Twitter.