AWS Security Blog
How to share security telemetry per OU using Amazon Security Lake and AWS Lake Formation
Part 3 of a 3-part series
Part 2 – How to visualize Amazon Security Lake findings with Amazon QuickSight
This is the final part of a three-part series on visualizing security data using Amazon Security Lake and Amazon QuickSight. In part 1, Aggregating, searching, and visualizing log data from distributed sources with Amazon Athena and Amazon QuickSight, you learned how you can visualize metrics and logs centrally with QuickSight and AWS Lake Formation irrespective of the service or tool generating them. In part 2, How to visualize Amazon Security Lake findings with Amazon QuickSight , you learned how to integrate Amazon Athena with Security Lake and create visualizations with QuickSight of the data and events captured by Security Lake.
For companies where security administration and ownership are distributed across a single organization in AWS Organizations, it’s important to have a mechanism for securely sharing and visualizing security data. This can be achieved by enriching data within Security Lake with organizational unit (OU) structure and account tags and using AWS Lake Formation to securely share data across your organization on a per-OU basis. Users can then analyze and visualize security data of only those AWS accounts in the OU that they have been granted access to. Enriching the data enables users to effectively filter information using business-specific criteria, minimizing distractions and enabling them to concentrate on key priorities.
Distributed security ownership
It’s not unusual to find security ownership distributed across an organization in AWS Organizations. Take for example a parent company with legal entities operating under it, which are responsible for the security posture of the AWS accounts within their lines of business. Not only is each entity accountable for managing and reporting on security within its area, it must not be able to view the security data of other entities within the same organization.
In this post, we discuss a common example of distributing dashboards on a per-OU basis for visualizing security posture measured by the AWS Foundational Security Best Practices (FSBP) standard as part of AWS Security Hub. In this post, you learn how to use a simple tool published on AWS Samples to extract OU and account tags from your organization and automatically create row-level security policies to share Security Lake data to AWS accounts you specify. At the end, you will have an aggregated dataset of Security Hub findings enriched with AWS account metadata that you can use as a basis for building QuickSight dashboards.
Although this post focuses on sharing Security Hub data through Security Lake, the same steps can be performed to share any data—including Security Hub findings in Amazon S3—according to OU. You need to ensure any tables you want to share contain an AWS account ID column and that the tables are managed by Lake Formation.
Prerequisites
This solution assumes you have:
- Followed the previous posts in this series and understand how Security Lake, Lake Formation, and QuickSight work together.
- Enabled Security Lake across your organization and have set up a delegated administrator account.
- Configured Security Hub across your organization and have enabled the AWS FSBP standard.
Example organization
AnyCorp Inc, a fictional organization, wants to provide security compliance dashboards to its two subsidiaries, ExampleCorpEast and ExampleCorpWest, so that each only has access to data for their respective companies.
Each subsidiary has an OU under AnyCorp’s organization as well as multiple nested OUs for each line of business they operate. ExampleCorpEast and ExampleCorpWest have their own security teams and each operates a security tooling AWS account and uses QuickSight for visibility of security compliance data. AnyCorp has implemented Security Lake to centralize the collection and availability of security data across their organization and has enabled Security Hub and the AWS FSBP standard across every AWS account.
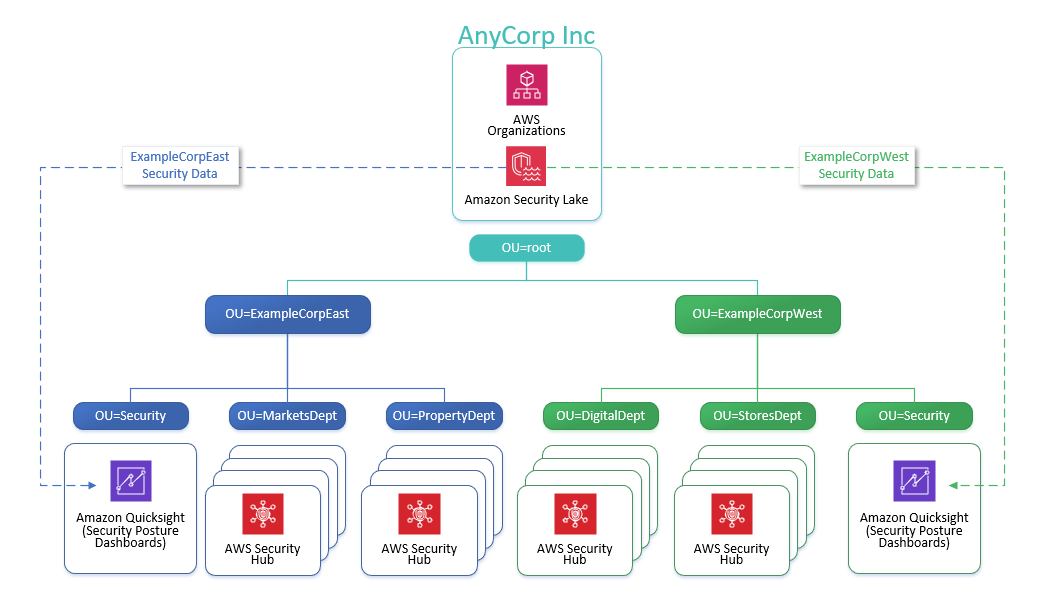
Figure 1: Overview of AnyCorp Inc OU structure and AWS accounts
Note: Although this post describes a fictional OU structure to demonstrate the grouping and distribution of security data, you can substitute your specific OU and AWS account details and achieve the same results.
Logical architecture
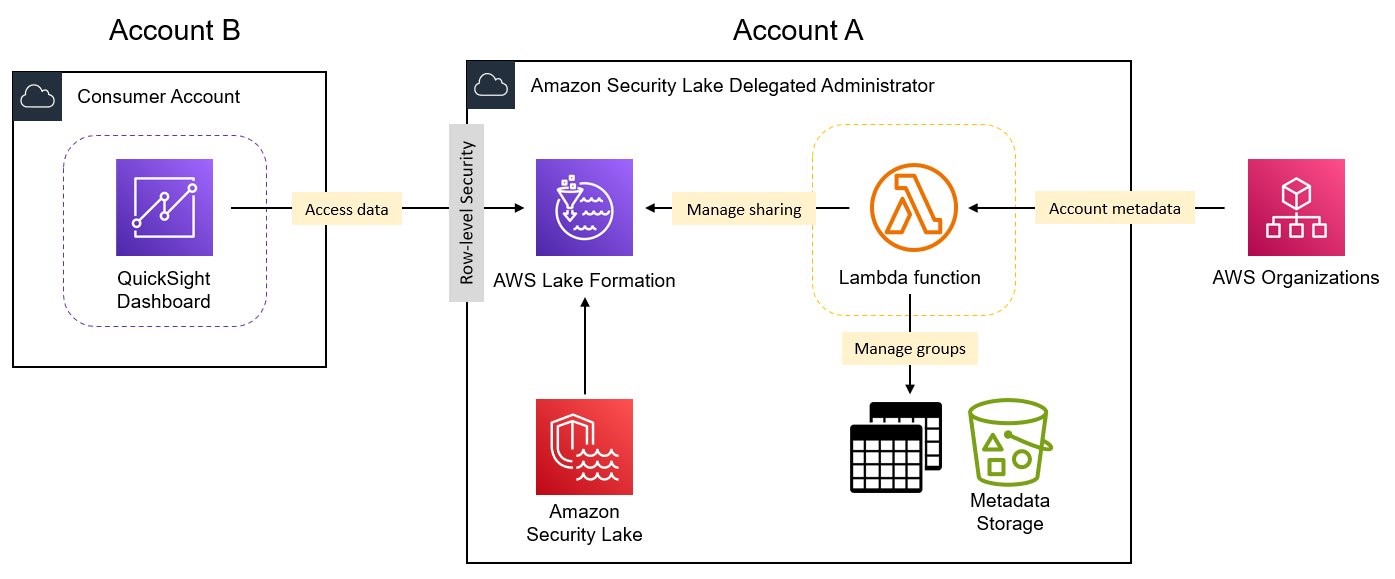
Figure 2: Logical overview of solution components
The solution includes the following core components:
- An AWS Lambda function is deployed into the Security Lake delegated administrator account (Account A) and extracts AWS account metadata for grouping Security Lake data and manages secure sharing through Lake Formation.
- Lake Formation implements row-level security using data filters to restrict access to Security Lake data to only records from AWS accounts in a particular OU. Lake Formation also manages the grants that allow consumer AWS accounts access to the filtered data.
- An Amazon Simple Storage Service (Amazon S3) bucket is used to store metadata tables that the solution uses. Apache Iceberg tables are used to allow record-level updates in S3.
- QuickSight is configured within each data consumer AWS account (Account B) and is used to visualize the data for the AWS accounts within an OU.
Deploy the solution
You can deploy the solution through either the AWS Management Console or the AWS Cloud Development Kit (AWS CDK).
To deploy the solution using the AWS Management Console, follow these steps:
- Download the CloudFormation template.
- In your Amazon Security Lake delegated administrator account (Account A), navigate to create a new AWS CloudFormation stack.
- Under Specify a template, choose Upload a template file and upload the file downloaded in the previous step. Then choose Next.
- Enter RowLevelSecurityLakeStack as the stack name.
The table names used by Security Lake include AWS Region identifiers that you might need to change depending on the Region you’re using Security Lake in. Edit the following parameters if required and then choose Next.
- MetadataDatabase: the name you want to give the metadata database.
- Default: aws_account_metadata_db
- SecurityLakeDB: the Security Lake database as registered by Security Lake.
- Default: amazon_security_lake_glue_db_ap_southeast_2
- SecurityLakeTable: the Security Lake table you want to share.
- Default: amazon_security_lake_table_ap_southeast_2_sh_findings_1_0
- MetadataDatabase: the name you want to give the metadata database.
- On the Configure stack options screen, leave all other values as default and choose Next.
- On the next screen, navigate to the bottom of the page and select the checkbox next to I acknowledge that AWS CloudFormation might create IAM resources. Choose Submit.
The solution takes about 5 minutes to deploy.
To deploy the solution using the AWS CDK, follow these steps:
- Download the code from the row-level-security-for-amazon-security-lake GitHub repository, where you can also contribute to the sample code. The CDK initializes your environment and uploads the Lambda assets to Amazon S3. Then, deploy the solution to your account.
- For a CDK deployment, you can edit the same Region identifier parameters discussed in the CloudFormation deployment option by editing the cdk.context.json file and changing the metadata_database, security_lake_db, and security_lake_table values if required.
- While you’re authenticated in the Security Lake delegated administrator account, you can bootstrap the account and deploy the solution by running the following commands:
cdk bootstrap
cdk deploy
Configuring the solution in the Security Lake delegated administrator account
After the solution has been successfully deployed, you can review the OUs discovered within your organization and specify which consumer AWS accounts (Account B) you want to share OU data with.
To specify AWS accounts to share OU security data with, follow these steps:
- While in the Security Lake delegated administrator account (Account A), go to the Lake Formation console.
- To view and update the metadata discovered by the Lambda function, you first must grant yourself access to the tables where it’s stored. Select the radio button for aws_account_metadata_db. Then, under the Action dropdown menu, select Grant.
- On the Grant data permissions page, under Principals, select the IAM users and roles dropdown and select the IAM role that you are currently logged in as.
- Under LF-Tags or catalog resources, select the Tables dropdown and select All tables.
- Under Table permissions, select Select, Insert, and Alter. These permissions let you view and update the data in the tables.
- Leave all other options as default and choose Grant.
- Now go to the AWS Athena console.
- On the left side, select aws_account_metadata_db> as the Database. You will see aws_account_metadata and ou_groups >as tables within the database.
- To view the OUs available within your organization, paste the following query into the Athena query editor window and choose Run.
- Next, you must specify an AWS account you want to share an OU’s data with. Run the following SQL query in Athena and replace <AWS account Id> and <OU to assign> with values from your organization:
- Repeat this process for each OU you want to assign different AWS accounts to.
- You can confirm that changes have been applied by running the Athena query from Step 3 again.
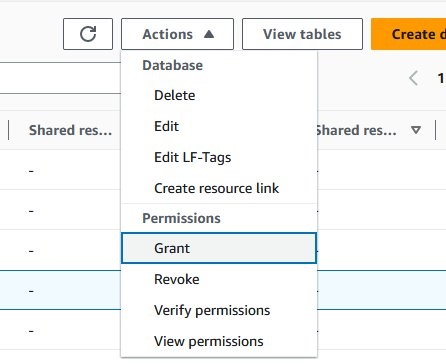
Figure 3: Creating a grant for your IAM role
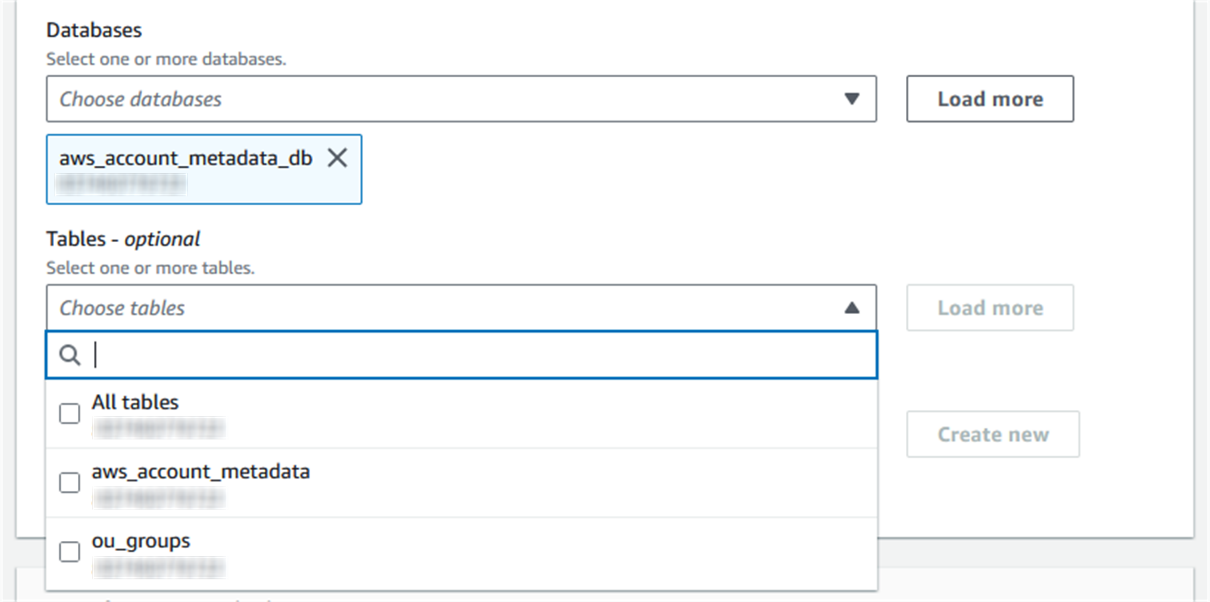
Figure 4: Choosing All Tables for the grant
Note: To use Athena for queries you must configure an S3 bucket to store query results. If this is the first time Athena is being used in your account, you will receive a message saying that you need to configure an S3 bucket. To do this, select the Edit settings button in the blue information notice and follow the instructions.

Figure 5: List of tables under the aws_accounts_metadata_db database
In the example organization, all ExampleCorpWest security data is shared with AWS account 123456789012 (Account B) using the following SQL query:
Note: You must specify the full OU path beginning with OU=root.
Note: You can only assign one AWS account ID to each OU group
You should see the AWS account ID you specified next to your OU.
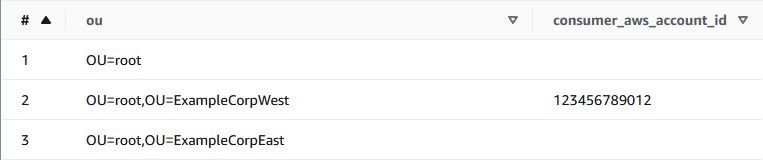
Figure 6: Consumer AWS account listed against ExampleCorpWest OU
Invoke the Lambda function manually
By default, the Lambda function is scheduled to run hourly to monitor for changes to AWS account metadata and to update Lake Formation sharing permissions (grants) if needed. To perform the remaining steps in this post without having to wait for the hourly run, you must manually invoke the Lambda function.
To invoke the Lambda function manually, follow these steps:
- Open the AWS Lambda console.
- Select the RowLevelSecurityLakeStack-* Lambda function.
- Under Code source, choose Test.
- The Lambda function doesn’t take any parameters. Enter rl-sec-lake-test as the Event name and leave all other options as the default. Choose Save.
- Choose Test again. The Lambda function will take approximately 5 minutes to complete in an environment with less than 100 AWS accounts.
After the Lambda function has finished, you can review the data cell filters and grants that have been created in Lake Formation to securely share Security Lake data with your consumer AWS account (Account B).
To review the data filters and grants, follow these steps:
- Open the Lake Formation console.
- In the navigation pane, select Data filters under Data catalog to see a list of data cells filters that have been created for each OU that you assigned a consumer AWS account to. One filter is created per table. Each consumer AWS account is granted restricted access to the aws_account_metadata table and the aggregated Security Lake table.
- Select one of the filters in the list and choose Edit. Edit data filter displays information about the filter such as the database and table it’s applied to, as well as the Row filter expression that enforces row-level security to only return rows where the AWS account ID is in the OU it applies to. Choose Cancel to close the window.
- To see how the filters are used to grant restricted access to your tables, select Data lake permission under Permissions from navigation pane. In the search bar under Data permissions, enter the AWS account ID for your consumer AWS account (Account B) and press Enter. You will see a list of all the grants applied to that AWS account. Scroll to the right to see a column titled Resource that lists the names of the data cell filters you saw in the previous step.

Figure 7: Viewing data filters in Lake Formation
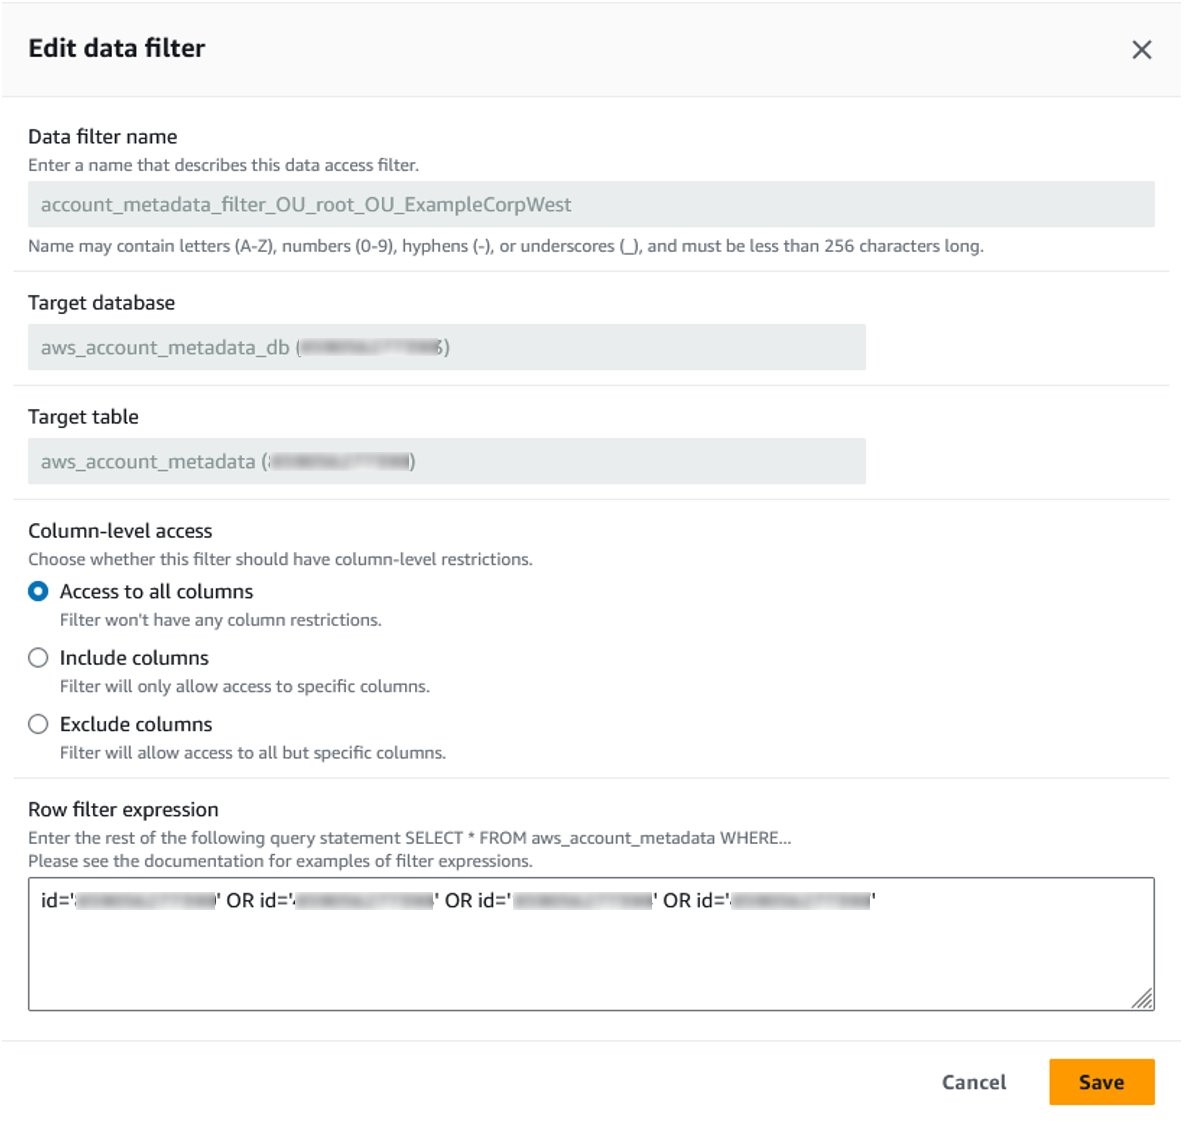
Figure 8: Details of a data filter showing row filter expression

Figure 9: Grants to the data consumer account for data filters
You can now move on to setting up the consumer AWS account.
Configuring QuickSight in the consumer AWS account (Account B)
Now that you’ve configured everything in the Security Lake delegated administrator account (Account A), you can configure QuickSight in the consumer account (Account B).
To confirm you can access shared tables, follow these steps:
- Sign in to your consumer AWS account (also known as Account B).
- Follow the same steps as outlined in this previous post to accept the AWS Resource Access Manager invitation, create a new database, and create resource links for the aws_account_metadata and amazon_security_lake_table_<region>_sh_findings_1_0 tables that have been shared with your consumer AWS account. Make sure you create resource links for both tables shared with the account. When done, return to this post and continue with step 3.
- [Optional] After the resource links have been created, test that you’re able to query the data by selecting the radio button next to the aws_account_metadata resource link, select Actions, and then select View data under Table. This takes you to the Athena query editor where you can now run queries on the shared tables.
- In the Editor configuration, select AwsDataCatalog from the Data source options. The Database should be the database you created in the previous steps, for example security_lake_visualization. After selecting the database, copy the SQL query that follows and paste it into your Athena query editor, and choose Run. You will only see rows of account information from the OU you previously shared.
- Next, to enrich your Security Lake data with the AWS account metadata you need to create an Athena View that will join the datasets and filter the results to only return findings from the AWS Foundational Security Best Practices Standard. You can do this by copying the below query and running it in the Athena query editor.
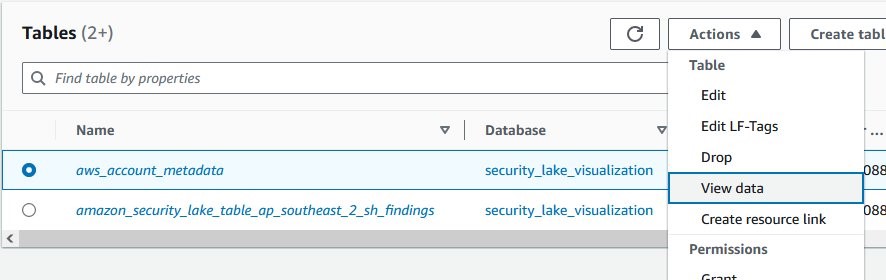
Figure 10: Selecting View data in Lake Formation to open Athena
Note: To use Athena for queries you must configure an S3 bucket to store query results. If this is the first time using Athena in your account, you will receive a message saying that you need to configure an S3 bucket. To do this, choose Edit settings in the blue information notice and follow the instructions.
The SQL above performs a subquery to find only those findings in the Security Lake table that are from the AWS FSBP standard and then joins those rows with the aws_account_metadata table based on the AWS account ID. You can see it has created a new view listed under Views containing enriched security data that you can import as a dataset in QuickSight.
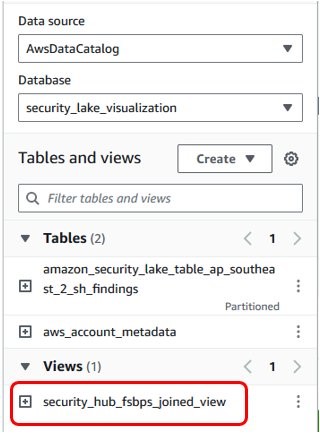
Figure 11: Additional view added to the security_lake_visualization database
Configuring QuickSight
To perform the initial steps to set up QuickSight in the consumer AWS account, you can follow the steps listed in the second post in this series. You must also provide the following grants to your QuickSight user:
| Type | Resource | Permissions |
| GRANT | security_hub_fsbps_joined_view | SELECT |
| GRANT | aws_metadata_db (resource link) | DESCRIBE |
| GRANT | amazon_security_lake_table_<region>_sh_findings_1_0 (resource link) | DESCRIBE |
| GRANT ON TARGET | aws_metadata_db (resource link) | SELECT |
| GRANT ON TARGET | amazon_security_lake_table_<region>_sh_findings_1_0 (resource link) | SELECT |
To create a new dataset in QuickSight, follow these steps:
- After your QuickSight user has the necessary permissions, open the QuickSight console and verify that you’re in same Region where Lake Formation is sharing the data.
- Add your data by choosing Datasets from the navigation pane and then selecting New dataset. To create a new dataset from new data sources, select Athena.
- Enter a data source name, for example security_lake_visualization, leave the Athena workgroup as [ primary ]. Then choose Create data source.
- The next step is to select the tables to build your dashboards. On the Choose your table prompt, for Catalog, select AwsDataCatalog. For Database, select the database you created in the previous steps, for example security_lake_visualization. For Table, select the security_hub_fsbps_joined_view you created previously and choose Edit/Preview data.
- You will be taken to a screen where you can preview the data in your dataset.
- After you confirm you’re able to preview the data from the view, select the SPICE radio button in the bottom left of the screen and then choose PUBLISH & VISUALIZE.
- You can now create analyses and dashboards from Security Hub AWS FSBP standard findings per OU and filter data based on business dimensions available to you through OU structure and account tags.
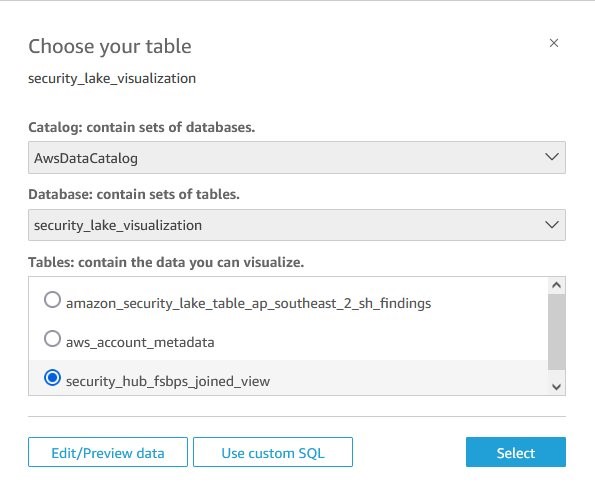
Figure 12 – Choosing the joined dataset in QuickSight

Figure 13: Previewing data in QuickSight
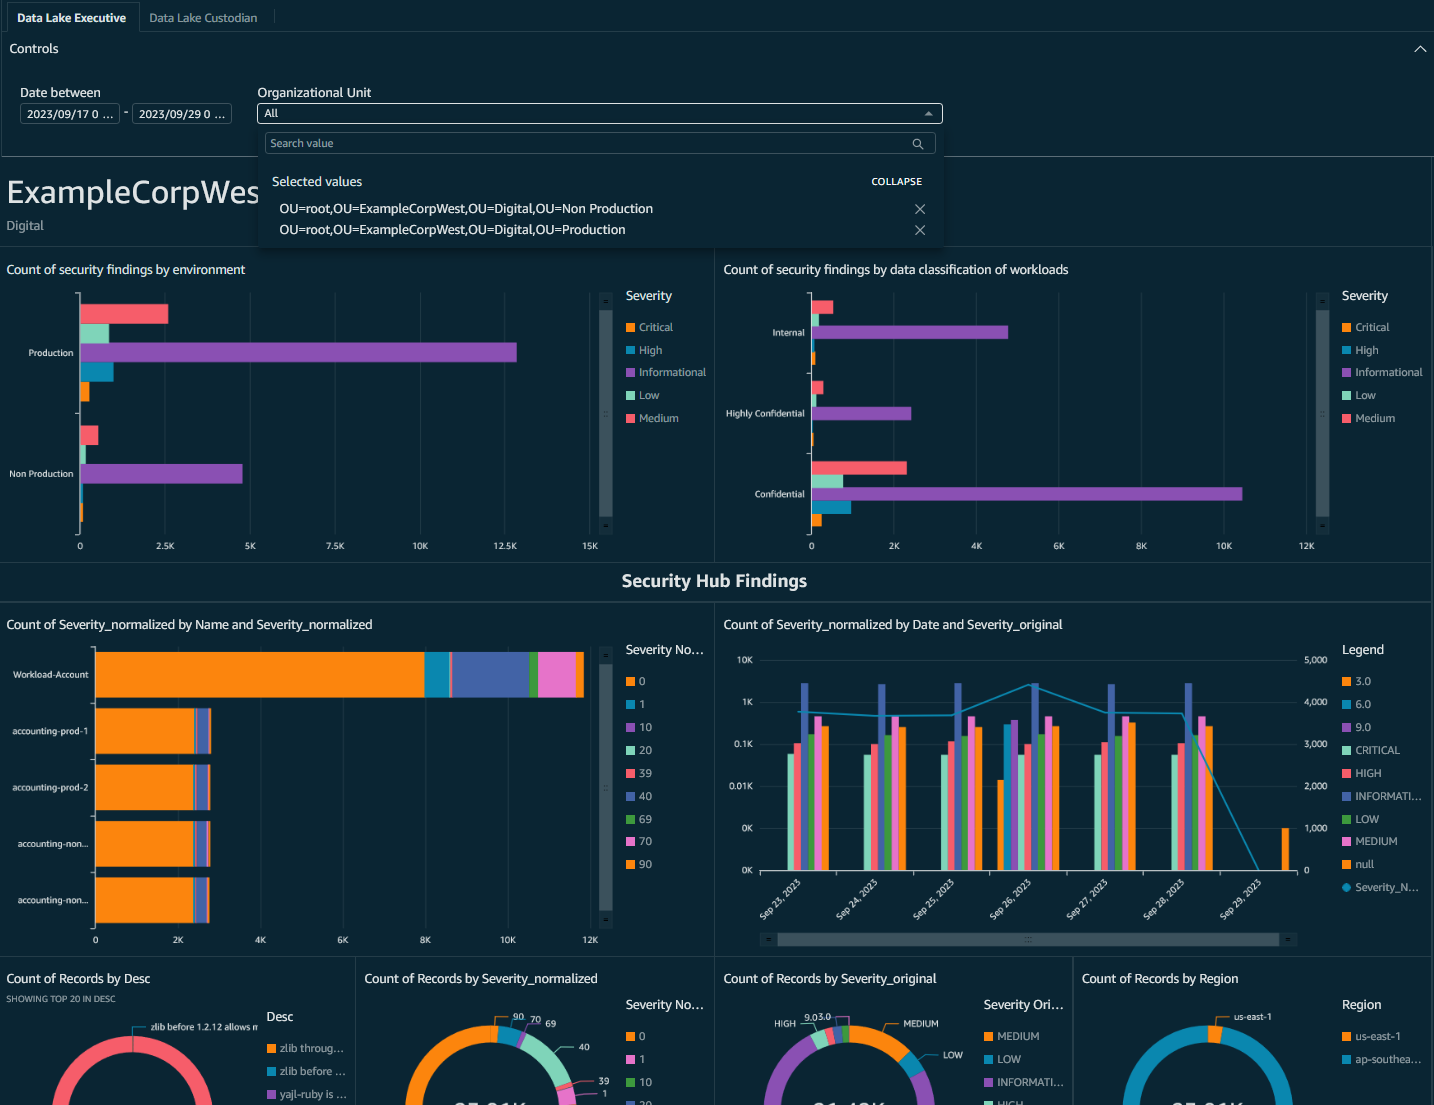
Figure 14: QuickSight dashboard showing only ExampleCorpWest OU data and incorporating business dimensions
Clean up the resources
To clean up the resources that you created for this example:
- Sign in to the Security Lake delegated admin account and delete the CloudFormation stack by either:
- Using the CloudFormation console to delete the stack, or
- Using the AWS CDK to run cdk destroy in your terminal. Follow the instructions and enter y when prompted to delete the stack.
- Remove any data filters you created by navigating to data filters within Lake Formation, selecting each one and choosing Delete.
Conclusion
In this final post of the series on visualizing Security Lake data with QuickSight, we introduced you to using a tool—available from AWS Samples—to extract OU structure and account metadata from your organization and use it to securely share Security Lake data on a per-OU basis across your organization. You learned how to enrich Security Lake data with account metadata and use it to create row-level security controls in Lake Formation. You were then able to address a common example of distributing security posture measured by the AWS Foundational Security Best Practices standard as part of AWS Security Hub.
If you have feedback about this post, submit comments in the Comments section below. If you have questions about this post, contact AWS Support.