AWS Security Blog
Simplify management of Network Firewall rule groups with VPC managed prefix lists
In this blog post, we will show you how to use managed prefix lists to simplify management of your AWS Network Firewall rules and policies across your Amazon Virtual Private Cloud (Amazon VPC) in the same AWS Region.
AWS Network Firewall is a stateful, managed, network firewall and intrusion detection and prevention service for your Amazon VPC. With Network Firewall, you can filter inbound and outbound traffic to or from internet gateways; AWS Direct Connect gateways; AWS PrivateLink, AWS Site-to-Site VPN, and AWS Client VPN gateways; NAT gateways; and even between other attached VPCs and subnets.
You can use Network Firewall to help prevent your VPC from accessing unauthorized domains, to block IP addresses, and to perform deep packet inspection or protocol filtering. However, it can be time consuming to update your firewall’s rule groups to add, remove, or modify the list of IP addresses across multiple Network Firewall instances that can be deployed in distributed, centralized, or combined deployment models.
With prefix lists, you can group one or more CIDR blocks into a single object. Therefore, you can group IP addresses that you frequently use in a prefix list, and reference this list in Network Firewall rule groups. With this approach, you don’t need to update individual firewall rules when scaling the network to add new IP addresses, and the Network Firewall rule groups that reference the prefix list are automatically updated.
In this post, we will show you how to build an example configuration in your test environment that uses customer-managed prefix lists in a Network Firewall rule group.
Note: This configuration will incur costs as described at AWS Network Firewall pricing.
Prerequisites
For this walkthrough, make sure that you have the following prerequisites in place:
- An AWS account with required permissions. If you don’t have an account, create and activate one.
- A VPC with at least three subnets.
- Your CIDR blocks grouped with managed prefix lists.
Solution overview
In this post, we will show you how to create a simple architecture in a VPC to create three different VPC prefix lists for private and public subnets and provide protection by restricting traffic flow to the firewall subnet. Then you will create a stateful Network Firewall rule group to include IP set references that are mapped to VPC prefix lists. Figure 1 illustrates the architecture of a protected VPC.
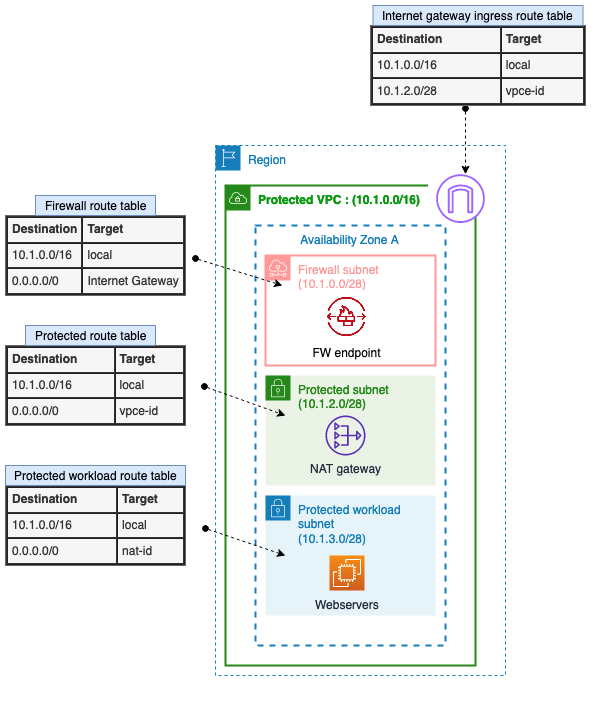
Figure 1: Simple architecture of a protected VPC
In this example, the following three subnets are in the protected VPC:
- Firewall subnet: 10.1.0.0/28
This subnet is dedicated for use by Network Firewall. The Network Firewall endpoint is deployed into a dedicated subnet of the VPC. - Public subnet (protected subnet): 10.1.2.0/28
The resources are designed to be internet-facing, so this subnet needs to communicate with the internet gateway. The NAT gateway and load balancer are also hosted on this subnet. - Private subnet (protected workload subnet): 10.1.3.0/28
This is the subnet where you host your private workload that doesn’t accept incoming traffic from the internet (in our example, this is the webservers). The private workload can send requests to the internet through the NAT gateway.
Deploy the CloudFormation template
The following AWS CloudFormation template deploys a network firewall and related resources in a distributed architecture across two Availability Zones. In production, AWS recommends that you use multiple Availability Zones to help ensure high availability and improve fault tolerance. To simplify the instructions, we will focus on a single Availability Zone for this blog post.
To deploy the CloudFormation template
- Choose the following Launch Stack button.

Launch the CloudFormation template in the Region of your choice. Make sure that the Region that you choose supports Network Firewall. Select the Availability Zone or Zones to be used for this deployment, and leave the rest of the options as default.
Create the VPC prefix lists
In this section, we will show you how to define your requirements and implement them within Network Firewall to only enable Secure Shell (SSH) traffic from a trusted IP range (an authorized public subnet on the protected VPC) to the private subnet. We will also show you how to block Internet Control Message Protocol (ICMP) traffic from another IP range (with CIDR 10.0.1.0/24).
You will create the following VPC prefix lists:
- Public-ip-list — includes the protected subnet: 10.1.2.0/28
- Private-deny-list — includes a CIDR block from the other VPC: 10.0.1.0/24
- Private-allow-list — includes the protected workload subnet: 10.1.3.0/28
To create the VPC prefix lists
- Open the Amazon VPC console and choose Managed prefix lists.
- Choose Create prefix list, and then do the following, as shown in Figure 2:
- For Prefix list name, enter a name for the prefix list. In our example, the name is Public-ip-list.
- For Max entries, enter the maximum number of entries for the prefix list. In our example, this number is 10.
- For Address family, select the prefix list that supports IPv4 entries.
Note: Network Firewall currently supports only references to IPv4 prefix lists.
- For Prefix list entries, choose Add new entry, and then enter the CIDR block and a description for the entry. In our example, the CIDR block is 10.1.2.0/28.
- Choose Create prefix list.

Figure 2: Example of managed prefix lists
- Repeat the preceding steps for the two remaining prefix lists: Private-deny-list and Private-allow-list.
When you’ve finished creating the prefix lists, you can view them under Managed prefix lists, as shown in Figure 3.
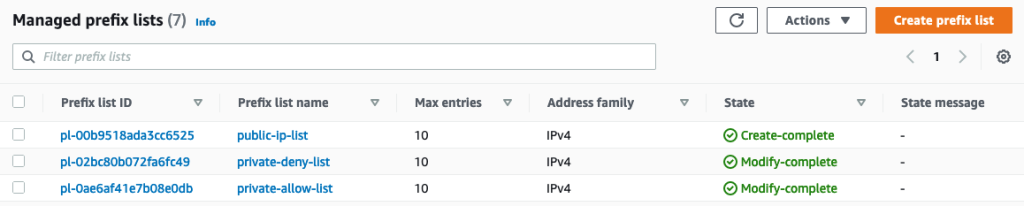
Figure 3: Example of VPC prefix lists
Create a Network Firewall rule group
The next step is to create a Network Firewall rule group. A Network Firewall rule group is a reusable set of criteria for inspecting and handling network traffic. As part of this configuration, we will take advantage of customer-managed VPC prefix lists as a variable to simplify the management of the rules.
To create a Network Firewall rule group
- In the Amazon VPC console, in the left navigation pane, choose Network Firewall rule groups.
- From the Rule groups tab, select Create Network Firewall rule group, and then do the following, as shown in Figure 4:
- For Rule group type, select Stateful rule group.
- For Name, enter your network firewall rule group.
- For Capacity, enter 25 or another appropriate value.
- For Stateful rule group options, select 5-tuple.
- Under Stateful rule order, select Default.

Figure 4: Network Firewall rule group
- In the IP set references section, do the following, as shown in Figure 5:
- For IP set preference variable name, enter new variable names for each of your VPC prefix lists.
- From the IP set resource ID dropdown, select an IP set.
In this example, you are creating three IP set references that are mapped to the VPC prefix lists that you configured in the previous sections, as shown in the following table.
IP set references variable name Mapped VPC prefix list name to IP set references CIDR block IP_list_Allow_ssh_subnets public-ip-list 10.1.2.0/28 IP_list_Private_Deny private-deny-list 10.0.1.0/24 IP_list_private_subnets private-allow-list 10.1.3.0/28 
Figure 5: Example of IP set references
- In the Add rule section, do the following, as shown in Figure 6:
- Select the protocol.
- For Source, select Custom and then enter the IP set reference variable name for the source IP address with the following format: <@Your_ip_set_reference_name>. In our example, the name is @IP_list_Allow_ssh_subnets.
- For Source port, select Custom and enter the appropriate port number.
- For Destination, choose Custom and then enter the IP set reference variable name for the destination IP address with the following format: <@Your_ip_set_reference_name>. In our example, the name is @IP_list_Private_subnets.
- For Destination port, choose Custom and enter the appropriate port number.
- For Traffic direction, select Any.
- For Action, select Pass.
- Choose Add rule.

Figure 6: Example of a Network Firewall rule group with custom IP set references
- For the next set of rules, repeat the preceding steps and choose the appropriate protocol, source, destination, traffic direction, and action, as shown in the following table.
Protocol Source Destination Source port Destination port Direction Action SSH @IP_list_Allow_ssh_subnets @IP_list_private_subnets 22 22 Forward Pass SSH Any @IP_list_private_subnets Any 22 Forward Drop ICMP @IP_list_Private_Deny Any Any Any Forward Drop After completion, you will have a set of stateful rules, as shown in Figure 7.

Figure 7: Example list of Network Firewall rules
Congratulations! You have configured Network Firewall rule groups by using VPC prefix lists for a simplified management to allow SSH traffic only from authorized subnets and to deny ICMP traffic from unauthorized subnets.
For the next steps, you can test your configuration by trying to use protocols such as SSH or ICMP from unauthorized subnets to your private subnets and reviewing the behavior. You can also test your configuration by doing the same from authorized subnets and comparing the results. Furthermore, you can create logging and monitoring solutions in Network Firewall to review the dropped or allowed packets from your Network Firewall log groups in CloudWatch Logs or use contributor insights to analyze Network Firewall logs.
Clean up the resources
To clean up the resources that you created for this walkthrough, do the following:
- Remove all subnet associations from the route tables.
- Delete Network Firewall policies, rule groups, and IP set preferences.
- Delete the network firewall.
- Delete VPC prefix lists.
- Delete your subnets.
- Delete the route tables.
- Delete the VPC.
- Delete the CloudFormation stack (if you created your environment through CloudFormation).
Conclusion
In this post, you learned how to use Amazon VPC managed prefix lists to simplify management of IP addresses within Network Firewall rule groups. IP set preferences that are mapped to your VPC prefix lists are a great tool to help simplify your firewall rules and reduce operational overhead and administration as you scale your network.
For information about pricing, see AWS Network Firewall pricing. For more information about managed prefix lists, see Work with customer-managed prefix lists. For more examples and use cases, see previous Network Firewall posts on the AWS Security Blog.
If you have feedback about this post, submit comments in the Comments section below. If you have questions about this post, start a new thread on the AWS Security, Identity, & Compliance re:Post or contact AWS Support.
Want more AWS Security news? Follow us on Twitter.