Artificial Intelligence
Use the Amazon SageMaker local mode to train on your notebook instance
September 2022: Post was reviewed for accuracy.
May 2021: Post was updated with a new sample notebook and resources to run processing, training, and inference with Amazon SageMaker local mode.
Amazon SageMaker is a flexible machine learning platform that allows you to more effectively build, train, and deploy machine learning models in production. Amazon SageMaker Python SDK supports local mode, which allows you to create estimators and deploy them to your local environment. This is a great way to test your deep learning scripts before running them in SageMaker’s managed training or hosting environments. Local Mode is supported for frameworks images (TensorFlow, MXNet, Chainer, PyTorch, and Scikit-Learn) and images you supply yourself.
The Amazon SageMaker training environment is managed. This means that it spins up instances, loads algorithm containers, brings in data from Amazon S3, runs code, outputs results to Amazon S3, and tears down the cluster, without you having to think about it. The ability to offload training to a separate multi-node GPU cluster is a huge advantage. Even though spinning up new hardware every time is good for repeatability and security, it can add friction when testing or debugging your algorithm code.
The Amazon SageMaker deep learning containers allow you to write TensorFlow, PyTorch or MXNet scripts as you typically would. However, now you deploy them to pre-built containers in a managed, production-grade environment for both training and hosting. Previously, these containers were only available within these Amazon SageMaker-specific environments. They’ve recently been open sourced, which means you can pull the containers into your working environment and use custom code built into the Amazon SageMaker Python SDK to test your algorithm locally, just by changing a single line of code. This means that you can iterate and test your work without having to wait for a new training or hosting cluster to be built each time. Iterating with a small sample of the dataset locally and then scaling to train on the full dataset in a distributed manner is common in machine learning. Typically this would mean rewriting the entire process and hoping not to introduce any bugs. The Amazon SageMaker local mode allows you to switch seamlessly between local and distributed, managed training by simply changing one line of code. Everything else works the same.
The local mode in the Amazon SageMaker Python SDK can emulate CPU (single and multi-instance) and GPU (single instance) SageMaker training jobs by changing a single argument in the TensorFlow, PyTorch or MXNet estimators. To do this, it uses Docker compose and NVIDIA Docker. It will also pull the Amazon SageMaker TensorFlow, PyTorch or MXNet containers from Amazon ECS, so you’ll need to be able to access a public Amazon ECR repository from your local environment. If you choose to use a SageMaker notebook instance as your local environment, this script will install the necessary prerequisites. Otherwise, you can install them yourself, and make sure you’ve upgraded to the latest version of the SageMaker Python SDK with pip install -U sagemaker.
Example use case
We have an example notebook showing how to use local mode with with PyTorch on the GitHub repo.
We will create a convolutional neural network model to train on the CIFAR-10 dataset, and we’ll do it entirely on an ml.c5.xlarge notebook instance. The same code we build here could easily transition to the Amazon SageMaker managed training environment, if we want it to run on multiple machines, or if we wanted to train on a recurring basis without managing any hardware.
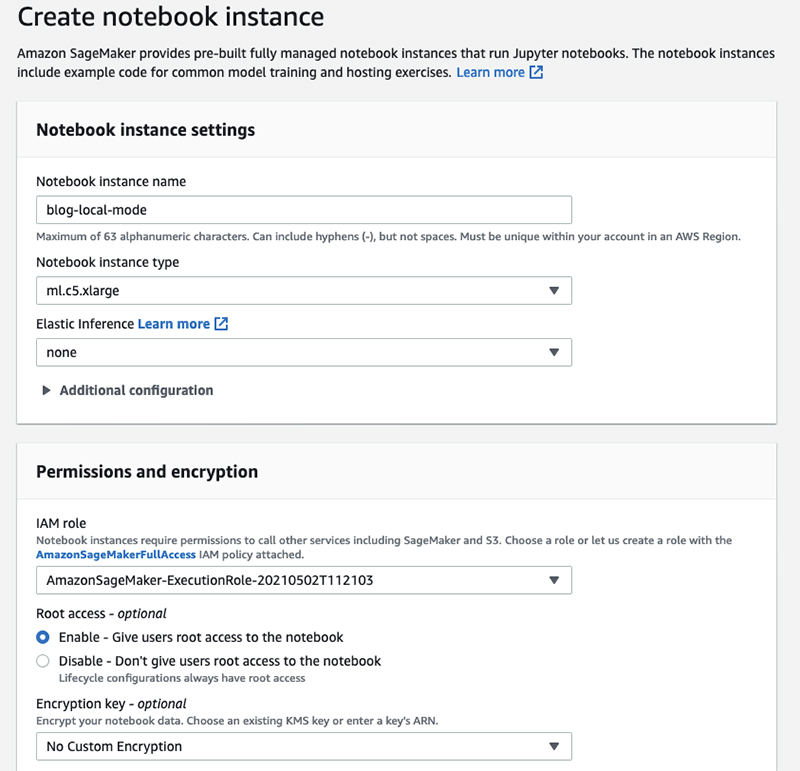
Let’s start by creating a new notebook instance. Log into the AWS Management Console, select the Amazon SageMaker service, and choose Create notebook instance from the Amazon SageMaker console dashboard to open the following page.
After the notebook instance is running, you can create a new Jupyter notebook and begin setting up. Or you can follow along with a predefined notebook here. We’ll skip some background in order to focus on local mode. If you’re new to deep learning, this blog post may be helpful in getting started. Or, see the other SageMaker example notebook, which fits MNIST dataset, but trains in the Amazon SageMaker managed training environment.
After you have the prerequisites installed, libraries loaded, and dataset downloaded, you’ll load the dataset to your Amazon S3 bucket. Note that even though we’re training locally, we’ll still access data from Amazon S3 to maintain consistency with SageMaker training.
Now, we’ll define our PyTorch estimator. The estimator points to the cifar10.py script, in source directory, that contains our network specification and train() function. It also supplies information about the job, such as the hyperparameters and IAM role. But, most importantly, it sets instance_type to 'local'. This is the only change required to switch from the SageMaker managed training environment to training entirely within the local notebook instance.
After training our estimator finishes, we can create and test our endpoint locally. Again, we’ll specify 'local' for the instance_type.
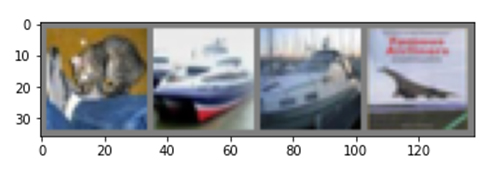
Now we can generate a few predictions to confirm that our inference code works. It’s a good idea to do this before deploying to a production endpoint, but you could also generate a few predictions for one-time model accuracy evaluation.
Our result should look similar to:
Predicted: cat car ship plane
Now that we’ve validated our training and inference script, we can deploy to the SageMaker managed environments to train at large scale or on a recurring basis, and to generate predictions from a real-time hosted endpoint.
But first, let’s clean-up the local endpoint, since only one endpoint can be running locally at a time.
You can shut down your notebook instance from the Amazon SageMaker console by navigating to the Notebook page and selecting Actions and Stop. This will avoid incurring any compute charges until you choose to start it back up. Or, you can delete your notebook instance by selecting Actions and Delete.
Conclusion
This blog post shows you how to use the Amazon SageMaker Python SDK local mode on a CPU notebook instance type to quickly test an image classification model on sample data. You can use local mode training to accelerate your test and debugging cycle today. Just make sure you have the latest version of the SageMaker Python SDK, install a few other tools, and change one line of code!
You can see full examples for how to process, train, and debug your training script with breakpoints, and serve on your local machine using Amazon SageMaker local mode for processing jobs, training and serving in the GitHub repo.
About the Author
 David Arpin is AWS’s AI Platforms Selection Leader and has a background in managing Data Science teams and Product Management.
 Eitan Sela is a Solutions Architect with Amazon Web Services. He works with AWS customers to provide guidance and technical assistance, helping them improve the value of their solutions when using AWS. Eitan also helps customers build and operate machine learning solutions on AWS. In his spare time, Eitan enjoys jogging and reading the latest machine learning articles.