AWS Partner Network (APN) Blog
Adding F5 BIG-IP Virtual Edition Load Balancing for Container Network Functions in Amazon EKS
By Kostas Skenderidis, Solutions Architect – F5
By Mark Rosche, Sr. Solutions Architect – F5
By Rolando Hilvano, Sr. Solutions Architect – AWS
By Young Jung, Principal Solutions Architect – AWS
 |
| F5 |
 |
While Kubernetes (or K8s) has become the de facto environment for container-based microservice applications for enterprises, this powerful and agile deployment of containerized applications was not designed for equal efficiency for telecommunication service providers at scale in its default configuration.
This is why in this post we’ll focus on optimizing container-based network functions (CNFs), which are also called cloud-native network functions, with Amazon Elastic Kubernetes Service (Amazon EKS).
Because Amazon EKS is a fully managed Kubernetes service that provides turnkey, highly available, scalable, secure, and tight integration to other AWS services, it enables telecom industry-specific container applications—such as 5G Core, RAN, and IMS Network functions—within the AWS environment. As a result, implementation of CNFs on Amazon EKS has become a more popular choice for the telecom industry’s network transformation journey to the cloud.
When deploying a CNF on Amazon EKS, a LoadBalancer Ingress is to be addressed from outside the cluster for the traffic exchange to ensure scalability and high availability of the exposed services. In some specific telco use cases, Layer 4 LoadBalancer Ingress is required for the CNF, especially when it has to be deployed in the edge site on AWS Outposts. In other cases, specific protocol support such as Stream Control Transport Protocol (SCTP) would be required for EKS integration regardless of the AWS region or Outpost environment.
Network Load Balancer doesn’t meet the requirements for the above scenario at the time of publishing, which is where the F5 BIG-IP Virtual Edition (VE) load balancer comes in. The BIG-IP VE deployment adds new Layer 4 application capabilities and added visibility to those applications inside the EKS cluster to ensure a successful deployment in a containerized environment.
This post presents a step-by-step guide for using the F5 BIG-IP VE on Amazon Web Services (AWS) as a load balancer for the Amazon EKS cluster by using additional components, including the F5 Container Ingress Service (CIS) and F5 IPAM Controller (FIC).
F5 is an AWS Networking Competency Partner that gives the world’s largest businesses, service providers, governments, and consumer brands the freedom to securely deliver every app, anywhere—with confidence.
Solution Overview
The basic building blocks for the solution are composed of the F5 BIG-IP load balancer, which can be downloaded from AWS Marketplace, and additional container controllers such as the F5 CIS and FIC.
CIS monitors the kubeapi and translates kubeapi calls to signal the proper BIG-IP configuration. FIC helps to assign service exposure IP to the cluster and BIG-IP.

Figure 1 – Reference architecture for F5 BIG-IP with Amazon EKS.
In general, BIG-IP and CIS provide two deployment options: NodePort and ClusterIP. NodePort mode, which relies on kubeproxy of Kubernetes, would generally be the easiest. Meanwhile, ClusterIP mode would be considered when you need direct communication between external node/client and pods inside of the cluster without having any network address translation (NAT), especially in some cases of CNF implementation.
ClusterIP mode requires the capability of the platform to provide direct communication between BIG-IP and pod, and therefore tunneling (VXLAN, for example) like an additional setup is generally required. However, in the EKS environment, the Amazon VPC Container Network Interface (CNI) provides direct VPC IP addresses to each pod, thus making direct communication between BIG-IP and each pod available without any tunneling.
In this post, we used this characteristic and opted to show ClusterIP mode as an example.
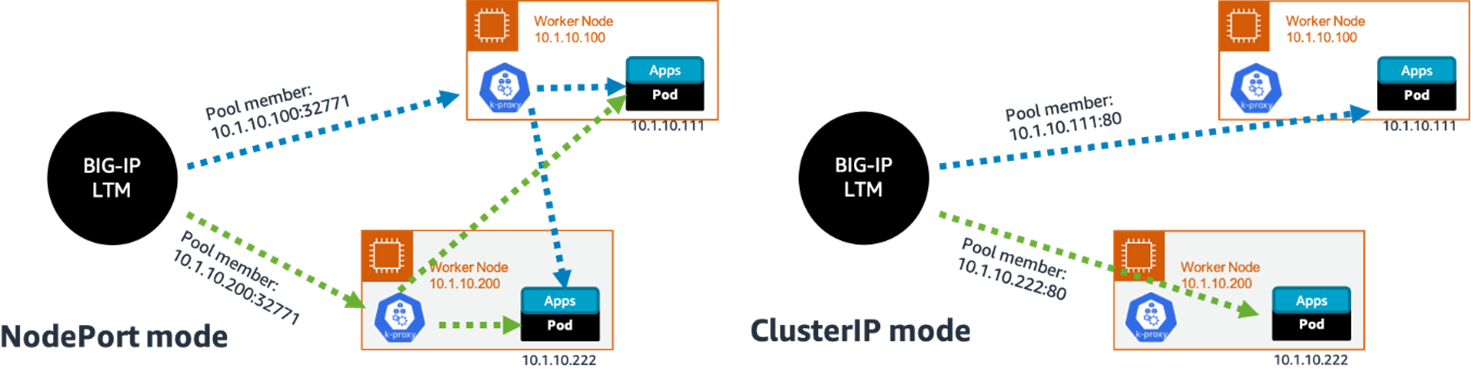
Figure 2 – BIG-IP deployment options.
Installation and Deployment Guide
We assume the user’s target VPC for CNF deployment has already been created and has proper public subnets and private subnet separation, as well as other VPC constructs (such as internet gateway (IGW), NAT gateway, and so on.
In the case of the region deployment of CNF, we can consider using multiple AWS Availability Zones (AZs) for hosting BIG-IP active/standby instances and EKS worker node groups to ensure high availability. We may also consider a single AZ-like environment in case of AWS Outposts deployments (please note that Outposts are an extension of an Availability Zone). This post focuses on an Outposts deployment.
In the example architecture, the subnet named “internal-subnet” is used for the EKS control plane (between EKS and worker nodes and in inter-worker node communication). It’s also used for BIG-IP management (between BIG-IP and CIS running inside of EKS cluster), as well as the data plane path between BIG-IP and worker nodes hosting target group pods.
On the other hand, “external-subnet” is only assigned to the F5 BIG-IP to expose services to the outside of the EKS cluster (both for intra-VPC and inter-VPC). The management subnet is for BIG-IP access management using Secure Shell (SSH) or via the graphical user interface.
Prerequisites
- Create a VPC, subnets, and EKS cluster similar to what is shown in the following reference architecture diagram. You can also find an example on GitHub, and for more information refer to this AWS blog post about open source mobile core network implementation on Amazon EKS.
- One subnet for external access.
- One subnet for internal (this is where you’ll launch the worker nodes, and this subnet will be used for K8s networking as well as BIG-IP LB to workers communication.
- One subnet for management access (SSH or GUI).
- Note that the external (or internal subnet) and management subnet should have a route to the internet (the external interface will be used to download installation packages). As shown in the previous reference architecture diagram, it’s recommended to use NAT gateway and proper security group implementation as the best practice for a secure worker nodes environment.
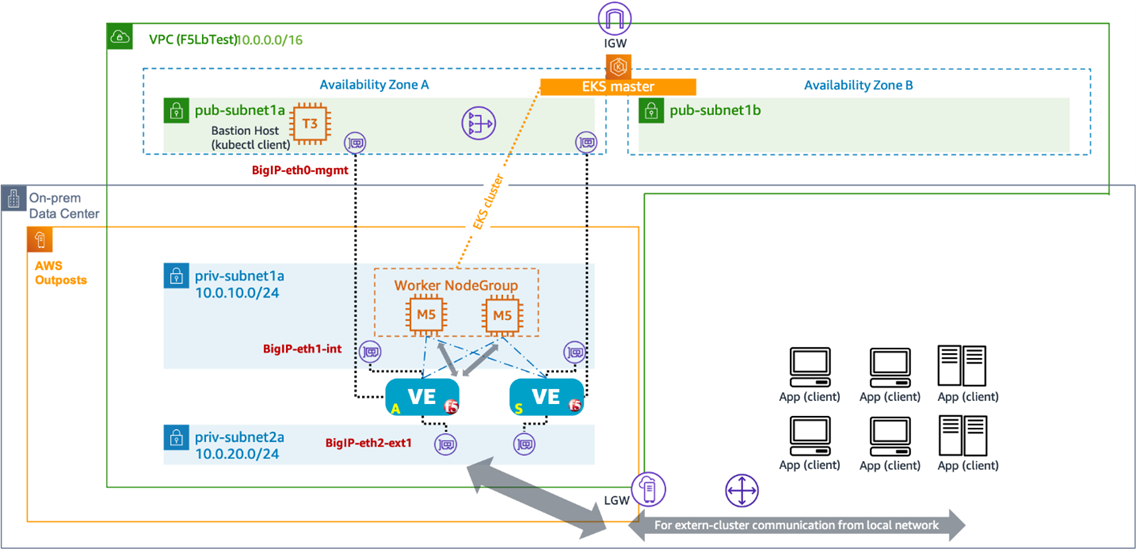
Figure 3 – BIG-IP for Amazon EKS as Layer4 load balancer in AWS Outposts.
- After the installation of Amazon EKS, we need the Amazon Elastic Block Store (Amazon EBS) CSI driver to be installed because F5 FIC requires a PVC volume. It can be installed either through an EKS add-on or manually. For installation of EBS CSI, refer to AWS user guide or another guiding article.
Run AWS CloudFormation for BIG-IP LE and Set Up Instances
- Run the AWS CloudFormation template from the F5 GitHub site. Under the Deploying the solution section, you can select the Launch Stack button, or put the Amazon Simple Storage Service (Amazon S3) template link directly in your CloudFormation console. Note that this stack creates two BIG-IP instances, one for active and the other for standby. It also automatically installs all other required extension packages such as Cloud Failover Extension (CFE) and Application Services 3 (AS3) inside of the BIG-IP instances.
- During the installation of the stack, you may refer to the following listed CloudFormation parameter settings as an example:
- “Mgmt Subnet” → pub-subnet1a
- “Public or External Subnet” → private-subnet2a
- “Private Subnet” → private-subnet1a
- Source Address → VPC CIDR and your host IP address from which you’ll sign in to BIG-IP GUI (if required)
- Source Address for HTTPS → same as step the second step above or your client IPs that will invoke the LB service IPs
- Configure the admin password at BIG-IP system (for K8s login). Ensure the security group, using the source address from Step 2, allows access from the bastion host. Then, sign in to BIG-IP from the bastion host. Remember or note down this password credential so you can pass this to the ConfigMap of CIS CRD.
- Sign in to BIG-IP management IP address (not EIP but ENI IP of management subnet).
- Bind the secondary service IP (which will float over the active and standby BIG-IP) for service exposure at the ENI of the external subnet to the current active BIG-IP. In this example, it is chosen as 10.0.20.6/32.
aws ec2 assign-private-ip-addresses --network-interface-id {eni-id-of-the external-interface} --private-ip-addresses 10.0.20.6
- If you want to disable SNAT at BIG-IP for client/source IP preservation, then you have to disable the Source/Destination IP Check flag at the Amazon Elastic Compute Cloud (Amazon EC2) instance of BIG-IP. To do this, follow EC2 > select BIG-IP instance > Action > Networking > Change source/destination check > Stop > Save. Note that this has to be done for both active and standby instances, respectively.
- If you disable SNAT and also want to make the request and response message be in a symmetric path (that is, the return message goes through the load balancer), then you have to set a proper route table at the internal subnet of BIG-IP.
If your client is sitting outside of the VPC (for example, 20.0.0.0/16 while BIG-IP VPC is using 10.0.0.0/16), then you have to add a route entry for “20.0.0.0/16 via eni-id of active BIG-IP in internal-subnet.” If your client is sitting inside of the same VPC with BIG-IP (but outside of the cluster), then we can use more specific routing to direct the return message to BIG-IP by adding a route entry of “10.0.20.0/24 via eni-id of active BIG-IP in internal-subnet.” Make sure the external subnet and internal subnet would have each its own routing table per subnet.

Figure 4 – Internal subnet route configuration for Amazon EKS worker nodes.
Configuring CFE for High Availability
- After setting up the BIG-IPs, you must provide configuration parameters for the CFE module to enable the active/standby BIG-IP to failover (by updating the service IP address as floating IP and updating the associated subnet route tables properly). This operation is done by the CFE module of BIG-IP using the information from resource tags that have already been created by the same CloudFormation stack. You only need to update a route-table resource Amazon Resource Name (ARN) in the policy created by the CloudFormation stack.
- Go to the Amazon EC2 console and select Instances. Select BIG-IP instance (any of Active or Standby), and then select the Security menu. Find the AWS Identity and Access Management (IAM) role that is bound to the instance and select the IAM hyperlink.
- In IAM, select the hyperlink of a policy named “BigipServiceDiscoveryPolicy,” and then select EC2. If you created BIG-IP using the steps in the previous section, you will receive two warnings in EC2 because you didn’t specify a route table resource as shown following screenshot.

Figure 5 – IAM BIG-IP policy after AWS CloudFormation stack creation.
-
- Select route-table and put your region and the route-table ID of the internal subnet.
- Select Resource and put the ARN of the internal subnet’s route table ID. An example ARN would be formed as:
arn:aws:ec2:us-east-1:34XXXXXXXXXX:route-table/rtb-0f86e48YYYYYYYYYYYY.
- Sign in to the BIG-IP active instance from your bastion host.
- Create a cfe.json file that contains the configuration of the current environment in the bash shell of the BIG-IP instance.
- You must update the f5_cloud_failover_label to reflect the stack name you used when you created the BIG-IPs using CFN.
- You must then update the scopingName of routeGroupDefinitions to the route table-id of your internal subnet. In the scopingAddressRanges, you can define the address range of the expected client.
In the following example, 10.0.20.0/24 is an external subnet of BIG-IP where the test client resides, and 10.0.10.116 and 10.0.10.153 are IPs of the internal subnet for active and standby BIG-IP. In this example, range=10.0.20.0/24 in the “failoverRoutes” is added as the configuration of more specific routing for the case when the client exists in the same virtual private cloud (VPC).
Note that “failoverAddresses” is not specified in the CFE configuration, which means that CFE will move any VirtualServer address defined in the BIG-IP during the failover (the VirtualServer address of EKS will be automatically floating to the active BIG-IP instance).
-
- Next, run this configuration to be given to CFE with the following curl command in the BIG-IP bash shell. It will give a return response starting with “message: success.”
Deploy CIS and FIC
- Create a credential for BIG-IP login (password should match the one we set in the previous section at the BIG-IP system directly).
kubectl create secret generic bigip-login -n kube-system --from-literal=username=admin --from-literal=password=[YOUR_PASSWORD]
- Download the CIS manifest files from aws-samples GitHub.
- Apply the CIS manifest such as CRD, Ingress Class, and RBAC definitions.
Kubectl apply -f cis-resource/
- Update bigip-url to be the management IP address (primary ENI IP) of BIG-IP active and standby instances at every -1 and -2 file. Note that you have to open the management interface security group with HTTPS from worker subnets (where the CIS pods are running).
Kubectl apply -f cis-deploy/
In this directory, there are ConfigMap and deployment files for each of active and standby BIG-IP instance. The ConfigMap file cis-ctlr-cfgmap-1.yaml contains the following configuration to install CIS to the EKS cluster.
The deployment file cis-ctlr-deployment-1.yaml works to download and install this CIS application to the EKS.
- FIC is an optional component to use BIG-IP for the EKS cluster, but it’s recommended to install it especially if you want to create Type=LoadBalancer Kubernetes service.
- Before installation of the FIC container, you must update ipam-deployment.yaml file under fic/directory. IP range in this file must be the one you already bound to the active BIG-IP external subnet ENI as a secondary IP in the previous step.
- In this example, you only bound one IP address (e.g., 10.0.20.6), and this IP address is given in the yaml file with the label of “sig.” If you have multiple network separation for the external network of load balancers, such as for the OAM network and Signaling network (either HTTP or UDP), then you can create different labels for the network.
- In this case, you should have multiple external subnets for BIG-IP that would require a slight change of the CloudFormation template.
Kubectl apply -f fic/
Creation of a Service for the EKS Cluster (Using type=Loadbalancer)
Now you are ready to use BIG-IP as a load balancer of the Amazon EKS cluster. You can create a Kubernetes service like the following example, and then (via kubeapi) CIS configures BIG-IP accordingly. For type=Loadbalancer, you will need to use aws-load-balancer-type: external annotation to prevent EKS from creating CLB.
Load balancer controller add-on is required to be able to use this annotation.
Creation of a Service for the EKS Cluster (Using a VirtualServer)
You may also create a VirtualServer to receive external traffic to the cluster using BIG-IP by implementing the following listed manifest example. If you use the VirtualServer approach, you may also implement client/source IP address preservation by disabling SNAT at BIG-IP.
Cleanup
To clean up any resources created as part of the walkthrough, you can go to CloudFormation in the AWS console and then delete the stack created for BIG-IP.
Further Considerations
In this post, we have explained all steps as manual configuration to give an insight into the overall installation procedure and the building blocks to make the integration between a redundant F5 BIG-IP Load Balancer pair and Amazon EKS cluster.
Once you understand the overall procedure, then you can create an automated pipeline for easier deployment through various AWS tools such as AWS CDK, AWS CodeCommit, and AWS CodePipeline, as well third-party tools such as Terraform.
As one last remark, load balancing for SCTP protocol is not covered in this post although it’s possible in this scenario by leveraging specific Configmap-based configurations.
.

.
F5 – AWS Partner Spotlight
F5 is an AWS Networking Competency Partner that gives the world’s largest businesses, service providers, governments, and consumer brands the freedom to securely deliver every app, anywhere—with confidence.