AWS Partner Network (APN) Blog
Building Secure and Private Data Flows Between AWS and Salesforce Using Amazon AppFlow
By Sophia Shramko, Sr. Product Manager Tech, AWS Insights and Enterprise Tools
By Michele Monclova, Sr. Manager of Product Management, AWS Insights and Enterprise Tools
By Venkatesh Krishnan, Product Lead, Integrations, AWS Insights and Enterprise Tools
 Amazon AppFlow is a fully managed no-code integration service enabling seamless and secure data flow between Amazon Web Services (AWS) and software-as-a-service (SaaS) applications. It allows you to source data from AWS services and SaaS applications such as Salesforce, and aggregate them in AWS data lakes and data warehouses to draw unique data-driven insights.
Amazon AppFlow also allows you to create triggers that move data automatically. It’s ideal for copying Salesforce data into Amazon Simple Storage Service (Amazon S3) for durable and low-cost backup of customer relationship management (CRM) data.
It also helps a sales operations manager who wants to ingest opportunity records from Salesforce into Amazon Redshift to combine it with data from different sources (such as billing systems, ERP, and marketing databases), and update their dashboard.
A Salesforce admin who wants to insert new lead records in Salesforce using campaign data stored in a comma separated values (CSV) file in Amazon S3 can also benefit from Amazon AppFlow.
Whatever the case may be, with Amazon AppFlow moving data back and forth between Salesforce and AWS is an easy and simple process that only takes a few minutes to set up. Amazon AppFlow can leverage the AWS PrivateLink connection to Salesforce so the data flow can be just as secure and private as moving data within the boundaries of your trusted network.
In this post, we will explain what Amazon AppFlow is and how it works. Then, we’ll show you how to set up Amazon AppFlow for Salesforce users. We’ll finish with two use cases, one for updating Amazon Redshift with new Salesforce contact information, and another for creating new Salesforce lead records using campaign data stored in S3.
Salesforce is an AWS Partner Network (APN) Advanced Technology Partner with the AWS DevOps Competency and AWS PrivateLink Service Delivery designation.
What is Amazon AppFlow and How Does it Work?
Amazon AppFlow is a simple, no-code, self-service tool that uses point-and-click configurations to move data easily and securely between various SaaS applications you commonly use in your business and AWS services.
It has built-in connection logic that can pull data from a supported source to a supported destination. The supported source and destination could be a SaaS application or an AWS service such as Amazon S3 or Amazon Redshift.
A “flow” describes how data is moved, including the source, destination, any information needed to authenticate user access to source or destination, flow triggers (on demand, events, or a schedule), and data processing tasks such as check-pointing, field validation, or masking.
When triggered, Amazon AppFlow executes a “flow run,” which calls APIs to get data from the source, runs data processing tasks, and transfers processed data to the destination.
How it Uses AWS PrivateLink
Amazon AppFlow leverages AWS PrivateLink, a framework that provides secure private connectivity between virtual private clouds (VPCs), AWS services, and on-premises applications on the AWS Cloud.
For example, customers can connect their Amazon VPCs to a Salesforce-managed VPC inside an AWS Region using AWS PrivateLink, ensuring the data does not get exposed to the public internet.
Amazon AppFlow provides the ability to create private flows with Salesforce orgs that have Salesforce Private Connect enabled, allowing the data transfers to stay entirely within the private network. This private connectivity is offered out of the box: simply choose the Create new connection with AWS PrivateLink option when creating the connection in Amazon AppFlow.
Amazon AppFlow automatically creates AWS PrivateLink endpoints on the fly for the data transfer, and deletes the endpoint when the transfer is complete.
How You Can Run Flows
You can run flows on demand, scheduled, or triggered by an event such as launching a campaign, converting a lead, closing an opportunity, or opening a case. You can also specify filters to narrow the records you transfer, add transformations to fields by specifying the formula, mask sensitive values in fields, and validate records before sending them to the destination. No coding is needed.
Amazon AppFlow leverages other AWS services, ensuring transaction integrity and scalable, secure, and accurate data flows. With Amazon AppFlow, there are no upfront charges or fees, and you only pay for the number of flows you run and the volume of data processed. For data transfers executed using Amazon AppFlow, you do not pay AWS Data Transfer fees.
How to Set Up Amazon AppFlow for Salesforce Users
The following procedure sets up Amazon AppFlow for users with certain versions of Salesforce and the proper permissions in their AWS account. For this walkthrough, we are using a Salesforce.com Developer Edition account. You can sign up for your own developer account at Salesforce.
Prerequisites
To access Salesforce from Amazon AppFlow, your Salesforce edition must provide API access. Salesforce Enterprise, Unlimited, Developer, and Performance editions provide API access. Professional or Essentials editions do not. Before proceeding, check the latest information on which editions provide API access.
Amazon AppFlow uses Salesforce Connected Apps to connect to your Salesforce org. Connected Apps is a framework that enables an external application (such as Amazon AppFlow) to integrate with Salesforce using APIs and standard protocols, such as SAML, OAuth, and OpenID Connect.
Connected Apps can be installed in all Salesforce editions. Your account should be enabled to allow Connected Apps to be installed. If not, contact your Salesforce admin.
Once you have met the prerequisites, follow these steps:
- Sign up for Amazon AppFlow.
- Create a Salesforce login connection in Amazon AppFlow.
- Enable Amazon AppFlow to access Salesforce.
Step 1: Sign up for Amazon AppFlow
If your organization is already using AWS, you can access Amazon AppFlow from AWS Console. If you are unable to access it, talk to your AWS administrator.
If your organization does not have an AWS account, follow these steps:
- Select the Get Started with Amazon AppFlow button on the Amazon AppFlow Page.
. - Sign up for an AWS account.
.
This step takes about 10 minutes. You are asked for your name, email, address, credit card, and phone number. You must have a valid phone number and credit card to complete the process.
. - Once you sign up, you are redirected to the Amazon AppFlow service page, and are automatically logged in as an admin user. You then have the option to add other users to your account.
You are now ready to create flows with Amazon AppFlow.
Step 2: Create a Salesforce Login Connection in Amazon AppFlow
Creating a login connection to Salesforce, or any other supported SaaS application, is a part of the flow creation. Once a new connection is established, it is saved under existing connections for future use. Follow these steps:
- On the Amazon AppFlow service page, select Create Flow.
A Specify flow details screen appears. The left navigation bar indicates your progress along the configuration steps.

- Under the Flow details portion of the screen, enter a name for your flow in the Flow name field. Select Next to advance to the Configure flow screen.
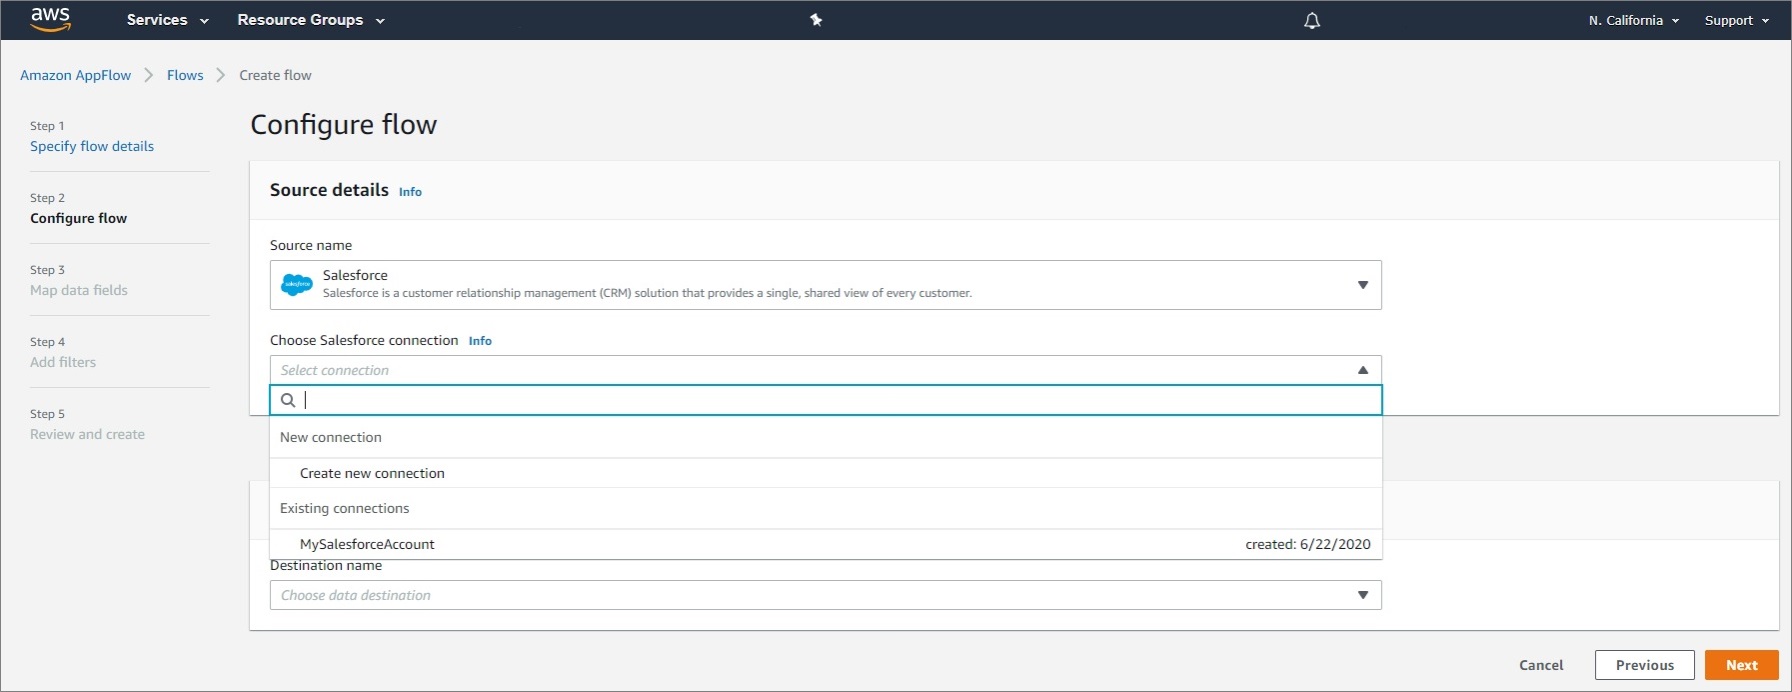
. - On the Configure flow screen, under Source name, select Salesforce from the pull-down menu.

- In the Choose Salesforce Connection field, select Create new connection from the pull-down menu to connect to your Salesforce account.
.
This new connection is saved for future use and appears under the Existing connections field.
- In the window that appears when you selected Create new connection, choose Production or Sandbox environment.

Note that a sandbox account has to be provisioned by a Salesforce administrator.
- Name the new connection, and select Continue to go to the Salesforce login window.
. - Select the username that is displayed, or log in with a different one.
. - Select Allow to allow Amazon AppFlow to access your Salesforce data.

Once you select Allow, your Salesforce objects and Salesforce events appear in your Amazon AppFlow account.

If you do not get connected or do not see objects in your account, follow the instructions in Step 3.
Step 3: Enable Amazon AppFlow to Access Salesforce
- Install the Amazon Applow Embedded Login App:
.
Go to your Salesforce account and navigate to Setup > Apps > Connected Apps > Connected Apps OAuth Usage.
 .
.
Select Amazon AppFlow Embedded Login App, and then click Install.
- Make sure you have the right App policies:
.
Navigate to Setup > Apps > Connected Apps > Connected Apps OAuth Usage.
.
Select Manage App Policies for the Amazon AppFlow Embedded Login App.
.
Under Oauth Policies, make sure Refresh token is valid until revoked is selected. If not, use Edit Policies to correct.

- If your Salesforce application enforces IP restrictions, make sure all Amazon AppFlow IP CIDR blocks are in the allowed list for your AWS Region.
.
AWS publishes its current IP address ranges in JSON format. To find the IP address ranges you can use to access AppFlow, search theip-ranges.jsonfile for the following string:service”: ”AMAZON_APPFLOW”
.
More information is available in the AWS documentation.
. - Enable Change Data Capture (CDC) in Salesforce to enable event-driven flow triggers.
.
After logging into your Salesforce account, from Setup, enter “Change Data Capture” in the Quick Find box, then select Change Data Capture.

- Select the objects you want to generate change event notifications, move them to the right, and then select Save.
Now you are ready to move data between Salesforce and AWS Service.
Next, we’ll describe two ways to create a flow to update Amazon Redshift with new Salesforce contact information, and a flow to insert new Salesforce lead records using campaign data stored in Amazon S3.
Use Case I: Updating Amazon Redshift with New Salesforce Contact Information
Amazon Redshift is a data warehouse—a special kind of database that makes it easy to extract and analyze data. In the context of a customer relationship management (CRM) application such as Salesforce, Amazon Redshift is designed to provide a complete view of the customer.
That’s markedly different from the data silos that often result from conventional transactional databases. This is because Amazon Redshift accepts data from many different sources, including billing systems, order systems, ERP, human resources, point of sale, web servers, marketing databases, and call center systems.
All of that data is aggregated, linked to customers, and stored in an integrated fashion. Once your data is in Amazon Redshift, you can leverage tools like Tableau, which natively connects to Amazon Redshift, to create a blazing fast data discovery environment for your organization.
The following procedure creates a flow in Amazon AppFlow that automatically updates the contacts table in Amazon Redshift whenever an existing contact is updated or a new contact is created in Salesforce.
Amazon AppFlow uses the Redshift COPY command to move data into Amazon Redshift using an Amazon S3 bucket. In other words, the data is stored in a S3 and then ingested into Amazon Redshift.
To set this up, follow these steps.
- Create or use an existing Amazon S3 bucket in your AWS account.
. - Create an IAM role for Amazon Redshift that grants
AmazonS3ReadOnlyAccessandkms:decryptactions, and attach it to your Amazon Redshift cluster.
.
When done, this is how the IAM summary page should look:

- Create an Amazon Redshift cluster for storing your data, and make sure to attach the IAM role you created to this cluster.
. - Ensure your Amazon Redshift cluster is publicly accessible from Amazon AppFlow’s IP address in your AWS Region.
.
Open the Amazon Redshift console, choose the cluster to modify, and then properties.
.
In the Network and security section, choose the link next to the VPC security groups to open the Amazon Elastic Compute Cloud (Amazon EC2) console.
.
On the Inbound Rules tab, be sure all Amazon AppFlow IP CIDR blocks for your region and the port of your Amazon Redshift cluster are allowed. For example:

Note that in the preceding screen, the default port for Amazon Redshift is 5439, but your port may be different.
.
To find the Amazon AppFlow IP CIDR block for your region, go to AWS IP address ranges.
.
In the Amazon Redshift console, navigate to Clusters > Properties. In the Network and security section, scroll to the end of the page, and select Yes for Publicly accessible.

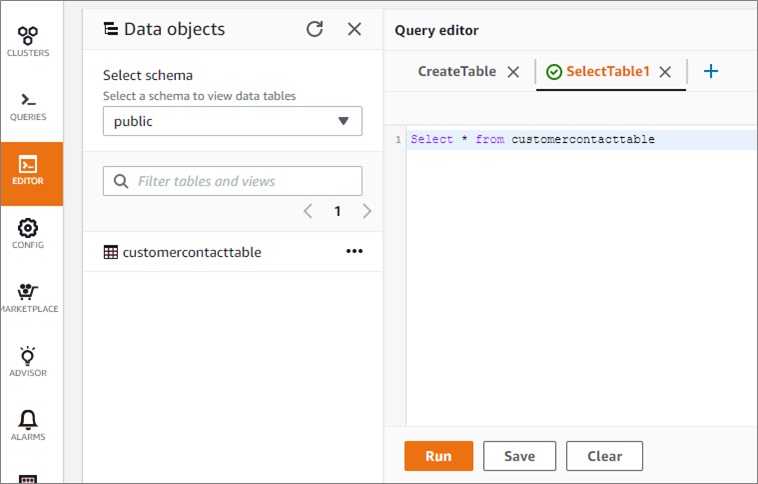
- Create a table in Amazon Redshift. In the left navigation bar, select Editor.
.
In the Data objects pane, select a schema from the pull-down menu under Select schema.
.
In the Query editor, enter the query shown in the following screen. We created this query for our example. You can create a different query with different fields, if you prefer.

Select the Run button to create a table with Name, Title, Email, and Account ID.
- To preview the data in this table, do the same with the query shown on this screen:
The table content appears under the Table details tab.
- In the Specify flow details pane of Amazon AppFlow, create a new flow, specify the flow details, and then select Next.

- In the Configure flow pane of Amazon AppFlow, choose Salesforce as the source. Select Salesforce events, and then choose Contact Change Event as the Salesforce event.
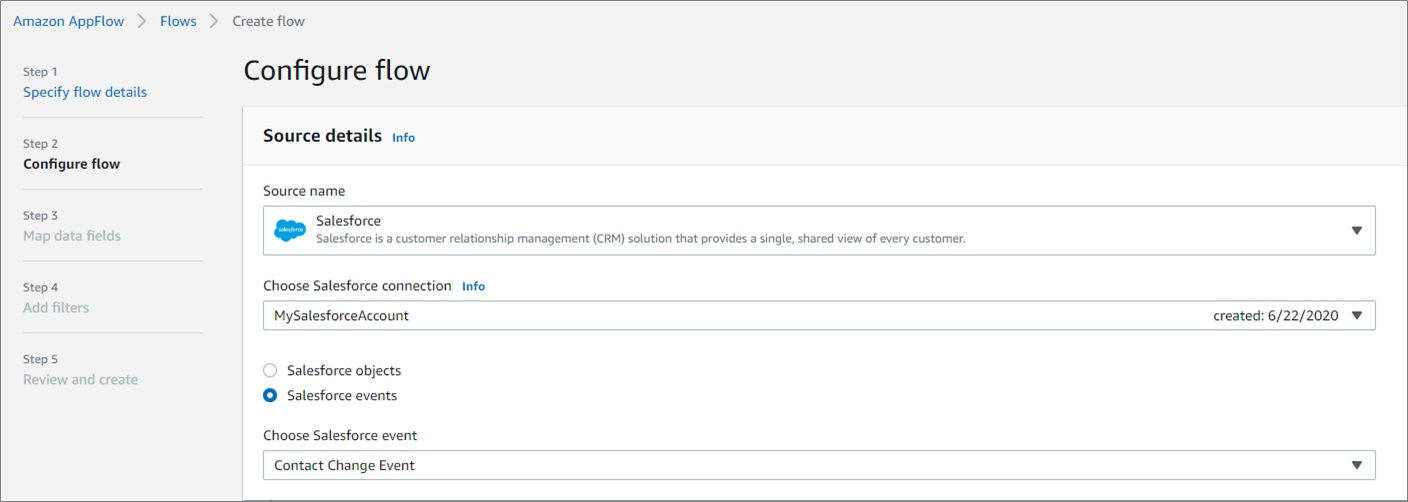
Whenever a Salesforce contact change occurs, such as adding a new contact or updating an existing contact, it triggers this flow
- In Amazon AppFlow, select Amazon Redshift as the destination. Then, select Connect immediately below it.

- Under Choose Amazon Redshift connection, select Create new connection from the drop-down menu.
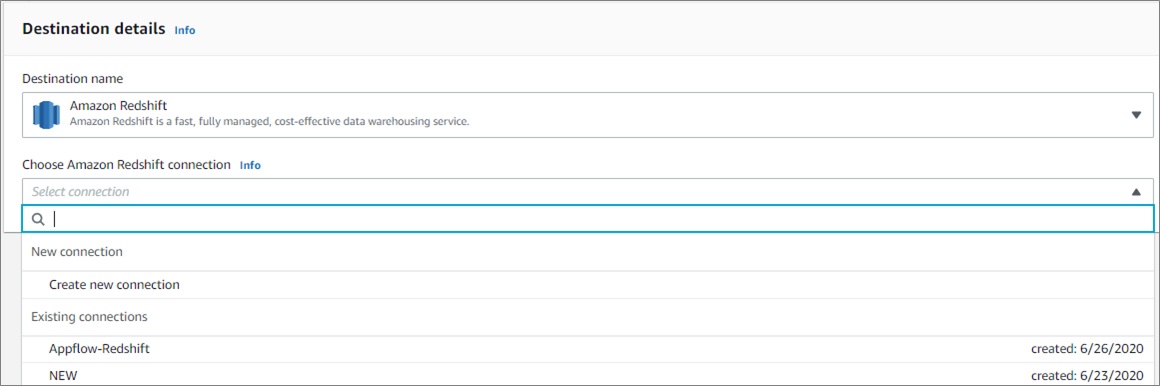
- A Connect to Amazon Redshift window appears.

Fill in the following information, and then select Connect:S3 Bucket. Choose the S3 bucket where Amazon AppFlow will first write the data before invoking COPY. This is most likely the S3 bucket you created in Step 1.
.
Bucket prefix (optional) — Choose the S3 bucket prefix or path where the data should be written.
.
Role — IAM role created in Step 2. This is attached to your Amazon Redshift cluster and has read-only access to S3. The logged-in user must have IAM:ListRoles permission for Amazon AppFlow to show a list of roles to choose from.
.
Username —User name to login to your Amazon Redshift account.
.
Password — Password to login to your Amazon Redshift account.
.
JDBC URL — The JDBC URL of your Amazon Redshift cluster. See Finding your cluster connection string in the Amazon Redshift Cluster Management Guide.
.
Connection name — Name the new connection.
- In the Destination details window that appears, choose the relevant Amazon Redshift object and table.
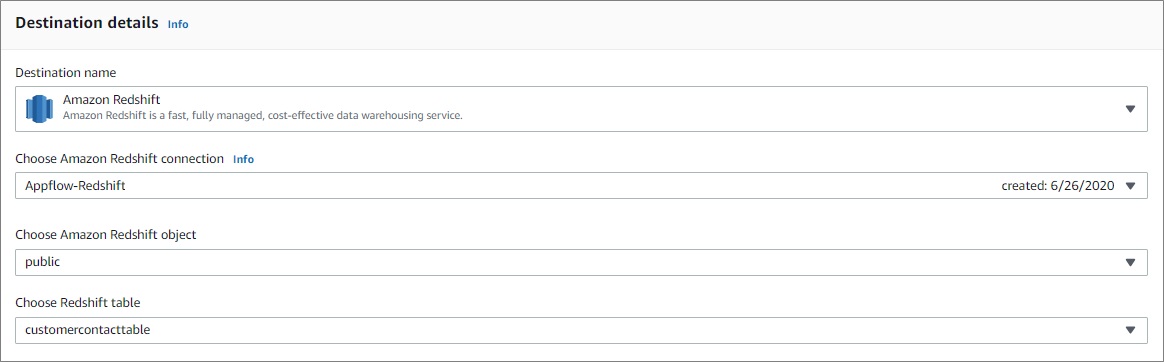
Under Error handling, select how you want to handle errors.

- In the Source to destination field mapping window that appears, use the drop-down menu to map the fields between the Salesforce contact and your Amazon Redshift table. Then, select Next.

- In the Add filters window, you have the option of adding filters, which help you pull records of interest. For example, use filters to import only the records that were created during the last month, or records for a particular customer.
.
When done, select Next.

- Under the Review and create window, review the configurations and select Create flow.
. - Under the Flow window, activate the flow selecting Activate flow.

- Select the Run History tab. Under that tab you can review the run status of recent flows. For example:

Now, when someone creates a new contact or changes an existing contact in Salesforce, it automatically appears in your Amazon Redshift table.
For example, we created a new contact named John Shaw in Salesforce. It instantly populated the Redshift table.

Use Case II: Creating New Saleforce Lead Record Using Campaign Data in S3
This procedure creates a flow in Amazon AppFlow that creates new Salesforce lead records using campaign data stored in a .csv file in Amazon S3.
To prepare this use case, we created an S3 bucket named AppFlow-salesforce-demo. Under that bucket, we created a folder named S3toDemo with a contacts.csv file with lead records from a recent campaign we would like to transfer to Salesforce. These are the content of contacts.csv file:

To create the flow, follow these steps.
- In Amazon AppFlow, select Create flow, specify the flow details, and then select Next.
. - Go to the Configure flow window, select Amazon S3 as the Source name and, under Bucket details, choose the relevant S3 bucket.
. - In the Bucket prefix field, enter the name of the folder that contains the .csv file. If the .csv file is located directly under the Amazon S3 bucket, then leave the Bucket prefix blank.

- Go to the Destination details section, and select Salesforce as the destination. Choose your connection or establish a new one as shown previously.
. - Under Choose Salesforce object, select Leads from the pull-down menu.
. - Under Error handling, select how you want to handle errors.

- Under the Flow trigger section, choose how to trigger the flow.

- Under Source to destination field mapping, map the fields in the .csv file to the fields in the Salesforce lead record, and select Next.

- Add filters, if you need them.
. - In the Review and create window, review your configurations and select Next.
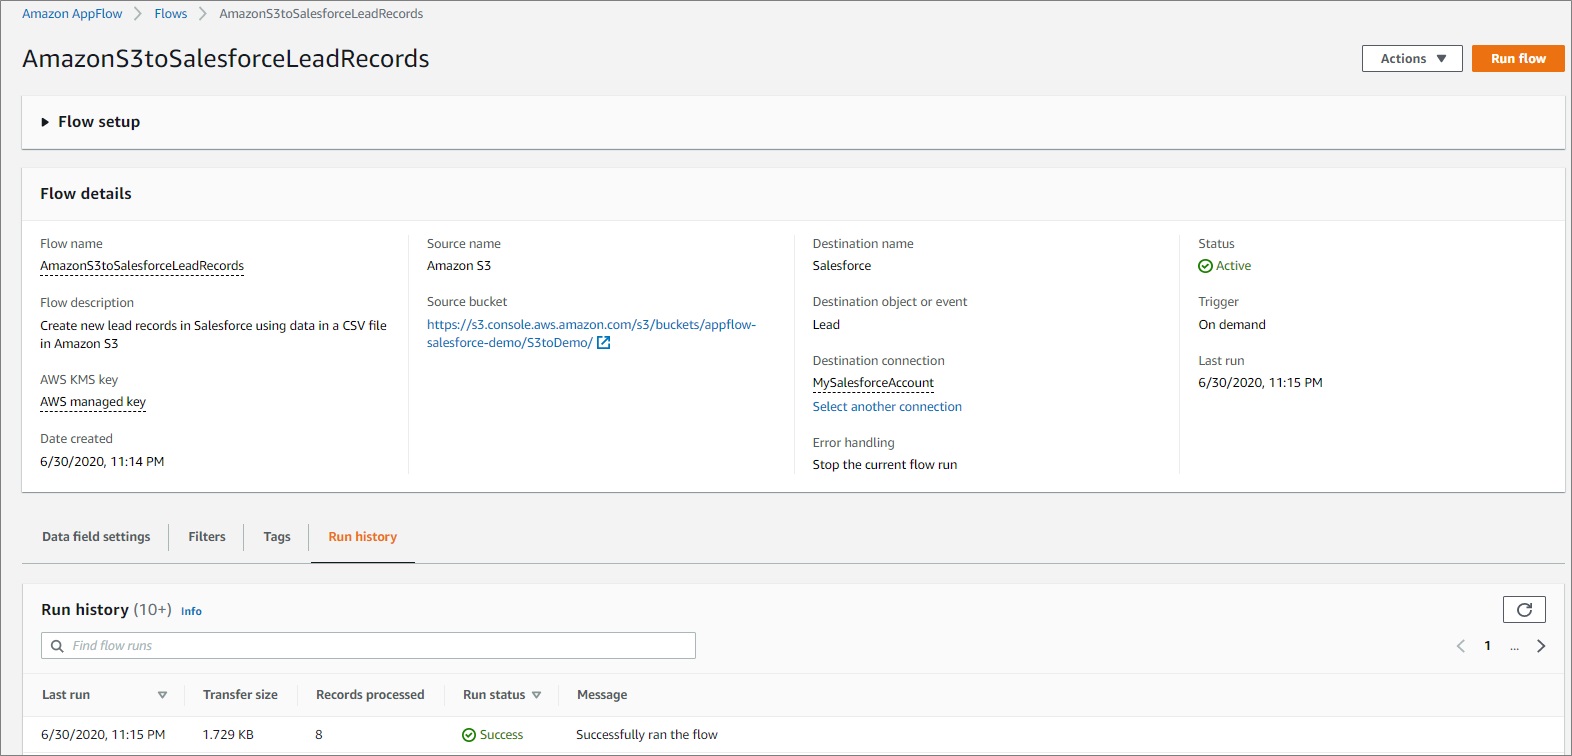
. - Under the Flow setup window, initiate the flow by selecting Run flow.
.
- Go to the Run history tab. There, you can see the eight records you successfully processed with the flow.
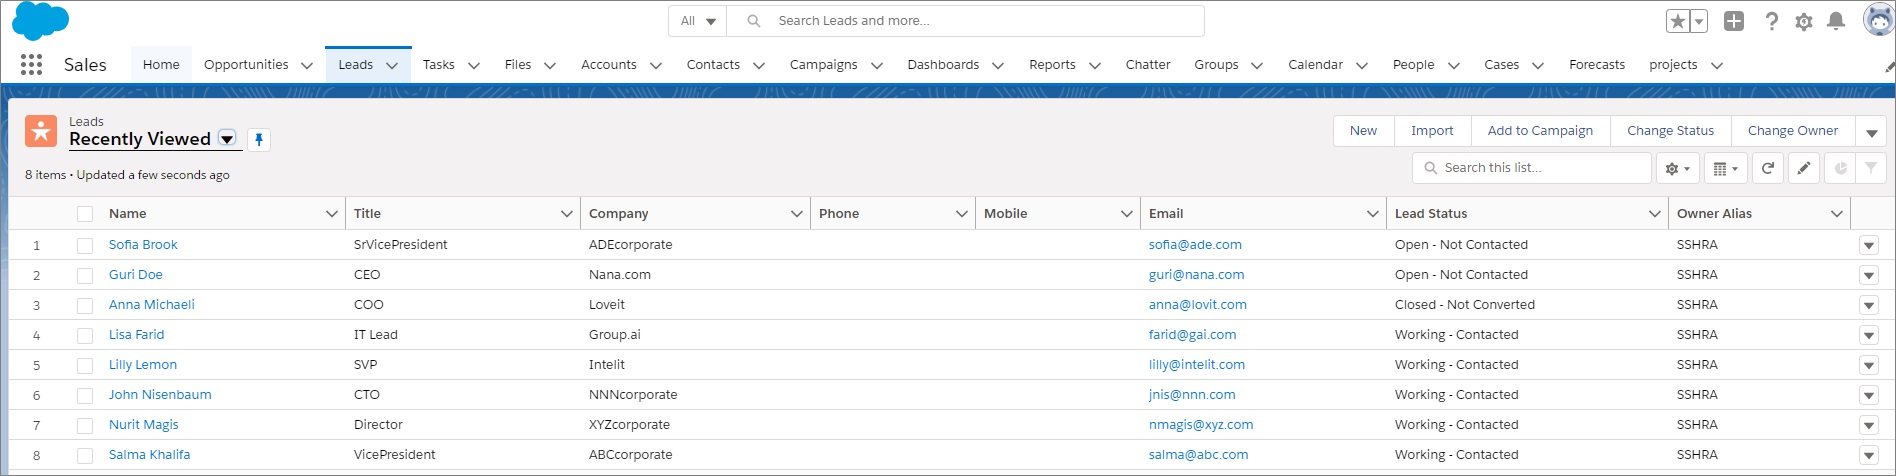
Back in Salesforce, you can see the new leads from the campaign data in the .csv file.
Conclusion
Amazon AppFlow allows automates workflows to improve business productivity by triggering data flows based on events. As shown in this post, you can use it to automatically update Amazon Redshift with new Salesforce contact information. You can also use it to use it to create new Salesforce lead records using campaign data stored in Amazon S3.
Moving data back and forth from Salesforce to AWS takes only a few minutes to set up. Because it leverages the AWS PrivateLink connection to Salesforce, the data flow can be just as secure and private as moving data within the boundaries of your trusted network.
For more information see the Amazon AppFlow User Guide.
.
Salesforce – APN Partner Spotlight
Salesforce is an AWS Competency Partner. Its leading customer relationship management (CRM) platform helps enterprises get more out of their customer data.
Contact Salesforce | Solution Overview
*Already worked with Salesforce? Rate this Partner
*To review an APN Partner, you must be an AWS customer that has worked with them directly on a project.