AWS Partner Network (APN) Blog
In-Depth Strategies for Building a Scalable, Multi-Tenant SaaS Solution with Amazon Redshift
By Anubhav Sharma, Partner Solutions Architect, AWS SaaS Factory
 Software-as-a-Service (SaaS) presents developers and architects with a unique set of challenges.
One essential decision you’ll have to make is how to partition data for each tenant of your system. Tenant isolation, performance, noisy neighbor effect, pricing strategy, and a range of other factors will influence the design choices you make.
Your data partitioning strategy will determine how you choose to physically or logically separate one tenant’s data from another. You will also be required to come up with security measures to prevent cross-tenant data access, commonly referred to as tenant isolation.
Given multiple tenants will be actively using your SaaS solution simultaneously, you have to address the challenge of sharing cluster resources and enforcing appropriate resource allocation strategies.
The pricing and tiering strategy of your SaaS solution will also influence the overall design. You have to limit certain actions depending upon what tier the tenant has subscribed to. Another challenge is determining tenant consumption using some sort of system- and/or application-generated metrics. This is usually a must-have requirement in a pay-as-you-go model.
I am a Partner Solutions Architect for AWS SaaS Factory, an AWS Partner Network (APN) program that helps organizations maximize innovation and agility by building on AWS.
In this post, I explain how to harness Amazon Redshift, a fully managed, petabyte-scale data warehouse, to address these common challenges and build a scalable, multi-tenant SaaS solution on AWS. I will explain strategies that are commonly used to partition and isolate tenant data in a SaaS environment, and how to apply them in Amazon Redshift.
Most importantly, we will examine the features inside Amazon Redshift that achieve consistent performance when multiple tenants share the same Amazon Redshift cluster.
SaaS Partitioning Models
Before diving into the specifics of Amazon Redshift, it will be beneficial to understand three commonly used SaaS partitioning models—silo, pool, and bridge. These models define how you partition your data and separate your infrastructure to achieve tenant isolation.
In the silo model, each tenant has their own set of infrastructure resources. Storage of tenant data is fully isolated from any other tenant data. This generally creates stronger boundaries between tenant environments and enables more predictable performance.
You have a clear view of activities and consumption for each tenant. But there are some disadvantages, too. Some of the challenges include higher infrastructure cost, compromised agility, and more complicated DevOps, onboarding, management, and monitoring footprint.
In the pool model, all tenants share a common storage and compute infrastructure. Tenant data is placed into a common database and all tenants share a common set of tables. This requires the introduction of a partitioning key that’s used to identify the data associated with each tenant.
This model tends to simplify a SaaS solution’s provisioning, management, and update experience. It also fits well with the continuous delivery and agility goals essential to SaaS providers. A challenge, however, is that you need measures to limit cross-tenant impact, such as accidental sharing of tenant data. Since all tenants share common infrastructure, you need to consider implementing strategies that will minimize noisy neighbor impact.
The bridge model offers a mix of both of the silo and pool models, where you can have a common compute infrastructure but offer data partitioning by creating separate databases, schemas, or tables per tenant.
A more detailed review of these models is covered in the SaaS Storage Strategies whitepaper. This post looks at implementing these models using Amazon Redshift.
The Silo Model
In Amazon Redshift, the most common approach to implementing the silo model would be to create a separate cluster for each tenant, as shown in Figure 1.
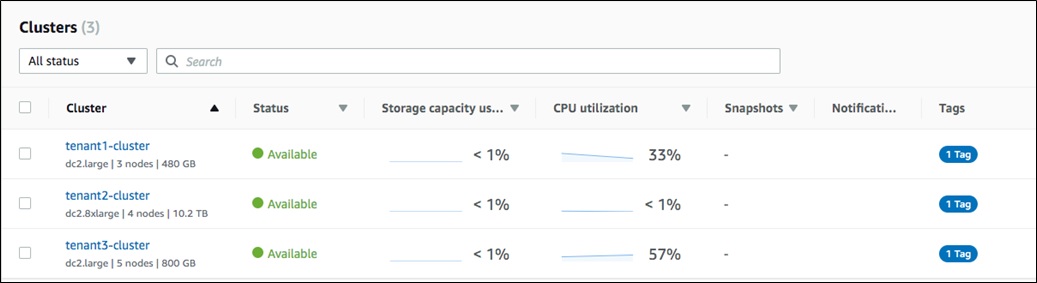
Figure 1 – Amazon Redshift console showing one cluster per tenant.
This gives us the benefits of data partitioning and tenant isolation out of the box. Here, you have separated data and compute for each tenant, by creating one cluster per tenant.
Each cluster can now be secured and sized based on the specific requirements of an individual tenant, ensuring tenants are operating in isolation. You can also apply separate AWS Identity and Access Management (IAM) roles per cluster and enforce Role Based Access Controls (RBAC).
Additionally, each tenant can now scale independently, based on the tier or service level agreements of that tenant. Each cluster can have different number of nodes and node types aligned with the tenant’s specific scaling needs.
As I described earlier in the post, the silo model can be easier to implement, especially when you have a more manageable number of tenants. However, in scenarios where you have a large number of tenants with a new tenant regularly onboarding, adding a new cluster for each tenant may not be feasible.
Some of the challenges would include:
- With tenant data being distributed across multiple clusters, you have to aggregate the operational data from each cluster to present a unified dashboard for management and monitoring purposes.
- Higher overall costs, since you’ll pay for each tenant cluster, even if they are not using it.
- Deployment of schema and data representation changes are more challenging. You have to deploy and verify each cluster separately.
- Depending upon your use case, you may have to duplicate certain shared data, such as list of countries, state, or users in each cluster.
While the silo model is often appealing and seems more straightforward to some developers, the challenges outlined here can limit the agility of a SaaS business. However, it’s not uncommon for SaaS providers to offer a silo model to premier tenants, mostly to ensure predictable performance and isolation guarantees.
If you don’t have these constraints and you have a large number of tenants with unpredictable loads, you may find the limits of a silo model are not suitable for your solution. This is also true when you want to share costs among smaller tenants.
The Pooled Model
In a pooled multi-tenancy model, data for all the tenants reside in a single Amazon Redshift cluster. Each table has the notion of a “tenant ID,” which allows you to distinguish the data associated with each tenant.
Pool overcomes the limitations of a silo model, providing more agility, cost optimization, better resource utilization, and a simpler approach to centralized management. In a growing SaaS business, especially when you’re rapidly adding new tenants, this model provides you a simpler onboarding experience.
The pool model does come with its own set challenges, though. While it simplifies some aspects of our environment, it complicates others. Tenant isolation, for example, is more challenging in a pooled model where tenant data is co-mingled.
You also need a way to strategically allocate resources of the shared cluster to tenants. This is especially true when you have your paid and free tier tenants sharing the same cluster. You need to prioritize and allocate resources according to each tenant’s tier. You also need to ensure queries from a single tenant are not saturating the entire cluster and degrading the experience of other tenants.
Figure 2 is a conceptual representation of a shared cluster, where Tenant 1 is consuming maximum resources and can potentially impact queries by other tenants.
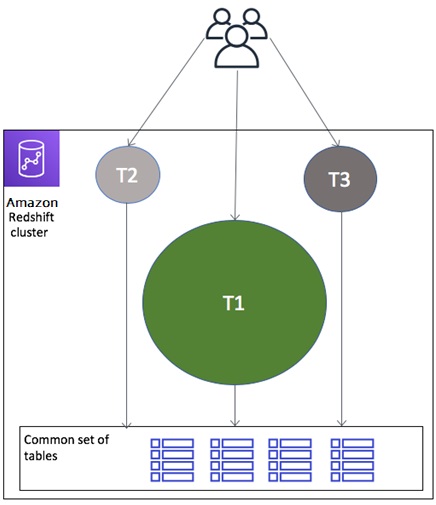
Figure 2 – Noisy neighbor effect.
To address the tenant isolation concerns described in this post, you need to evaluate both data partitioning and compute isolation strategies available inside Amazon Redshift to implement a pooled model.
Data Partitioning Considerations in a Pooled Model
In a pooled model, each table has a notion of “tenant ID” to distinguish data across tenants. At the time of writing for this post, Amazon Redshift doesn’t support a row-level isolation model that would enable you to restrict access to individual rows.
This means you may need to build your own mechanism to restrict cross-tenant data access. You need to introduce your own framework/libraries—commonly referred as an application layer—that sits between your users and the Amazon Redshift cluster.
It will be the responsibility of this application layer to enforce authorization and only allow access to the data that belongs to that tenant. This application layer should be aware of the identity of that tenant. AWS SaaS Factory has various blog posts and videos that discuss how to enforce identity in SaaS. Please refer to them to get more in-depth coverage of this approach.
Using Workload Management for Compute Isolation in a Pooled Model
Since in a pooled model all of the tenants reside in the same Amazon Redshift cluster, they also share compute resources for that cluster. This requires us to implement strategies to reduce the noisy neighbor effect, by evenly allocating resources among tenants based upon their tier and service level agreements.
The Workload Management (WLM) feature of Amazon Redshift gives us one way to manage the allocation of compute resources in a pooled model. WLM allows you to define multiple query queues and route queries to appropriate queues at runtime.
To implement WLM, you must first create a parameter group, which contains the WLM configuration, and associate that parameter group with that cluster. Your cluster is now associated with a WLM configuration and starts using that configuration to manage query resources.
You can create parameter groups by using the Amazon Redshift console, and read more in the AWS documentation about implementing workload management.
WLM supports two modes: Manual WLM and Automatic WLM. You are defaulted to Automatic WLM when creating a new parameter group, but you can switch to Manual WLM, if needed. In each of these modes, you end up creating multiple queues to support tenants.
There are few key features of WLM that help achieve the tenant-level compute isolation needed in a SaaS environment:
- Create tenant- or tier-specific queues, which allow Amazon Redshift to allocate resources across tenants in a fair manner. WLM manages the memory allocation of queries, query concurrency (number of simultaneous queries at any given time), and concurrency scaling (adding more resources to scale if needed) across these queues.
- Associate your queries with a tenant-specific query group or user group, and route queries to the appropriate queues.
- Create tenant- or tier-specific query monitoring rules to control your tenant actions across these queues.
Figure 3 shows a conceptual representation of these key elements in play.
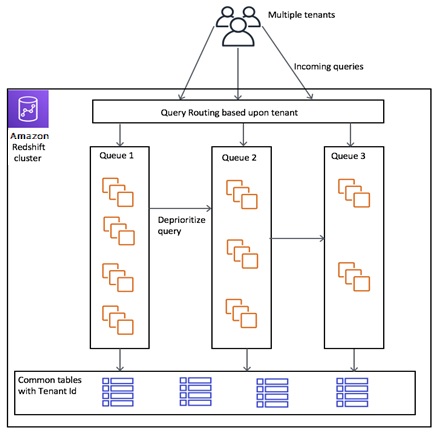
Figure 3 – Cluster with data partitioning and compute isolation.
Let’s see how to apply these concepts in the case of Automatic and Manual WLM.
Automatic WLM
To implement Automatic WLM, start by creating queues and associate those queues with a query priority. You can define up to five query priorities starting from highest to lowest. Next, associate those queues with a query group. Now, when a tenant issues a query, associate this query with a query group, as shown below:
Amazon Redshift will now execute this query on the queue associated with that query group. Read more in the AWS documentation about routing queries to queues.
At this stage, with automatic WLM, Amazon Redshift will automatically manage query concurrency and memory allocation of your queries based upon priority. It keeps track of overall cluster resources and gives the query with higher priority a preferential treatment. It also allocates memory to these queries based upon priority and amount of resources they need.
But at some point, you might saturate your cluster when large number of queries are issued. This is where the concurrency scaling mode option comes into play. You can set this option to either “off” or “auto” in your queue. Setting it to auto allows queues to scale to an unlimited number of tenant queries. This can be an ideal choice in a pooled SaaS model, and a very beneficial feature you should be aware of.
Look at the information in Figure 4 as an example of implementing automatic WLM, with one queue per subscription tier.
Here, I have created four queues, each with a different priority. I have set the query priority of my premier tier tenants to high, so that Amazon Redshift can prioritize them before standard or free tier tenants.
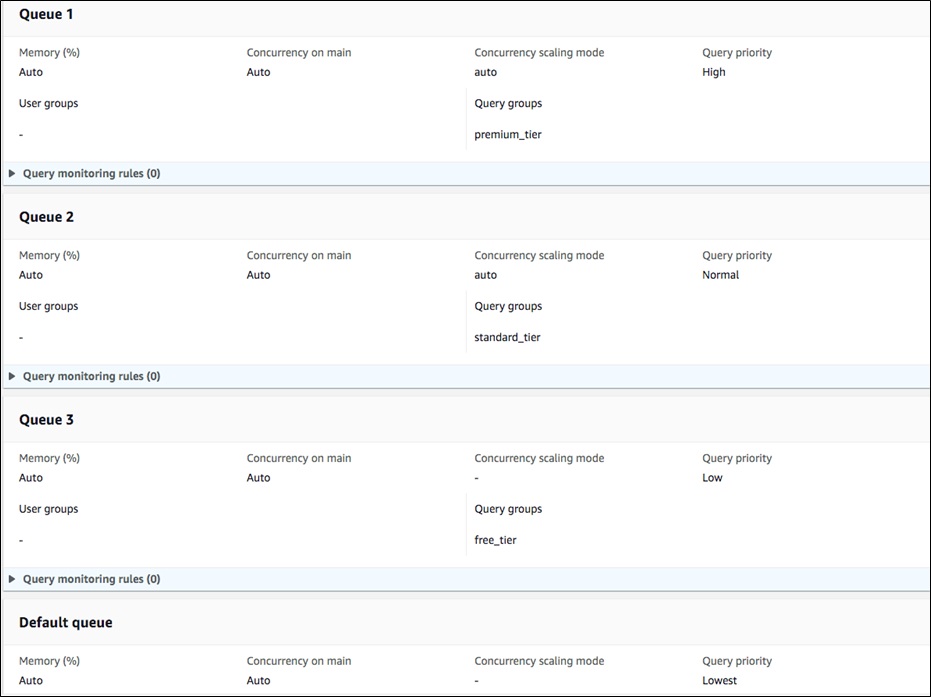
Figure 4 – Automatic WLM queues per subscription tier.
Automatic WLM allows you to create query monitoring rules and change the priority based upon query parameters, like time taken to execute the query or number of rows scanned.
Figure 5 demonstrates how you can change the priority of long-running queries for your standard tier tenants.
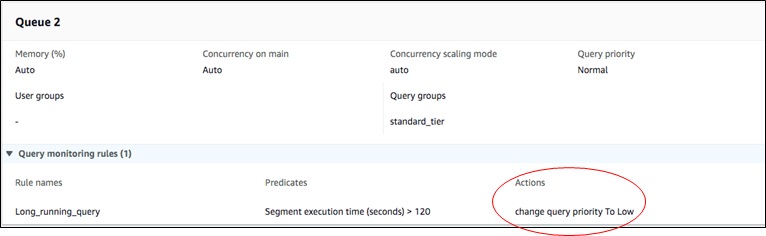
Figure 5 – Change query priority based upon subscription tier.
In Automatic WLM, there is no additional overhead of manually managing resources across tenants or subscription tiers. Amazon Redshift manages them on your behalf, assuming the right priorities are being set for your queries and that concurrency scaling mode is set to auto.
This approach is a good fit for SaaS environments where new tenants are onboarded on a regular basis. It also allows more dynamic memory management as the number of tenants per tier can vary over a period of time.
Manual WLM
Although we recommend using Automatic WLM to achieve tenant compute isolation, Manual WLM makes sense in cases where you want to take more control of the resources within each queue.
There are two ways to think about achieving compute isolation using Manual WLM in a SaaS environment. If you have a finite and small number of tenants, then you can create one queue per tenant. A second option is to create queues for each subscription tiers, such as premium, standard, basic, and free.
Figure 6 shows an example of Manual WLM, which uses one queue per tenant.
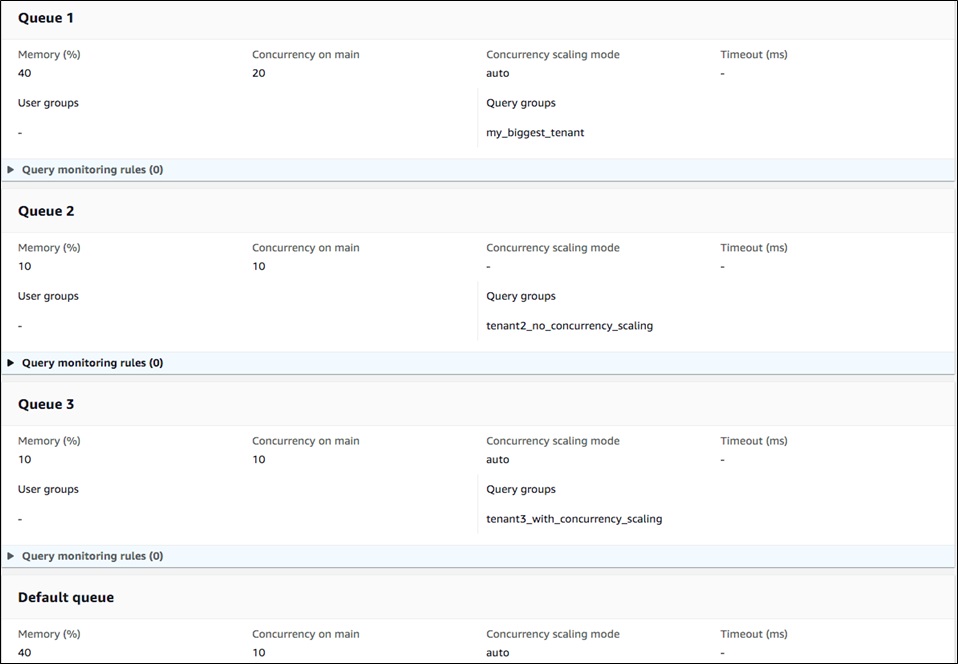
Figure 6 – Manual WLM with one queue per tenant.
With Manual WLM, you start by creating queues and manually define “Memory (%)” per queue. This dedicates a certain percentage of total cluster resources to that queue, irrespective of the number of queries running.
Next you set “Concurrency on main” per queue, which defines the maximum number of concurrent queries in a queue at any given point of time. In addition to this, you can also set concurrency scaling mode to either “off” or “auto” for each of those queues.
If concurrency scaling mode is set to auto, your cluster can add more resources when the number of queries in that queue goes beyond the number specified in “Concurrency on main.” This allows your cluster to add more resources when your tenants become more active and requests are queued.
Query routing based upon query groups work in a similar fashion, as previously described in Automatic WLM.
Since you’re manually setting memory and concurrency per queue, you have to actively monitor your queues and tune memory allocation and concurrency settings based upon tenant activity.
As an example, you may not have premium tier users to begin with. Setting aside 40 percent of memory will not be an optimal solution, since this memory will be unutilized when the queue is not in use. This also conflicts with Automatic WLM, which ensures maximum resource utilization and does not statically partition resources between queues.
Eventually, in Manual WLM you will have to monitor the number of tenants in each tier and capture usage patterns to tune memory and concurrency allocation. Amazon Redshift Utilities on GitHub has some Admin Scripts and Admin Views that can be useful to determine the resource usage for each queue. You can then add or remove resources from these queues as needed.
As described previously in this post, Manual WLM requires manual intervention and constant monitoring. This is not aligned with the best practices of SaaS, and can be a very challenging and daunting task.
The Bridge Model
The bridge model is a hybrid approach by which you can still have a single cluster but avoid shared tables for all tenants. With this approach, you can create separate tables, schemas, or databases per tenant. You can still get compute-level tenant isolation by using WLM, as previously described in the pooled model.
One way to set up a bridge model is by creating one schema per tenant, followed by one user group per tenant. You can then grant user group access to its specific schema.
As an example, begin by creating a user group called “tenant1.” Add all the users for that tenant to this user group. Now create a schema called “tenant1” and create all the tables for tenant1 inside this schema. This schema now holds data only for tenant1. Finally, grant tenant1 user group access to tenant1 schema.
This approach allows you to have a more flexible data partitioning model. You can apply more fine-grained controls to prevent cross-tenant data access.
To follow this model, you need to be aware of certain limitations with regards to number of tables, schemas, and databases inside a single Amazon Redshift cluster:
- Maximum number of tables is 9,900 for large and x-large cluster node types, and 20,000 for 8xlarge cluster node types.
- Number of user-defined databases you can create per cluster is 60.
- Number of schemas you can create in each database in a cluster is 9,900.
Apart from these considerations, some of the challenges related to duplication of data and managing multiple schemas, as described in the silo model, also apply in this case.
Onboarding a New Tenant
A SaaS model should aim for an automated tenant onboarding and provisioning experience. Depending upon the model you choose (silo, pool, or bridge), you should come up with an automated mechanism to provision a new tenant in your Amazon Redshift cluster.
For a silo model, this means creating a new cluster altogether and setting up the required metadata, using some sort of automation. You’ll have to use a credential manager, like AWS Secrets Manager, to store a connection string for each tenant, and map that string to the tenant ID.
On the other hand, for a pool model, since we already have a shared cluster, it may be as simple as assigning a WLM queue to run queries for that tenant.
In case of bridge model, assuming you have one schema per tenant, you have to map schema names to tenant IDs, and add them to queries during runtime.
Irrespective of the model you choose, this is something you need to consider as part of architecting your SaaS solution.
Scaling Tenants with Elastic Resizing
So far, we have talked about data partitioning and tenant isolation, using silo, pool, and bridge models. But we haven’t discussed how to scale your cluster to meet application needs.
Regardless of the partitioning or isolation model you choose, this is one of the most common challenges in any architecture and more prominent in a SaaS-based application. As more tenants are onboarded or tenant data increases, it becomes necessary to add more nodes to keep up with data growth and query performance.
Even though concurrency auto scaling can add compute capacity on demand for spikey workloads, you still might want to ensure you’re provisioning adequate cluster resources to begin with (mainly to avoid latency on baseline and predictable load).
Similarly, when the number of tenants decreases, we don’t want to keep an overprovisioned cluster. In a SaaS model, it’s important to do so quickly and with minimal downtime.
Fortunately, these challenges can be easily overcome by using the Elastic Resize feature in Amazon Redshift. Elastic Resize is the fastest method to resize a cluster. It adds or removes nodes within a few minutes. It also eliminates the need to overprovision to meet peak needs, as well as scale down when demand is not there anymore.
Even better, you can use the Elastic Resize Scheduling feature to automate this process. This way, you can provision more nodes during peak time and reduce them during off hours. With proper automation, you can auto scale your cluster per your tenant needs.
Elastic Resize Scheduling also removes the need to overprovision your cluster when launching a new solution. Start with your baseline needs and add more nodes later as the number of tenants grow.
Metrics for Capturing Consumption (and Eventually Cost Per Tenant)
Metrics allows you to track, aggregate, and analyze tenant activity. Metrics are the lifeblood of a SaaS application, driving both the business and technical aspects of SaaS. There are a wide variety of metrics an application should capture, and one of them is consumption per tenant.
Some of the metrics you can use to get consumption per tenant are: number of queries issued by a tenant, average execution time of those queries, resources (CPU/memory) consumed by those queries, and how much storage footprint each tenant has.
These metrics can be used to optimize the tenant experience by adjusting your cluster size and/or WLM settings. One of the main reasons SaaS product owners are interested in getting consumption per tenant is because they can easily correlate that to cost per tenant.
The ultimate goal is to predict how much a tenant costs you. At times, this is also tied to the billing model, where each tenant is billed based upon their actual consumption. It can also influence your pricing strategy, especially when analyzing the difference between cost and revenue.
Figure 7 shows the metrics of a real-life use case in which your basic tier tenants are costing more than the actual revenue they are generating.
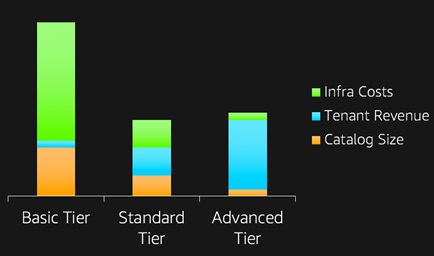
Figure 7 – Metrics allows you to track, aggregate, and analyze tenant activity.
Amazon Redshift has specific features that allow you to find consumption and cost per tenant in both the silo and pool models.
Using Cost Allocation Tags in a Silo Model
In a silo model, where each tenant belongs in a separate cluster, you can get cost per tenant by applying cost allocation tags to each cluster. You can determine the cost per tenant without collecting additional metrics and usage. Figure 8 shows an example of a cost allocation tag associated with a cluster.
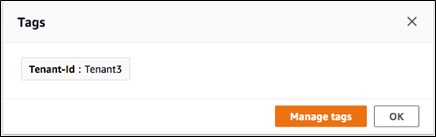
Figure 8 – Cost per tenant using cost allocation tags.
Using Application and System Metrics in a Pool Model
In a pool model, it’s more challenging to find your tenant cost, and you need to collect metrics at a more granular level. One way is to keep track of all queries issued by a tenant and calculate the resources consumed by each query. When you combine this metric with the storage footprint per tenant, you’ll know the consumption per tenant inside a pooled Amazon Redshift cluster.
Amazon Redshift provides specific mechanisms allowing you to capture resources consumed by each query and associate that with a tenant ID. The key is to use query groups and associate those query groups with a tenant.
Amazon Redshift saves the information about a database query along with query groups in a system table called STL_QUERY. As described in the documentation for STL_QUERY, this table only holds data for two to five days. This requires us to move the data to Amazon Simple Storage Service (Amazon S3) or other permanent storage.
To achieve this, you first need to associate your queries with a query group. You can do so in one of two ways:
- If you have one queue per tenant, your query group will be your tenant ID.
- If you have multiple tenants per queue, you can use the wildcards support of query groups in Amazon Redshift and a combination of tier and tenant ID. As an example, you can assign a query group name of
premium_*to a queue for premium tier tenants, and then set the query group name topremium_tenant1while running a query.
Here’s an example of how to use a tenant ID when you have one queue per tenant (option 1, preceding):
You can now run this SQL command to see which queries are executed by each tenant.
SQL:

Results:

Finally, you can join the output shown in the preceding table with other System Tables, using query column (which represents query ID) to get additional metrics for that tenant.
STL_QUERY_METRICS and STL_WLM_QUERY are two of several tables that provide useful metrics such as query execution time and CPU time. These metrics, when collected and aggregated, give a clear picture of tenant consumption inside a pooled Amazon Redshift cluster.
Even when you have collected all of these metrics, the question of getting cost per tenant remains. That’s when you use an aggregation service to aggregate metrics, mainly query execution time and CPU time, and determine the consumption percentage of each tenant in the cluster. You can then use the AWS Cost Explorer API to get your monthly cost for Amazon Redshift, and apportion the consumption across that cost to get an approximation of cost per tenant.
Conclusion
In this post, I discussed some key elements of SaaS that you musts consider while building a multi-tenant solution using Amazon Redshift. Regardless of the model you choose (silo, pool, or bridge), you need to ensure your application has a well-defined mechanism to handle data partitioning and tenant isolation.
As we discussed, Amazon Redshift has a variety of features to support both of these requirements. The best choice depends on various factors such as agility, onboarding requirements, number of tenants, data volume per tenant, data isolation needs across tenants, SLA for queries, cost optimization, and billing model.
Although I didn’t talk much about identity, DevOps, and testing, these are other key elements that need special attention in the world of SaaS. I also didn’t talk about the various performance tuning techniques you can use to tune your cluster and queries. These are critical to the success of your SaaS application, as well.
This process is by no means a straightforward task, and requires both substantial effort and an infrastructure of its own. But I hope these techniques help you make the most of the features inside Amazon Redshift to build a scalable, multi-tenant SaaS solution.
About AWS SaaS Factory
AWS SaaS Factory helps organizations at any stage of the SaaS journey. Whether looking to build new products, migrate existing applications, or optimize SaaS solutions on AWS, we can help. Visit the AWS SaaS Factory Insights Hub to discover more technical and business content and best practices.
SaaS builders are encouraged to reach out to their account representative to inquire about engagement models and to work with the AWS SaaS Factory team.
Sign up to stay informed about the latest SaaS on AWS news, resources, and events.