AWS Partner Network (APN) Blog
Signing Data Using Keys Stored in AWS CloudHSM with Python
By Elliot Morris, Software Engineer at BJSS
 |
| BJSS |
 |
AWS CloudHSM is a cloud-based hardware security module (HSM) that enables you to generate and use your own encryption keys on Amazon Web Services (AWS).
BJSS, an AWS Advanced Consulting Partner with multiple AWS Competencies, has been working with a large public sector client for several years and helping them to build multiple workloads on AWS. Most recently, the client asked BJSS to enable the secure signing of sensitive documents relating to individuals.
The standard service for managing keys for signing would usually be AWS Key Management Service (KMS). However, due to legacy requirements from the customer side, the team at BJSS needs to support both SHA256 and SHA1.
SHA1 is only available in KMS for use with encryption, but we need support for signing. AWS CloudHSM allows us to create and manage our own keys in an isolated HSM, whilst still keeping them in the cloud.
As a software engineer at BJSS, I spent many hours researching how to manage keys that are stored in an HSM for cryptographic operations. There are many resources online, but I couldn’t find clear instructions on how to implement an AWS CloudHSM-based solution using Python.
In this post, I’ll show you how to successfully sign some data with a key from AWS CloudHSM using Python. I will walk you through the setup of an AWS CloudHSM cluster and test it using a sample application.
Please note that AWS CloudHSM does not offer an AWS free tier, so implementing the solution described in this tutorial will incur a cost.
Cryptography for Document Signing
A digital signature is a mathematical scheme to verify the authenticity of digital messages or documents. By comparing a hash enclosed in the signature of a signed document to one they decrypt using the sender’s public key, a recipient can ensure no changes have been made to the document after signing. This process is shown below.
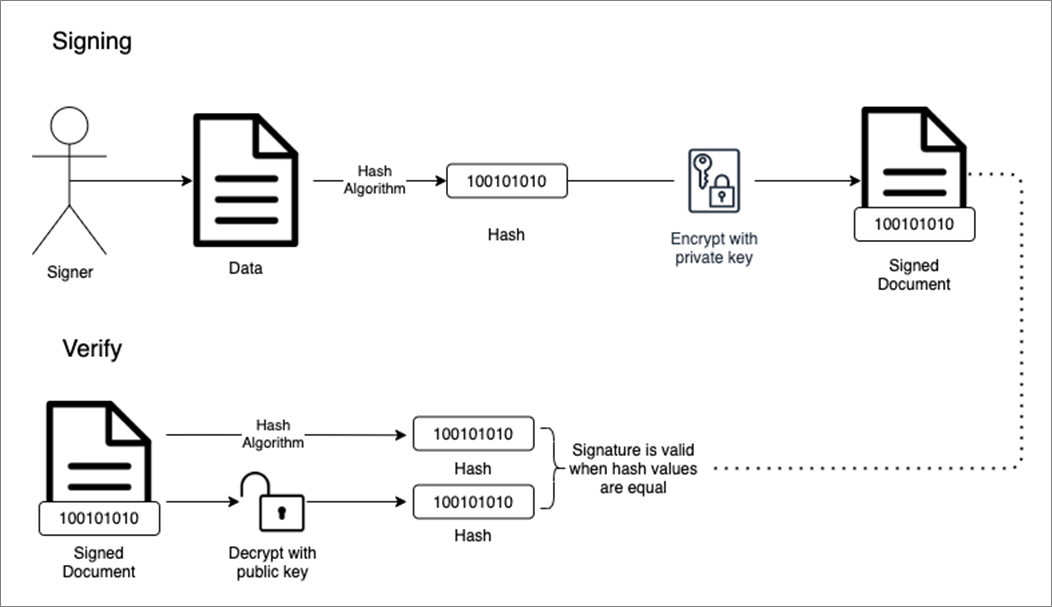
Figure 1 – How digital signatures work.
In this tutorial, I will leverage AWS CloudHSM to create and verify a digital signature, using PKCS#11.
What is PKCS#11?
PKCS is a group Public-Key Cryptography Standards devised and published by RSA Security. The PKCS#11 standard defines a platform-independent API to access cryptographic tokens, such as HSM and smart cards.
AWS CloudHSM offers an implementation of the PKCS#11 library, which is what we’re going to use to interface with the HSM.
HSM User Types
Several roles are associated with managing an HSM. Unlike other AWS services, CloudHSM does not use AWS Identity and Access Management (IAM) users. Rather, you use Crypto Officer (CO) and Crypto User (CU) users directly on the HSM.
During the setup of CloudHSM for the sample application, you’ll see how to create these users. More information on understanding HSM users can be found in the documentation.
Prerequisites for Running the Sample Application
This tutorial assumes you already have an AWS account and an IAM user with AWS CloudHSM Power User permissions as described in the Identity and Access Management for AWS CloudHSM section of the AWS CloudHSM User Guide.
We can use the default virtual private cloud (VPC) for this tutorial.
Step 1: Prepare the EC2 Instance and AWS CloudHSM Cluster
Create the Amazon EC2 Instance
We will use ‘amazonlinux2’ as our Amazon Machine Image (AMI) for this instance, as the commands I will be showing have been tested against this distro.
To create and launch an Amazon Elastic Compute Cloud (Amazon EC2) instance, you can follow the user guide tutorial.
Install Required Packages to Your EC2 Instance
Once the EC2 instance is ready, connect to it using SSH or the AWS Systems Manager Session Manager to install the following required packages:
cloudhsmclient– This is how we talk to our CloudHSM cluster from our EC2 instance.cloudhsmclient-pkcs11– This is how we talk to CloudHSM via our application.python3and dependencies are able to install the python package PyKCS11.
Install yum packages by running these commands:
Install pip:
Install Python packages:
Create, Initialize, and Activate the CloudHSM Cluster
Below are the steps you need to take to set up an AWS CloudHSM cluster ready for use in the demo application:
- Create a cluster.
- Initialize the cluster.
- Configure CloudHSM Client for the Linux operating system (Windows instructions are also available in the documentation). We have already installed the CloudHSM client. We just need to follow the Edit the client configuration step.
- Activate the cluster.
Once your cluster is activated, you can now create an HSM.
Set Up AWS CloudHSM for the Sample Application
To create a Crypto User (CU), ensure the HSM client is started:
Start the user management tool, which will give you an aws-cloudhsm> prompt:
Log in in with the previously created Crypto Officer (CO) credentials:
Create a CU:
Create an RSA Key Pair for the CU
Now that you have a CU, let’s create a key pair.
If you still have an aws-cloudhsm> prompt, press ctl-c to exit the user management tool. Start the key management tool with the following command:
Log in as in the CU:
Create an RSA keypair within the HSM:
The table below explains the flags for this command:
| Flag | Description |
| -m | Specifies the length of the modulus in bits. The minimum value is 2048. |
| -e | Specifies the public exponent. |
| -l | Key pair label. |
| -attest | Runs an integrity check that verifies the firmware on which the cluster runs on has not been tampered with. |
| -nex | Makes the private key nonextractable. |
If you still have a Command> prompt, press ctl-c to exit the user management tool.
Step 2: Deploy the Sample Application
This application will sign the text ‘Sign me please.’ with the RSA private key we created in the HSM using SHA256.
The below code uses the PyKCS11 package to call functions in the CloudHSM PKCS#11 library.
PyKCS11
PyKCS11 is an open source wrapper for Python, which allows us to interface with the AWS CloudHSM PKCS#11 library without having to use C. The PyKCS11 project is located on GitHub, and you can check out the documentation for more information about the AWS CloudHSM PKCS#11 library.
Running the Python Code
The below code signs the payload ‘Sign me please.’ using a key stored in CloudHSM.
The code performs the following actions:
- Load the
cloudhsmclient-pkcs11lib. - Create a session with the HSM.
- Log in to the HSM and identify the user’s private key to be used for signing the payload.
- Sign the payload and log the signature to the console.
Copy the code above, edit a new file in your home folder on your EC2 instance, and paste the code into the file:
To save and quit, press ESC then : and then wq!
Now run the code:
Below is the expected response from this demo application. The response is the string ‘Sign me please.’ hashed using SHA256 and then signed using the RSA private key. This is our digital signature.
Troubleshooting: CloudHSM Not Started
If you come across the below error:
Using the service to start the client appears to cause this issue.
Ensure you have started the CloudHSM client using the below command:
Clean Up
To clean up after this demo, you need to remove any active HSMs from you cluster. You can leave the cluster there empty if you would like to use it again, as you are only billed for the HSMs in your cluster.
Conclusion
In this post, I showed how to successfully sign data using keys stored in a CloudHSM using Python and PKCS#11.
As part of our AWS Security practice at BJSS, we run a free AWS Well-Architected Review to assess your current security posture in the cloud. As an outcome, we’ll share with you a detailed plan and roadmap for improvements.
Organizations can now benefit from BJSS Enterprise Cloud—a secure and scalable landing zone accelerator that has helped both public and private sector clients accelerate their journeys to AWS.
The content and opinions in this blog are those of the third-party author and AWS is not responsible for the content or accuracy of this post.
.

.
BJSS – AWS Partner Spotlight
BJSS is an AWS Competency Partner and leading delivery-focused IT and business consultancy providing a wide range of IT delivery and advisory services.
Contact BJSS | Partner Overview
*Already worked with BJSS? Rate the Partner
*To review an AWS Partner, you must be a customer that has worked with them directly on a project.