AWS Partner Network (APN) Blog
Top Recommendations for IAM from Our AWS Heroes – Part 2: The Visual Editor and Federation
By Ben Bridts, AWS Technologist at Cloudar
 |
AWS Identity and Access Management (IAM)‘s 10th anniversary continues with Part 2 of our blog series, where you’ll hear about the top recommendations on IAM from AWS Heroes and AWS Partner Network (APN) Ambassadors such as myself.
In Part 1 of the series, Rowan Udell covers how to balance developer innovation with the principle of least privilege and elaborated on IAM resource IDs. In Part 3, Ian Mckay explores permissions boundaries and conditions, and in Part 4 Mark Nunnikhoven dives deep on available permissions and user identity.
I am an AWS Technologist at Cloudar, an AWS Premier Consulting Partner and leading AWS Professional Services company with a customer-centric approach. Having a broad interest in serverless computing, automation, and enabling builders, I work with businesses ranging from startups to enterprises.
As I begin with my recommendations on IAM, I hope that all of these insights will enable you to build better and more securely using this foundational service.
Let the Console Guide You
Writing an IAM policy can be tricky. Not only do you have to make sure you’re using the correct syntax, you also have to think about which actions, resources, and conditions you want to include. Tools like AWS IAM Access Analyzer policy checks, Parliament, and the AWS CloudFormation Linter can check the syntax, and more.
Don’t feel overwhelmed, though. When beginning to learn what to include in a policy, you can start with the AWS Security documentation page, which has a direct link to the security-specific pages for each AWS service. Here will be a link to the IAM pages specific to that service, where you can find policy examples to help you get started.
Although you’ll still need to understand how API calls relate to IAM actions and how you will format the Amazon Resource Names (ARNs) for the resources section of a policy, these pages can help.
For another place where I frequently start that gives the complete overview of the actions, resources, and condition keys for AWS services, you’ll need to look at the Service Authorization Reference. In Part 4 of our blog series coming soon, Mark Nunnikhoven will explain why that’s an important reference. Thankfully, the console can help both with writing correct policies and understanding what goes in them.
When you create a policy—and this works for both inline and managed policies—the IAM console shows you the visual editor. If you use the editor, you end up with the correct syntax and get helpful documentation along the way.
Like me, you may not have noticed all of these features because some of them are hidden behind the light grey question marks. The editor is, however, a more concise way to see all the possible actions. Selecting a question mark gives you a quick look into the same documentation that we mentioned before, including a short description of the action, the resource types, and the condition keys.
Here is the IAM policy editor when granting access to Amazon Simple Storage Service (Amazon S3).
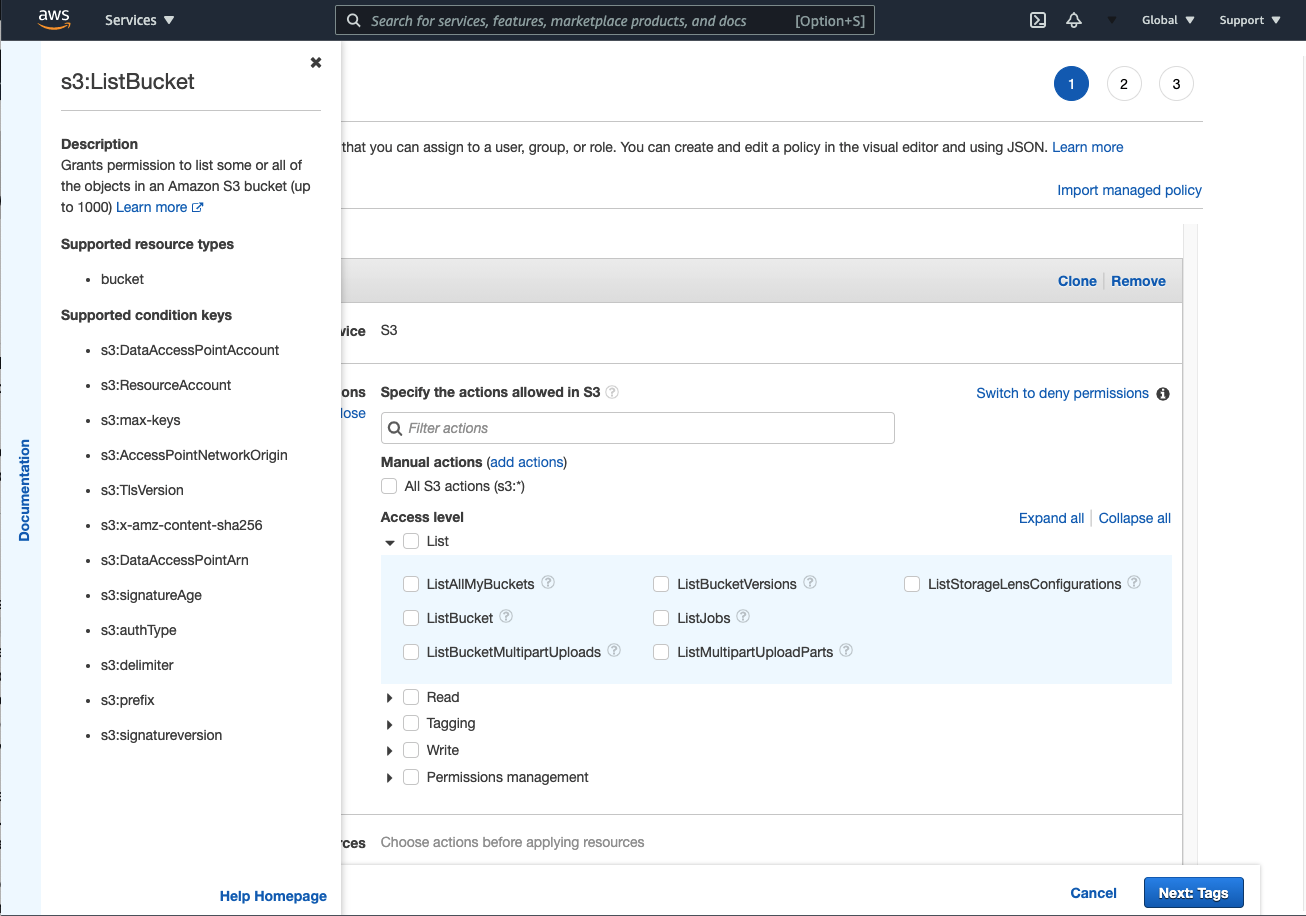
Figure 1 – IAM policy visual editor with S3 List actions expanded.
After you select the actions that fit your use case, you also can open a dialog box that helps you write the correct ARN in the resources section. To do this, under Resources, choose Add ARN, as shown below.
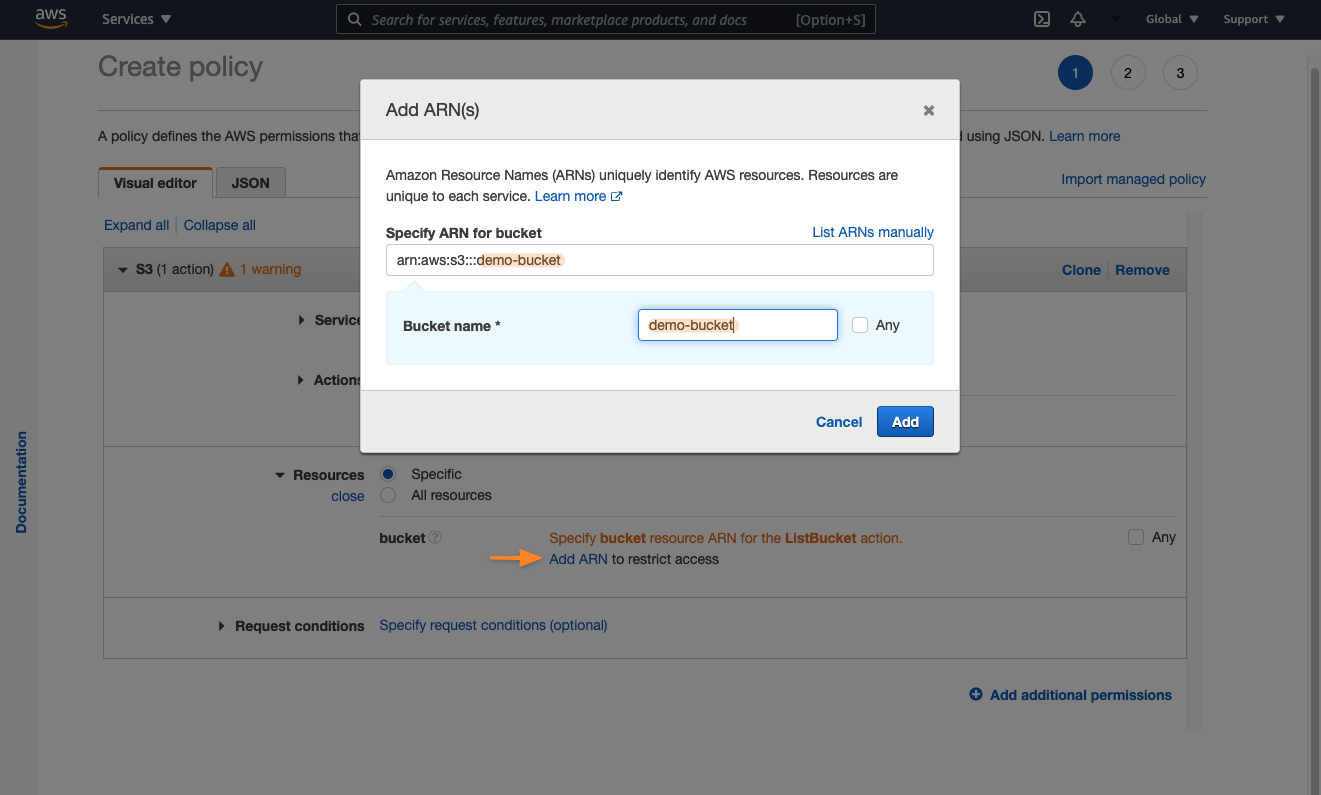
Figure 2 – IAM policy visual editor when specifying an ARN as your resource.
You also have the option of opening a dialog box that helps you add a condition. To do this, expand the Request conditions section and choose Add condition.
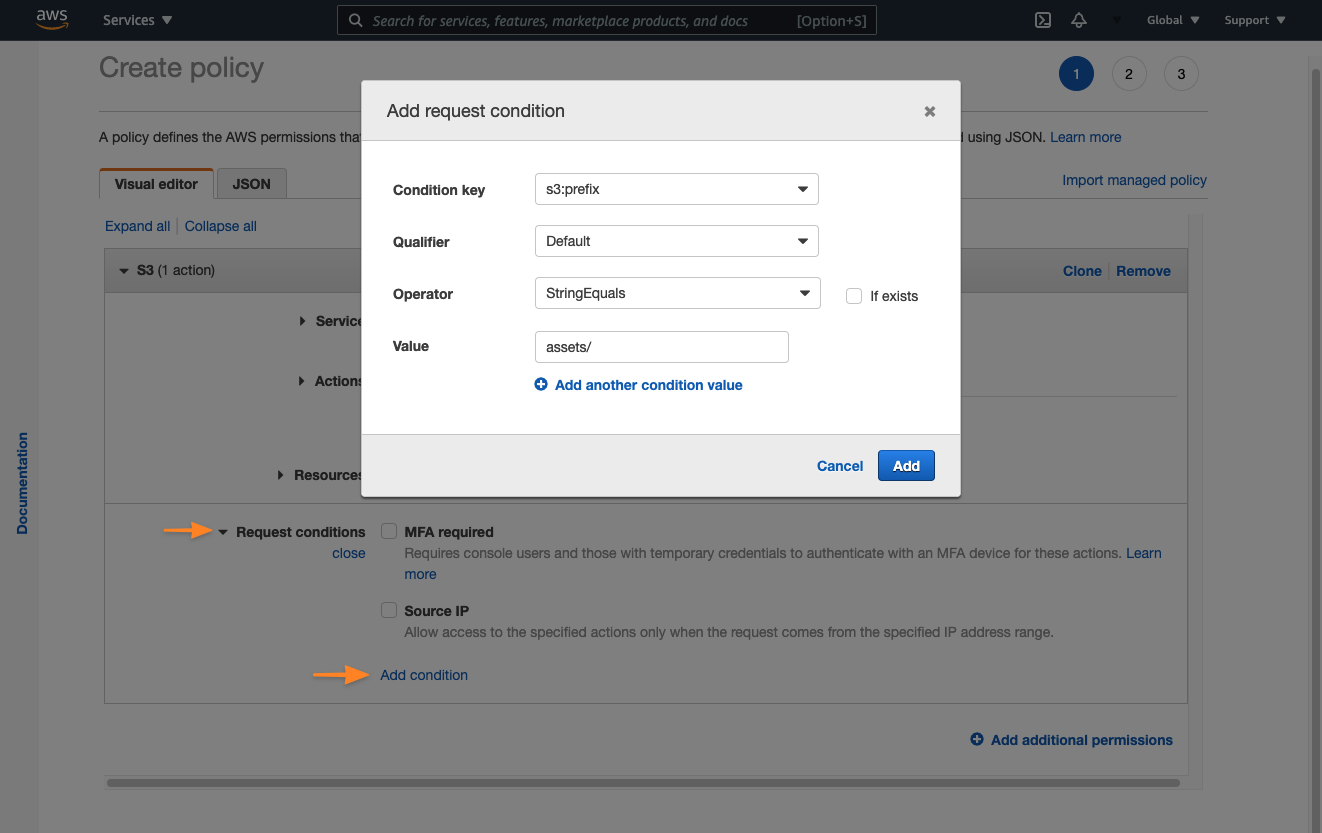
Figure 3 – IAM policy visual editor when adding a condition.
After you finish creating the policy, you can create it directly in the console or take the created JSON document and deploy it in your preferred way. I like to use AWS CloudFormation because it allows me to add comments to the policy and write it in YAML instead of JSON.
Don’t Use Users as Users
AWS recommends not to use the root user credentials and to create users, groups, and roles instead. Even though AWS introduced IAM 10 years ago, that advice still stands: avoid using the root user.
However, with all of the features that were released in the last decade—and a multi-account setup becoming more the norm—it might be time to take this advice a step further and rephrase it as “use short-lived credentials for everything (that supports it).” This is achieved through federation, which makes it possible for you to have a central location for your identities, combined with the IAM roles they will assume.
If you’re not used to working with IAM roles, federation might seem daunting at first, but it’s an investment with big returns:
- Keep all your identities in one place. That can be the built-in identity store in AWS Single Sign-On (AWS SSO), your own identity provider (IdP), or a dedicated AWS account with IAM users. Where possible, I recommend you use AWS SSO.
- Because you’re federating into each account, there is minimal overhead to add a new account, and the process to sign in to each one will be the same.
- You’re not restricted to one role in each account, so you can have a read-only role that you use by default, and a read-write role for when you need to make changes.
The AWS Command Line Interface (AWS CLI) v2 also supports assuming roles and using AWS SSO, so this strategy isn’t limited to the console.
There are a few approaches you can take for federation. Each of them ends with short-lived credentials in the account where you’re going to work, so you don’t have to pick only one option. They can safely co-exist.
- AWS SSO: This service supports an internal identity store, SAML 2.0, and Active Directory. It also integrates directly with AWS Organizations.
- You can configure an external IdP, by using SAML or OpenID Connect (OIDC), for each AWS account. To learn how to do this, see Identity providers and federation.
- If neither of those options work for your current setup, you can create one AWS account to serve as an identity store and create all your IAM users in there. You can then create IAM roles in all your other accounts, and allow the users to assume those. To learn more, see the IAM tutorial Delegate access across AWS accounts using IAM roles.
If you want to know more about federation, see this dedicated page.
Summary
The AWS Identity and Access Management (IAM) visual editor is there to help you when creating policies. It provides helpful documentation and gives you the correct syntax.
You’ll also want to refer to the AWS Security Documentation page for service-specific policy examples and the Service Authorization Reference when wanting an overview of the actions, resources, and condition keys for AWS services.
Finally, I explained in this post why you should use federation due to the short-term credentials made possible by IAM roles. More tips like these can be found throughout our series!
Be sure to check out the other posts in our IAM 10th anniversary series on the APN Blog:
- Part 1 – Rowan Udell shares why less is more when it comes to privileges
- Part 3 – Ian Mckay explores permissions boundaries and conditions
- Part 4 – Mark Nunnikhoven dives deep on available permissions and user identity
The content and opinions in this blog are those of the third-party author and AWS is not responsible for the content or accuracy of this post.
.

.
Cloudar – AWS Partner Spotlight
Cloudar is an AWS Premier Consulting Partner that provides a best of breed approach in migration, managed services, cloud-native development, data analytics, and more.
Contact Cloudar | Partner Overview
*Already worked with Cloudar? Rate the Partner
*To review an AWS Partner, you must be a customer that has worked with them directly on a project.