AWS for SAP
Integrating SAP Systems with AWS Services using SAP Open Connectors
Introduction
SAP customers are accelerating innovation and reforming business process by using AWS services. Customers such as Zalando, Invista and Bizzy have modernised their SAP landscape and streamlined operations by integrating SAP with AWS technologies. SAP’s RISE with SAP solution provides consumption credits for SAP Business Technology Platform (SAP BTP), which customers can use for integration and extension scenarios. Customers frequently ask how SAP systems can be integrated with AWS services using SAP BTP to cover wide range of use cases such as analytics, machine learning, video and image recognition and many more.
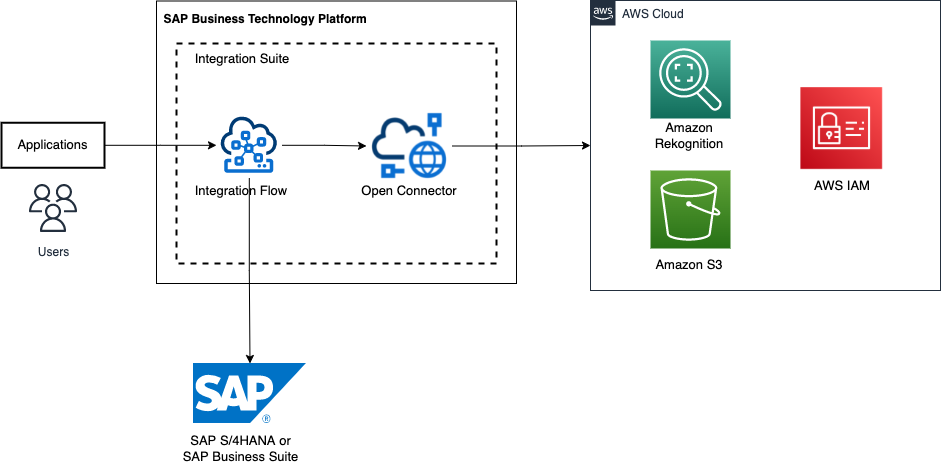
This blog post shows how you can integrate SAP systems with AWS services using SAP Open Connectors, which is a component of SAP Integration Suite available on the SAP Business Technology Platform. SAP Open Connectors has prebuilt connectors for Amazon Simple Storage Service (Amazon S3) and Amazon SQS. In addition, you can accelerate integration by creating custom connectors to integrate with other AWS services. This blog is an extension of the AWS Adapter described in the blog Integrating SAP Systems with AWS Services using SAP Business Technology Platform
Overview
I will show how you can create a custom SAP Open Connector to connect to Amazon Rekognition. Amazon Rekognition makes it easy to add image and video analysis to your applications. You just provide an image or video to the Amazon Rekognition API, and the service can identify objects, people, text, scenes, and activities. It can detect any inappropriate content as well. Amazon Rekognition is based on the same proven, highly scalable, deep learning technology developed by Amazon’s computer vision scientists to analyze billions of images and videos daily. It requires no machine learning expertise to use. Amazon Rekognition includes a simple, easy-to-use API that can quickly analyze any image or video file that’s stored in Amazon S3. Amazon Rekognition is always learning from new data, and we’re continually adding new labels and facial comparison features to the service.
The custom SAP Open Connector that you will create will make API calls to Amazon Rekognition Image to analyze images. The custom connector will then be used in the SAP Integration Suite Integration Flow to identify the product image from S3 bucket and retrieve products matching the image from SAP system.
Walkthrough
Below are the steps that will be performed in this blog.
- Configure access to AWS services
- Create custom SAP Open Connector to connect to Amazon Rekognition
- Test SAP OData Service
- Create credentials in Security Material of the SAP Integration Suite
- Create Integration Flow in the SAP Integration Suite
- Test Integration Flow with Amazon Rekognition
Prerequisites
For this walkthrough, you should have the following prerequisites:
- SAP BTP Trial account
- Set up Integration Suite as described in Set Up Integration Suite Trial
- SAP S/4HANA or SAP Business Suite
- An AWS account
- An S3 bucket with a product image
1. Configure access to AWS services
Create an IAM user in your AWS account with programmatic access. Attach AmazonRekognitionReadOnlyAccess permission to this user and read only permission to S3 bucket where the product image is uploaded. Download access key ID and secret access key, which will be used later in SAP Open Connector configuration.
2. Create custom SAP Open Connector to connect to Amazon Rekognition
2.1. In the SAP Integration Suite home page, select the tile Extend Non-SAP Connectivity to open SAP Open Connectors page.
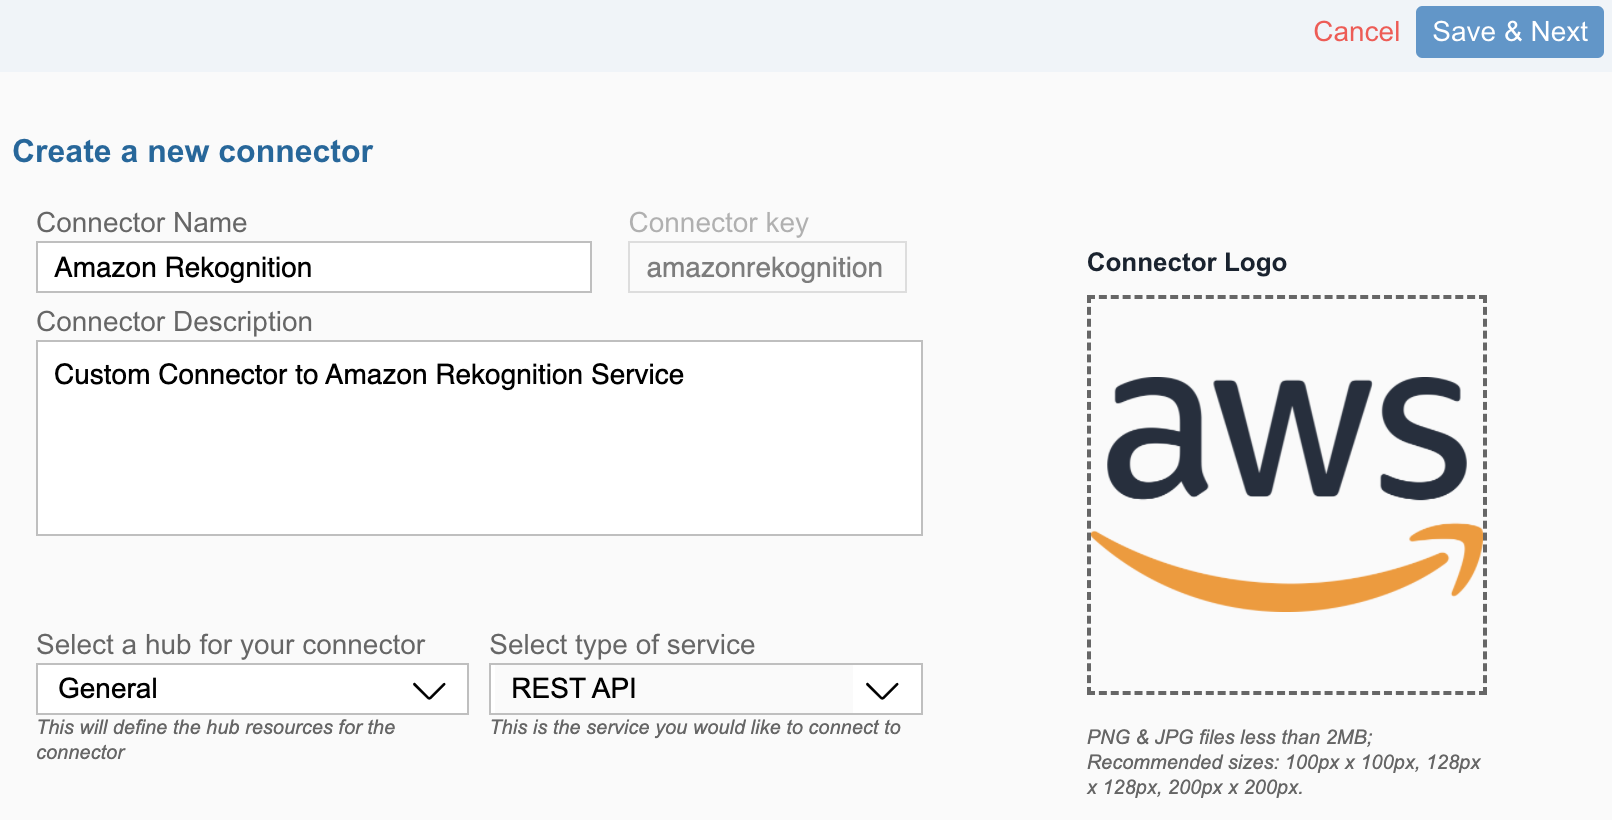
Select Connectors from the left navigation menu, and choose Build New Connector. Provide connector details as shown in the below screenshot. You can upload a connector logo (optional). Choose Save & Next
2.2. In the “Setup” tab, for Base URL, provide Amazon Rekognition endpoint URL. Refer Amazon Rekognition endpoints and quotas to get endpoint information for your AWS region. The us-east-1 region is used in this example.

2.3. To add authentication information to Amazon Rekognition API request, you need to use Signature Version 4 signing process. In “Authentication” section, select awsv4 as authentication type. Enter your AWS region name (in this example it is us-east-1) in “AWS Region Name”. Enter rekognition in “AWS Service Name”.

2.4. The headers Content-Type and X-Amz-Target must be included in the request to Amazon Rekognition. This can be achieved by using PreRequest Hook. In “Hooks” section, create a PreRequest Hook with the following code. Choose Save
let vendorHeaders = request_vendor_headers;
vendorHeaders['Content-Type'] = 'application/x-amz-json-1.1';
vendorHeaders['X-Amz-Target'] = 'RekognitionService.DetectLabels';
done({
	'request_vendor_headers': vendorHeaders
});
2.5. Navigate to “Resources” tab. Here you will add a resource which will be used for the request.
Choose “ADD RESOURCES” -> “Blank”. In the pop up, enter detectlabels in “Cloud Connector Resource Name”. Check only the POST radio button and add the resource.
Choose pencil icon (edit) in detectlabels resource. Enter /detectlabels in “Maps to” field. Under “Configuration”, select Execution Type as Function REST and enter Description.

You’ve to add request model for the resource. Request model provides the structure of the JSON body for POST request. In the detectlabels resource, under “Models” section, choose Request Model. Enter detectlabelsPostReq in “Model Display Name”.
Enter the following JSON and choose Save
{
  "detectlabelsPostReqImageS3Object": {
    "properties": {
      "Bucket": {
        "type": "string",
        "x-samplevalue": "bucket"
      },
      "Name": {
        "type": "string",
        "x-samplevalue": "input.jpg"
      }
    },
    "title": "S3Object",
    "type": "object"
  },
  "detectlabelsPostReq": {
    "properties": {
      "Image": {
        "type": "detectlabelsPostReqImage"
      },
      "MaxLabels": {
        "format": "int32",
        "type": "integer",
        "x-samplevalue": 10
      },
      "MinConfidence": {
        "format": "int32",
        "type": "integer",
        "x-samplevalue": 75
      }
    },
    "title": "detectlabelsPostReq"
  },
  "detectlabelsPostReqImage": {
    "properties": {
      "S3Object": {
        "type": "detectlabelsPostReqImageS3Object"
      }
    },
    "title": "Image",
    "type": "object"
  }
}
You’ve to add response model for the resource. Response model provides the structure of the response. In the detectlabels resource, under “Models” section, choose Response Model. Enter detectlabelsPostRes in “Model Display Name”. Enter the following JSON and choose Save
{
  "detectlabelsPostResLabelsParents": {
    "properties": {
      "Name": {
        "type": "string",
        "x-samplevalue": "string"
      }
    },
    "title": "Parents"
  },
  "detectlabelsPostResLabelsInstances": {
    "properties": {
      "BoundingBox": {
        "type": "detectlabelsPostResLabelsInstancesBoundingBox"
      },
      "Confidence": {
        "format": "double",
        "type": "number",
        "x-samplevalue": 99.99885559082031
      }
    },
    "title": "Instances"
  },
  "detectlabelsPostResLabelsInstancesBoundingBox": {
    "properties": {
      "Height": {
        "format": "double",
        "type": "number",
        "x-samplevalue": 0.863124430179596
      },
      "Left": {
        "format": "double",
        "type": "number",
        "x-samplevalue": 0.06545531749725342
      },
      "Top": {
        "format": "double",
        "type": "number",
        "x-samplevalue": 0.13158991932868958
      },
      "Width": {
        "format": "double",
        "type": "number",
        "x-samplevalue": 0.8849014043807983
      }
    },
    "title": "BoundingBox",
    "type": "object"
  },
  "detectlabelsPostRes": {
    "properties": {
      "LabelModelVersion": {
        "type": "string",
        "x-samplevalue": "2.0"
      },
      "Labels": {
        "items": {
          "type": "detectlabelsPostResLabels"
        },
        "type": "array"
      },
      "OrientationCorrection": {
        "type": "string",
        "x-samplevalue": "string"
      }
    },
    "title": "detectlabelsPostRes"
  },
  "detectlabelsPostResLabels": {
    "properties": {
      "Confidence": {
        "format": "double",
        "type": "number",
        "x-samplevalue": 99.99885559082031
      },
      "Instances": {
        "items": {
          "type": "detectlabelsPostResLabelsInstances"
        },
        "type": "array"
      },
      "Name": {
        "type": "string",
        "x-samplevalue": "string"
      },
      "Parents": {
        "items": {
          "type": "detectlabelsPostResLabelsParents"
        },
        "type": "array"
      }
    },
    "title": "Labels"
  }
}
Choose Save on the upper right. Navigate to “API Docs” section. The detectlabels resource is visible.
2.6. To authenticate with Amazon Rekognition, you need to create a connector instance. Select Authenticate Instance option on the left and enter Name for the instance, AWS Access Key ID and Secret Access Key of the IAM user created in Step 1. Choose Create Instance
2.7. Select Test in the API docs tile to navigate to API Docs. You can test the connector by making request to Amazon Rekognition.
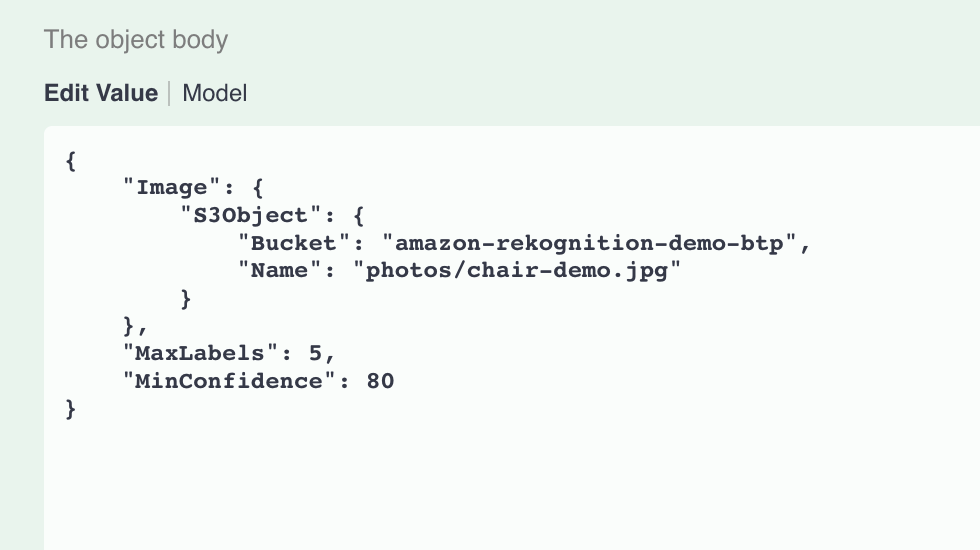
Select the instance created in above step and select /detectLabels resource. Choose Try it out. Enter the following payload in body section. Replace your-S3-bucket-name and your-S3-image-key-name with your own information
{
   "Image": {
      "S3Object": {
         "Bucket": "your-S3-bucket-name",
         "Name": "your-S3-image-key-name"
      }
   },
   "MaxLabels": 5,
   "MinConfidence": 80
}
MaxLabels is the maximum number of labels to return in the response.
MinConfidence is the minimum confidence that Amazon Rekognition Image must have in the accuracy of the detected label for it to be returned in the response.
The request should resemble the example in the following screenshot. Choose Execute.
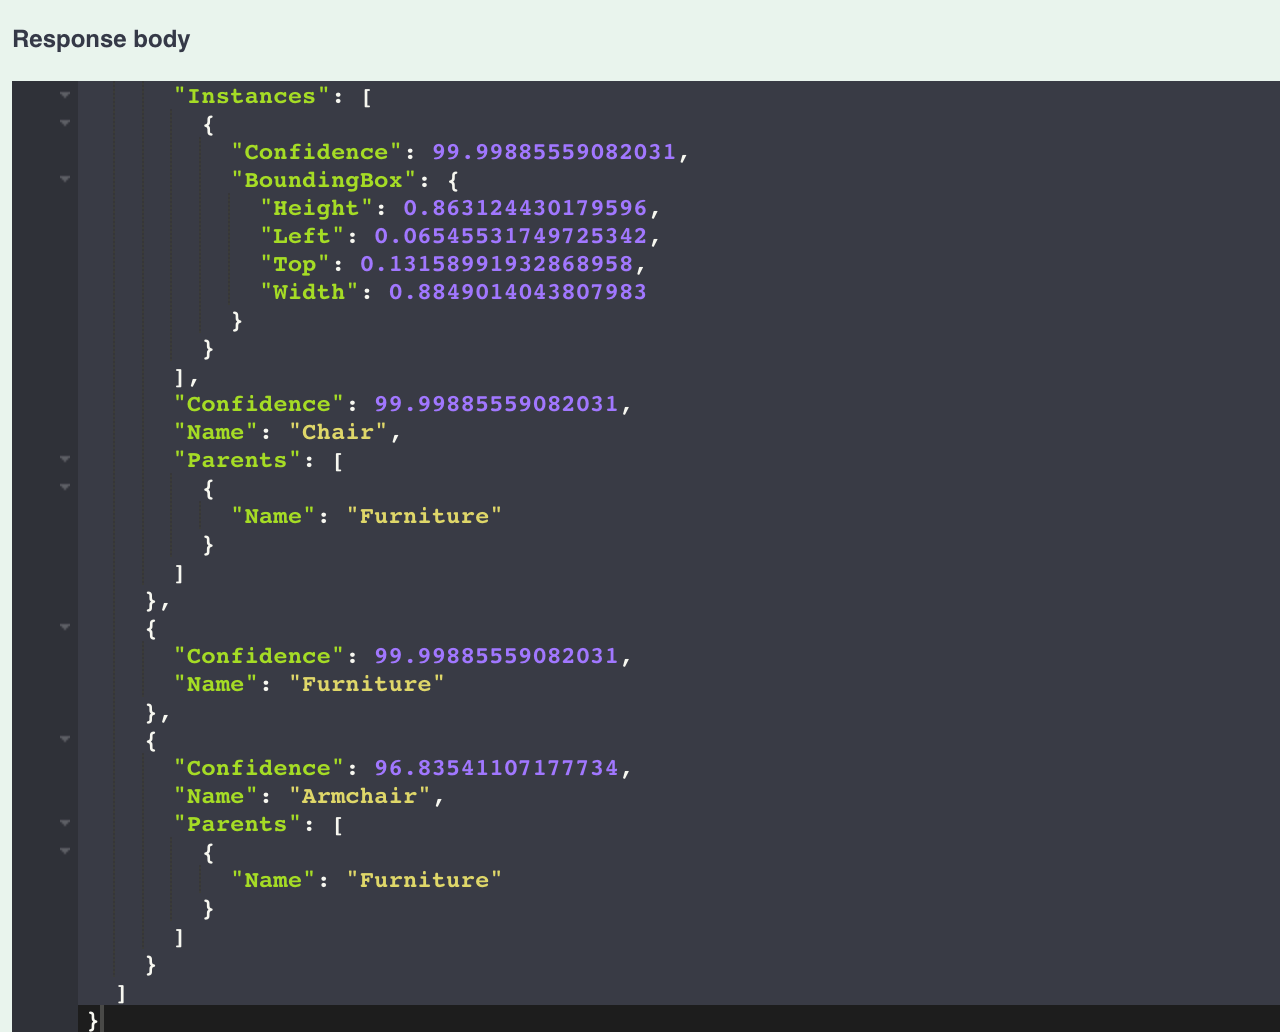
If the request is sent successfully to Amazon Rekognition, you will see a server response code of 200. You will see a response that resembles the example in the following screenshot. The response shows an array of labels detected in the image and the level of confidence by which they were detected.
2.8. Make note of the authorization token from the Curl field. The format of the authorization token will be as follows.
Authorization: User <value>, Organization<value>, Element<Value>
Make note of Request URL field. These values will be used later in Integration Flow.

You’ve now created a custom SAP Open Connector which can connect to the Amazon Rekognition service. This connector will be used in the Integration Flow.
3. Test SAP OData Service
I will use the Enterprise Procurement Model (EPM) OData service (EPM_REF_APPS_SHOP_SRV) in this demo. If you want to know more about what this OData service provides, see OData Exploration with EPM . This OData service has an entity set called “Products”, which gives the list of Products. This OData service and entity set will be used in the Integration Flow.
For instructions on how to activate the OData service, see Activate Available OData in SAP Gateway. To test OData service, you can use the SAP Gateway Client (Transaction Code /IWFND/GW_CLIENT), with the following Request URI.
/sap/opu/odata/sap/EPM_REF_APPS_SHOP_SRV/Products?$format=json&$select=Id,Description,SubCategoryId
The following screenshot shows JSON output of “EPM_REF_APPS_SHOP_SRV” OData service from SAP Gateway Client. The HTTP Response section shows Description, Id and SubCategoryId of each product.
4. Create credentials in Security Material of the SAP Integration Suite
The security material is used to store credentials of Amazon Rekognition Open Connector and the SAP system which will be referenced in the Integration flow.
In SAP Integration Suite home page, select Design, Develop, and Operate Integration Scenarios. Select Monitor on the left menu and choose Security Material tile under Manage Security section.
4.1. To create user credential for Amazon Rekognition Open Connector, choose Create -> User Credentials. Enter the Name for security material and select Open Connectors in Type. Enter values for User, Organization and Element from step 2.8. Choose Deploy to deploy Amazon Rekognition Open Connector credentials.
 4.2.To create user credential for SAP system, choose Create -> User Credentials. Enter the Name for security material and select User Credentials in Type. Enter values for User and Password of the SAP system which will be used in the Integration Flow. Choose Deploy to deploy SAP credentials.

5. Create Integration Flow in the SAP Integration Suite
In this step, you will create an Integration Flow which will connect to the Amazon Rekognition SAP Open Connector that you created in Step 2 and the OData service of SAP system in Step 3.
5.1. In SAP Integration Suite home page, select Design, Develop, and Operate Integration Scenarios
Select Design on the left menu and choose Create on the upper right. Enter Name, Technical Name, and Short Description fields. Choose Save on the upper right to create a new integration package.
5.2. Navigate to Artifacts tab and choose Add -> Integration Flow. Enter Name, ID and Description to create an Integration Flow.

5.3. Select the Integration Flow. You will see the graphical designer where you can define the integration process. Choose Edit on the upper right.
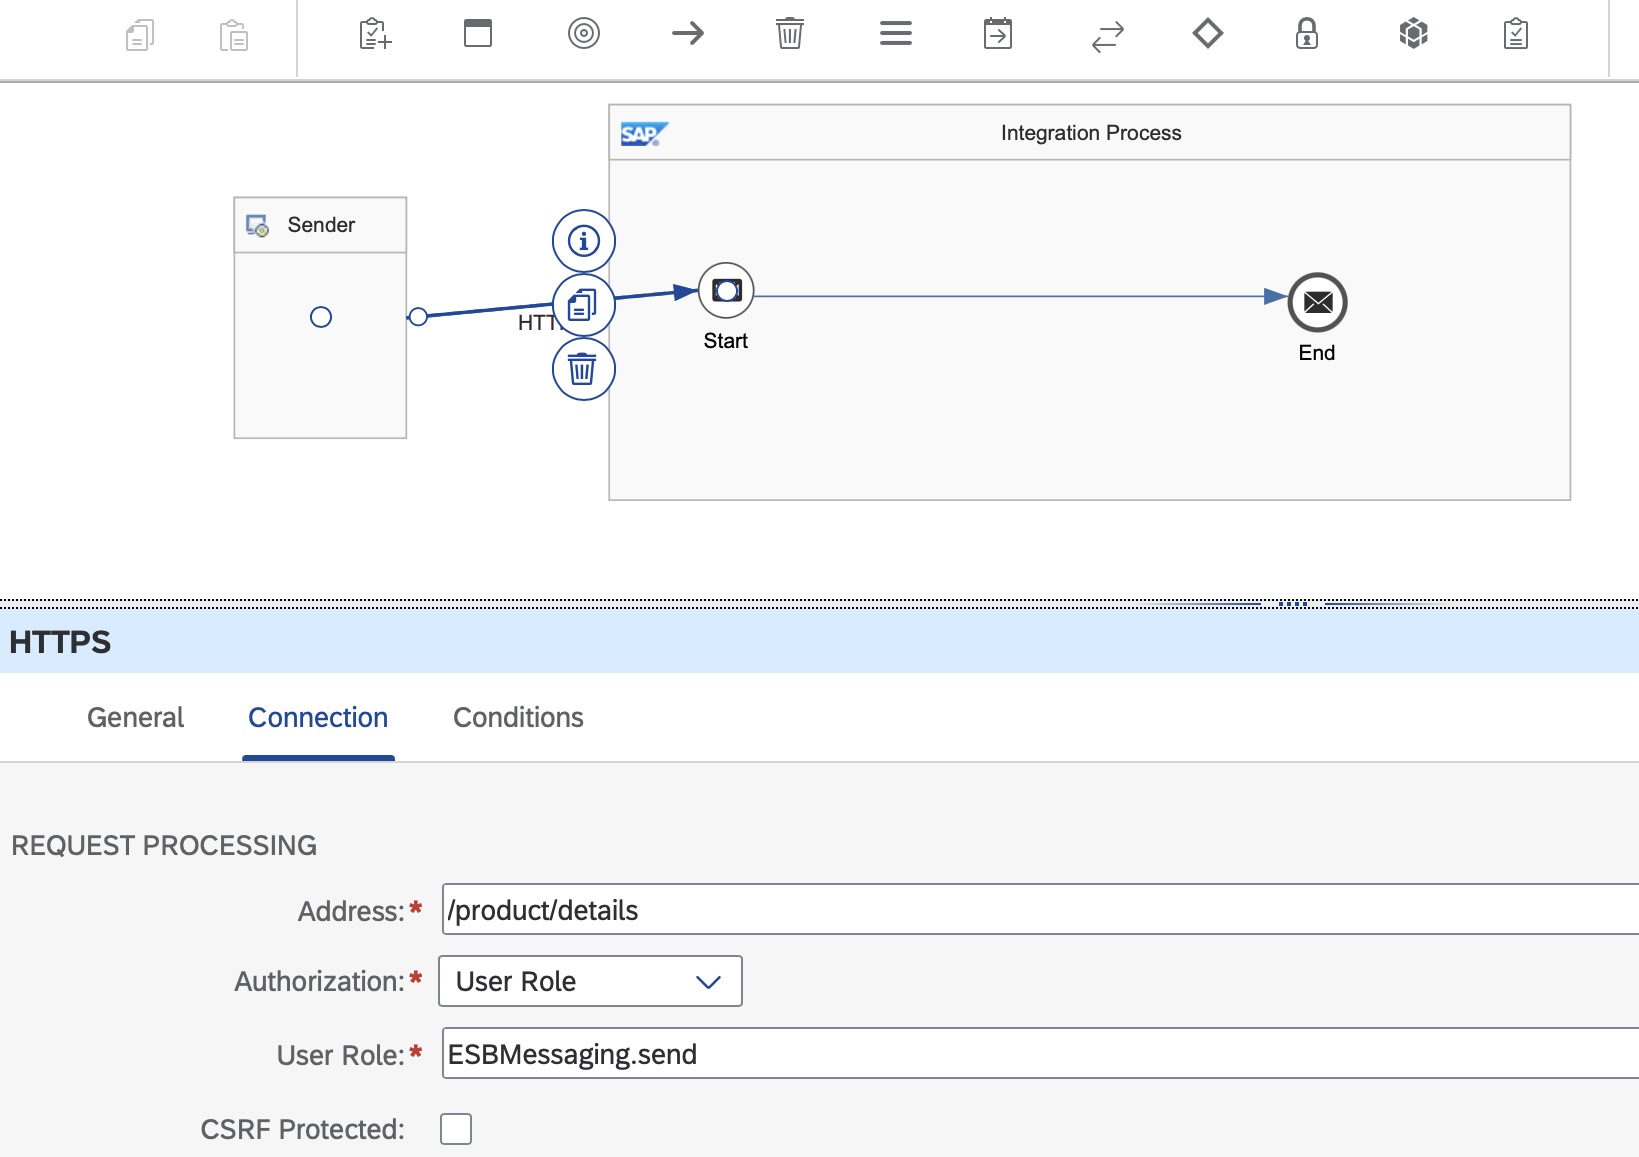
In the graphical editor, choose Sender step. Click the arrow icon on Sender and drag it to Start step. In Adapter Type dialog window, select HTTPS adapter.
In the property sheet below, select Connection tab, and enter /product/details in Address field. A sender can call the Integration Flow through this endpoint address. Uncheck “CSRF Protected” field.
5.4. From the palette (the grey bar on the top containing integration flow steps), choose Call -> External Call -> Request Reply and add it upon the arrow in integration process canvas. Request Reply is used to call the custom Amazon Rekognition SAP Open Connector defined in next step and get back a response.
5.5. In this step, I will show how you can connect to the custom Amazon Rekognition SAP Open Connector in the Integration Process.
From the palette, choose Participant -> Receiver. Add the Receiver below Integration Process canvas and name it as “OpenConnectors”. Click the arrow icon on Request Reply 1 and drag it to the Receiver (Open Connectors). Select OpenConnectors in Adapter Type dialog window. In the property sheet, enter Request URL from Step 2.8 in Base URI field of Open Connector.
In Credential Name field, select Security Material that you created in Step 4.1, and select the resource /detectlabels of Amazon Rekognition SAP Open Connector. Change method to POST. Leave all other parameter values as default.

5.6. In this step, I will add Groovy script to parse the output of Amazon Rekognition SAP Open Connector. Groovy is a scripting language for the Java platform with java like syntax, supported by the Apache Software Foundation
From the palette, choose Transformation -> Script -> Groovy Script and add it upon the arrow in Integration Process canvas. Click on the + sign next to Groovy Script step to create the script. Replace the contents of the file with the following code and choose OK on the upper right.
This code parses output from Amazon Rekognition SAP Open Connector and creates a filter query which will be used in the OData query to SAP system. The filter query is set in a property named oFilter
import com.sap.gateway.ip.core.customdev.util.Message
import groovy.json.JsonSlurper

def Message processData(Message message) {
    def filterQuery = '';
    def labels;

	def body = message.getBody(java.lang.String) as String
    if (body) {
      def json = new JsonSlurper().parseText(body);
      labels = json.get('Labels');
    }

    labels.each {val ->
        if (filterQuery.trim().length() > 0)
            filterQuery += ' or ';

        filterQuery += "substringof('" + val.Name + "', SubCategoryId)";
    }

    message.setProperty("oFilter", filterQuery);
	return message
}
From the palette, choose Call -> External Call -> Request Reply and add it upon the arrow in integration process canvas. Request Reply is used to call the OData service in SAP system defined in next step and get back a response. At this step, the integration flow will look as below.

5.7. Add Receiver to Integration process, as in step 5.5 and name it as SAP. Click the arrow icon on Request Reply 2 and drag it to the Receiver (SAP). Select OData -> OData V2 in Adapter Type dialog window.
In the property sheet of OData, select Connection tab, enter the OData URL (https://<sap-host>:<sap-port>/sap/opu/odata/sap/EPM_REF_APPS_SHOP_SRV) of SAP system in the Address field. Choose Basic in the Authentication drop down, and enter name of the security material created that you created in Step 4.2.

Select the “Processing” tab and choose Select button in Resource Path field to open a new dialog window with details of SAP OData service. Choose Step 2
Select Products OData entity set in Select Entity. Select only the fields Id, Description and SubCategoryId. These fields will be displayed in the output when the integration flow is executed.
Choose Finish to close the dialog box. In “Processing” tab of OData property sheet, enter the following string in Query Options field. oFilter property was created in the Groovy script in Step 5.6. Leave all other fields as default.
$filter=${property.oFilter}&$select=Id,Description,SubCategoryId
5.8. To convert the output to JSON format, add XML to JSON converter. From the palette, choose Transformation -> Converter -> XML to JSON Converter and add it upon the arrow in Integration Process canvas.
The following screenshot shows the complete Integration Flow. Choose Save on the upper right and then Deploy to deploy the Integration Flow.

6. Test Integration Flow with Amazon Rekognition
I will use Postman to test Integration Flow.
To get the URL of the SAP Integration flow, navigate to “Monitor” -> “Manage Integration Content” and select All tile in SAP Integration Suite. Select your Integration flow. The URL will be in the Endpoints tab. Enter this URL in Postman and select POST method.
To get the username and password, navigate to “Instances and Subscriptions” in the BTP Home page and select default_it-rt_integration-flow under “Instances”. Choose View Credentials. The clientid is the username and clientsecret is the password. Enter these credentials in the “Authorization” tab of postman.
In the Postman “Body” tab, enter the following payload. Replace your-S3-bucket-name and your-S3-image-key-name with your own information. Choose Send
{
   "Image": {
      "S3Object": {
         "Bucket": "your-S3-bucket-name",
         "Name": "your-S3-image-key-name"
      }
   },
   "MaxLabels": 5,
   "MinConfidence": 80
}
If the request is sent successfully to SAP Integration Suite Integration Flow, the response pane in Postman shows a status of 200 OK. You see a response that resembles the example in the following image. The response shows list of all products in SAP system matching the product image in S3 bucket.

Conclusion
In this blog, I’ve shown how you can build a custom SAP Open Connector to connect to Amazon Rekognition service and how this connector can then be leveraged in SAP Integration Suite Integration Flow.
In addition to prebuilt SAP Open Connectors to Amazon S3 and Amazon SQS, you can build feature-rich custom connectors to other AWS services such as Amazon Translate which is a Neural Machine Translation (MT) service for translating text between supported languages, Amazon Simple Email Service (Amazon SES) which is a service that provides an easy, cost-effective way for you to send and receive email using your own email addresses and domains. Customers who are leveraging SAP BTP can connect to AWS services using SAP Open Connectors and simplify integration.
Visit SAP on AWS to learn why more than 5000 active SAP customers are using AWS as their platform of choice and innovation.