AWS Marketplace
Contact center testing, training, and monitoring with Bespoken
For customers building modern contact-center systems with Amazon Connect and Amazon Lex, quality is paramount. High-quality, accurate systems ensure that users aren’t frustrated and increase customer satisfaction (CSAT) as well as first-call resolution (FCR) rates. But it’s expensive and time-consuming to ensure modern Interactive Voice Response (IVR) and Intelligent Virtual Agent (IVA) systems are working correctly.
Test automation fills this gap by enabling you to simulate real interactions with your system. Tests interact via either phone or text message and verify at every step in the chain that the application is working correctly. In work that Bespoken did with a major Canadian utility company, time spent testing was reduced by 90 percent, speech recognition errors were reduced by more than 50 percent, and throughput was increased more than sixfold. What’s more, increased accuracy and reduced bugs lead to higher customer satisfaction. Bespoken Testing for IVR is available in AWS Marketplace. Customers can get started today with implementing their own automated testing regimen to improve the quality, accuracy, and scalability of their systems.
In this blog post, I show how to create an initial set of automated functional tests for your voice experiences. I also show how to set up these tests to run on a schedule so the team always knows the status of their system.
Prerequisites
- A GitHub account – sign up at github.com if you do not already have one.
- An Amazon Connect instance.
Solution overview
The following image shows the solution’s architecture. Here is how it works:
- The test script is loaded and run by the Bespoken test client.
- The client calls the Bespoken Device Service, which in turn interacts with the platform being tested. In this case, it is an Amazon Connect application that is powered by Amazon Lex.
- Amazon Connect and Amazon Lex will potentially interact with your backend services before returning a response to the Bespoken Device Service. It in turn provides a response to the test client.
- The test client then creates a visual HTML report and sends the results to any integrated systems, such as Amazon CloudWatch, DataDog, or Splunk, for additional reporting and notifications.

Solution walkthrough
This solution has the following steps.
- Start with the Bespoken Airlines sample project for Amazon Connect.
- Run the tests as a GitHub Action workflow.
- Review the results of the tests and verify that the IVR is working correctly.
- Set up a schedule for running the tests on a routine basis, both daily and when code changes.
- Customize your own contact center testing.
As part of the first four steps of this section, I show you how I set up an automated testing and monitoring environment using Bespoken. This help you understand how scripts can be written and run to automate your testing.
Step 1: Start with the Bespoken Airlines sample project for Amazon Connect
For end-to-end testing of a contact center-based workflow, Bespoken simulates an actual user talking to the system as closely as possible. The test calls the phone number of the system to be verified and interacts as a real user would. This can be seen in the following sample sequence:
- $DIAL: “Welcome to Bespoken Airlines – how can I help you?”
- “Bookings”: “Sure – where do you want to travel from?”
- “Las Vegas”: “Great – and where do you want to travel to?”
In this sample, a real phone call is placed to the system. The test waits for it to say, “Welcome to Bespoken Airlines – how can I help you?” It then proceeds to the next step and says “Bookings.” The test uses text-to-speech to turn the written words into spoken audio. To validate the response from the phone system, the audio is turned back into written text using speech-to-text. This transcript is then compared to the expected one: “Sure – where do you want to travel from?”.
The following test is a more complete example that validates the sample Bespoken Airlines voice application. This sample comes from Bespoken’s public project on GitHub.
---
- test : Book a flight
- $DIAL:
- prompt : welcome to the Bespoken Airlines Contact Center
- set finishOnPhrase: in a few words please tell me what you're calling about
- New flight reservations:
- prompt: new flight reservations
- set finishOnPhrase:
- what city are you traveling from
- what city are you departing from?
- Miami:
- set finishOnPhrase: what city are you traveling to
- set repeatOnPhrase: what city are you departing from
- Denver:
- prompt: thanks your flight from * to * has been booked
- set finishOnPhrase: what city are you traveling to
You can see how easy it is to map a contact center sequence to a Bespoken test. If you are following along, you can get started with this sample project:
- Go to the public project on GitHub.
- In the upper right, select Fork to add it to your own GitHub account.
Congratulations! Now that you have created your own copy of the project, you are ready to run the sample tests.
Step 2: Run the tests
- In the project on GitHub, at the top of the new project, select Actions.
- In the navigation menu on the left, select End-to-end Tests.
- Select the Run Workflow drop-down. The following screenshot shows the GitHub project page with End-to-end Tests chosen and Run workflow highlighted.

- On the right, choose the Run Workflow button.
Congratulations! You ran the tests on a sample contact center workflow setup using Bespoken’s AWS environment. You can now review the results.
Step 3: Review the results
After the tests are run, a report is generated as part of the GitHub Actions workflow output.
If you are not following along and just want to see an existing report for one of the test runs, they are available at a sample repository in the Actions section.
To view the report, do the following:
- In the GitHub console’s Artifacts section, choose test_output. The output file automatically downloads to your computer.
- The output file is archived in the zip format, so unzip it.
- Browse to the report folder inside the newly extracted directory.
- To view the report, double-click on inline.html.
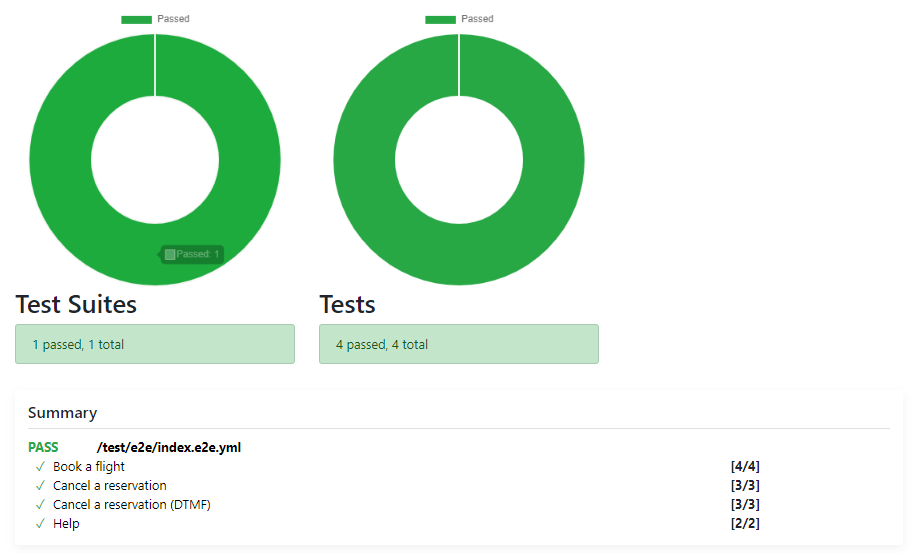
The report shows how many of the test suites passed, in addition to how many tests within each suite passed. The following screenshot shows the report and summary. The report indicates that there is just one test suite with four tests, all of which passed. Following the summary, there is a detailed breakdown of what happened for the test suite. For each test within the suite we see whether or not it passed. The breakdown shows that four out of four steps to book a flight were successfully run. It shows that three of the three steps to cancel a reservation were successful using speech. Another test successfully canceled a reservation using dual-tone multi frequency (DTMF) or touch tones. The tests for getting additional help were successful as well. Refer to the following screenshot of the results.
Step 4: Set up a schedule for testing
As you saw in step 3, tests are run as part of a GitHub Action workflow. Bespoken is built to integrate with popular Continuous Integration/Continuous Delivery (CI/CD) tools, while enabling DevOps best practices. This enables users to:
- Run tests on a set, timed schedule.
- Run tests whenever changes are made to code.
- Run tests when new versions of the system are deployed.
Using continuous integration tools such as GitHub Actions and AWS CodePipeline, you can monitor your software on a regular basis. In this case, I set up my test to run every hour. To do this, you need only the following three lines of configuration in your GitHub Actions workflow file:
on:
schedule:
# Runs our tests at the top of every hour
- cron: '0 * * * *'
You can configure different schedules by using the standard CRON-syntax. For more information, see Events that trigger workflows in the GitHub Actions documentation.
Step 5: Customize your contact center testing
To try this blog post, you need a contact center to test with. To learn how to set one up with Amazon Connect and Amazon Lex for building chatbots and voice bots, read the documentation.
The initial test is only a starting point. To automate your own contact center testing, you can do the following:
- Create a Bespoken trial account and a Virtual Device.
- Add the Virtual Device to your testing.json file.
- Update the phone number in the testing.json file with the phone number you want to test.
- Edit the initial test suite to interact with your contact center system. Follow Bespoken’s documentation to learn how to write plain-English tests.
- Add more tests suites to expand the scope and depth of test coverage.
Conclusion
In this blog post, I showed how to set up automated tests for your contact center voice experiences, run and review the results of these tests, and schedule them using CI/CD to continue running on a routine basis. This is the foundation of building high-quality voice experiences that users will love.
Additional resources
- Use automated tests to evaluate and improve the speech recognition and natural language accuracy.
- Create high-level reports and dashboards for external stakeholders: end customers, executives, and anyone else concerned with the health of the system.
- Integrate with systems such as DataDog to set up fine-grained notifications and alerting, so the right people know right away when there is a problem.
The content and opinions in this post are those of the third-party author, and AWS is not responsible for the content or accuracy of this post.
About the Author
John Kelvie is the CEO and Co-Founder of Bespoken. Bespoken is a provider of automated testing, training and monitoring for voice and chat. Bespoken has thousands of users and works with well-known brands such as Roku, Spotify, Mercedes-Benz, Moën and many more. Bespoken participated in the inaugural Google for Startups Accelerator for Voice AI and has been recognized in print, in online publications, and on broadcasts. Find me on twitter at jpkbst or via email at jpk@bespoken.io.