AWS Marketplace
Liquibase removes database bottlenecks for faster, safer database releases
Application code changes often depend on database schema changes. Developers rely on database administrators (DBAs) to perform database code deployments. When the number of databases and releases is small, this solution works well. As organizations move to the cloud, the number of different databases increases, both in type and usage. Along with the increase in application releases that cloud agility provides, organizations can no longer rely on manual schema changes from DBAs. Furthermore, as the number of releases increases, manual effort inevitably leads to errors and downtime.
In this blog post, Mike and I will walk through an example using Liquibase, a cost-effective, database-independent tool available in AWS Marketplace. This tool helps solve common database change problems that prevent organizations from realizing all the benefits of moving more databases to the cloud, including the following:
- Getting your database code changes into version control so they can be tracked and managed in automation
- Understanding which database changes have been applied to which database environments
- Ensuring bad database changes don’t get promoted to production
- Providing visibility into the database change process to all stakeholders
After completing this tutorial, you’ll understand how to deploy Liquibase on AWS CodePipeline and AWS CodeBuild using AWS CloudFormation to create these and other resources. Additional resources include Amazon Relational Database Service (Amazon RDS), PostgreSQL databases, an AWS CodeCommit repository, and AWS Secrets Manager so that credentials can securely be passed to the pipeline.
Liquibase supports dozens of databases, including Amazon Aurora, Oracle Database, Microsoft SQL Server, MySQL, MariaDB, MongoDB, and Snowflake.
Overview: removing your database bottleneck for faster, safer database releases on AWS using Liquibase
Liquibase is a tool that helps align database code changes with application code changes by using a version-based approach to update your database.
The following tutorial uses a pre-built repository that provides an AWS CloudFormation file along with a .zip file containing all artifacts required to demonstrate how Liquibase integrates with AWS. By installing the provided codebuild-cs-demo-project.zip in an S3 bucket and executing the CloudFormation template with the provided cloudformation-cs-demo-project.yaml, you will have an example of how Liquibase integrates with your existing AWS infrastructure.
Process flow diagram
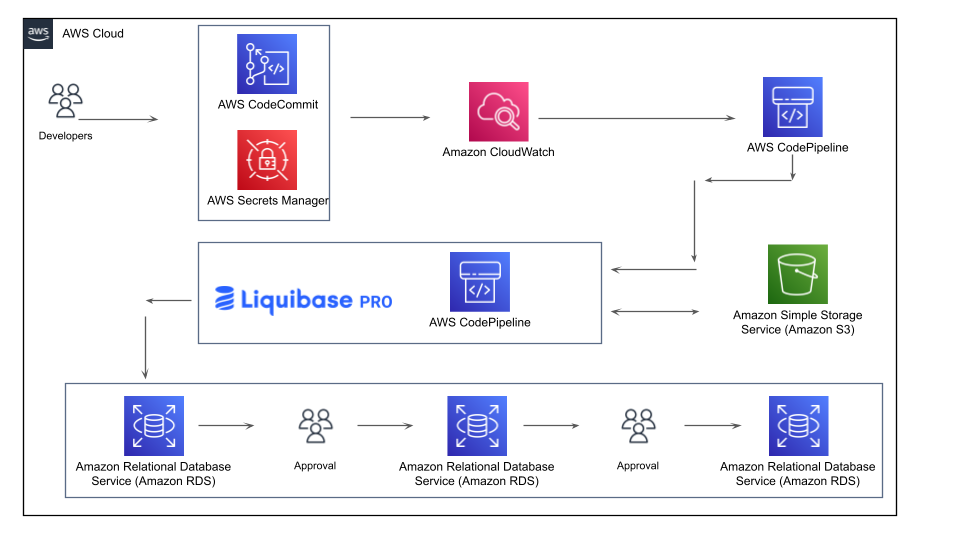
In the following diagram, a developer creates a database schema change. The developer then pushes this change through a series of test, staging, and production databases using an approval process.
The following diagram shows the process flow:
- A developer creates a change to the database, which they check into AWS CodeCommit.
- Amazon CloudWatch is monitoring AWS CodeCommit for changes and sees an update to the repository. This in turn tells AWS CodePipeline to start the pipeline process of making the change to the test Amazon RDS database. AWS CodePipeline runs Liquibase Pro to make the update to the test Amazon RDS database using the AWS Secrets Manager to get the userid and password to connect to the database at runtime.
- Liquibase Pro makes the change to the database and stores the output of the changes into an Amazon S3 bucket.
- If the change is successful, AWS CodePipeline waits for approval of moving that change through the rest of the pipeline. For example, the next step is to move the change to the staging Amazon RDS database. If that change is successful using Liquibase Pro, the AWS CodePipeline waits for the approval to move the change to the production Amazon RDS database using Liquibase Pro to do the update to the database.
Prerequisites
To follow this tutorial, you will need the following:
- AWS account
- AWS S3 bucket
- Database subnet group
- A Liquibase Pro trial license key to initiate advanced features
Additionally, you may wish to use a SQL viewing tool, such as pgAdmin or DBeaver, to verify your database updates.
A. Create an AWS CodePipeline and AWS CodeBuild via AWS CloudFormation
All resources used in this tutorial are created using CloudFormation. The AWS CodeBuild service has been configured to use a Docker Hub image with Liquibase already installed, so there is no need to download and install Liquibase for this tutorial. To create an AWS CodePipeline and AWS CodeBuild, do the following:
- Download the example CodeBuild project, follow this link to download the codebuild-cs-demo-project.zip. You do not need to extract the contents. All artifacts required for this tutorial are contained in the that zip file.
- Note that the name of the .zip file is hard coded in the CloudFormation YAML. If you rename the .zip file, make sure to rename it in your CloudFormation YAML file in Step A.6.
- Create a new S3 bucket and upload codebuild-cs-demo-project.zip. You will need the URL for this new S3 bucket Step A.6.
- Identify a database subnet group in Amazon RDS. It should correspond to a VPC. Copy the database subnet group and VPC values for use in Step A.6.
- Provide a username and password for each of your three Amazon RDS databases. These usernames and passwords will be specified in Step A.6 as part of the stack details.
- Create a stack using the provided CloudFormation template called cloudformation-cs-demo-project.yml from the example repository. Download or copy the contents and save the file locally so that it can be selected in the next steps.
- In the AWS Management Console, navigate to CloudFormation.
- Select Create Stack, With new resources (standard).
- Select Template is ready.
- Select Upload a template file.
- Select the cloudformation-cs-demo-project.yml file that you saved locally.
- Choose Next.
- Specify stack details
- The CloudFormation template will prompt you for the items listed in Steps A.2 through A.4, as well as some custom names.
- Select a Stack name. Select a Project name.
- Under Liquibase Configuration, enter the name of the S3 bucket from Step A.2.
- For LiquibaseProKey, enter the Liquibase Pro key value from the prerequisites.
- Under Amazon Configuration, for VPC, select the VPC value where you would like to create your objects.
- For DBSubnetGroupName, enter the group you created in Step A.3.
- Under Database Configuration, the CloudFormation template will create three RDS Postgres databases. These databases represent database environments for test, stage, and prod. Enter the usernames and passwords you would like to use for each of these three databases. Make sure that passwords are at least eight characters long.
- For instance:
- Database Configuration
- DatabaseUsernameTest: postgres
- DatabasePasswordTest: yourdatabasetestpassword
- DatabaseUsernameStage: postgres
- DatabasePasswordStage: yourdatabasestagepassword
- DatabaseUsernameProd: postgres
- DatabasePasswordProd: yourdatabaseprodpassword
- Choose Next.
- For instance:
- Configure stack options and review
- Leave the settings on this page at their default values and choose Next.
- Review the settings and values selected on the previous pages, check the acknowledgment checkbox I acknowledge that AWS CloudFormation might create IAM resources with custom names, and choose Create stack.
The CloudFormation template may take a few minutes while the RDS databases are being created.
B. Visit CodePipeline and approve changes for staging and production
Once CloudFormation completes the stack, CodePipeline begins the database deployment process. In AWS Management console, naviagate to CodePipeline, and select Pipelines. You see a new pipeline named projectName-CodePipeline. The projectName was specified in the stack details.
CodePipeline starts automatically and makes the first deployment to the test database. To deploy the changes to staging and production, an approval process has been set up in the CloudFormation configuration for CodePipeline. To follow it, in your pipeline do the following:
- Under Approval-Stage, select Review.
- Under Review, Comments, enter your comments for the review, such as Ready for staging. I approve moving forward. Then choose Approve. This action begins the deployment to the staging database. AWS CodeBuild performs this deployment using Liquibase Pro.
- To watch the deployment process, in the AWS Management console, navigate to CodeBuild and select Build projects. Locate projectName-CodeBuild-Job. The first build run is a completed build to the test database that was triggered automatically. The second build run is the deployment to the staging database. To view the staging database deployment details, select the second build run.
- To deploy the production database, repeat the review and approve CodePipeline directions in steps B.1 and B.2.
C. Verify SQL database changes
Use your favorite SQL viewing tool to verify the changes in the database. For this scenario, I used DBeaver. To verify the SQL database changes, do the following:
- Retrieve the hostname using RDS console
- In the Amazon RDS console, you must to find the database connection information. Databases have the following DB identifiers: projectName-test, projectName-stage, and projectName-prod.
- Navigate to Amazon RDS, then Databases to find the databases created by your CloudFormation stack.
- For each of the three databases, select the desired database, eg. projectName-test, then navigate to the Connectivity & security tab. The passwords are the values you selected on database configuration with CloudFormation. The Parameters section of CloudFormation will display the password values that were selected if you have forgotten them.
- In your favorite SQL viewing tool, populate the connection from the Amazon RDS information as follows:
- Host: <Endpoint value from Amazon RDS>
- Port: 5432
- Database: postgres
- Username: <Value selected in CloudFormation>
- Password: <Value selected in CloudFormation>
- Verify the data was loaded
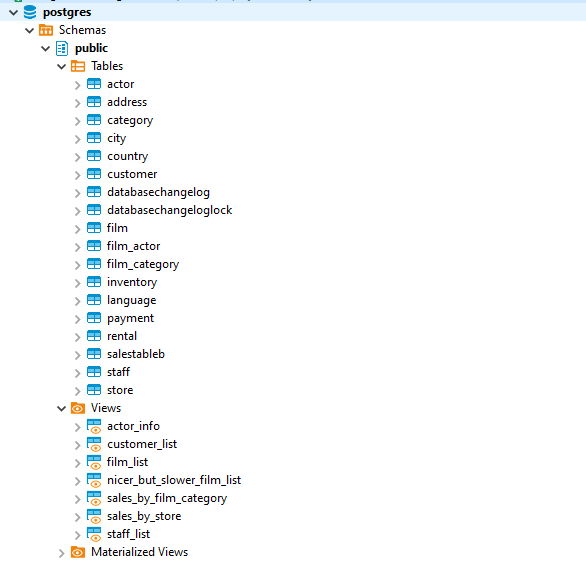
- In your SQL navigation tool, navigate to where Tables and Views and other stored logic objects are stored.
- You should see all of the objects that were added via the Liquibase Pro deployment. Notice there are new objects for tables, views, indexes, functions, and sequences. View the data in the tables, such as the actor table, to see that Liquibase Pro also loaded data into these objects. The following screenshot shows a list of tables and views under postgres public schemas.
- Select data from the Liquibase tracking table
- Liquibase Pro uses a tracking table, databasechangelog, to house and track deployment information. To see all the changes added, in your SQL navigation tool select the data from the DATABASECHANGELOG table. Notice the table contains information such as author, filename, and date.
D. Deploy a new database change
Deploy a new database change by pushing code to the source control repository. Updates to AWS CodeCommit have been configured to automatically trigger a deployment to the test database. In this example, I’m using a SQL format to make a change, but Liquibase Pro also supports XML, JSON, and YAML. To deploy a new database change, do the following:
- Push the database code to the CodeCommit repository
- To push the database code to the CodeCommit repository, in the AWS Management Console, navigate to CodeCommit. Select Source and then Repositories. The name of the repository will be projectName-samplecoderepo.
- Within the repository, navigate to the sqlfiles.
- Create a new file by selecting Add file then Create file. You are going to create a file sqlfiles/testfile2.sql.
- Edit the file by adding the following code:
--changeset YourName:createTable_salesTableB
CREATE TABLE salesTableB (
ID int NOT NULL,
NAME varchar(20) NULL,
REGION varchar(20) NULL,
MARKET varchar(20) NULL
);
--rollback DROP TABLE salesTableB
-
- Enter the File name as sql.
- Enter the author name, email address, and add an optional commit message.
- Select Commit changes.
- View the build
- To view the build, in AWS Management Console, navigate to first CodePipeline and then CodeBuild. The commit in step D.1 triggers a build to the test environment. If you do not see an automatic build starting, you may need to review and approve the earlier deployments to staging and production by completing the steps B.1 thru B.4 in CodePipeline.
In this example, I am using the primary branch for making changes, but Liquibase Pro also handles complex branching. The AWS resources can be adjusted to suit your branching and merging strategies.
E. Add quality checks for database changes
In step D, as you view the build, review the quality checks section at the start of the build. It looks something like the following:
[Container] 2021/12/08 15:07:40 Running command liquibase --defaultsFile=liquibase.properties checks run
Starting Liquibase at 15:07:41 (version 4.6.2 #886 built at 2021-11-30 16:20+0000)
Liquibase Version: 4.6.2
Liquibase Pro 4.6.2 by Liquibase licensed to customersuccess until Mon Jun 27 04:59:59 UTC 2022
Executing Quality Checks against dvdrentalupdatedrb.xml
Executing all checks because a valid Liquibase Pro license was found!
Changesets Validated:
ID: 1619029696370-01; Author: mikeolivas; File path: dvdrentalupdatedrb.xml
ID: 1619029696370-02; Author: mikeolivas; File path: dvdrentalupdatedrb.xml
ID: 1619029696370-03; Author: mikeolivas; File path: dvdrentalupdatedrb.xml
ID: 1619029696370-04; Author: mikeolivas; File path: dvdrentalupdatedrb.xml
ID: 1619029696370-05; Author: mikeolivas; File path: dvdrentalupdatedrb.xml
ID: 1619029696370-06; Author: mikeolivas; File path: dvdrentalupdatedrb.xml
Liquibase Pro checks database code in changesets against predefined, customizable rules set by your organization’s DBAs and security teams before commit. At this stage, it’s cheaper and easier to fix problems.
The quality checks used in this demo include:
- Detection of GRANT and REVOKE statements
- Detection of DROP statements for tables and columns
- Detection of TRUNCATE statements
- Limit on table columns so that the number of columns cannot exceed a threshold
Liquibase quality checks are configurable. Each check contains a severity level from INFO to BLOCKER to warn for inconsistencies. Quality checks can also enforce naming standards for tables, columns, and sequences. To learn more about quality checks, visit Working with Quality Checks.
Conclusion
Using AWS services such as CodePipeline, CodeBuild, and CodeCommit in conjunction with Liquibase Pro can help your team deploy database changes automatically, smoothly, and safely.
The CloudFormation template provides all the artifacts necessary to build out a multi-database pipeline. It includes an approval process and credential secrets management. With modifications to the CloudFormation script, this process can be updated to work with any of the 28 databases that Liquibase supports.
Learn more about Liquibase Pro in AWS Marketplace.
The content and opinions in this post are those of the third-party author, and AWS is not responsible for the content or accuracy of this post.
About the Authors

Amy Smith is a Professional Services Engineer at Liquibase and is an AWS Certified Solutions Architect.
I
I

Mike Olivas is a Senior Solutions Architect at Liquibase. He has several years of experience helping prospects and clients understand devops for databases and how it fits into their CI/CD pipelines.