AWS Big Data Blog
Collect and distribute high-resolution crypto market data with ECS, S3, Athena, Lambda, and AWS Data Exchange
This is a guest post by Floating Point Group. In their own words, “Floating Point Group is on a mission to bring institutional-grade trading services to the world of cryptocurrency.”
The need and demand for financial infrastructure designed specifically for trading digital assets may not be obvious. There’s a rather pervasive narrative that these coins and tokens are effectively natively digital counterparts to traditional assets such as currencies, commodities, equities, and fixed income. This narrative often manifests in the form of pithy one-liners recycled by pundits attempting to communicate the value proposition of various projects in the space (such as, “Bitcoin is just a currency with an algorithmically controlled, tamper-proof monetary policy,” or, “Ether is just a commodity like gasoline that you can use to pay for computational work on a global computer.”). Unsurprisingly, we at FPG often hear the question, “What’s so special about cryptocurrencies that they warrant dedicated financial services? Why do we need solutions for problems that have already been solved?”
The truth is that these assets and the widespread public interest surrounding them are entirely unprecedented. The decentralized ledger technology that serves as an immutable record of network transactions, the clever use of proof-of-work algorithms to economically incentivize rational actors to help uphold the security of the network (the proof-of-work concept dates back at least as far as 1993, but it was not until bitcoin that the technology showed potential for widespread adoption), the irreversible nature of transactions that poses unique legal challenges in cases such as human error or extortion, the precariousness of self-custody (third-party custody solutions don’t exactly have track records that inspire trust), the regulatory uncertainties that come with the difficulty of both classifying these assets as well as arbitrating their exchange which must ultimately be reconciled by entities like the IRS, SEC, and CFTC—it is all very new, and very weird. With 24-hour market volume regularly exceeding $100 billion, we decided to direct our focus towards problems related specifically to trading these assets. Granted, crypto trading has undoubtedly matured since the days of bartering for bitcoin in web forums and witnessing 10% price spreads between international exchanges. But there is still a long path ahead.
One major pain point we are aiming to address for institutional traders involves liquidity (or, more precisely, the lack thereof). Simply put, the buying and selling of cryptocurrencies occurs across many different trading venues (exchanges), and liquidity (the offers to buy or sell a certain quantity of an asset at a certain price) continues to become more fragmented as new exchanges emerge. So say you’re trying to buy 100 bitcoins. You must buy from people who are willing to sell. As you take the best (cheapest) offers, you’re left with increasingly expensive offers. By the time you fill your order (in this example, buy all 100 bitcoins), you may have paid a much higher average price than, say, the price you paid for the first bitcoin of your order. This phenomenon is referred to as slippage. One easy way to minimize slippage is by expanding your search for offers. So rather than looking at the offers on just one exchange, look at the offers across hundreds of exchanges. This process, traditionally referred to as smart order routing (SOR), is one of the core services we provide. Our SOR service allows traders to easily submit orders that our system can match against the best offers available across multiple trading venues by actively monitoring liquidity across dozens of exchanges.
Fanning out large orders in search of the best prices is a rather intuitive and widely applicable concept—roughly 75% of equities are purchased and sold via SOR. But the value of such a service for crypto markets is particularly salient: a perpetual cycle of new exchanges surging in popularity while incumbents falter has resulted in a seemingly incessant fragmentation of liquidity across trading venues—yet traders tend to assume an exchange-agnostic mindset, concerned exclusively with finding the best price for a given quantity of an asset.

Access to both real-time and historical market data is essential to the functionality of our SOR service. The highest resolution data we could hope to obtain for a given market would include every trade and every change applied to the order book, effectively allowing us to recreate the state of a market at any given point in time. The updates provided through the WebSocket streams are not sufficient for reconstructing order books. We also need to periodically fetch snapshots of the order books and store those, which we can do using an exchange’s REST API. We can fetch a snapshot and apply the corresponding updates from the streams to “replay” the order book.
Fortunately, this data is freely available, because many exchanges offer real-time feeds of market data via WebSocket APIs. We found several third-party vendors selling subscriptions to these data sets, typically in the form of CSV dumps delivered at a weekly or monthly cadence. This presented the question of build vs. buy. Given that we felt capable of building a robust and reliable system for ingesting real-time market data in a relatively short amount of time and at a fraction of the cost of purchasing the data from a vendor, we were already leaning in favor of building. Further investigation made buying look like an increasingly unattractive option. Disclaimers that multiple vendors issued about their inability to guarantee data quality and consistency did not inspire confidence. Inspecting sample data sets revealed that some essential fields provided in the original data streams were missing—fields necessary for achieving our goal of recreating the state of a market at an arbitrary point in time. We also recognized that a weekly or monthly delivery schedule would restrict our ability to explore relatively recent market data.
This post provides a high-level overview of how we ingest and store real-time market data and how we use the AWS Data Exchange API to organize and publish our data sets programmatically. Our system’s functionality extends well beyond data ingestion, normalization, and persistence; we run dedicated services for data validation, caching the most recent trade and order book for every market, computing and storing derivative metrics, and other services that help safeguard data accuracy and minimize the latency of our trading systems.
Data ingestion
The WebSocket streams we connect to for data consumption are often the same APIs responsible for providing real-time updates to an exchange’s trading dashboard.
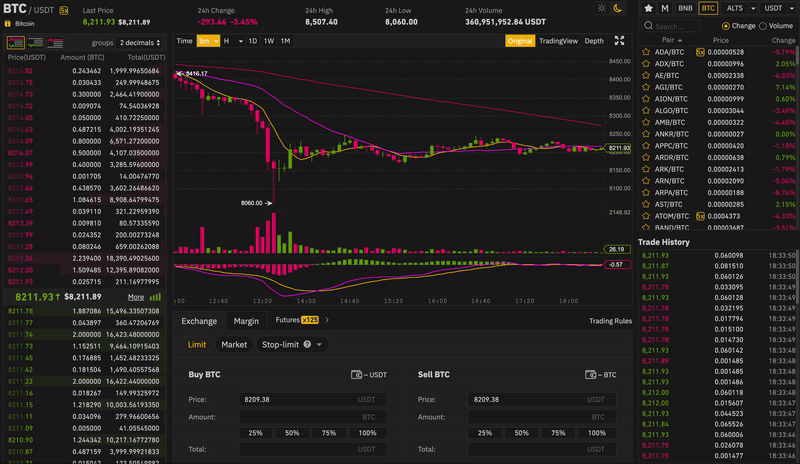
WebSocket connections transmit data as discrete messages. We can inspect the content of individual messages as they stream into the browser. For example, the following screenshot shows a batch of order book updates.

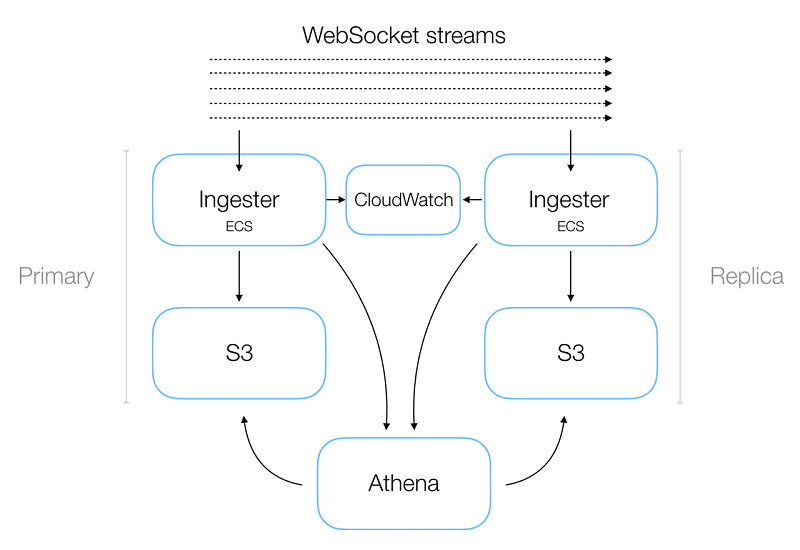
The updates are expressed as arrays of bids and asks that were either added to the book or removed from it. Client-side code processes each update, resulting in a real-time rendering of the market’s order book. In practice, our data ingestion service (Ingester) does not read a single stream, but rather thousands of different streams, covering various data feeds for all markets across multiple exchanges. All the connections required for such broad coverage and the resulting flood of incoming data raise some obvious concerns about data loss. We’ve taken several measures to mitigate such concerns, including a redundant system design that allows us to spin up an arbitrary number of instances of the Ingester service. Like most of our microservices, Ingester is a Dockerized service run on Amazon ECS and deployed via Terraform.
All these instances consume the same data feeds as each other while a downstream mechanism handles deduplication (this is covered in more detail later in this post). We also set up Amazon CloudWatch alerts to notify us when we detect non-contiguous messages, indicating a gap in the incoming data. The alerts don’t directly mitigate data loss, but they do serve the important function of prompting an investigation.
Ingester builds up separate buffers of incoming messages, split out by data-type/exchange/market. Then, after a fixed time interval, each buffer is flushed into Amazon S3 as a gzipped JSON file. The buffer-flush cycle repeats.
The following screenshot shows a portion of the file content.

This code snippet is a single, pretty-printed JSON record from the file in the screenshot above.
Ingester handles additional functionality, such as applying pre-defined mappings of venue-specific field names to our internal field names. Data normalization is one of many processes necessary to enable our systems to build a holistic understanding of market dynamics.
As with most distributed system designs, our services are written with horizontal scalability as a first-order priority. We took the same approach in designing our data ingestion service, but it has some features that make it a bit different than the archetypical horizontally scalable microservice. The most common motivations for adjusting the number of instances of a given service are load-balancing and throttling throughput. Either your system is experiencing backpressure and a consumer service scales to alleviate that pressure, or the consumer is over-provisioned and you scale down the number of instances for the sake of parsimony. For our data ingestion service, however, our motivation for running multiple instances is to minimize data loss via redundancy. The CPU usage for each instance is independent of instance count, because each instance does identical work.
For example, rather than helping alleviate backpressure by pulling messages from a single queue, each instance of our data ingestion service connects to the same WebSocket streams and performs the same amount of work. Another somewhat unusual and confounding aspect of horizontally scaling our data ingestion service is related to state: we batch records in memory and flush the records to S3 every minute (based on the incoming message’s timestamp, not the system timestamp, because those would be inconsistent). Redundancy is our primary measure for minimizing data loss, but we also need each instance to write the files to S3 in such a way that we don’t end up with duplicate records. Our first thought was that we’d need a mechanism for coordinating activity across the instances, such as maintaining a cache that would allow us to check if a record had already been persisted. But we realized that we could perform this deduplication without any coordination between instances at all. Most of the message streams we consume publish messages with sequence IDs. We can combine the sequence IDs with the incoming message timestamp to achieve our deduplication mechanism: we can deterministically generate the same exact file names containing the exact same data by writing our service code to check that the message added to the batch has the appropriate sequence ID relative to the previous message in the batch and using the timestamp on the incoming message to determine the exact start and end of each batch (we typically get a UNIX timestamp and check when we’ve rolled over to the next clock minute). This allows us to simply rely on a key collision in S3 for deduplication.
AWS suggests a similar solution for a slightly different problem, relating to Amazon Kinesis Data Streams. For more information, see Handling Duplicate Records.
With this scheme, even if records are processed more than one time, the resulting Amazon S3 file has the same name and has the same data. The retries only result in writing the same data to the same file more than one time.
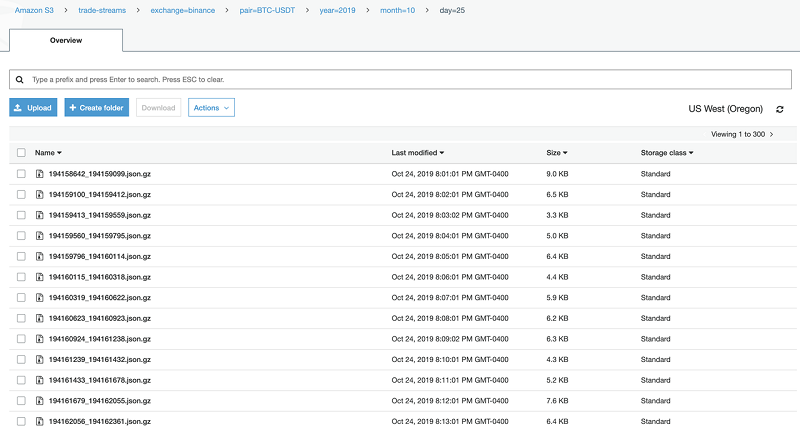
After we store the data, we can perform simple analytics queries on the billions of records we’ve stored in S3 using Amazon Athena, a query service that requires minimal configuration and zero infrastructure overhead. Athena has a concept of partitions (inherited from one of its underlying services, Apache Hive). Partitions are mappings between virtual columns (in our case: pair, year, month, and day) and the S3 directories in which the corresponding data is stored.
S3’s file system is not actually hierarchical. Files are prepended with long key prefixes that are rendered as directories in the AWS console when browsing a bucket’s contents. This has some non-trivial performance consequences when querying or filtering on large data sets.
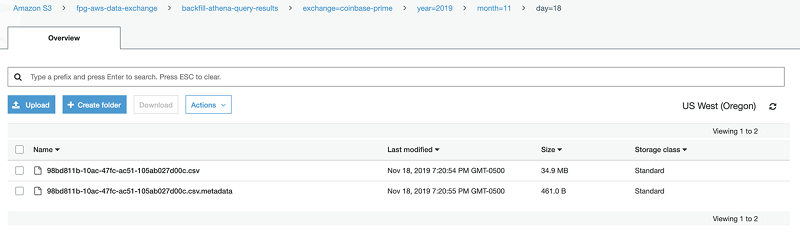
The following screenshot illustrates a typical directory path.
![]()
By pointing Athena directly to a particular subset of data, a well-defined partitioning scheme can drastically reduce query run times and costs. Though the ability the perform ad hoc business analytics queries is primarily a convenience, taking time to choose a sane multi-level partitioning scheme for Athena based on some of our most common access patterns seemed worthwhile. A poorly designed partition structure can result in Athena unnecessarily scanning huge swaths of data and ultimately render the service unusable.

Data publication

Our pipeline for transforming thousands of small gzipped JSON files into clean CSVs and loading them into AWS Data Exchange involves three distinct jobs, each expressed as an AWS Lambda function.
Job 1
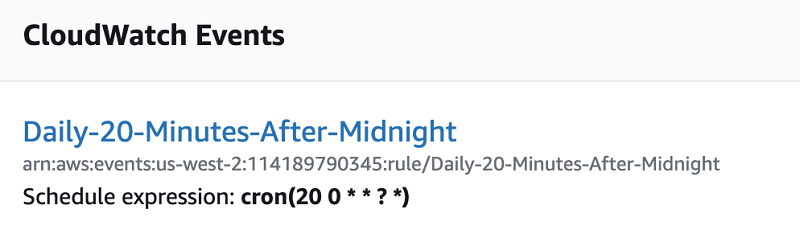
Job 1 is initiated shortly after midnight UTC by a cron-scheduled CloudWatch event. As mentioned previously, our data ingestion service’s batching mechanism flushes each batch to S3 at a regular time interval. A timestamp on the incoming message (applied server-side) determines the rollover from one interval to the next, as opposed to the ingestion service’s system timestamp, so in the rare case that a non-trivial amount of time elapses between the consumption of the final message of batch n and the first message of batch n+1, we kick off the first Lambda function 20 minutes after midnight UTC to minimize the likelihood of omitting data pending write.
Job 1 formats values for the date and data source into an Athena query template and outputs the query results as a CSV to a specified prefix path in S3. (Every Athena query produces a .metadata file and a CSV file of the query results, though DDL statements do not output a CSV.) This PUT request to S3 triggers an S3 event notification.
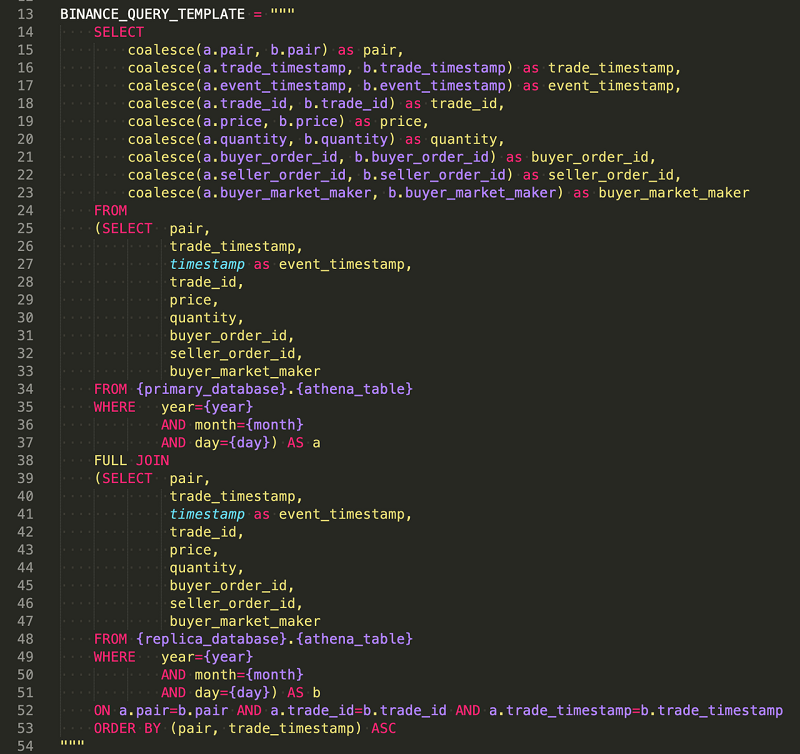
We run a full replica data ingestion system as an additional layer of redundancy. Using the coalesce conditional expression, the Athena query in Job 1 merges data from our primary system with the corresponding data from our replica system, and fills in any gaps while deduplicating redundant records.
We experimented fairly extensively with AWS Glue and PySpark for the ETL-related work performed in Job 1. When we realized that we could merge all the small source files into one, join the primary and replica data sets, and sort the results with a single Athena query, we decided to stick with this seemingly simpler and more elegant approach.
The following code shows one of our Athena query templates.
Job 2
Job 2 is triggered by the S3 event notification from Job 1. Job 2 simply copies the query results CSV file to a different key within the same S3 bucket.
The motivation for this step is twofold. First, we cannot dictate the name of an Athena query results CSV file; it is automatically set to the Athena query ID. Second, when adding an S3 object as an asset to an AWS Data Exchange revision, the asset’s name is automatically set to the S3 object’s key. So to dictate how the CSV file name appears in AWS Data Exchange, we must first rename it, which we accomplish by copying it to a specified S3 key.


Job 3
Job 3 handles all work related to AWS Data Exchange and AWS Marketplace Catalog via their respective APIs. We use boto3, AWS’s Python SDK, to interface with these APIs. The AWS Marketplace Catalog API is necessary for adding data set revisions to products that have already been published. For more information, see Tutorial: Adding New Data Set Revisions to a Published Data Product.
Our code explicitly defines mappings with the following structure:
data source / DataSet / Product
The following code shows how we configure relationships between data sources, data sets, and products.
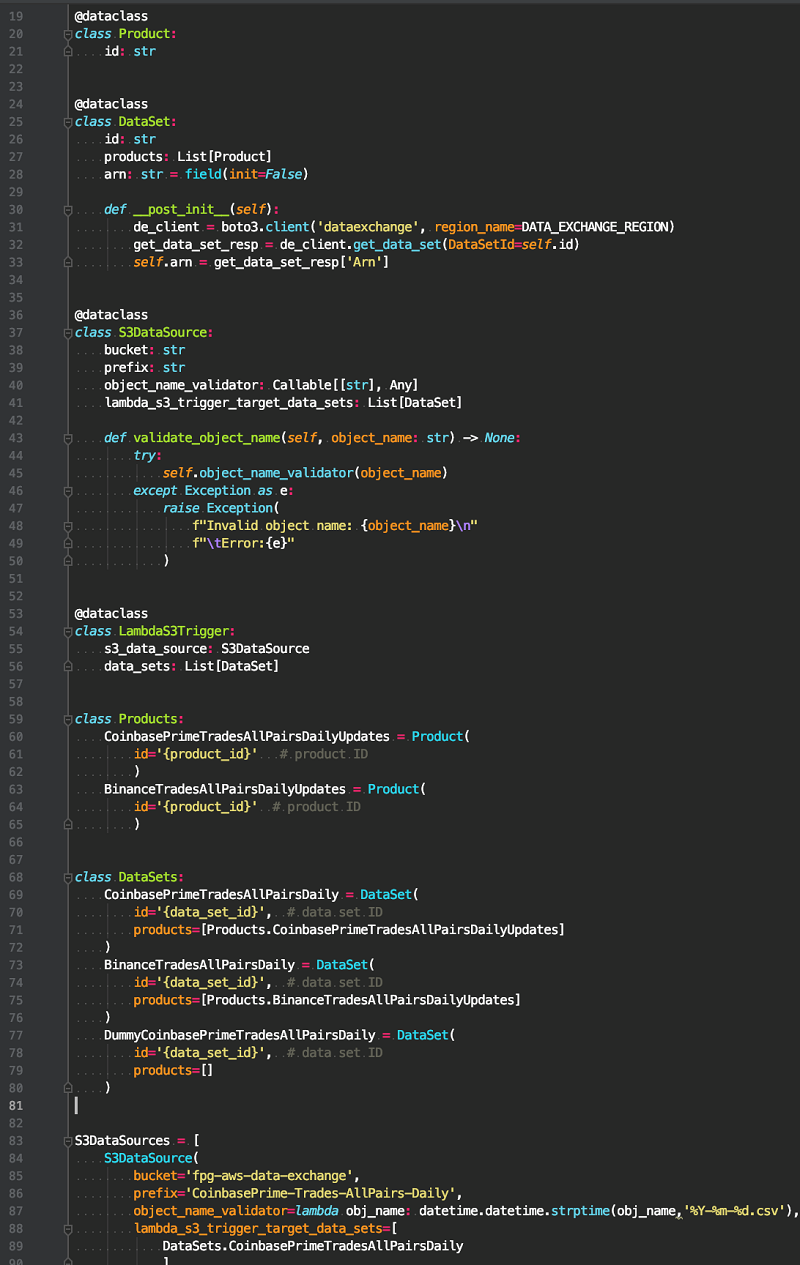
Our data sources are typically represented by a trading venue and data type combination (such as Binance trades or CoinbasePro order books). Each new file for a given data source is delivered as a single asset within a single new revision for a particular data set.
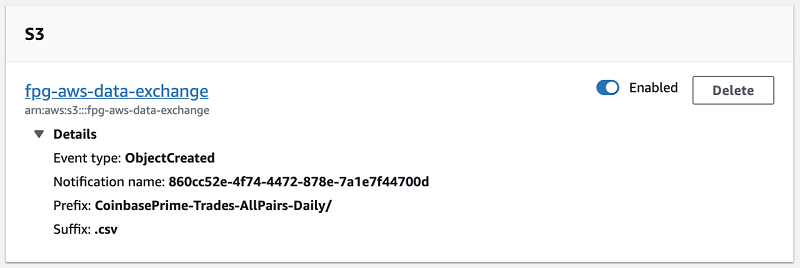
An S3 trigger kicks off the Lambda function. The trigger is scoped to a specified prefix that maps to a single data set. The function alias feature of AWS Lambda allows us to define the unique S3 triggers for each data set while reusing the same underlying Lambda function. Job 3 carries out the following steps (note that steps 1 through 5 refer to the AWS Data Exchange API while steps 6 and 7 refer to the AWS Marketplace Catalog API):
- Submits a request to create a new revision for the corresponding data set via
CreateRevision. - Adds the file that was responsible for triggering the Lambda function to the newly created revision via
CreateJobusing theIMPORT_ASSETS_FROM_S3job type. To submit this job, we need to supply a few values: the S3 bucket and key values for the file are pulled from the Lambda event message, while theRevisionIDargument comes from the response to theCreateRevisioncall in the previous step. - Kicks off the job with
StartJob, sourcing theJobIDargument from the response to theCreateJobcall in the previous step. - Polls the job’s status via
GetJob(using the job ID from the response to theStartJobcall in the previous step) to check that our file (the asset) was successfully added to the revision. - Finalizes the revision via
UpdateRevision. - Requests a description of the marketplace entity using
DescribeEntity, passing in the product ID stored in our hardcoded mappings as theEntityID - Kicks off the entity
ChangeSetviaStartChangeSet, passing in the entity ID from the previous step, the entity ID from theDescribeEntityresponse in the previous step asEntityID, the revision ARN parsed from the response to our earlier call toCreateRevisionasRevisionArn, and the data set ARN asDataSetArn, which we fetch at the start of the code’s runtime using AWS Data Exchange API’sGetDataSet.
Here’s a thin wrapper class we wrote to carry out the steps detailed above:
The following screenshot shows the S3 trigger for Job 3.
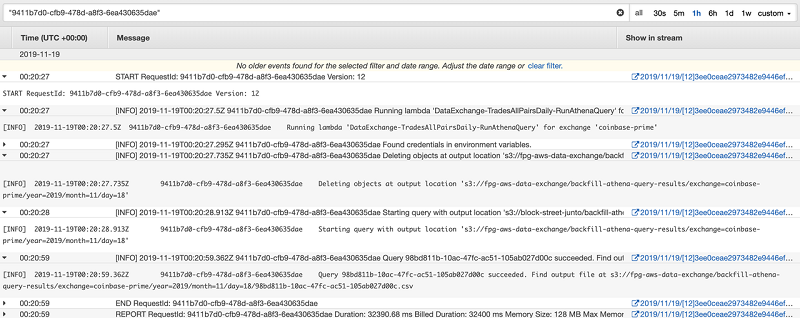
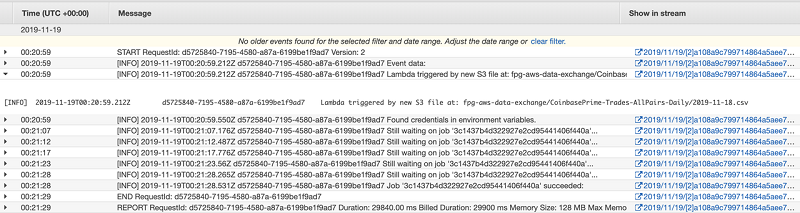
The following screenshot shows an example of CloudWatch logs for Job 3.
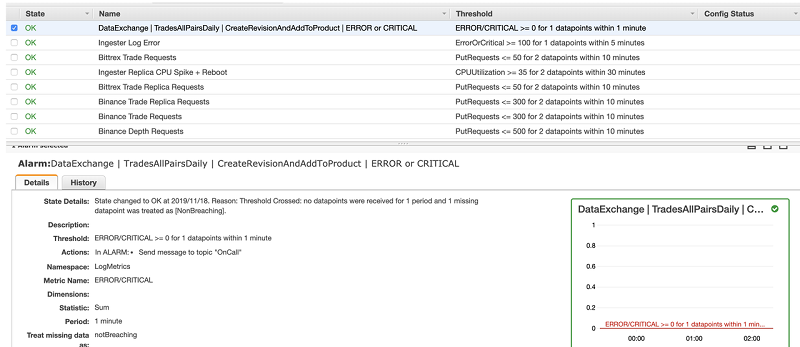
The following screenshot shows a CloudWatch alarm for Job 3.
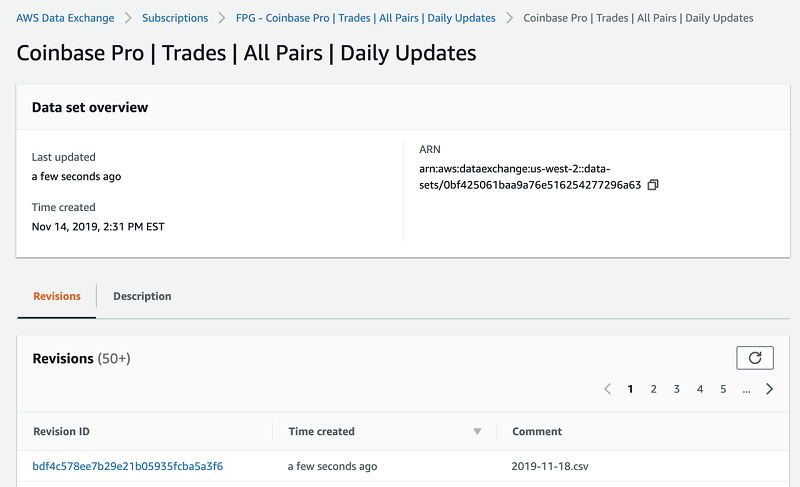
Finally, we can verify that our revisions were successfully added to their corresponding data sets and products through the AWS console.
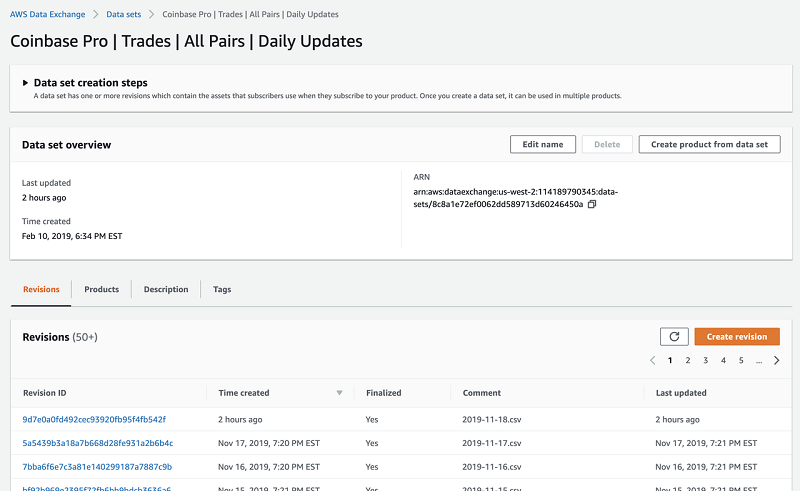
AWS Data Exchange allows you to create private offers for your AWS account IDs, providing a convenient means of checking that revisions show up in each product as expected.
Conclusion
This post demonstrated how you can integrate AWS Data Exchange into an existing data pipeline frictionlessly. We’re pleased to have been invited to participate in the AWS Data Exchange private preview, and even more pleased with the service itself, which has proven to be a sophisticated yet natural extension of our system.
I want to offer special thanks to both Kyle Patsen and Rafic Melhem of the AWS Data Exchange team for generously fielding my questions (and patiently enduring my ramblings) for the better part of the past year. I also want to thank Lucas Adams for helping me design the system discussed in this post and, more importantly, for his unwavering vote of confidence.
If you are interested in learning more about FPG, don’t hesitate to contact us.