AWS Big Data Blog
Simplify Querying Nested JSON with the AWS Glue Relationalize Transform
May 2022: This post was reviewed and updated to include resources for orchestrating data and machine learning pipelines.
AWS Glue has a transform called Relationalize that simplifies the extract, transform, load (ETL) process by converting nested JSON into columns that you can easily import into relational databases. Relationalize transforms the nested JSON into key-value pairs at the outermost level of the JSON document. The transformed data maintains a list of the original keys from the nested JSON separated by periods.
Let’s look at how Relationalize can help you with a sample use case.
An example of Relationalize in action
Suppose that the developers of a video game want to use a data warehouse like Amazon Redshift to run reports on player behavior based on data that is stored in JSON. Sample 1 shows example user data from the game. The player named “user1” has characteristics such as race, class, and location in nested JSON data. Further down, the player’s arsenal information includes additional nested JSON data. If the developers want to ETL this data into their data warehouse, they might have to resort to nested loops or recursive functions in their code.
Sample 1: Nested JSON
Instead, the developers can use the Relationalize transform. Sample 2 shows what the transformed data looks like.
Sample 2: Flattened JSON
You can then write the data to a database or to a data warehouse. You can also write it to delimited text files, such as in comma-separated value (CSV) format, or columnar file formats such as Optimized Row Columnar (ORC) format. You can use either of these format types for long-term storage in Amazon S3. Storing the transformed files in S3 provides the additional benefit of being able to query this data using Amazon Athena or Amazon Redshift Spectrum. You can further extend the usefulness of the data by performing joins between data stored in S3 and the data stored in an Amazon Redshift data warehouse.
Before we get started…
In my example, I took two preparatory steps that save some time in your ETL code development:
- I stored my data in an Amazon S3 bucket and used an AWS Glue crawler to make my data available in the AWS Glue data catalog. You can find instructions on how to do that in Cataloging Tables with a Crawler in the AWS Glue documentation. The AWS Glue database name I used was “blog,” and the table name was “players.” You can see these values in use in the sample code that follows.
- I deployed a Zeppelin notebook using the automated deployment available within AWS Glue. If you already used an AWS Glue development endpoint to deploy a Zeppelin notebook, you can skip the deployment instructions. Otherwise, let’s quickly review how to deploy Zeppelin.
Deploying a Zeppelin notebook with AWS Glue
The following steps are outlined in the AWS Glue documentation, and I include a few screenshots here for clarity.
First, create two IAM roles:
- An AWS Glue IAM role for the Glue development endpoint
- An Amazon EC2 IAM role for the Zeppelin notebook
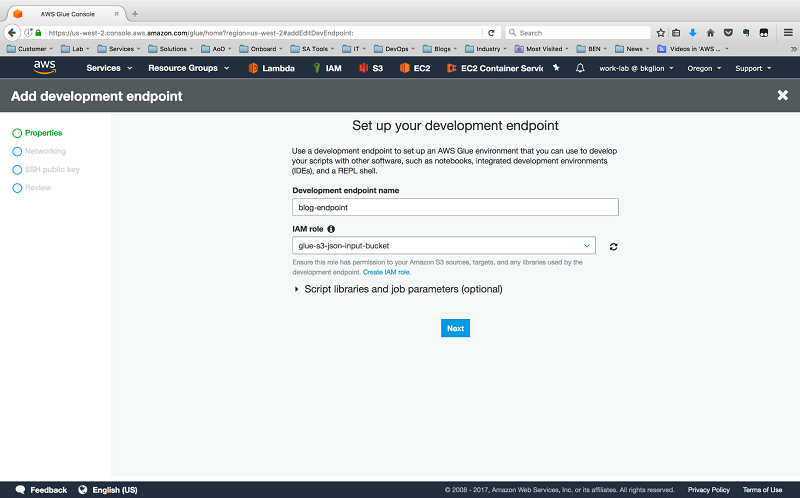
Next, in the AWS Glue Management Console, choose Dev endpoints, and then choose Add endpoint.

Specify a name for the endpoint and the AWS Glue IAM role that you created.
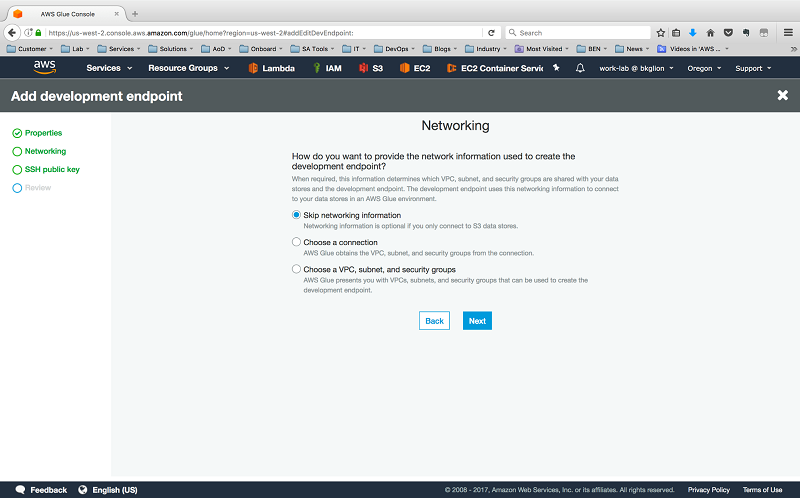
On the networking screen, choose Skip Networking because our code only communicates with S3.
Complete the development endpoint process by providing a Secure Shell (SSH) public key and confirming your settings.
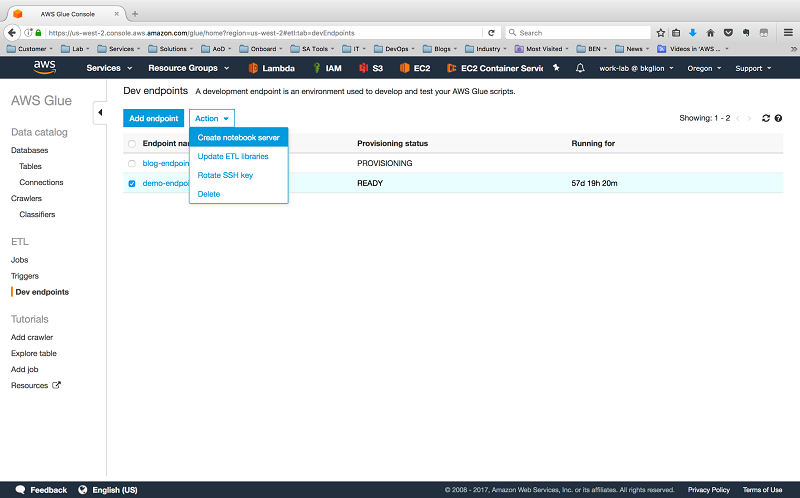
When your new development endpoint’s Provisioning status changes from PROVISIONING to READY, choose your endpoint, and then for Actions choose Create notebook server.
Enter the notebook server details, including the role you previously created and a security group with inbound access allowed on TCP port 443.

Doing this automatically launches an AWS CloudFormation template. The output specifies the URL that you can use to access your Zeppelin notebook with the username and password you specified in the wizard.
How do we flatten nested JSON?
With my data loaded and my notebook server ready, I accessed Zeppelin, created a new note, and set my interpreter to spark. I used some Python code that AWS Glue previously generated for another job that outputs to ORC. Then I added the Relationalize transform. You can see the resulting Python code in Sample 3.
Sample 3: Python code to transform the nested JSON and output it to ORC
What exactly is going on in this script?
After the import statements, we instantiate a GlueContext object, which allows us to work with the data in AWS Glue. Next, we create a DynamicFrame (datasource0) from the “players” table in the AWS Glue “blog” database. We use this DynamicFrame to perform any necessary operations on the data structure before it’s written to our desired output format. The source files remain unchanged.
We then run the Relationalize transform (Relationalize.apply()) with our datasource0 as one of the parameters. Another important parameter is the name parameter, which is a key that identifies our data after the transformation completes.
The Relationalize.apply() method returns a DynamicFrameCollection, and this is stored in the dfc variable. Before we can write our data to S3, we need to select the DynamicFrame from the DynamicFrameCollection object. We do this with the dfc.select() method. The correct DynamicFrame is stored in the blogdata variable.
You might be curious why a DynamicFrameCollection was returned when we started with a single DynamicFrame. This return value comes from the way Relationalize treats arrays in the JSON document: A DynamicFrame is created for each array. Together with the root data structure, each generated DynamicFrame is added to a DynamicFrameCollection when Relationalize completes its work. Although we didn’t have any arrays in our data, it’s good to keep this in mind. Finally, we output (blogdataoutput) the root DynamicFrame to ORC files in S3.
Using the transformed data
One of the use cases we discussed earlier was using Amazon Athena or Amazon Redshift Spectrum to query the ORC files.
I used the following SQL DDL statements to create external tables in both services to enable queries of my data stored in Amazon S3.
Sample 4: Amazon Athena DDL
Sample 5: Amazon Redshift Spectrum DDL
I even ran a query, shown in Sample 6, that joined my Redshift Spectrum table (spectrum.playerdata) with data in an Amazon Redshift table (public.raids) to generate advanced reports. In the where clause, I join the two tables based on the username values that are common to both data sources.
Sample 6: Select statement with a join of Redshift Spectrum data with Amazon Redshift data
Summary
This post demonstrated how simple it can be to flatten nested JSON data with AWS Glue, using the Relationalize transform to automate the conversion of nested JSON. AWS Glue also automates the deployment of Zeppelin notebooks that you can use to develop your Python automation script. Finally, AWS Glue can output the transformed data directly to a relational database, or to files in Amazon S3 for further analysis with tools such as Amazon Athena and Amazon Redshift Spectrum.
As great as Relationalize is, it’s not the only transform available with AWS Glue. You can see a complete list of available transforms in Built-In Transforms in the AWS Glue documentation. Try them out today!
Additional Reading
If you found this post useful, be sure to check out Using Amazon Redshift Spectrum, Amazon Athena and AWS Glue with Node.js in Production and Build a Data Lake Foundation with AWS Glue and Amazon S3.

You can also read How Genworth built a serverless ML pipeline, and learn how you can orchestrate data and ML pipelines at scale with Amazon SageMaker and AWS Glue.
About the Author

Trevor Roberts Jr is a Solutions Architect with AWS. He provides architectural guidance to help customers achieve success in the cloud. In his spare time, Trevor enjoys traveling to new places and spending time with family.