AWS Compute Blog
Building a Raspberry Pi telepresence robot using serverless: Part 2

The deployed web frontend and the robot it controls.
In a previous post, I show how to build a telepresence robot using serverless technologies and a Raspberry Pi. The result is a robot that transmits live video using Amazon Kinesis Video Streams with WebRTC. It can be driven remotely via an AWS Lambda function using an Amazon API Gateway REST endpoint.
This post walks through deploying a web interface to view the live stream and control the robot. The application is built using AWS Amplify and Vue.js. Amplify is a development framework that makes it easy to add authentication, hosting, and other AWS resources. It also provides a pipeline for deploying web applications.
I use the Amplify Command Line Interface (CLI) to create an authentication flow for user sign-in using Amazon Cognito. I then show how to set up an authorizer in API Gateway so that only authenticated users can drive the robot. An AWS Identity Access and Management (IAM) role sets permissions so users can assume access to Kinesis Video Streams to view the live video feed. The web application is then configured and run locally for testing. Finally, using the Amplify CLI, I show how to add hosting and publish a production ready web application.
Prerequisites
You need the following to complete the project:
- Complete Building a Raspberry Pi telepresence robot using serverless: Part 1.
- An AWS account. This project can be completed using the AWS Free Tier.
Amplify CLI and project setup
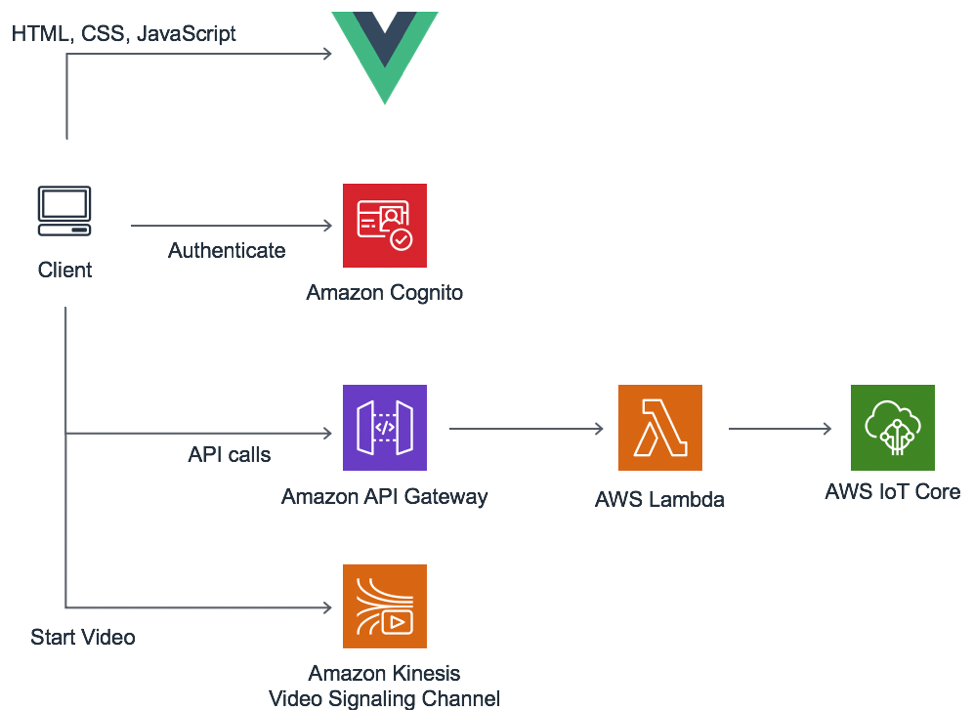
An architecture diagram showing the client relationship between the AWS resources deployed by Amplify.
The Amplify CLI allows you to create and manage resource on AWS. With the libraries and UI components provided by the Amplify Framework, you can build powerful applications using a variety of cloud services.
The web interface for the telepresence robot is built using Amplify Vue.js components for user registration and sign-in. Download the application and use the Amplify CLI to configure resources for the web application.
To install and configure Amplify on the frontend web application, refer to the project set-up instructions on the GitHub project.
Creating an API Gateway authorizer
In the first guide, API Gateway is used to create a REST endpoint to send commands to the robot. Currently, the endpoint accepts requests without any authentication. To ensure that only authenticated users can control the robot, you must create an authorizer for the API.
The backend resources deployed by the Amplify web application include a Cognito User Pool. This is a user directory that provides sign-up and sign-in services, user profiles, and identity providers. The following instructions demonstrate how to configure an authorizer on API Gateway that verifies access using a user pool.
- Navigate to the Amazon API Gateway console.
- Choose the API created in the first guide for driving the robot.
- Choose Authorizers from the menu.
- Choose Create New Authorizer. Choose Cognito for Type and select the user pool created by the Amplify CLI. Set Token Source to Authorization.

- Choose Create.
- Choose Resources from the menu.
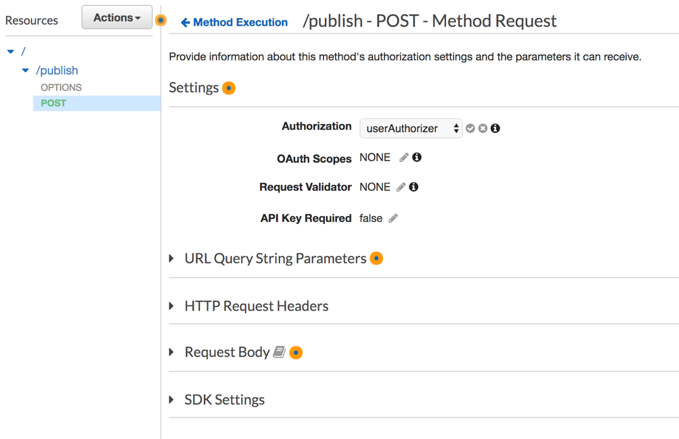
- Choose POST, Method Request.
- Set Authorization to the newly created authorizer.
Adding permissions
The web application loads a component for viewing video from the robot over a WebRTC connection. WebRTC is a protocol for negotiating peer to peer data connections by using a signaling channel.
The previous guide configured the robot to use a Kinesis Video Signaling Channel. Users signed into the web application must assume some permissions for Kinesis Video Streams to access the signaling channel.
When the Amplify CLI deploys an authentication flow, it creates a role in IAM. Cognito uses this role to assume permissions for a user pool based on matching conditions.
This Trust Relationship on the authRole controls when the role’s permissions are assumed. In this case, on a matching “authenticated” user from the identity pool.
{
  "Version": "2012-10-17",
  "Statement": [
    {
      "Effect": "Allow",
      "Principal": {
        "Federated": "cognito-identity.amazonaws.com"
      },
      "Action": "sts:AssumeRoleWithWebIdentity",
      "Condition": {
        "StringEquals": {
          "cognito-identity.amazonaws.com:aud": "us-west-2:12345e-9548-4a5a-b44c-12345677"
        },
        "ForAnyValue:StringLike": {
          "cognito-identity.amazonaws.com:amr": "authenticated"
        }
      }
    }
  ]
}
Follow these steps to attach Kinesis Video Streams permissions to the authRole.
- Navigate to the IAM console.
- Choose Roles from the menu.
- Use the search bar to find “authRole”. It is prefixed by the stack name associated with the Amplify deployment. Choose it from the list.

- Choose Add inline policy.

- Select the JSON tab and paste in the following. In the Resource property, replace <RobotName> with the name of the robot created in the first guide.
{ "Version": "2012-10-17", "Statement": [ { "Sid": "VisualEditor0", "Effect": "Allow", "Action": [ "kinesisvideo:GetSignalingChannelEndpoint", "kinesisvideo:ConnectAsMaster", "kinesisvideo:GetIceServerConfig", "kinesisvideo:ConnectAsViewer", "kinesisvideo:DescribeSignalingChannel" ], "Resource": "arn:aws:kinesisvideo:*:*:channel/<RobotName>/*" } ] } - Choose Review Policy.
- Choose Create Policy.
Configuring the application
The authorizer allows authenticated users to invoke the Lambda function through API Gateway. The permissions set on the authRole control access to the live video. The web application must know the endpoint for sending commands and the Kinesis Video Signaling Channel to use for the robot.
This information is configured in web-app/src/main.js. It requires a file named config.json to let the application know which endpoint and signaling channel to use.
- Inside the application folder
aws-serverless-telepresence-robot/web-app/src, create a new file namedconfig.json.{ "endpoint": "", "channelARN": "" } - Replace endpoint with the Invoke URL of the robot API. This can be found in API Gateway console under Stages, Prod. It can also be found under Outputs in the AWS CloudFormation stack created by the aws-serverless-telepresence-robot serverless application from the first guide.

- Replace channelARN with the ARN of your robot’s signaling channel. This can be found in the Amazon Kinesis Video Streams console under Signaling channels.

Running the application
You can build and run the application locally for testing purposes. It still uses the backend deployed in the cloud. Do this before publishing to production:
- Inside the web-app directory, run the following command:
npm run serve - Navigate to the locally hosted application at http://localhost:8080
- Follow the onscreen steps to create a new account.

- Choose Start Video. If the robot is active, a WebRTC connection is made and live video is displayed.

- Use the onscreen arrow buttons to drive the robot.
Deploying a hosted application
Amplify makes it easy to deploy a hosted application. The following commands configure and deploy hosting resources in Amazon S3 and Amazon CloudFront. This allows you to securely and quickly deploy your application for production use.
- Inside aws-serverless-telepresence-robot/web-app, run the following. When prompted, select PROD, this configures the application to deploy using S3 and CloudFront.
amplify add hosting - Finally, this command builds and publishes all the backend and frontend resources for your Amplify project. On completion, it provides a URL to the hosted web application. Note, it can take a while for the CloudFront distribution to deploy.
amplify publish
Conclusion
In this post, I show how to build a web interface for remotely viewing and controlling the robot. This is done using AWS Amplify, Vue.js, and a previously deployed serverless application.
With a few commands, the Amplify CLI is used to configure backend resources for a web frontend. Cognito is used as an identity provider. An Authorizer is created for an API Gateway endpoint, allowing authenticated users to send commands to the robot from the frontend. An IAM Role with a trusted relationship with the Cognito User Pool is given permissions to use Kinesis Video Signaling Channels, which are passed to the authenticated users. This allows the web frontend to open a live video connection to the telepresence robot using WebRTC.
Once run and tested locally, I showed how the Amplify CLI can streamline configuring hosting and deployment of a production web application using S3 and CloudFront. The summation of this is a custom-built telepresence robot with a web application for viewing and operating securely, all done without managed servers.
The principles used in this project can be applied towards a variety of use cases. Use this to build out a fleet of remote vehicles to monitor factories or for personal home security. You can create a community for users to experience environments remotely. The interface Vue component can also easily be modified for custom commands sent to the application running on the robot.