AWS Compute Blog
Building a Raspberry Pi telepresence robot using serverless: Part 1

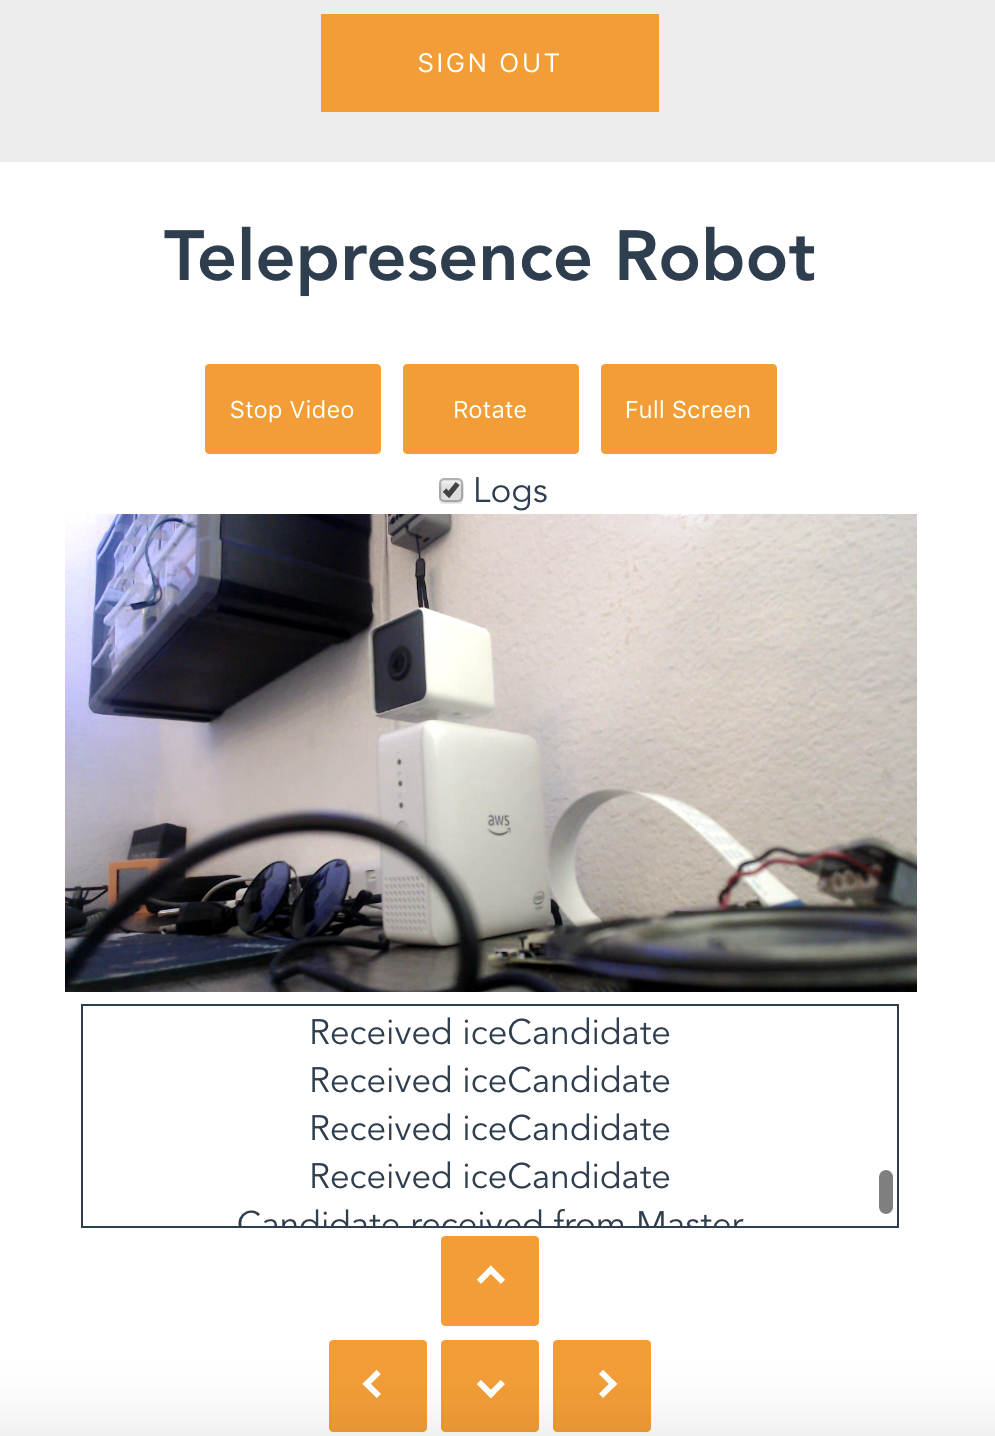
A Pimoroni STS-Pi Robot Kit connected to AWS for remote control and viewing.
A telepresence robot allows you to explore remote environments from the comfort of your home through live stream video and remote control. These types of robots can improve the lives of the disabled, elderly, or those that simply cannot be with their coworkers or loved ones in person. Some are used to explore off-world terrain and others for search and rescue.
This guide walks through building a simple telepresence robot using a Pimoroni STS-PI Raspberry Pi robot kit. A Raspberry Pi is a small low-cost device that runs Linux. Add-on modules for Raspberry Pi are called “hats”. You can substitute this kit with any mobile platform that uses two motors wired to an Adafruit Motor Hat or a Pimoroni Explorer Hat.
The sample serverless application uses AWS Lambda and Amazon API Gateway to create a REST API for driving the robot. A Python application running on the robot uses AWS IoT Core to receive drive commands and authenticate with Amazon Kinesis Video Streams with WebRTC using an IoT Credentials Provider. In the next blog I walk through deploying a web frontend to both view the livestream and control the robot via the API.
Prerequisites
You need the following to complete the project:
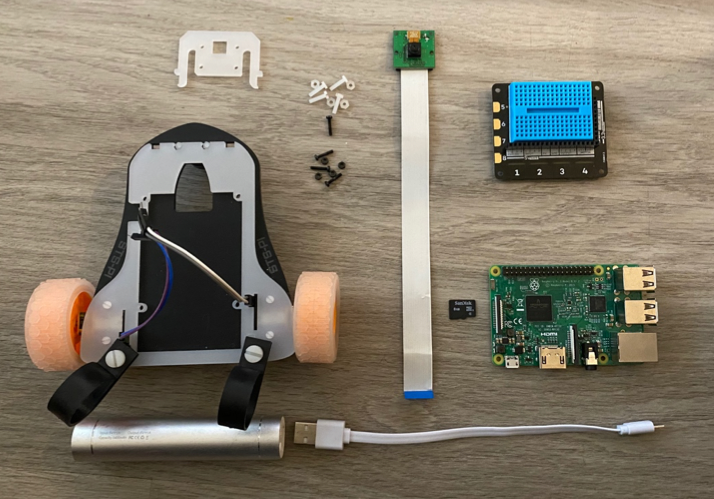
A Pimoroni STS-Pi robot kit, Explorer Hat, Raspberry Pi, camera, and battery.
- An AWS account. This project can be completed using the AWS Free Tier.
- Raspberry Pi model 3 B+ or newer
- Raspberry Pi camera module
- Pimoroni STS-Pi robot kit
- Pimoroni Explorer Hat or Adafruit Motor Hat
- Minimum 4 GB micro SD card
- USB battery (ideally cylindrical)
- USB Micro cable
Estimated Cost: $120
There are three major parts to this project. First deploy the serverless backend using the AWS Serverless Application Repository. Then assemble the robot and run an installer on the Raspberry Pi. Finally, configure and run the Python application on the robot to confirm it can be driven through the API and is streaming video.
Deploy the serverless application
In this section, use the Serverless Application Repository to deploy the backend resources for the robot. The resources to deploy are defined using the AWS Serverless Application Model (SAM), an open-source framework for building serverless applications using AWS CloudFormation. To deeper understand how this application is built, look at the SAM template in the GitHub repository.

The Python application that runs on the robot requires permissions to connect as an IoT Thing and subscribe to messages sent to a specific topic on the AWS IoT Core message broker. The following policy is created in the SAM template:
RobotIoTPolicy:
      Type: "AWS::IoT::Policy"
      Properties:
        PolicyName: !Sub "${RobotName}Policy"
        PolicyDocument:
          Version: "2012-10-17"
          Statement:
            - Effect: Allow
              Action:
                - iot:Connect
                - iot:Subscribe
                - iot:Publish
                - iot:Receive
              Resource:
                - !Sub "arn:aws:iot:*:*:topicfilter/${RobotName}/action"
                - !Sub "arn:aws:iot:*:*:topic/${RobotName}/action"
                - !Sub "arn:aws:iot:*:*:topic/${RobotName}/telemetry"
                - !Sub "arn:aws:iot:*:*:client/${RobotName}"
To transmit video, the Python application runs the amazon-kinesis-video-streams-webrtc-sdk-c sample in a subprocess. Instead of using separate credentials to authenticate with Kinesis Video Streams, a Role Alias policy is created so that IoT credentials can be used.
{
  "Version": "2012-10-17",
  "Statement": [
    {
      "Action": [
        "iot:Connect",
        "iot:AssumeRoleWithCertificate"
      ],
      "Resource": "arn:aws:iot:Region:AccountID:rolealias/robot-camera-streaming-role-alias",
      "Effect": "Allow"
    }
  ]
}
When the above policy is attached to a certificate associated with an IoT Thing, it can assume the following role:
 KVSCertificateBasedIAMRole:
      Type: 'AWS::IAM::Role'
      Properties:
        AssumeRolePolicyDocument:
          Version: '2012-10-17'
          Statement:
          - Effect: 'Allow'
            Principal:
              Service: 'credentials.iot.amazonaws.com'
            Action: 'sts:AssumeRole'
        Policies:
        - PolicyName: !Sub "KVSIAMPolicy-${AWS::StackName}"
          PolicyDocument:
            Version: '2012-10-17'
            Statement:
            - Effect: Allow
              Action:
                - kinesisvideo:ConnectAsMaster
                - kinesisvideo:GetSignalingChannelEndpoint
                - kinesisvideo:CreateSignalingChannel
                - kinesisvideo:GetIceServerConfig
                - kinesisvideo:DescribeSignalingChannel
              Resource: "arn:aws:kinesisvideo:*:*:channel/${credentials-iot:ThingName}/*"
This role grants access to connect and transmit video over WebRTC using the Kinesis Video Streams signaling channel deployed by the serverless application. 
A deployed API Gateway endpoint, when called with valid JSON, invokes a Lambda function that publishes to an IoT message topic, RobotName/action. The Python application on the robot subscribes to this topic and drives the motors based on any received message that maps to a command.
- Navigate to the aws-serverless-telepresence-robot application in the Serverless Application Repository.
- Choose Deploy.
- On the next page, under Application Settings, fill out the parameter, RobotName.
- Choose Deploy.
- Once complete, choose View CloudFormation Stack.

- Select the Outputs tab. Copy the ApiURL and the EndpointURL for use when configuring the robot.

Create and download the AWS IoT device certificate
The robot requires an AWS IoT root CA (fetched by the install script), certificate, and private key to authenticate with AWS IoT Core. The certificate and private key are not created by the serverless application since they can only be downloaded on creation. Create a new certificate and attach the IoT policy and Role Alias policy deployed by the serverless application.
- Navigate to the AWS IoT Core console.
- Choose Manage, Things.
- Choose the Thing that corresponds with the name of the robot.
- Under Security, choose Create certificate.
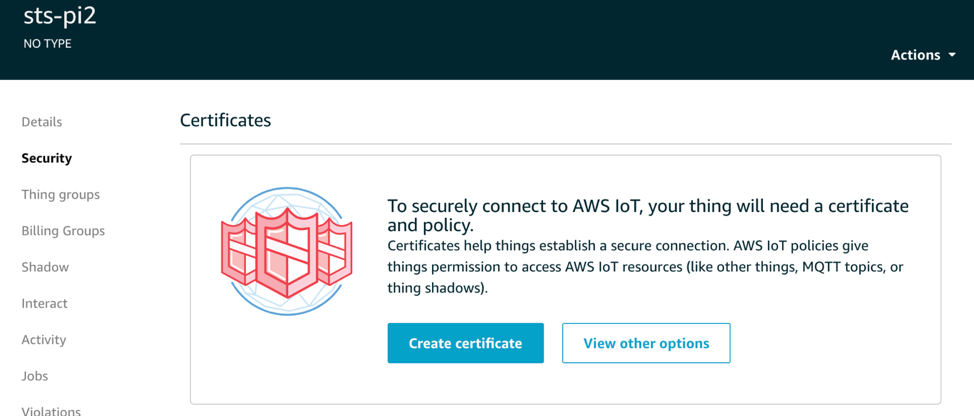
- Choose Activate.
- Download the Private Key and Thing Certificate. Save these securely, as this is the only time you can download this certificate.
- Choose Attach Policy.
- Two policies are created and must be attached. From the list, select
<RobotName>Policy
AliasPolicy-<AppName> - Choose Done.
Flash an operating system to an SD card
The Raspberry Pi single-board Linux computer uses an SD card as the main file system storage. Raspbian Buster Lite is an officially supported Debian Linux operating system that must be flashed to an SD card. Balena.io has created an application called balenaEtcher for the sole purpose of accomplishing this safely.
- Download the latest version of Raspbian Buster Lite.
- Download and install balenaEtcher.
- Insert the SD card into your computer and run balenaEtcher.
- Choose the Raspbian image. Choose Flash to burn the image to the SD card.
- When flashing is complete, balenaEtcher dismounts the SD card.
Configure Wi-Fi and SSH headless
Typically, a keyboard and monitor are used to configure Wi-Fi or to access the command line on a Raspberry Pi. Since it is on a mobile platform, configure the Raspberry Pi to connect to a Wi-Fi network and enable remote access headless by adding configuration files to the SD card.
- Re-insert the SD card to your computer so that it shows as volume
boot. - Create a file in the boot volume of the SD card named
wpa_supplicant.conf. - Paste in the following contents, substituting your Wi-Fi credentials.
- Create an empty file without a file extension in the boot volume named
ssh. At boot, the Raspbian operating system looks for this file and enables remote access if it exists. This can be done from a command line: - Safely eject the SD card from your computer.
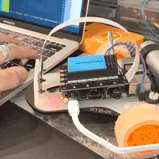
Assemble the robot
For this section, you can use the Pimoroni STS-Pi robot kit with a Pimoroni Explorer Hat, along with a Raspberry Pi Model 3 B+ or newer, and a camera module. Alternatively, you can use any two motor robot platform that uses the Explorer Hat or Adafruit Motor Hat.
- Follow the instructions in this video to assemble the Pimoroni STS-Pi robot kit.
- Place the SD card in the Raspberry Pi.

- Since the installation may take some time, power the Raspberry Pi using a USB 5V power supply connected to a wall plug rather than a battery.
Connect remotely using SSH
Use your computer to gain remote command line access of the Raspberry Pi using SSH. Both devices must be on the same network.
- Open a terminal application with SSH installed. It is already built into Linux and Mac OS, to enable SSH on Windows follow these instructions.
- Enter the following to begin a secure shell session as user
pion the default local hostnameraspberrypi, which resolves to the IP address of the device using MDNS: - If prompted to add an SSH key to the list of known hosts, type
yes. - When prompted for a password, type
raspberry. This is the default password and can be changed using the raspi-config utility. - Upon successful login, you now have shell access to your Raspberry Pi device.

Enable the camera using raspi-config
A built-in utility, raspi-config, provides an easy to use interface for configuring Raspbian. You must enable the camera module, along with I2C, a serial bus used for communicating with the motor driver.
- In an open SSH session, type the following to open the raspi-config utility:
- Using the arrows, choose Interfacing Options.

- Choose Camera. When prompted, choose Yes to enable the camera module.
- Repeat the process to enable the I2C interface.
- Select Finish and reboot.
Run the install script
An installer script is provided for building and installing the Kinesis Video Stream WebRTC producer, AWSIoTPythonSDK and Pimoroni Explorer Hat Python libraries. Upon completion, it creates a directory with the following structure:
- Open an SSH session on the Raspberry Pi.
- (Optional) If using the Adafruit Motor Hat, run this command, otherwise the script defaults to the Pimoroni Explorer Hat.
- Run the following command to fetch and execute the installer script.
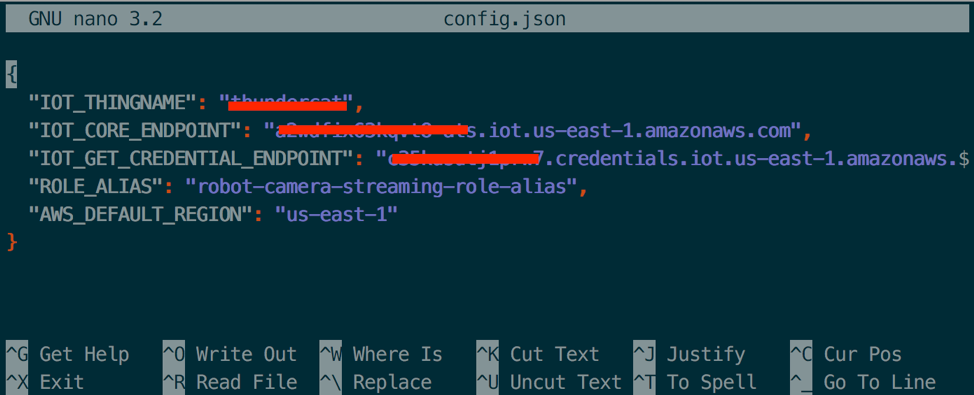
Configure the code
The Python application on the robot subscribes to AWS IoT Core to receive messages. It requires the certificate and private key created for the IoT thing to authenticate. These files must be copied to the directory where the Python application is stored on the Raspberry Pi.
It also requires the IoT Credentials endpoint is added to the file config.json to assume permissions necessary to transmit video to Amazon Kinesis Video Streams.
- Open an SSH session on the Raspberry Pi.
- Open the
certificate.pemfile with the nano text editor and paste in the contents of the certificate downloaded earlier. - Press
CTRL+Xand thenYto save the file. - Repeat the process with the
private.key.pemfile. - Open the config.json file.
- Provide the following information:
IOT_THINGNAME: The name of your robot, as set in the serverless application.
IOT_CORE_ENDPOINT: This is found under the Settings page in the AWS IoT Core console.
IOT_GET_CREDENTIAL_ENDPOINT: Provided by the serverless application.
ROLE_ALIAS: This is already set to match the Role Alias deployed by the serverless application.
AWS_DEFAULT_REGION: Corresponds to the Region the application is deployed in.
- Save the file using
CTRL+XandY. - To start the robot, run the command:
- To stop the script, press
CTRL+C.
View the Kinesis video stream
The following steps create a WebRTC connection with the robot to view the live stream.
- Navigate to the Amazon Kinesis Video Streams console.
- Choose Signaling channels from the left menu.
- Choose the channel that corresponds with the name of your robot.
- Open the Media Playback card.
- After a moment, a WebRTC peer to peer connection is negotiated and live video is displayed.

Sending drive commands
The serverless backend includes an Amazon API Gateway REST endpoint that publishes JSON messages to the Python script on the robot.
The robot expects a message:
{ “action”: <direction> }
Where direction can be “forward”, “backwards”, “left”, or “right”.
- While the Python script is running on the robot, open another terminal window.
- Run this command to tell the robot to drive forward. Replace <API-URL> using the endpoint listed under Outputs in the CloudFormation stack for the serverless application.
Conclusion
In this post, I show how to build and program a telepresence robot with remote control and a live video feed in the cloud. I did this by installing a Python application on a Raspberry Pi robot and deploying a serverless application.
The Python application uses AWS IoT credentials to receive remote commands from the cloud and transmit live video using Kinesis Video Streams with WebRTC. The serverless application deploys a REST endpoint using API Gateway and a Lambda function. Any application that can connect to the endpoint can drive the robot.
In part two, I build on this project by deploying a web interface for the robot using AWS Amplify.
A preview of the web frontend built in the next blog.