AWS Compute Blog
Using artificial intelligence to detect product defects with AWS Step Functions
Factories that produce a high volume of inventory must ensure that defective products are not shipped. This is often accomplished with human workers on the assembly line or through computer vision.
You can build an application that uses a custom image classification model to detect and report back any defects in a product, then takes appropriate action. This method provides a powerful, scalable, and simple solution for quality control. It uses Amazon S3, Amazon SQS, AWS Lambda, AWS Step Functions, and Amazon SageMaker.
To simulate a production scenario, the model is trained using an example dataset containing images of an open-source printed circuit board, with defects and without. An accompanying AWS Serverless Application Repository application deploys the Step Functions workflow for handling image classification and notifications.
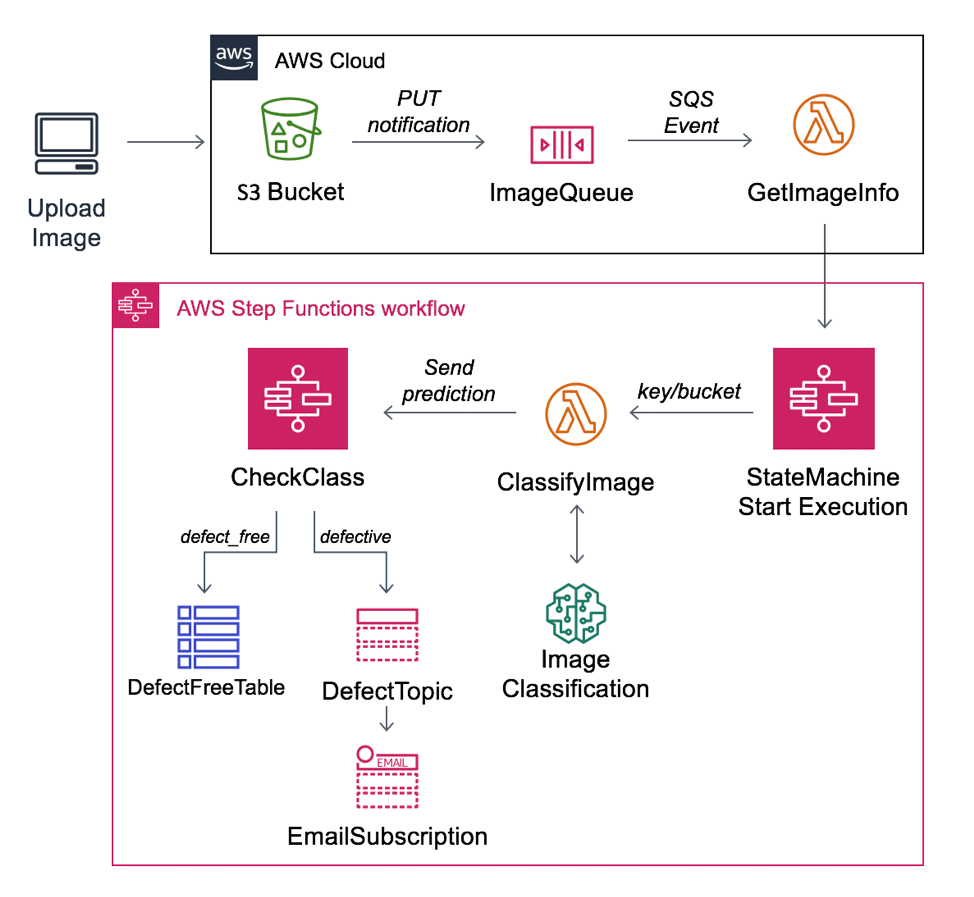
Typically, in a solution like this, there would be some form of automated camera capture. In this walkthrough, you manually upload images to S3. A Lambda function then consumes an SQS queue of notifications from S3. That Lambda function then kicks off a workflow in Step Functions to complete the quality review. This controls the flow of images sent to the model endpoint.
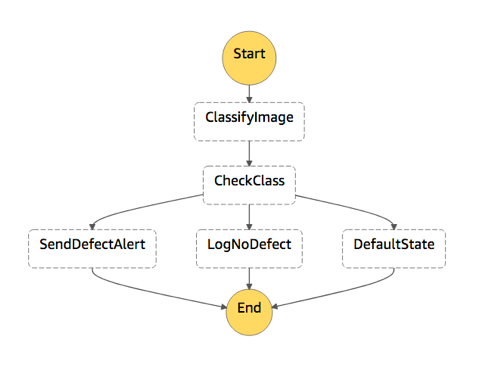
The returned predictions are used by a state machine to determine action. Detected defects publish an Amazon SNS notification to an email subscription. When no defect is detected, an item is logged to an Amazon DynamoDB table.
Required steps
To complete the walkthrough, follow these steps:
- Clone the aws-sar-sagemaker-image-classification GitHub repository.
- Prepare an image dataset and upload it to S3.
- Create an Amazon SageMaker notebook instance.
- Use a Jupyter notebook to train and deploy a custom image classification with Amazon SageMaker.
- Create an S3 bucket for processing images.
- Deploy an AWS Serverless Application Repository application.
- Create an S3 bucket notification.
- Upload a test image to S3 for classification.
Clone the GitHub repository
Before beginning, clone or download the walkthrough repository from GitHub. It contains all the necessary files to complete this walkthrough.
Prepare an image dataset
The best image classification models are made using the best datasets. While the quantity of samples can strengthen your machine learning (ML) model, the quality of the dataset is going to directly affect the reliability of the image classifier.
In this walkthrough, the training algorithm expects the images to be 233×233 pixels. Images are organized in folders named for their corresponding class. In this application, two classes are used, defect_free and defective.
This sample dataset has been provided in the GitHub repository. It contains four images of a circuit board for each class. The defective images show the circuit board missing the microcontroller component, which is integral to its function. This walkthrough uses a small dataset. For production usage, a larger dataset can produce predictions of higher confidence.
Upload the image dataset to S3
- In the S3 console, choose Create bucket and enter a unique bucket name.
- For Region, select one that matches the location of the notebook instance.
- Choose Create.
- In the list of S3 buckets, select the newly created bucket and choose Upload.
- Use the drag and drop feature to drag the image folder, as structured in the previous section, into the S3 upload dialog box.
- Choose Upload, and proceed to the next section.
Create an Amazon SageMaker notebook instance
Amazon SageMaker provides ML tools in the cloud for developers and data scientists. A notebook instance deploys a fully managed ML compute instance running the Jupyter notebook app, which is used for training and deploying the image classification model.
- In the Amazon SageMaker console, choose Notebook instances, Create notebook instance.
- For IAM role, choose Create a new role, and specify the bucket created for the dataset in the previous section.
- The remaining fields can be left as their default options.
- Choose Create notebook instance.
- Wait for the notebook instance to finish deploying before moving to the next section.
Train and deploy a custom image classification
The following steps instruct you how to open and run the example notebook on the Amazon SageMaker notebook instance.
- Download this example Jupyter notebook to your local machine.
- In the Amazon SageMaker console, choose Notebook instances, and select the notebook created earlier.
- Choose Open Jupyter, Upload, and then select the notebook downloaded from GitHub.
- Open the notebook.
- The Jupyter notebook has eight steps, each with a cell containing code that can be executed by choosing Run. Follow through each step until a model has been trained and deployed.

- In the Amazon SageMaker console, choose Inference, Endpoints.
- Choose the endpoint labeled IC-images-to-classify-xxxxx.
- Make a note of the name of this endpoint. You need it for deploying the AWS Serverless Application Repository application.
Create an S3 bucket for processing images
To apply certain permissions, you must create an S3 bucket before you deploy the AWS Serverless Application Repository application. This bucket is where images are stored for classification.
- In the Amazon S3 console, choose Create bucket.
- Enter a unique bucket name.
- For Region, select one that matches the location of the notebook instance.
- Choose Create.
Deploy the AWS Serverless Application Repository application
Now that a model has been trained and deployed, a serverless backend can orchestrate classifying images and alerting on detected defects. When fully configured and deployed, any S3 image upload events passed to the SQS queue are classified. An AWS Step Functions state machine determines whether to send the email alert through Amazon SNS.
- In the AWS Serverless Application Repository, select Show apps that create custom IAM roles or resource policies.
- In the search bar, search for and choose
sagemaker-image-classification. - Under Application settings, all fields are required. BucketName must be the same as the bucket created for processing images. To receive notification of detected defects, for EmailAddress, enter a valid email address. The ModelEndpointName must be the same as it is in Amazon SageMaker.
- Choose Deploy.
- After creation of the application is complete, a confirmation email is sent to the provided address. Confirm the request to allow Amazon SNS notifications to be sent.

Create the S3 bucket notification
The AWS Serverless Application Repository application sets up an SQS event subscription on the Lambda function for handling the classification of images. To avoid circular dependencies, configure an S3 bucket notification separately to forward S3 image upload events to the SQS queue.
- In the Amazon S3 console, select the newly created bucket for processing images, and choose Properties, Events, Add notification.
- For Events, select PUT.
- For Suffix, enter
.jpg - For Send to, enter
SQS Queue.
- Select the SQS queue created by the AWS Serverless Application Repository application.
- Choose Save.
Upload a test image to S3 for classification
Any image upload events on the S3 bucket cause the application to run. In a real use case, the file name could correspond to a numerical ID to track the physical product.
- In the dashboard for the S3 bucket, choose Overview, Upload.
- From the walkthrough GitHub repository, choose the test file defective.jpg.
- Choose Upload.
If a defect is detected, an alert is sent to the email address specified when the AWS Serverless Application Repository app was created. The alert includes the file name of the image and its URL path. It also includes a line indicating the confidence score as a floating-point number between 0 and 1. A higher score indicates that it is more likely the prediction is accurate.

If there is no defect, the bucket, key, and confidence score of the image are logged to a DynamoDB table.

The DynamoDB table is created by the AWS Serverless Application Repository app and can be found in the Resources card on the application page. In the Lambda console, choose Applications.

Conclusion
This post walks you through building a fully managed quality control automation solution using Amazon SageMaker to train and deploy an image classification model endpoint. It shows how you can use AWS Serverless Application Repository to deploy a serverless backend and S3 to store and pass images along for classification. While this walkthrough used a specific and minimal dataset, it illustrates how to build more complex and higher fidelity image classification workflows. As it stands, it’s a cost-effective and highly scalable solution.
To take this solution further, create an app for uploading images into Amazon S3. Optionally, create a serverless application that can resize images for a training job. If a custom image classifier isn’t necessary, explore how Amazon Rekognition can be used for object detection and labeling jobs.